How to use templates in joomla 3. Joomla template installation
or install templates for the site on Joomla yourself
Before we install the Joomla template, it still needs to be found and downloaded.
The fact is that Joomla themes or templates are much less common than, for example, WordPress themes. Of course, on the Internet you can find free templates for almost any CMS, but in our case the choice is not too big, since there are almost no Russified themes as such, so we will use Western resources. The joomla24.com portal is one such resource. It offers a more or less wide selection Joomla themes and templates which, in principle, satisfies us. You can look for any other sites, but just keep in mind that we need new modern templates for CMS Joomla.
Installing and editing templates can be tricky. Perhaps you need knowledge in both CSS and the following Joomla tutorials to get professional website design.
CMS Joomla. Install free website templates
1. From the site joomla24.com, download the archive with a free theme (template) to your computer.
We are looking for templates with a right side menu column or a left column (then you can change the location).
Usually templates for CMS Joomla are distributed under the Creative Commons License, which allows you to copy, distribute and transfer this work, remake this work subject to copyright. In general, if you are very interested, you can get acquainted with this license in more detail on the Wikipedia website. Some topics at the very bottom have a link to their creator, which, according to the condition, cannot be deleted or can, but for this they offer to pay for work and the like. There are themes without any preconditions - just take it and use it. Well, if you have sufficient knowledge in HTML and especially in CSS, then you can create any theme yourself, using a standard template or some other. So I do and I don’t owe anything to anyone in this case, which I wish you too.
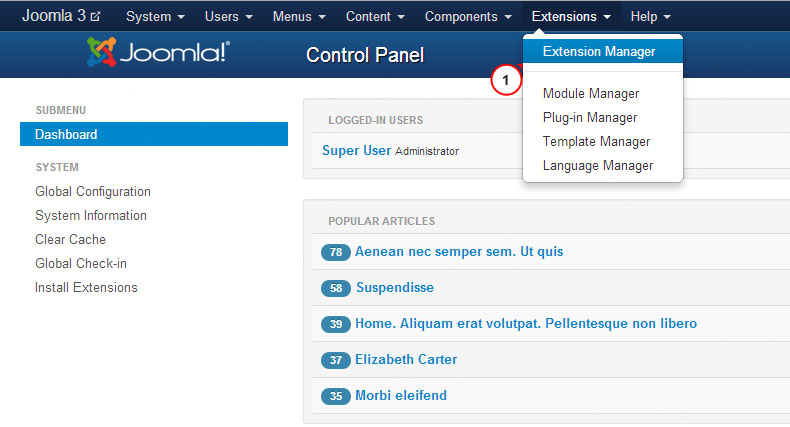
2. Open Extensions → Extension Manager in the admin panel:
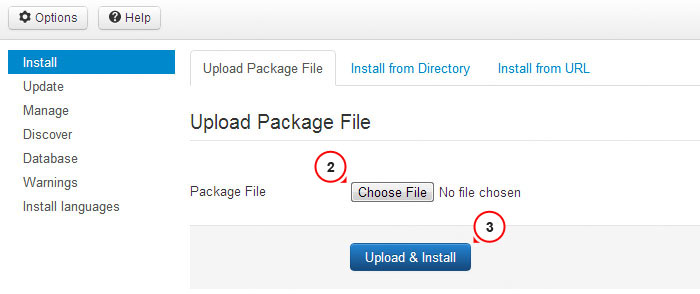
3. We are looking for the template archive on the computer → Download and install: 
As a result, you will see a message about successful installation.
4. Open the Template Manager in the admin menu: 
The system has several demo themes, one of which is activated.
5. Tick installed theme and click on the star on the right: 
The appearance of the site has changed. This way you can install other themes. At this stage, I advise you to return to the previously set default site template so that everything is like in that fairy tale, in the sense that it is understandable and without errors. Plus the template looks good.
In the following lessons, we will see how to create menus, categories, modules, materials, and the like.
Knowledge and practice in the field HTML And css will always help you move forward. With these fundamental disciplines, you can easily manipulate the appearance of page elements, even within a CMS - such manipulations will give you joy, confidence and courage in your experiments in creating sites, and whether you will work for yourself or for someone in some any decent firm, depends entirely on your aspirations.
Installing a new template on a Joomla site is an important point, so you need to know how to do it.
There are several ways to install a Joomla template.
Before you start installing the Joomla template, you need to check the template archive itself.
- The template archive must have the extension ZIP
- Must be compatible with your version of Joomla
- The archive should contain files such as index.php, templateDetails.xml and folders with css files and pictures images.
Peculiarity. It also happens that there are several archives in the archive with templates, for installation you will need exactly the archive in which these files are present.
So let's look at the main ways to install a template on Joomla.
- Installation via admin panel
- Installing a Template Manually
- Installation thanks to Quick start
How to install a Joomla 2.5-3.3 template through the admin control panel?
- The first thing you need to go to the admin panel of the Joomla site. Usually written in the browser line http://site.ru/administrator and enter your username and password in the appropriate fields.
- Go to the "Extensions" tab, select "Extension Manager"
- Next, click the "Select File" button and find the previously downloaded archive with the template, select it and click "Download and Install".
- After installation, enable new template. To do this, go to the "Extension"-->"Template Manager" tab, find the installed template and press the star next to the template to make the new template "Default Template".
- Now when you visit the site, you will be able to see the new template.
Consider others ways to install a template in joomla.
How to "manually" install a new template in Joomla?
Usually installation "manually" apply only when it is not possible due to any reason to install the template through the administrative panel. Perhaps this is due to the absence of any of the files or the damage to the archive.
To install a template "manually" you need to create a new folder with the same name as the archive of the new template. Then unpack the archive into this folder and download it via FTP connection. This folder must be uploaded to the folder where all the templates of your site are located - “site folder name / templates”.
After that, go to the admin - site panel and in the "Template Manager" we find this template and define it as the "Default Template". If everything is done correctly, the template will work.
Installing a new template using Quickstart (quick start).
This installation method is only suitable for those templates that have a so-called Quickstart archive.
This archive contains the Joomla CMS engine itself, which already contains the necessary template and extensions. Installing the package " quick start» exactly the same as with . As a result, after installation, you will get a full-fledged website with the installed template.
This installation method can be used if you already have an existing Joomla and just want to change appearance site using a template.
1. Open the Joomla control panel and go to the menu "Extensions > Extensions Manager".
2. Using the button Package File (Theme File) "Browse" find the file "theme###.zip" in folder joomla template. Click the button to install the Joomla template.
3. Install all modules from the folder 'sources_XXX.zip'(this folder must first be unzipped according to the instructions in the file 'info.txt').
4. The next step is to install demo data.
To install demo data, follow these steps:
Step 1. Download demo images.
Connect to the server using an FTP client. To download a demo image, open the folder "sources" in template.
Here is the folder "to_the_root_directory", which contains the files to be placed in the Joomla root folder.
Step 2 Import SQL file.
The last and most important step in setting up the demo data is to import the SQL file using the database management tool (phpMyAdmin ).
SQL file - dump. sql» is in the folder "sources" template.
DO NOT import SQL file if you have an active website, because it will completely overwrite existing data!
Note: Before importing the SQL file, make sure that the prefix of the database tables matches the prefix in the SQL file.
The table prefix can be checked directly in the database through the database management tool. Notice the table names. The prefix is the set of characters before the table name. ( for example, in the "jos_assets" table, the prefix is "jos_"). Also, the database prefix can be found in the "configuration.php" file in the Joomla root folder. Line 19: public $dbprefix = "jos_"; ( where "jos_" is the prefix)
If the table prefixes do not match, open the "dump. sql" V text editor and using Find and Replace (hotkeys CTRL+F or CTRL+H), replace the prefix "jos_" ( in SQL file) database prefix. You can also follow the detailed video tutorial on how to change prefix in SQL file.
or how to import SQL file using phpMyAdmin tool
Refresh your browser window. Send us an inquiry if you have any questions.
There are a lot of design themes for Joomla, but they are all scattered across the Internet and, unfortunately, there is no single repository. Templates, as usual, are commercial and free. In order to start your search, I will give several sites with freely distributed design themes for this CMS.
bestofjoomla.com
Once a template is selected, it must be installed and activated.
Installation from archive
1. Download the theme archive.
2. Open the archive and make sure that the theme is in its root, and not several other archives. If its structure is approximately the same as in the figure below, then immediately proceed to the next step. If there are several others inside one archive, unpack it into a separate folder.
3. Login to your Joomla control panel and open Extensions -> Extension Manager -> Install.

4. The page that appears has three tabs: Download package file(open by default), Install from directory And Install from URL. If you want to install a template from a folder, then first extract the archive to one of the directories (for example, to the directory tmp located at the root of the site), then go to the appropriate tab and click the button Install. To install using the link, go to the tab Install from URL, enter the address where Joomla can download the theme and click Install. To install from the archive, click the button Select a file tab Download package file and follow the next steps.
5. In the Explorer window that appears, select the file and click Open.
6. Once the theme archive is selected, click the button Download and install in the Joomla admin panel.

7. A message on the next page will inform you that the installation was successful. The template is installed, it remains to activate it.

8. Open Extensions -> Template Manager.

9. On the page that appears, click "asterisk" to the right of the name of the template you want to set as default.

When you see the message Style set to default(or something like that), open the site and see how its appearance has changed. You need to understand that the resource may turn out to be almost empty, because if the template was installed without demo data, then you will have to configure all the elements, including menus, modules, components and content yourself, so if you see an almost empty site, don’t be afraid, and should be.
So, after you have installed Joomla 3 on a local server (for example, on Denver), you need to correctly install the template. Let's open the secret: the installation is absolutely simple. But the difficulty is the selection of a template that will be suitable not only in design, but also in terms of functionality in general. At the same time, before starting the search, you need to get all the skills to install the template in order to immediately check the found one for suitability in work. Usually you download a zipped template. That is, it looks like in the picture below, as follows.
Beginners make a common mistake - they install (or rather, try to install) this template immediately, and they do not succeed. It's just that this archive, like a nesting doll, contains a few more, and therefore you need to create a separate folder where you will unzip it.
Now you see all the archives that were contained in one big one. It is worth noting that their number can be absolutely any - in the picture below, for example, there are 4 of them.
In the first two archives you will find a template with demo data for joomla 2.5 and 3.1 versions. Demo_package is the demo package, and the numbers after the j indicate the version. Clean templates are the last two archives. Version 3 requires an archive whose name ends with j.31.
Look at the weight of the archive. The first two archives are approximately 15 MB in size, since they contain the entire site. The last 2 are 1 MB each, that is, they are clean.
The archive we need, containing the desired template, is the last one. After that, you need to go to the admin panel.
Installing the Joomla template on the site
1. Go to the Extension Manager (Extensions tab).


3. Finally, download it and install it by clicking on the appropriate button.

If executed correctly, you will receive a corresponding message that will notify you that the template was installed successfully.
4. Now you need to activate it by making it the default. In the same Extensions tab, click on Template Manager.

5. You will see the template you just installed in front of you. And making it the default is very simple - this is what the asterisk is for next to the template name.

Finally, you can go with a clear conscience to the updated site and see how it looks with the newly minted template.
We hope that after reading this article, you will no longer have any problems installing templates. Indeed, after all, installing templates is a fairly quick and simple action. In this case, you may need the ability to edit templates.
We wish you success in site administration!


