How to make a metal detector at home. DIY metal detector - diagrams, application features and sensitivity settings (115 photos)
Today it is known a large number of ways to make a metal detector at home completely independently, without the help of specialists. Some of them require certain knowledge of physics, as well as skills in working with electrical and radio devices. Others do not require any special skills, and any beginner can assemble a metal detector at home with their own hands.
How to make your own metal detector from disks
It’s quite easy to make a metal detector at home with your own hands. using two discs - CD and DVD. This method is very simple and does not require any complex components. All you need for this is:
- CD and DVD disc. It is advisable to take double-sided ones, then the sensitivity of the metal detector will be much higher.
- Any calculator you have at hand, you can take the simplest and cheapest one
- headphones
- crown size battery
- glue and tape
Sequencing

The metal detector is ready you can start testing it. For ease of use, you can attach a comfortable handle to the metal detector. To search for coins and metal in the ground, the power of such a device will not be enough, but in the house it can always be useful. For example, to search for hidden wiring, a walled-up wall, or to find a metal profile under a sheet of drywall.
Metal detector made from a radio and calculator
In order to make such a metal detector, the following things are needed:
- Empty CD box
- The simplest and cheapest calculator
- Radio receiver operating on AM frequency
- Double-sided tape or tape
- Nails
- Wooden mop stick
Assembly order
Device assembly sequence next.

Thus, you can assemble a metal detector at home with your own hands, even without special knowledge and skills. But it should be borne in mind that such metal detectors not suitable for serious searches metal objects underground, because their range of action is small. For complex tasks, you should try to assemble a “butterfly” or “terminator” type device. On the one hand, if everything works out, you can save a good amount of money, but on the other hand, according to experts, such homemade metal detectors don't always work as intended.
As a child, did you want to have a device that could be used to find metal objects and even treasure? Most children want to have such a unit. Fortunately, it exists. This is a conventional metal detector that allows you to detect various metals under a layer of soil and in other places. The principle is that it finds a material that differs in its magnetic or electrical properties from its environment. It is noteworthy that you can find not only metal objects and not only in the ground.
The metal detector is used by geologists, security services, the military, criminologists and construction workers. This is a very useful thing in the household. Is it possible to make a metal detector with your own hands? Yes, and this article will help you with this.
How does a metal detector work and what does it consist of?
To make such a device at home with my own hands, you need to understand the principle of its operation. How is it able to detect metal and signal it? It's all about electromagnetic induction. Metal detectors have their own circuit, consisting of:
- Transmitter of electromagnetic wave oscillations.
- Receiver.
- A special signal transmitting coil.
- Coil that receives the signal.
- Display devices.
- Discriminator (useful signal selection circuit).

Some operating units can be combined schematically and structurally. For example, both the receiver and the transmitter can operate on the same coil. Part of the receiver will immediately emit a positive signal and so on.
Now let’s take a closer look at the operating principle of the metal detector. Thanks to the coil, an EMF (electromagnetic field) of a certain structure begins to be created in the medium. In the case when an object that conducts electricity is within the range of this field, Foucault or eddy currents appear in it. They create the object’s own EMF. Now the original structure of the coil begins to become distorted. And when an object located in the ground does not conduct electricity, but has ferromagnetic properties, then due to shielding, the structure of the coil is also distorted. In both the first and second cases, the metal detector picks up the electromagnetic field from the object and converts it into a signal (acoustic or optical). You hear a certain sound and can see the signal on the screen.

Note! In general, for a metal detector to work, it is not necessary that the body conduct current; the ground does not. It is important that the magnetic and electrical properties of bodies differ.
This is how a metal detector system works. The principle is simple and effective. Now, let's take a closer look at how to make a metal detector with your own hands. The first thing you need is to prepare all the tools and materials.
Metal detector components
So, if you want to make a device, then you cannot do without special devices. It's still electronic device, which needs to be assembled from different components. What will be required? The set is as follows:

You can see other components in the diagram below.
Also, you will need a plastic box to mount electronic circuit. Also prepare a plastic pipe to create a rod with a coil attached to it. Now you can get to work.
Assembling a metal detector with your own hands: creating a printed circuit board
The most difficult stage of work is the electronics. Everything here is subtle and complex. Therefore, it is rational to start with the creation of a working printed circuit board. There are only a few options for different boards. It all depends on the radioelements used to create it. There are boards operating on the NE555 chip and on transistors. Below you can see what these boards look like.
We assemble a metal detector with our own hands: installing electronic elements on the board
Further work will also not be easy. All electronic elements of the metal detector will have to be soldered and installed as shown in the diagram. In the photo you can see the capacitors. They are film-like and have high thermal stability. Due to them, the operation of the metal detector will be much more stable. This indicator is very useful, especially during the autumn period of using the device. After all, it gets quite cool outside then.
All that remains is to do the soldering. We will not describe the process itself, since the soldering technology should be known to everyone. To clearly understand how to perform all the work on the electronic part of the metal detector, we suggest that you additionally familiarize yourself with this video:
Assembling a metal detector with your own hands: power supply
In order for the device to receive current, you need to provide a power source of 9-12 V. It is worth noting that the metal detector consumes electricity quite voraciously. This is not surprising, since the device is quite powerful. If you think that one “Krona” (battery) will be enough, then this is not so. He won't work for long. You will need two or even three batteries connected in parallel. Alternatively, use one powerful battery. It will be cheaper since it can take a long time to discharge and charge.

Assembling a metal detector with your own hands: coil
Since we are making a pulsed metal detector, careful and precise assembly of the coil is not required. The normal diameter of the coil will be 19-20 cm. To do this, you will have to wind 25 turns. Once you have made the coil, wrap the top well with insulating tape. To increase the depth of detection of objects by the coil, wind the diameter of the send about 26-27 cm. In this case, you need to reduce the number of turns to 21-23. In this case, a wire Ø 0.5 mm is used.
Once you have wound the coil, you will need to mount it on the hard body of the metal detector. It is important that there is no metal on the body. Think and look for any case that will fit in size. The housing will perform a protective function. The coil will be protected from impacts on the ground during searches.
To make a tap from the coil, solder two wires Ø 0.5-0.75 mm to it. It is recommended to use 2 wires twisted together.
Assembling a metal detector with your own hands: setting up the device
When assembling a metal detector according to the diagram, you do not need to configure it. It already has maximum sensitivity. To fine-tune the metal detector, adjust the variable resistor R13 by twisting it slightly. Do this until you hear occasional clicks. In the case when this is achieved at the extreme position of the resistor, change the rating of the R12 device. Such a variable resistor should set the metal detector to optimal performance in the middle position.
There is a special oscilloscope that allows you to measure the gate frequency of resistor T2. The pulse length should be 130-150 μs, and the optimal operating frequency should be 120-150 Hz.
To start the metal detector search process, you need to turn it on and wait about 20 seconds. Then it will stabilize. Now twist resistor R13 to adjust it. That's all, you can start your search using a simple metal detector.
Let's sum it up
Such detailed instructions will help you learn how to make a metal detector yourself. It is simple but fully capable of finding metal objects. More complex models of metal detectors require more effort and time.
Metal detectors are used to search for metal in the soil at a certain depth. This device You can assemble it yourself at home, having at least minimal experience in this matter, or following the clear instructions in the instructions. The main thing is the desire and availability of the necessary tools.
Detailed instructions for the Terminator 3 metal detector with your own hands
This type of design is designed to search for coins. The process of assembling it is completely simple. However, experience in assembling such a tool is still necessary. The Terminator is able to detect an object even if the target of capture is minimal.
To begin, you should prepare the necessary equipment, namely:
- a multimeter that measures speed.
- LC meter
- Oscilloscope.
Next, you need to find a diagram broken down into nodes. Now you can make a printed circuit board into which jumpers, resistors, panels for microcircuits and other parts should be soldered in order. The next step is to clean the board with alcohol.. It is definitely worth checking for defects. You can check whether the board is in working condition as follows:
- Turn on the power.
- Turn down the sensitivity control until no sound is heard from the speaker.
- Touch the sensor connector with your fingers.
- When turned on, the LED should blink and then go out.
If all actions occurred, then everything was done correctly. Now you can make a coil. It is necessary to prepare a winding enamel wire with a diameter of 0.4 mm, which must be folded in half. A circle is drawn on a sheet of plywood with a diameter of 200 mm and 100 mm. Now you need to drive nails in a circle, the distance between them should be 1 cm.
Next, you can move on to winding the turns. At 200 mm you should make 30 of them, and at 100 - 48. Then the first coil should be soaked in varnish; when it dries, you can wrap it with thread. The thread can be removed, and by soldering the middle, you get a solid winding of 60 turns. Afterwards, the coil must be wrapped quite tightly with electrical tape.. And a 1 cm foil is placed on top, this will be a screen, and more electrical tape is wound on top of it. The ends should come out.
On the second coil it is also necessary to solder the middle. In order to start the generator, you need to connect the first coil to the board. The second coil should be wrapped with a wire of 20 turns, then we connect it to the board. Now you need to connect the oscilloscope minus to minus to the board, and the plus is connected to the coil. Be sure to look at what frequency it will be when you turn it on and remember it or write it down on paper.
Now the coils need to be placed in a special mold so that they can then be filled with resin. Next, the oscilloscope is connected to the board, with the negative pole, the amplitude should reach zero value. The coils in the mold are filled with resin to approximately half the depth. When everything is ready, the metal discrimination scale is adjusted.
Parts list for the Terminator 3 metal detector
As parts for the trio metal detector you will need:

If you have these parts, you can assemble the Terminator Pro metal detector yourself.
Circuit diagram of a metal detector with metal discrimination
 You can make a metal detector with metal discrimination yourself using the circuit for the Chance pulse device. The process of making a coil is quite simple.
The diagram itself can be found on the Internet. But still, experience in assembling such devices will be useful. Assembling the metal detector should begin with the board.
After the board is manufactured, the microcontroller needs to be flashed. And at the end of the work, we connect the metal detection device to the power supply.
Homemade equipment can be made without complex microcircuits, but using a simple transistor generator. The metal detector will be non-discriminatory. It will detect objects in the ground to a depth of 20 centimeters, and in dry sand - to a depth of 30 centimeters. In this device, the transmitting and receiving coils operate simultaneously.
Terminator 3 metal detector coil
 To begin with, you should take winding enamel with a diameter of 0.4 mm. Fold it so that there are two ends and two beginnings. Next, you should wind from two reels at a time.
Now we need to make transmitting and receiving coils; for this, two circles of 200 mm and 100 mm are drawn on a plywood sheet. Nails are driven in along these circles, the distance between them should be 1 cm. 30 turns of enamel wire are wound onto a large mandrel. Then you should apply varnish to the coil and wrap it with thread, then remove it from the winding and solder the middle. This creates one middle wire and two outer wires.
The resulting coil should be wrapped with electrical tape and a piece of foil should be placed on top, and foil again on top. The ends of the windings should go outside.
Now it’s time to move on to the receiving coil. 48 turns are already wound here. To start the generator, you need to connect the transmitting coil to the board. The middle wire is connected to the negative. And the middle terminal of the take-up coil is not used. The transmitting coil requires a compensating coil, on which 20 turns are wound.
 We connect the oscilloscope to the board like this: a probe with a minus to the minus of the board, and a plus probe to the coil. Be sure to measure the frequency of the coils and write it down.
After connecting the coils according to the diagram, they must be placed in a special container and filled with resin. The oscilloscope now sets the division time (10 ms and 1 volt per cell). Now you should reduce the amplitude to zero. We wind the turns until the volt value reaches zero. We make a compensating loop at the coil, which will be outside.
The mold should be filled halfway with resin. When everything hardens, you need to connect the oscilloscope and bend the loop inward. Then twist it until the amplitude value becomes minimal. Afterwards, you need to glue the loop, check the balance, and now you can fill the second half of the container with resin. The reel is ready for use.
Before you begin the repair, you should prepare the following tools:
- Stationery knife;
- Incandescent lamp;
- A container for glue, preferably flat;
- Special or epoxy resin;
- Medium and fine sandpaper;
- Small spatula.
 First of all, you need to dry the coil using an incandescent lamp. And use a utility knife to widen the cracks on it. Squeeze the glue onto a flat surface and mix with a spatula. Apply this substance to the coil. In places of cracks, you can apply more resin. Now you should wait until it all hardens thoroughly. And then sand it, using first medium and then fine sandpaper. This procedure will help smooth out all the unevenness. In this fairly simple way, you can revive the oldest coil from a metal detecting device.
Printed circuit board for the Terminator 3 device
 A printed circuit board for this type of equipment can be made and configured independently. The board diagram for Terminator 3 is available on the Internet. Once it is found, you can begin manufacturing the printed circuit board. After that, jumpers, SMD resistors and panels for microcircuits are soldered into it. The capacitors on the board must have high thermal stability.
DIY metal detector sensor
Before starting work, it is necessary to prepare a device that will accurately measure capacitance and inductance. Now you should take the housing for the reel and make PCB inserts into the ears. Pieces of fabric are used for compaction. The upper surface of the ears should be sanded. The fabric must be impregnated with epoxy resin. When everything is dry, you should sand everything and insert a sealed lead-in, thus making grounding. Next you need to apply a special Dragon varnish.
Now windings are made, which are tied with threads. All windings are placed in a coil and capacitors are glued. Everything can be connected and configured. A housing is required for pouring. Mandatory: there should be no metal nearby. After pouring, the epoxy should be sanded and dried thoroughly. The sensor is suitable for the Terminator 3 and Terminator 4 metal detectors, which are the most popular models of devices.
Metal detector Terminator 3: reviews
Many people believe this model popular device. The positive qualities include:
- Finding objects made of non-ferrous metal.
- No false positives.
And the following are identified as negative features:
- Rusty iron is detected rather poorly.
- You may lose some of your finds.
The search depth of the device is higher than that of other similar models. Basically this is 30 centimeters using the example of a coin.
Metal detector Sokha 3: diagram and description
 The metal detector has an operating frequency of 5 to 17 kHz. Its power supply is 12 Volts. Its ground balance is manual.
Scheme of this device is not entirely simple, since it contains two microcontrollers. The diagram can be found on the Internet. The device itself has good characteristics. However, due to the lack detailed information Assembly difficulties may arise during the manufacture of the device.
A small number of people believe that factory-made devices for detecting metal objects are significantly superior to home-made devices, but this is a mistaken opinion. If you properly make a metal detector with your own hands and configure it, it can surpass branded metal detectors. Which, in turn, will save a considerable amount of money. But in order to build a homemade product, you should know the principle of operation and design.
Operating principle
 The device detects metal underground using an electromagnetic field created by a transmitter coil. It begins to interact with the object (almost all metals are conductive), resulting in the formation of an eddy current that vibrates the radio waves of the metal detector coil. Shielding on a computer will pick up interference even from metals that do not conduct electricity, but only if they have electromagnetic properties.
When the equipment begins to pick up interference, it the data is immediately sent to the control unit. This detector part produces sound signal, notifying that a find has been found. The sound may be strong or weak. A strong signal indicates that the object is shallow, and a weak signal, on the contrary. There may be a coin at a distance of 50 cm, its signal will be weak. And with the same level of sound alert, large objects in the form of a helmet, weapons, and so on can lie at a depth of 100 cm. This factor must be taken into account.
Some expensive factory models display the received data on a monitor; they are very difficult to build at home. The Pirate detector is the easiest to assemble. Therefore, using his example, you can analyze the process of assembling a homemade device.
 If you still can’t make a metal detector at home, then you can go to the store and buy a branded device or order a homemade one from craftsmen who assemble at home. You can find craftsmen through friends or the Internet.
Attention! Beginners who take on assembling a metal detector with their own hands for the first time often get confused by the electronics. As a result, they give up this activity because formulas, diagrams and special terminologies scare them. To build homemade device It is enough to understand the essence of the system by plunging into school physics lessons.
Printed circuit board
One of the most important parts of the device is the board. In the future, all detector components will be attached to it. The most optimal method for creating a board is LUT (laser ironing technology). Manufacturing involves compliance with all stages, the implementation of which must occur in strict order.
A detailed description of assembling a circuit on a homemade metal detector or how to make a board from scratch:

Luding the board tracks is the last step. The entire surface is treated with LTI-120 solution.
Soldering elements
The manufactured board must be inspected. You need to make sure that all the track lines are clearly visible and the holes are in their places. After that, all the necessary elements are soldered onto the made metal detector board:

The most difficult thing is to find the K157UD2 amplifier. Because it hasn't been produced for a long time. Therefore, it is preferable to look for modern analogues that match the characteristics of the Soviet version.
Creating a Reel
To make a coil, you need a frame with a cross-section of 20 cm. An average of 25 turns are wound on it, but the total number can be changed up or down. Craftsmen advise adjusting the amount of wire winding by testing the device on a coin. It may turn out to be either 23 or 26 wikis. This is the only way to determine the farthest detection distance of a small object. It is advisable to use PEV wire half a centimeter thick.
After the master has decided on the amount of wire, it should be wound tightly around the frame. Insulated tape is applied to all homemade coils. There is no need to make a thick protective coating; one layer is enough so that the turns are not visible. Working with homemade coil can be considered completed.
Additional equipment
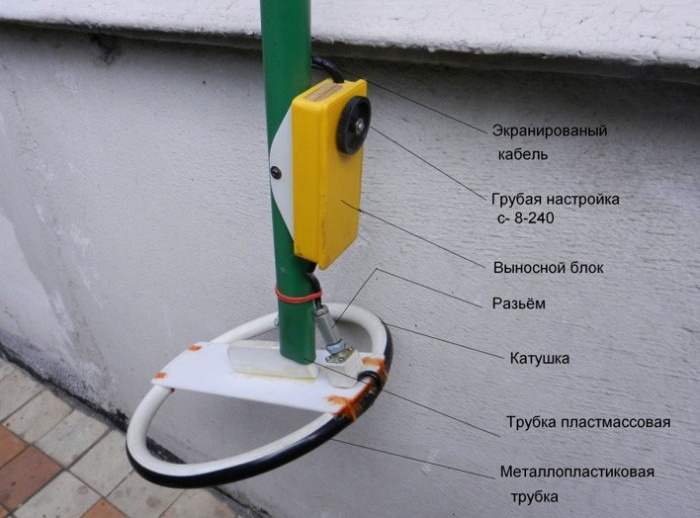
In addition to the board and coil, you will have to supplement the metal detector with other necessary accessories that will significantly improve its performance. Experienced experts recommend equipping the device with the following devices:
- Signal speaker. It can be removed from an ordinary radio. An important condition: it must have a resistance of 8 ohms. To save money, it is better to purchase a portable version made in China.
- 2 potentiometers, their power should be different. One model is 10 kOhm and the other is 100 kOhm. It is almost impossible to eliminate interference, so you will have to minimize it as much as possible. For these purposes, a shielded wire connecting the coil and the circuit will serve. The metal detector must operate from a power supply of 12 V no less.
- The L7812 voltage stabilizer increases the stability of the electrical microcircuit. It is mounted at the entrance.
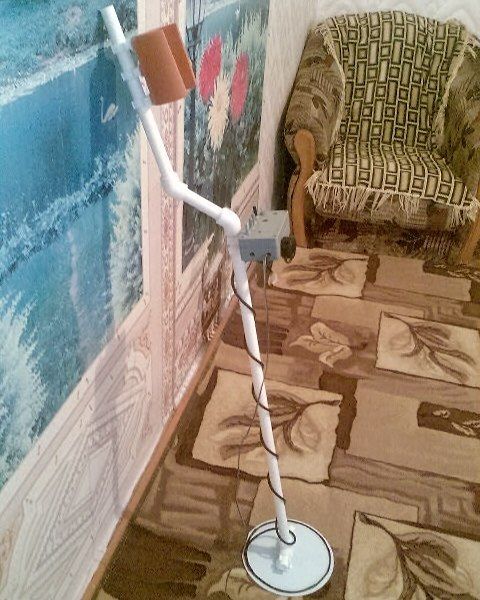
- Detector frame. It is mounted from any materials available at hand. However, for convenience, it is better to use a 5 m long PVC pipe. They are often used for laying pipeline lines. You will also need to buy several jumpers. A semicircular hand rest is installed on the top. Then you need to find a sealed plastic box in which the board will fit. After this, it is mounted above the middle of the rod.
- A battery from a screwdriver is suitable to power the system. The advantage is that the battery is lightweight and has a long service life.
Important! The entire skeleton and other parts of the metal detector should not be metal. Their presence can distort the electromagnetic field. It is better to give preference to plastic.
Setup and testing
 First of all, on the detector with potentiometers sensitivity is adjusted. You need to achieve uniform crackling. It is advisable to set it up on a small object. A DIY metal detector made at home should detect it at a distance of 30 cm. It will show a Soviet ruble at a depth of 45 cm. Larger objects are detected from a distance of 100 cm.
At very great depths, the device will not be able to find coins and similar small pieces of iron. Experienced treasure hunters are, of course, capable by sound, approximately understand the parameters of the detected object, but it is impossible to distinguish the type. In this case, a beginner will very often stumble upon nails and other unnecessary pieces of iron.
Making a metal detector with your own hands is not too difficult. Homemade models Great for training for novice treasure hunters. You can get a lot of experience and even an important find from them. In addition, you won’t have to spend money on purchasing the device. cash. And after honing your skills, you can buy a professional detector with a monitor that will even look for coins at great depths.
The design of a deep metal detector is similar to a regular one, with the exception of some technical details. It also differs in its increased sensitivity to metal objects, which makes it possible to detect them at greater depths compared to a simple metal detector. In addition, there is a selective search function, that is, the ability to find objects of a certain size without reacting to those that do not fit the parameters.
Diagram of a deep metal detector
It is quite simple, despite its apparent complexity. The metal detector consists of two parts – receiving and transmitting. The main device is a high frequency transmitter generator. Two loop antennas, one of which serves as a signal transmitter, the second as a receiver. They must be located strictly at an angle of 90 degrees to each other to prevent the receiving antenna from picking up the generator signals. When a metal object is found, the magnetic field created by the generator is distorted and subsequently picked up by the receiving antenna. In this case, the mass of a metal object is used as a source of radiation, sending the energy produced to the receiving antenna.
Metal detector receiver circuit
The transmitting device includes a thyristor with a power of 0.25 to 1 W and a sound generator with a frequency of 200 Hz. When a metal object is found, the operator hears a sound with a frequency of 200 Hz, the strength of which depends on the size of the object found and the distance to it.
A detector receiver whose oscillation circuit responds to a frequency of 120 kHz, and consists of two diodes. Absolutely any generator can serve as an amplifier low frequencies, which can be found in an old radio. An amplifier with transistors in the amount of 5-6 pieces is enough. A transistor is also used as a current amplifier for a pointer instrument, allowing the level of the received signal to be measured. That is, the device contains two types of indicators - visual and acoustic. The operating frequency is adjusted so as not to interfere with the operation of the signal receiver.
 Transmitter circuit
Required parts and tools for assembly
To assemble such a metal detector, you must first prepare a set of necessary parts and tools.
In case of pulse metal detector exemplary parts list will look like this:
- Electrolytic capacitors with a voltage of at least 16 V in the following capacities: 2 capacitors with a capacity of 10 μF, one with a capacity of 2200 μF, 2 pcs - 1 μF.
- Ceramic capacitors: 1 piece with a capacity of 1 nf.
- Film capacitors of the lowest voltage value, for example, 63 V - 2 pieces of 100 nf each.
- Resistors of 0.125 W: 1 k - one, 1.6 k - one, 47 k - one, 62 k - two, 100 k - one, 120 k - one, 470 k - one, 2 ohm - one, 100 ohm – one, 470 ohm – one, 150 ohm – one,
- Resistors of 0.25 W: 10 ohms - one.
- Resistors 0.5 W: 390 ohm - one
- Resistors 1 W: 220 ohm - one.
- Variable resistors: 10 k – one, 100 k – one,
- Transistors: BC 557 – one, BC 547 – one, IRF 740 – one,
- Diodes: 1N4148 - two, 1N4007 - one.
- Microcircuits: K157 UD2, NE555.
- Panels for each of them.
 Metal detector parts
From tools When performing work you will need:
- Soldering iron, tin, special solder, other soldering supplies.
- A set of screwdrivers, wire cutters, pliers and other plumbing tools.
- Materials for the production of printed circuit boards.
Metal detector assembly steps
The process of assembling a deep metal detector with your own hands includes the following steps:
At the first stage, it is necessary to assemble the electronic part, namely the control unit.
The step-by-step process looks like this:
- Cutting PCB to the required size.
- Preparing a PCB design and transferring it directly to the board.
- Preparing the etching solution. It contains table salt, electrolyte and hydrogen peroxide.
- Etching the board and drilling technological holes.
- Tinning the board using a soldering iron.
- Next comes the most important stage in assembling the control unit. This is the selection, search and soldering of parts directly onto the board.
- Winding a test coil. There are several options for winding it. The simplest option is to use PEV wire size 0.5 and wind it 25 turns on a suitable frame with a diameter of about 19-20 cm.
The best option would be to solder everything directly, and after the setup is complete, select the necessary connectors and adapters. It is better not to twist, as this has a negative effect on the sensitivity of the device.
The second good option would be to make such a ring from twisted pair wire. You will need about 2.5 - 2.7 m of wire.
To achieve maximum sensitivity, do the following:
- Wind 25 turns of wire.
- Perform a test by cutting small pieces of wire and observing the increase in sensitivity.
- This must be done until sensitivity begins to decrease.
- Count the number of turns, wind the final version of the coil, adding 1-2 turns. Thus, the maximum sensitivity value is achieved.
Upon completion of the main work, the control unit, coil and other parts are fixed in place on the rod. The metal detector can be turned on and checked.
Possible problems during assembly
- The assembled device does not react to metal objects. The cause may be a breakdown of the diodes or transistor. Faulty parts need to be replaced.
- Excessive heating of the transistor. You should install a resistor of lower resistance, reducing it until the heating stops.
Assembly of this type of metal detectors is not too difficult, provided all rules and instructions are strictly followed.


