Homemade flash drive recorders. Homemade flash drive
Welcome to all beginners, as well as experienced life hackers of this site!
We have an electronic magazine where we write various interesting articles about useful gadgets and unusual concepts. We also look into the future or make the present more interesting, more beautiful and more useful. Read the next article of the electronic magazine.
Almost everyone has a USB flash drive these days. But with all the variety, the range of cases for such devices is quite limited. And, why not make a case for a flash drive yourself? It is not as difficult as it seems, you just need to spend quite a bit of time. But you will become the owner of a unique little thing.
So let's get started! Following step by step instructions, we will make a case for our USB flash drive from Lego bricks for children.
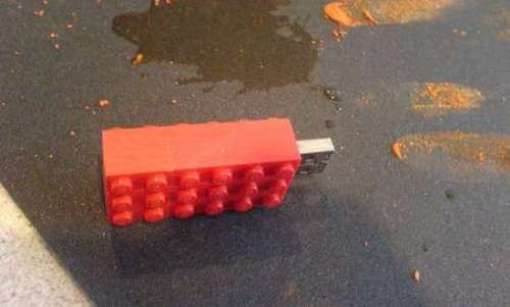
 This is how she will look
Tools and materials
Penknife
Pliers
Several Lego blocks
Super glue
Sandpaper
Metal polish
Flash drive
Step 1. Body base
 Internal elements are broken
USB memory cards are different sizes. We will package quite a large fee. Therefore, we need a brick from Lego with a size of 6 × 3 cylindrical landing elements (we agree to call them "points").
With a penknife, you need to cut all the internal partitions of the brick, and then break them out with pliers.
We use two more low-profile bricks with sizes 4x2 and 2x2 "points" to create a cover. Also, for the lid, you will need a low-profile element of 1 × 6 “points” (for the lid, you can use other combinations of designer parts, or you can simply take exactly the same brick as for the base of the case (6 × 3), and carefully cut it off with a jigsaw upper part parallel to the horizontal plane).
Using superglue, we glue the elements of the cover to get a part of 6 × 3 “dots” in size.
Step 2 Installing the Board
 Board in the case
At the end of the case, we cut out a groove for the USB connector, and after a slight adjustment, we install the device into the case with a penknife.
Step 3. Fixing the board
 We fill the body with silicone
We put brick trimmings on the bottom of the case and make sure that the board is parallel to the horizontal plane and does not push through. We fill all the remaining space in the case with transparent silicone, sealing it to reduce the possibility of any movement of the flash card inside the case.
It is important to use transparent silicone, since the indicator LED will have to shine through it.
Step 4 Gluing and Polishing
 We clean the edges
 Polishes of different abrasiveness
To ensure that there are no gaps between the lid and the case, we take sandpaper, put it on a flat surface, and align the lower plane of the lid on it.
After we glued the lid to the case with superglue, use the same sandpaper to remove burrs and smudges of glue from the side faces of the case.
Then we finish polishing the body with a polish.
Step 5. Finish
 Hull ready
 Compare your exclusive and mass consumer goods
 Look stylish!
But the creative possibilities for creating exclusive flash drives do not end there. On the contrary, there can be an infinite number of types of cases for them.
See what other craftsmen have done.

Do you have the original flash drive? What ways of personalizing this mini-carrier do you know?
In the meantime, there are still some unread curiosities in the mini-magazine: a visionary video about the medicine of the future; gadgets - stationary cellular telephone and a bottle for a tourist to disinfect water. and don't miss anything!
Flash drives often break and, as a rule, the outer shell - the case - fails. How to revive the drive so that it will serve you for a long time? Read on for how to make a DIY flash drive case: step by step instructions.
Today we're going to look at a few questions:
- how to properly disassemble flash drives of different designs;
- what tools are needed for this;
- how to make a case for a flash drive.
In addition, we will tell you what materials at hand can be used to create a new case, and which ones are better not to use so as not to damage the media. At the end there will be small workshops on how to design this device in the form of a Lego cube and a lighter.
Flash drives are an integral part of life modern man. Of course, there are various other kinds of storage media. Computers, laptops have long appeared in everyday life, in the end, some even use their smartphones for this. But despite this, these storage media do not lose their relevance: they can store large amounts of information, quickly and easily connect to various devices, do not take up much space. They are used to store photos, videos, movies, music, and for many, this is an indispensable thing at work, for transferring reports, presentations and important documents.
Usually they are in a plastic "body", sometimes in silicone - manufacturers like to make such types in funny shapes like fruits, cartoon characters and TV shows. And much less often they are more impressive, for example, steel. Plastic data carriers, on the other hand, are easily damaged, they can crack from an unexpected fall, bend at a break, or crack when under a heavy object.
What is the way out of this situation? Spending money to buy a new device, time to transfer information? Why, if you can just read this article and learn how to create your own original case for a flash drive. In the possible options, you are limited only by the availability of materials and your imagination, the methods and types of home-made cases can be different: from a Lego cube or a piece of a bar left after repair, and ending with an ordinary cork. Some craftsmen create real works of art in various styles and even sell them. Since there are many options, we will look at the basic principles - how to properly remove a flash drive from an old "body", and how not to damage it, what tools you may need and what items can be used to create a new design, and what materials should not be used.

Removing a flash drive
So, let's begin! First, just in case, transfer all the content to another device. A flash drive is:
- whole;
- collapsible.
If the former have a visible gap in the case, then the latter look monolithic. But both of them can be easily disassembled, the main thing is to know how.
Let's start with the "whole" type. Its connector is connected by a latch to the board, and this latch snaps into place, and disconnect it in the usual way impossible. We need a thin, flat screwdriver. Using this tool, we make a hole between the body and the latch. Carefully, so as not to damage anything, lightly pressing, swing up and down. Such holes must be made in three or four places where the connection goes, now we can easily remove it.

Now about how to remove the case from a "collapsible" flash drive. Such a drive is much simpler and its disassembly requires less effort: there is a small slot along the case that facilitates work. We will also need a thin pen screwdriver. Unlike the monolithic type, there is no latch here, but there are latches that we need to open. We insert a screwdriver into the groove and open the case using the same rocking method. The latches may break, but this will not cause any harm to the drive.
Making a case for a flash drive
Well, we dismantled the flash drive, and now we move on to main task- how to make a case for a flash drive? Your homemade version, as mentioned earlier, can be of any kind - the main thing is to keep the functionality of the drive. Firstly, the item must be easily connected to the computer, and secondly, the materials must not damage its components.
That is, the protruding edges should not interfere with the connection to the USB port, since an incompletely inserted one may not work, and it is also necessary to avoid collision of components with hot glue, paint and other aggressive materials. The new case must be sealed and prevent moisture from entering the board. The easiest way to choose plastic. It is much more difficult to create a shell made of wood or metal, but it will definitely last a long time and will retain its “presentation”.

One of the options for the case - from electrical tape
We make a flash drive case from a lighter
We will consider the simplest option, made from an ordinary lighter. Almost everyone has an old used lighter lying around somewhere at home, and sometimes they have an interesting design. We will need a clerical knife, a glue gun, a lighter of a suitable size, a screwdriver with a 3 mm drill. Such a lighter is suitable so that a flash drive without a case fits completely into it and only the USB port protrudes. Glue can be used any of those suitable for plastic.
First you need to release the remaining gas from the lighter, then make two holes in the bottom. Next, we make a cut with a knife along the contour framed by holes. Inside we install a USB flash drive and glue it with the case, remove the remaining glue. Our new drive enclosure is ready. We have an interesting and practical flash drive-lighter. As you can see, it is not difficult at all and does not take much time.

Flash drive - Lego cube
Another way to design a flash drive in an original way is to make it in the form of a Lego cube, which almost everyone has. We will need a few Lego blocks, a penknife, pliers, glue suitable for plastic, polish and sandpaper. First, we select cubes that are suitable in size for our flash drive. You can make a body of several cubes of different sizes and colors. We cut all the internal partitions with a penknife, now we break them out with pliers. We use the second same cube for the lid, cutting off everything to the top. At the end, we cut a hole for the USB connector, adjust, install the device.

Using the remains of the brick, we fix the flash drive so that it lies parallel. We fill the empty space, for this you can use transparent silicone. So that there is no gap between the base part and the cover, we rub the joint with sandpaper, glue it. After the glue dries, remove the residue using sandpaper. With the help of a polish, we complete the work.

Your exclusive do-it-yourself flash drive is ready!
So, as you may have noticed, making a case for a flash drive is not so difficult. The main advantage of making it yourself is that it will be truly original. After all, before proceeding with its implementation, you turn on your imagination, choose materials from improvised and more accessible to you, put them together and as a result you have an original and individual flash drive, which 100% will not go unnoticed. It will certainly emphasize your individuality and creativity.
Good day, Giktimes!
Today I want to talk about how I happened to dress a naked flash drive in a not quite ordinary camouflage, namely, in an old lighter.
Of course, I don’t have enough experience in this, and on my knee with improvised materials it’s difficult to achieve a special wow quality, but I still got some kind of unique artifact, frames from the history of the creation of which, with some comments, I expose to the public.
This is such an inconspicuous disguise. If interested, welcome under cat.
To reduce the volume of publication, I preferred to combine some not very important pictures with tiles of 4 pieces, hoping very much that this would not hurt the eye.
As the story of life began in the water, so this project began in a puddle in one of the St. Petersburg courtyards. It was there, for reasons not yet fully realized, that I picked up a crushed flash drive. The amount of garbage is growing in terrible progressions, so I don’t see anything particularly reprehensible in giving things a second life. Reasoning like this, I took one ziplock bag out of the glove compartment, and upon arrival home I began to study what I got hold of.

This is how sad she looked. It turns out that as many as 8 gigabytes - that's the motivation.

Opening and verification.
The case turned out to be metal with strips of plastic inside - probably, this saved the electronic part from destruction - after all, the case was obviously damaged intentionally. However, the clamped all-metal shell turned out to be also a challenge - I had to take a dremel and carefully cut along the edge, after which the filling went to bathe in water, and then in alcohol and dry on a battery.
Seeing that the board was slightly bent, I soldered the wire left over from the Chinese USB hub without much hope, but it turned out that not everything was so gloomy.

The device was successfully identified.

The contents turned out to be extremely strange for my personal taste, so I formatted the media without the slightest regret. It turned out that the device is fully functional.
And then, in the absence of dead donor flash drives, I simply threw the fee into the far corner of the table and forgot about it until I came across a very old and long-ended disposable lighter at home. It looked like a Soviet one, but even if not, the look was quite vintage. And since I don't smoke and I'm not interested in refilling disposable lighters, so I didn't feel sorry for her.
Another thing is that I would like to find a case more original, while the lighter seemed to be a sane idea, but difficult to implement. So I would not have taken up this case, if not for the case. Due to the fact that my favorite radio station, Radio Rocks, stopped broadcasting in St. Petersburg, I was forced to jump through the stations with a sour mine, trying to find at least something acceptable, and I really liked the one I accidentally caught on " Maximum ”a rather old composition“ Propellerheads - Crash ”, which launched a chain of ideas in my head to create a separate playlist in a similar style.
But for some reason, ideologically, I didn’t want to add another one to a dozen sheets on the phone, and then the idea to make a car flash drive woke up and pushed me to pick up a dremel with a soldering iron and disassemble the lighter, for the sake of a higher goal.

Here is such a green, not very noticeable lighter. The idea of using it with its inconspicuousness attracted me - I immediately wanted the flash drive to look nothing like a flash drive from the outside, and then there was such an excellent camouflage option.

The case is disassembled and cut with a dremel.
Then I gradually began to make a cap from the top. The task turned out to be more difficult than I thought. No, not that there USB connector I didn’t fit in at all, I just wanted to keep the disguise and the connector should not be visible, therefore I tried to leave the scenery, which at first glance would not give out the stuffing.

Many, especially on gyktimes, have long been aware of how these two components are related, but I met them just a couple of months before the event described and used them with caution, preferring the good old epoxy. However, in this project, epoxy turned out to be its negative sides for me - brittleness in thin places and very poor adhesion to metal and plastic, while superglue stuck many times better, especially when quickly cured with soda.

I carried out the first glue tests just on the cap. On the first frame, you can see that half of the button is tightly glued with glue. It is not pressed, but do not forget that this is just a disguise. On the second frame, the adjustment wheel sawn off inside, of course, also already used as a decoration - the connector just passes inside, there was no extra space for the twists. Well, the lighter wheel itself also had to be left, although I had to deprive it of its bracket (and there was no flint anyway) and solder it on a wire (last frame) to the cap itself in an inconspicuous place, securing it with glue for reliability.

In-between, all fakes together.
Next, I filled it with epoxy (not entirely successful) and then with superglue and soda the plastic insert of the cap and sawed a rectangular hole in the resulting mass with a dremel.
This was followed by the final connection of the board and the non-native connector with wires and wire. Despite the commitment of MGTF, I still decided to use ordinary PVC-insulated wires, of which I have a whole bunch of scraps, and at the same time I chose the right USB colors so as not to get confused.
Connector and board were hard soldered copper wire so that the board does not dangle inside, plus transverse strips are soldered from the same wire for better gluing, so that everything does not fall inside.

In order not to lose the cap, it was necessary to reinvent the wheel, for this I took a piece of synthetic thread, a drop of glue and a tube made from a ballpoint pen. And on the cap - a loop of metal. So that the droplet, walking in the internal cavities, does not cling to the flash drive board, at the end I glued a small piece of a dense film.
After it is time to make a "false fuse". For if you put everything together, through the top you could see the connector, compromising all the disguise created by such labors.

I had to cut off everything superfluous, since there was no place at all, glue it and go for a trick - raise the fake to the very top, soldering it to the case by wires. Of course, an experienced smoker, peering, will quickly figure out that something is wrong here, but I’ll be honest - it turned out so neatly that without thoughtful peering you won’t understand that something is wrong here.

During the sealing process.

Actually, it turned out like this. It remains only to paint the glue with a black marker. I do not have production for sale, but only for myself, so this option more than suited me.
Such a finished flash drive was immediately checked. Some shoals of the design were revealed, which it was already too late to fix, but in general appearance and functionality have left impressions exclusively positive.

Opening…

Closing…

And it looks great on a laptop.
I was very pleased, because I have a unique artifact, made completely with my own hands, and besides, looking like a telephone booth, a simple lighter. And in view of the general success of the idea, I can forgive myself for some inaccuracies.
Now you can safely upload a new fresh playlist, take it to the car and ride for your pleasure to great music.
In our modern world, to store a wide variety of information, it is customary to use special electronic media, namely flash drives! Now on sale there is a huge range of these electronic media, which differ not only in memory capacity, but also in shape and color. Many people try to buy a flash drive of an unusual color or shape so that it seems original and unique! It is in the event that you want your flash drive to be unique, that is, not like everyone else, then you can make it, or rather its outer shell, with your own hands! IN this example will talk about how to create a flash drive from deer antlers! To work with this material, you do not need to have special craft skills at all! Deer antlers are a material that is very easy to work with, making it a very good case for a USB flash drive!
Necessary materials and tools for creating a flash drive from deer antlers:
- deer horn or part of it;
- drill;
- flash card;
- jigsaw or hand saw;
- epoxy resin;
- sandpaper or needle file.
First stage. Cooking process
First of all, you need to remember that you need to be careful when working with sharp objects! In the process of cutting the antler of a deer, a lot of bone dust can occur. It is for this reason that it is recommended to wear a protective mask and to ensure very good ventilation in the room.
Then you will need to disassemble the flash drive. Then you need to outline the approximate location of the hidden "pocket" in the antler for the flash drive.
You also need to think in advance about exactly where it is best to make a hole for the chain.


Second phase. Direct creation process
At the next stage of work, you will need to prepare a container or box for bone dust.
After that, it will be necessary to saw off the unnecessary part of the horn.
Then you will need to outline a rectangular area for the size of the existing flash drive.
Then the horn will need to be wrapped in cardboard paper in order to protect the product from unnecessary scratches.
When creating a hole, it is best to use a machine. But you can also do without it. Then you need to measure 0.3 centimeters or a little more on the drill, after which you will need to stick a piece of adhesive tape. Thanks to this, there will be a clear idea of how exactly the mark needs to be drilled in depth without using a machine.
When drilling a rectangular hole for a flash drive, you need to remember to collect bone dust in a container! After that, you should polish the product with sandpaper.
Then you need to turn the horn over to the other side and create a through hole for the chain so that the horn does not crack!


Third stage. Use of epoxy
Then you will need to add epoxy resin to the rectangular hole made.
It will be necessary to wait five minutes, after which, with the help of a needle file, you will need to get rid of the excess coating.
Then you need to insert the flash card into the appropriate hole.


Everything, the product is completely ready! You can give such an original flash drive to a friend who, for example, works with computers!
USB flash drive- a common device that everyone who has their own home probably has Personal Computer. There are a wide variety of flash drives available today. They usually have a plastic or metal body, although there are more original options. But what to do if the case of your flash drive is damaged or for some reason ceased to suit you, but you do not want to buy a new one? In this article, we will show you how to replace the old plastic or metal case of your flash drive with a new wooden case.
How to make a case for a flash drive?
To do wooden case For a flash drive, we need the following tools:
USB flash drive without case.
Piece of wood.
Drill or other drilling device.
Sandpaper.
Silicone.
Clips, 2 pcs.
Pencil.
Let's start making!
1. First, determine the size of the case you need and use a saw to cut a rectangle of the appropriate size from a piece of wood using the marked marks.


3. Using a drilling device, cut non-through holes in the large and medium pieces of wood and a through hole in the smallest piece. The holes should be sized to easily fit and hold the USB stick. In the middle part, which will serve as a lid, small gaps should be made inside the hole so that the lid can close tightly and open easily.
4. Insert the USB flash drive into the through hole of the small piece so that the connector sticks out on one side and the rest of the flash drive is on the other. If the flash drive does not sit tightly in the hole, fix it with silicone.

5. Now stick the protruding long part of the flash drive into the hole of the largest piece, after applying hot glue to both parts and using a press, glue them into one case. It is necessary to use a press so that both parts are tightly fastened together, and after grinding, no gaps are visible between them.

6. Now carefully sand the entire body with sandpaper to give it a neater and smoother look. You can also cover the case with paint or varnish. Our original wooden flash drive is ready!


