How to make a copy of a DVD disc in nero. Copying discs and burning from an image file in Nero Express
In this article, we will learn how to copy any disk for subsequent recording on a blank disk or simply storing it on a hard drive, and we will tell you in what ways you can copy information, how they differ, and we will also clearly explain to novice users how to do this.
How to copy a disc in Windows
To copy a disk, go to My Computer, then find the CD/DVD drive into which we previously inserted the required disk, right-click and click “Open”.
Then select all the files with the right button and click “Copy”. The same action can be done using a combination of “hot” Windows keys XP. To do this, press Ctrl + A, selecting all files, and then Ctrl + C, copying them to the clipboard.

That's it, the main part is done! Now we take this disk out of the drive and insert an empty one, also open it, right-click and click "Open". Then in top corner there is such an inscription - Burn files to a CD, click "Next", transfer the folder with the files to this window and fulfill all the requirements of the CD Burning Wizard.
How to Rip Discs Using Nero
Now let's look at another method for copying files. In this section we will tell you how to create a virtual one from an ordinary CD, that is, save its image to a hard drive. You can call it copying, and the feature this method The problem is that the computer may not have a burner drive; to create an image file, a simple CD or DVD-ROM is enough for us.
Image file or virtual disk, This full copy an ordinary CD, with the only difference that you cannot hold it in your hands and it is recorded not on an industrial blank, but on the hard drive of your computer. When working with it, the computer treats it like an ordinary disk and works accordingly. You can work with such a CD using the utility included in the Nero 6 package - Nero Image Drive, and now let's start creating it.
The process of creating such a disk is completely identical to ordinary copying, but there are slight differences, let’s consider everything in order.
Launch Nero Burning ROM

From the list of disk types (on the left), select CD-Copy, the corresponding project window appears. Let's dwell on those settings that directly relate to the creation of a virtual disk.
Image tab - no settings required.
Copy options:

On the fly - we definitely select this option, since we are not recording to a CD, we actually do not risk anything, otherwise double work will be done. First, from the primary disk, Nero will create a temporary copy (i.e., the image we need), and then the image file will be written from this copy. Just a waste of time:
Drive source - select the drive (if there are several) where the disk is installed.
Reading speed - the default is set to maximum, lowering it makes sense when the disk we are copying is difficult to read, sometimes this helps:
Reading Options
All settings are set automatically; to do this, in the “Quick copy settings” drop-down menu, select the appropriate disk type.
Recording tab

Action - the only thing we need is to check the "record" option.
Recording speed - choose any, we will record at HDD, the recorder will not be used.
Recording method - select DAO or DAO/96 (Nero developers recommend installing DAO/96 when copying a disk).
The number of copies is naturally one.
Power-Burn - this option will not be used, so we leave it unchanged.
Using many recorders is the most important thing! Select this option.
Click the “Copy” button and get a window with a list of those “many recorders”.
Select "Image Recorder" and click "OK".
The program automatically starts and the image saving dialog appears.

We select a suitable name for the image and click the “Save” button, after which Nero will begin to create the image file, and we just have to wait a little and after the recording is complete, use the finished virtual disk.
>Copy Audio CD to Hard Drive
Copyright and Trademark Information Start Successfully Launch the Program Main Window Project Window Data Disc Audio CDs and Audio Files Videos and Slideshows Boot disk Load a LightScribe Labelflash™ Image File Burn a Project Copy CDs and DVDs Erase Rewritable Disc Window Update the Antivirus Database Configuration Options Technical Information Contact Us
Copy Audio CD to Hard Drive
Using Nero Burning ROM you can save audio files from audio CDs to your hard drive. The files are encoded, meaning they are converted into a format that a computer can read. In addition, the audio file is compressed.
An audio CD can be automatically identified by Gracenote MusicID. The Gracenote database accesses so-called metadata - title, genre and track title - and associates it with tracks. There you have audio files that are accurately and completely named according to the encoding process.
Some novice users have difficulty copying discs. Many people don’t even know that the process of copying discs is very simple and can be done even on a computer with one DVD drive. The erroneous opinion of many novice computer users is that to copy discs you need to have two DVD devices in your computer, one for reading, the other for writing. This is wrong. This instruction shows how to copy a disc with only one writer DVD drive on the computer and installed program Nero Burning ROM.
So, first, let's launch the program for burning and copying discs. This is one of the Nero software suite - Nero Burning ROM.
Immediately after starting the program, a window will open asking you to select the type of disk being used (CD or DVD) and what kind of disk you want to get as a result. Select from the drop-down list in the upper left corner DVD and below DVD Copy, which indicates that we will be working with DVD discs and as a result we want to get a copy of the DVD disc.
The next step is to go to the tab Image. On this tab you need to select a place on your hard drive where there is at least 10 gigabytes of free space to create a temporary “image file”. This is a file with all the information that is stored on a DVD disc. It will be created during the copying process, information from the original DVD disc will be written into it, and subsequently this information will be written to the new DVD disc. After all copying operations, this file will be automatically deleted and free up space on your hard drive.
I did not change anything and did not change the new location of the image, since I have enough space to create the image on any of the hard drives.
Copy Options. This is a very important tab where we must choose the right source drive. The source drive is the DVD drive from which the source information will be read. Sometimes there are several drives installed on a computer, there are even several “virtual” ones. So we need to correctly indicate the one from which we will read information. In other words, the one in which we installed the source disk - original disc, which we will copy.
In my case, the original disc is inserted into the DVD drive GH24NSBO. Below you can specify the maximum reading speed from this drive; this is useful; if at maximum speeds your drive makes a lot of noise or reads discs poorly, then you can set the speed lower and get rid of these shortcomings. I left my speed at maximum.
Next we go to the tab Reading Options. In the dropdown list Profile selection You must specify the profile of the disk you are copying. It is very important! Copying software discs and video discs differs. The difference lies in the attitude towards errors that may appear when reading. For video discs, occasional errors are not significant and can be skipped without significantly affecting the quality of the video information. For discs with programs, this attitude towards reading errors will most likely be fatal, which is why for discs with programs they use a more strict reading profile - DVD with data.
We indicate DVD-Video and a little lower Reading with error correction. Check mark Ignore read errors for uncorrectable errors should be set as shown in the screenshot below.
Now go to the tab Record. This tab contains very important settings for disc recording. Check the box Record And Check app. data. The second checkbox is needed so that after recording the recorded disc is read and compared with the source. This way we will know that the disk, after checking, is identical to the source and was recorded without errors.
Below, from the drop-down list, select the desired dimsk recording speed. I would recommend that you do not leave the recording speed at maximum! It is better to choose a speed of 4X or even 2.4X. At lower speeds, the recording process takes longer, but the quality of recording to the disk increases. Consequently, the likelihood of successfully recording and checking a recorded disc at low recording speeds increases! I choose 4X for recording because I am confident in my DVD writer and the quality of the blank DVD disc. For older DVD drives, it is better to choose 2.4X speed.
Even lower, you can specify the number of copies to be recorded. If you need more than one copy of a DVD, you can set the required number. For example, 3 or 100. In this case, after recording and checking the first disc, the computer will prompt you to insert another blank disc to record a second copy, then a third, and so on, until the entire required number of discs has been written. I left the number of copies equal 1 .
All! All settings are done. We insert the source disc into the DVD drive, i.e. disk with the source video and press the button Copy below the window. The process of reading the original DVD-Video disc into a temporary image file will begin.
After finishing reading the source DVD, the system will ask you to insert a blank DVD for burning. As soon as you insert a blank DVD disc, the program will begin recording. The recording process at 4X speed lasts about 15 minutes. Once recording is complete, the process of checking the recorded disc will begin. If the verification process goes through without errors, then as a result you will see a message indicating the successful completion of the recording process! That's it, you can take out the disc and put it in the box!
Related articles.
If this is your first time encountering the process of copying CDs, then Nero Express is ideal for creating your first copies.
The minimum number of settings and ease of operation of this program will not create any inconvenience and will allow you to work with the program “on the fly,” that is, without practical experience.
Let's launch Nero Express:
When asked which recorder to use, select CD-R/RW from the drop-down menu. For computers equipped only with a CD-RW drive, this menu will not appear. If you select DVD, you can copy a DVD disc; the copying process is completely the same as copying an ordinary CD disc.
On the right, in the menu, we select to copy the entire disk by simply clicking on it with the mouse. The following dialog box appears:

Source drive- select the drive (if there are several of them) where the disk is inserted - the source.
Receiver drive- the drive on which the recording will be made.
Options- shows information about the receiver drive.
Quick copy- when you select this option, copying will occur from disk to disk without first saving the image on the hard drive; it only works if there are two or more drives in the computer. The option is completely identical to on-the-fly copying in Nero Burning Rom.
Write speed- select the speed at which we will write the disk.
Number of copies- number of desired copies. After creating the first copy, the tray in the recording drive will open, from there we take out the recorded disc and insert a blank one, etc.
Check data after writing to disk- after recording is completed, the copied disc is compared with the original and, in case of an error, issues a warning. I recommend using this option when copying very important data or when you have doubts about the quality of a blank disk.
The copying process depends on the number of drives in your computer.
If there are two drives, then install the primary disk in the source drive, and a clean disk in the destination drive. If desired, check the “quick copy” option - this can significantly reduce the copying time, but if there are errors on the primary disk, you can get a copy instead of the desired one final product in defective form. An ordinary CD(DVD)-ROM can be used as a source drive.
If there is only one drive, then install the primary disk in the source drive and press the copy button. Nero will create a copy of the information on your hard drive in the form of an image file, then you need to replace this disk with a blank one in the output tray. After closing the tray, the program starts automatically and writes ready-made information from the hard drive to disk.
All! We press “record” and wait for a fresh, just recorded disc to appear...
Hello, I will briefly state my problem. I have very little experience working on a computer, so don’t scold me too much for asking questions. I recently purchased a laptop with pre-installed operating system Windows 7. I know that it does not have a built-in program for working with CDs and DVDs, meaning recording and so on. Accordingly, the question is, the information I need, because there is probably good and proven free software? Tried to take advantage ImgBurn program, but in my opinion it doesn’t have a function for direct copying of disks at all, or I just didn’t find it? I also want to install Ashampoo Burning Studio, then everything will probably be fine. Dmitriy.
Second letter. I've encountered a problem that I can't fix on my own. I understood the settings of the Nero 8 program and apparently changed something in the Nero Burning ROM application, now instead of rewriting the disk I need to a blank disc, Nero tries to Save the image file on the hard drive.
And in Nero Express I create an image from my files and burn it to disk, but the information is on this disk it turns out to be completely unreadable. Thank you in advance. Vladimir.
How to copy from disk to disk
As you correctly noted, free programs, which could rewrite almost any CD or DVD you own, quite a lot. Personally, I prefer to work with two free applications Ashampoo Burning Studio And ImgBurn, which have long proven themselves to be good. Well, two paid ones Nero 8 And Nero 6.
Unfortunately, Windows 7 itself can only burn the finished image onto a blank CD (if you hover your mouse over any image and right-click, a menu will open in which you can select Open with, and then select Windows Disc Image Burner).
And very often one of the very first problems that beginners face after purchasing a computer is finding and installing programs for working with CDs and DVDs.
So our freely distributed ones are Ashampoo Burning Studio and ImgBurn. It is very easy to work with them, they are in Russian and even a complete beginner can handle them. How to download and install these programs is described step by step in our article - you can follow the link and read it, I won’t repeat it. In this article I will go straight to working with them. For those who are interested how to copy from disk to disk various information using Nero 8 and Nero 6, and what mistakes may be made, can go directly to the end of the article.
Ashampoo Burning Studio, the main window of the program, as you can see, its capabilities are quite large and it will undoubtedly be useful to you. So, insert the disc that you need to copy or rewrite into a CD/DVD drive.
Choose Copy CD/DVD/Bly-ray disc.

Next you need to select the source drive, those users who have programs installed for working with virtual drives, for example Daemon Tools, must indicate here exactly their real drive, in my case Optiarc DVD RW AD-7191S and click next.


We insert a blank CD or DVD, depending on what we are copying. Click Burn DVD

A short recording process occurs and the disc is ready.


How to copy from disk to disk the files we need using ImgBurn. Before us is the main window of the program. This program originally intended primarily for creating and burning almost any existing images. You can also use it to create an audio CD from files: AAC, APE, FLAC and the like. It is possible to create a DVD video disc from the VIDEO_TS folder.
This program does not have the Copy CD/DVD function directly, but if you do not need to rewrite discs often, you can first create an image of the disc you need in this program, and then burn it to a blank disc.
In the main program window, select Create disk image.
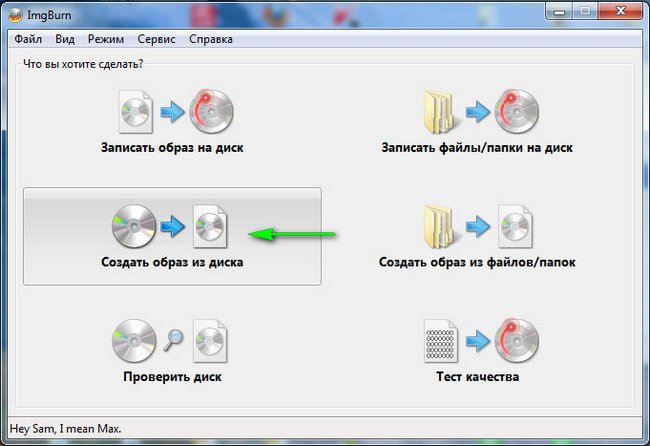
We select the destination folder, that is, where exactly on our hard drive the image will be created.

You can select the desktop and give the image any name, for example My image, then click the Save button.

Press the read button. An image is being created.

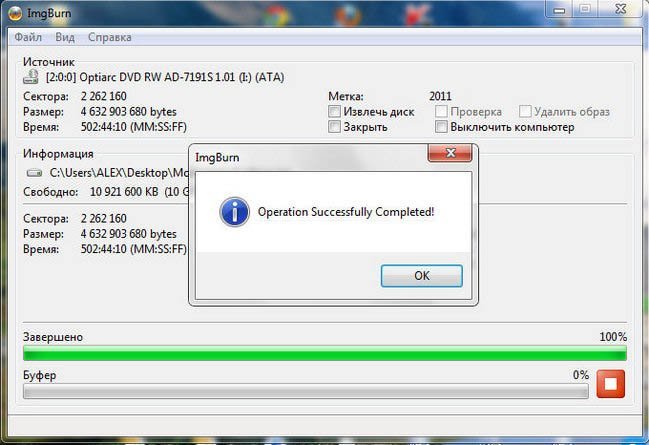
Now it's time to burn this image onto a blank disk, insert it into the CD/DVD drive.
In the main ImgBurn window, select Burn image to disk.
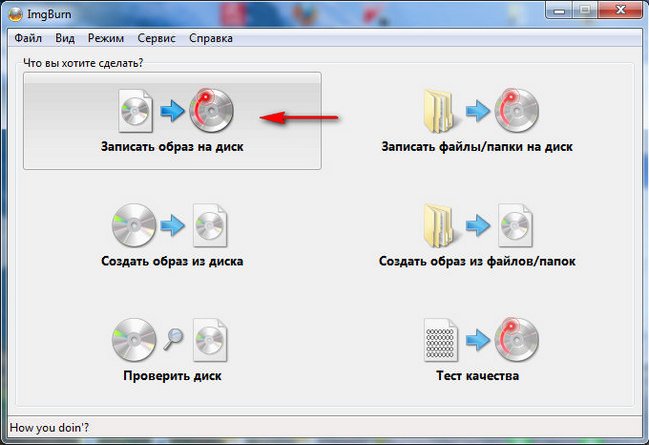
In Select file,

select our image and then Open.


Now let's look at working with Nero 8.
The initial window of the Nero 8 program is Nero StartSmart, from which we can launch the following programs, with which we can copy the files we need and more from disk to disk.
Nero StartSmart- a module for launching your ready-made projects
Nero Burning ROM– a special module for creating images and burning discs
Nero Express– a very simple module, one might say for the same purposes.
Let's start with Nero StartSmart - insert the disc into the drive and click on the Copy Disc button, then Copy.

After a short copying process

insert a blank disc to burn and press Download, in a couple of minutes our disk will be ready.

The same can be done using Nero Burning ROM. Select Launch Nero applications and tools, then Nero Burning ROM.

If we want to rewrite a DVD, then select the project DVD, then DVD-Copy and most importantly, if you intend to rewrite a DVD disc, and NOT create an image, then your list of recorders must be indicated in the List of recorders item CD/DVD drive, in my case Optiarc DVD RW AD-7191S. Click Copy.

The copying process will begin, then you will need to insert a blank disc.

Nero Express is also very simple.

Image, project, copying. Copy of the entire DVD.

We also pay attention to the fact that Source drive And Receiver drive were specified correctly, click on the Copy button.


