How to show system files in windows 7. How to show hidden folders in Windows
Hello friends. After the update, or Windows installations 7 you have has a partition (disk) called “System Reserved” appeared? It's okay, now let's try to solve this problem.
I somehow downloaded a new one and installed it on my laptop, not even for myself. After installation, I went to “My Computer” and saw that, along with the usual drives C, D, etc., a disk called “Reserved by the system” appeared. It is approximately 100 MB in size. I didn’t want to leave it, especially since the laptop is not mine and there was little they could do with this partition, for example, delete files from it. Therefore, I had to hide it manually.
This partition is created during the Windows 7 installation process, when we . The system warns you about the creation of this backup partition. But it should be hidden, but for some reason in my case it received the letter, if I’m not mistaken, then also E, and was displayed along with all local drives.
How to hide the “System Reserved” section?
Let's now proceed to actions that will help us remove the “Reserved by the system” section; it won’t disappear anywhere, we just won’t see it.
Click “Start”, then right-click on “Computer” and select “Management”.
 A window will open in which we click on the right “Disk Management”, wait a little while the system loads the information, and look for our section in the list, which is called "Reserved by the system". Right-click on it and select “Change drive letter or drive path...”.

A window will appear in which we delete our letter by clicking on “Delete”. We answer “Yes” to all questions.
Like any operating system, Windows keeps some of its files hidden. Microsoft developers did this to prevent users from accidentally deleting or changing important system files, thereby disrupting the operation of the system. However, situations occasionally arise when access to hidden system folders and files is simply necessary. It is also worth adding that to ensure confidentiality Windows data allows you to hide from prying eyes and custom file folders. To hide and display hidden and system files in the functionality operating system Windows provides several methods, which we will look at in this guide.
How to hide and show system files and folders
1. Through the settings panel
To make visible hidden files and system folders, you need to open Windows Explorer(keyboard shortcut Win+E) or just any folder from your desktop. Next, in the settings panel at the top, select the tab View, then click on the submenu Show and hide and check the box next to the option Hidden elements.
After this, all hidden system files and folders will become visible. It is quite easy to distinguish them from other objects - they have translucent icons.

To make these objects invisible again, you need to do the same operation and uncheck the option Hidden elements.
2. Through folder and search options
Same as in the first method, open Windows Explorer ( Win+E) and select the tab at the top View, then click on the submenu Options (Change folder and search options ).

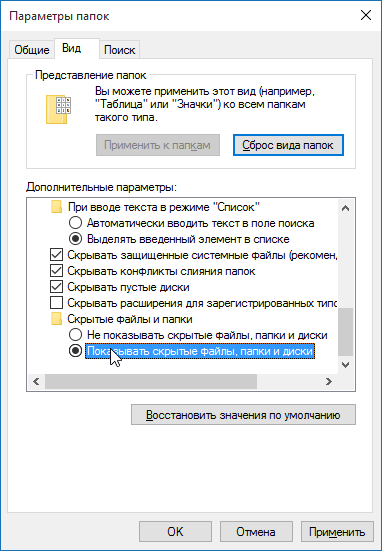
In the window that opens Folders settings go to the tab View, by using scroll the slider list of options to the very bottom, then check the box next to the option Show hidden files, folders and drives.

To complete the operation, click Apply And OK(if you want to apply changes to only one folder you opened in this moment) or click on the button Apply to folders so that the system shows all hidden files, available on the hard drive.

It’s worth adding that the list of folder options also contains additional options ( Hide protected system files , Hide empty drives etc.), using which you can make visible large quantity system files and folders. As you can see, this method provides the user with more options than the first!

3. Via the command line (cmd)
This the method will work for advanced users who know at least entry level, what is entering commands manually. First, you need to launch a command prompt with administrator rights. To do this, open the menu Start, Choose a section Utilities - Windows, then right-click on the program Command line and go through the options one by one: Additional →Run as administrator.

IN command line use one of the commands below:
Show hidden system files and folders:
reg add “HKCU\Software\Microsoft\Windows\CurrentVersion\Explorer\Advanced” /v Hidden /t REG_DWORD /d 1 /f
Hide system files and folders:
reg add “HKCU\Software\Microsoft\Windows\CurrentVersion\Explorer\Advanced” /v Hidden /t REG_DWORD /d 2 /f
Show hidden protected system files and folders:
reg add “HKCU\Software\Microsoft\Windows\CurrentVersion\Explorer\Advanced” /v ShowSuperHidden /t REG_DWORD /d 0 /f
Hide protected system files and folders:
reg add “HKCU\Software\Microsoft\Windows\CurrentVersion\Explorer\Advanced” /v ShowSuperHidden /t REG_DWORD /d 1 /f
For example:

How to hide and show user files and folders
operating room Windows system gives its users the ability to make personal files and folders invisible. If you decide to hide from strangers using your computer some confidential information, then you can use any of the two methods below.
1. Through the properties of files and folders
Right click on the desired folder or file and select the option Properties.

In the window that opens, go to the tab Are common(if it is not open by default) and check the box next to the option Hidden. After this, your folder or file will become invisible.

To re-display a previously hidden object in Explorer, use the method described at the beginning of this guide. After using this function, all previously hidden user objects will become visible along with system files/folders.
If you no longer want to hide files or folders, go into their properties again and uncheck the option Hidden.

2. Via the command line
Run a command prompt with administrator rights, as described in the topic "How to hide and open system files and folders".
At the command prompt, enter the command attrib with key +h, then in quotes, specify the path to the file or folder you want to hide.
Example command to make a specific file invisible:
attrib +h "C:\Temp\1.jpg"

Example if you are going to hide the entire folder:
attrib +h "C:\Temp"

To make hidden files visible again, use the command attrib with key -h.
An example of a command that removes invisibility from a specific file:
attrib -h "C:\Temp\1.jpg"
And an example for removing invisibility from an entire folder:
attrib -h "C:\Temp"
That's all. Keep your personal information secret from strangers, just don't forget the location of your hidden files and folders so you don't lose sight of them later!
In Windows 7, Windows 8, Windows 10 and Vista, you can hide important files and folders so that other users do not accidentally delete/change important data, or simply from being viewed by prying eyes. If necessary, these same files are quite easy to display, which we will look at later in this article.
Also, recently there has been a very common case when users have all their files and folders become hidden, as if everything that was deleted has been deleted, and instead of them, shortcuts with the same names are created, which is a consequence of the computer/removable storage being infected with a virus.
This can also happen after installing or scanning your computer with an antivirus. If you have just such a case associated with a virus, instructions below They will also help you display hidden files and folders. But to completely remove the virus, read the article How to remove a virus with shortcuts.
The first and simplest method I always use is using Total programs Commander. Open the program, select required disk and just click the "Hidden Items" button and you will see everything that was hidden (marked with a red exclamation mark).
If you do not have the program installed, use also quite simple ways described below.
Show hidden files and folders in Windows 8.x or 10
Use the View tab and click the Options button.

On the View tab, check the “Show hidden files, folders and drives” option at the very bottom. If you want to get to hidden Windows system files, uncheck the "Hide protected system files" option
Hidden files will appear semi-transparent. If you want to completely remove the “hidden” attribute from a file or folder, right-click on it and select properties. On the General tab, uncheck the Hidden option.

In most cases, this helps, but sometimes it happens that the checkbox from the option cannot be removed, because the hidden attribute is inactive. If so, scroll down a little and follow the instructions provided.
Windows 7 or Vista
Open any folder and select Folder and Search Options from the Organize menu.

Just like in the previous example, check or uncheck the desired options and click OK.

What to do if the folder's hidden attribute is inactive
In case you cannot remove the attribute hidden folder using the above method, the code below can help you in this situation. Just copy it, paste it into notepad and save it as folder with the extension .vbs instead of txt to get folder.vbs. Then copy and paste the file into the drive you want ( USB flash drive, SD card or HDD) where you want to show hidden files and launch it with a standard double-click.
Don't forget to change "d:" to your drive letter.
‘ Reset file attributes for all folders within a specific drive
‘ Change d: to the drive letter where the script will be applied
cDrive = "d:"
Set FSO = CreateObject("Scripting.FileSystemObject")
ShowSubfolders FSO.GetFolder(cDrive)
WScript.Echo "Done with fix."Sub ShowSubFolders(Folder)
str = ""
For Each Subfolder in Folder.SubFolders
str = str & » » & Subfolder.Path
subFolder.Attributes = 0
ShowSubFolders Subfolder
Next
End Sub
After running the file you should see everything hidden folders, but not files (note) since this method Applies only to folders. And for files use the following method:
- Open the Run dialog box, enter cmd and press Enter.
- Enter your drive letter, for example d: and press Enter.
- Then enter the following command:
attrib d:\*.* /d /s -h -r -s
Now, all hidden files should appear.
How to enable display of hidden files?


By Windows default hides important system files so that the user does not delete them by mistake. However, sometimes there is a need to look at them, and in our article we will tell you what should be done in this case.
Windows XP
To enable the display of hidden files in Windows XP, you will need to open the Control Panel. You can find it through the Start menu. In Control Panel, find the Folder Options icon and double-click it. In the dialog box that pops up, you will need the View tab. Find Hidden files and folders in the list of options, check the Show hidden files and folders option, and then click OK.
Windows Vista
To see hidden files and folders in Windows Vista, you will also need to open the Control Panel, but you should look for another section in it - “Design and personal customization" It will contain the already familiar “Folder Options” item. When the window of the same name appears, open the “Show” tab and in the “Advanced options” list, check the “Show hidden files and folders” checkbox. To apply the changes, click OK.
Windows 7
In Windows 7, the procedure and names of the options are almost the same as in Windows Vista. In the Control Panel, go to the “Appearance and Personalization” section, select “Folder Options”, in the pop-up dialog box, open the “View” tab and in the “Advanced options” list, check the “Show hidden files, folders and drives” option. Don't forget to click "OK" to apply the changes.
Windows 8
In Windows 8, viewing invisible files is a little easier. There is no need to go to the “Control Panel” - just open “Explorer” on any folder. From the top menu bar, select View. When a panel with a set of options opens, find the “Hidden elements” item on it and check the box. There is no need to do anything else.
Finally, we note that not only system files can be hidden. If you wish, you can hide a folder or file yourself to hide them from prying eyes. Read about how to do this in our articles.


