How to install PHP: all the pitfalls of the process. Installing and configuring PHP Installing php 5 windows 7
At htmlAcademy and I work there as a mentor. As part of the intensive course, students will have to improve their work environment and this note is aimed at simplifying this difficult task for a beginner. Eat different ways raising a full-fledged LAMP stack, but we will go the classic way. Let's configure all components separately (without using ready-made combines) and start with PHP (there will definitely be a note discussing ready-made LAMP assemblies). Since I plan to work as mentors at PHP intensives in the future, I am going to write similar instructions for repetition in other operating systems (Linux, macOS). As they say, it’s better to sweat once, but then it will become easier for everyone. So let's get started.
Download PHP for Windows
Go to the official website and download current version PHP. At the time of writing, this is - 7.1.4 . There are several distribution options available on the page. I have Windows 7 x64, so I choose accordingly zip archive with VC14 x64 Thread Safe.
Please note that there are two distribution options available for download: Thread-Safe (TS) And Non-Thread-Safe (NTS). The choice depends on how you plan to use the interpreter. TS is recommended to be used for a single web services process (for example, configured via the mod_php module for Apache). NTS is recommended for using IIS (Internet Information Service) and alternative FastCGI web servers (for example, Apache with the FastCGI module) and command line.
Install PHP 7.1
Let's start preparing PHP for comfortable work from the command line. In the previous step, you downloaded the archive with the PHP distribution. Unlike most programs, PHP is supplied in a simple archive, and not as an installation package. Therefore, you will have to extract the files yourself to any directory convenient for you. I prefer to keep things like this at the root system disk. Create a directory in the root of the “C:” drive (or any other place) "php" and extract the contents of the downloaded archive into it.

Many files will appear in the directory, but we are most interested in:
- go-pear.bat– script for installing PEAR. You can read more about PEAR in the official documentation.
- php.exe– allows you to execute PHP scripts from the console;
- php-win.exe- allows you to execute PHP scripts without using the console;
- php-cgi.exe– required for executing PHP code in FastCGI mode;
- php7apache2_4.dll– integration module with the Apache 2.4.X web server;
- phpdbg.exe– debugger;
- php.ini-development– example configuration PHP file for the developer environment (development)
- php.ini-production– example of a PHP configuration file for a production environment
Connecting the configuration file
We have the unpacked distribution kit, let's connect it for it configuration file. We are going to do experiments, so we will take as a sample php.ini-development. Make a copy of this file in php directory (C:\php) With name php.ini. IMPORTANT! Make a copy, not a simple rename. During development, you may need to change the configuration file and there is every chance of making a mistake that will be difficult to detect.
In such cases, there is nothing better than returning to the reference settings. In our case, it will be enough to copy the file again php.ini-development V php.ini. So, at the end of the actions, the php.ini file should appear in the directory with php. In further notes we will definitely talk about its contents in more detail.

Testing PHP from the command line
At this step, the so-called “installation” is completed. Open your console ( cmd.exe, the shortcut is available in the Accessories menu) and enter the command:
C:\php\php.exe --version
The result will be something like this:
PHP 7.1.4 (cli) (built: Apr 11 2017 19:54:37) (ZTS MSVC14 (Visual C++ 2015) x64) Copyright (c) 1997-2017 The PHP Group Zend Engine v3.1.0, Copyright (c) 1998 -2017 Zend Technologies
The result confirms that PHP is working. For example, try creating a new script file (I created the “test.php” file right in the root of the “C:” drive) and place the text in it:
Now try executing this file and see the result:
C:\php\php.exe –f test.php
Function phpinfo() displays PHP configuration information in a convenient form. We'll talk about this function later.
Simplifying access to php.exe
PHP is ready to work, but you must admit that entering the path to the PHP interpreter into the console every time is quite inconvenient. To make your life easier, let's make some small changes to the environment variables. Let's launch the applet in the control panel "System"(or just press the hotkey "Windows + Pause Break". Then click on the button "Change settings". In the window that appears "Properties of the system", let's go to the bookmark "Additionally". Find and click on the button "Environment Variables".

Find a variable in the list "PATH" and press the button "Change", the variable editing window will appear. In the “Variable value” field we need to add the path to the directory with PHP. Go to the very end of the line and, separated by semicolons, indicate the path to the directory with PHP: C:\php;

That's it, click "Ok". Now reboot the system (alas, you have to). After restarting Windows, you can access PHP simply: php. For example, to display the version name, just write:
Php –version
And to interpret the test.php file located in the root of the “C:” drive:
Php –f C:\test.php
Or even launch the built-in web server:
Php -t C:\ -S 127.0.0.1:8888 Listening on http://127.0.0.1:8888 Document root is C:\ Press Ctrl-C to quit.
To test, open a web browser and try going to http://127.0.0.1:8888/test.php. Please note that after the parameter –t we specify the path to the directory that will become the root directory of the web server. All scripts located in this folder will be available for request from the client. I have one file on drive “C:” 1.php and that is exactly what I am asking for.

Assoc .php=phpfile ftype phpfile="C:\php\php.ee" -f "%1" -- %~2
A little more about environment variables
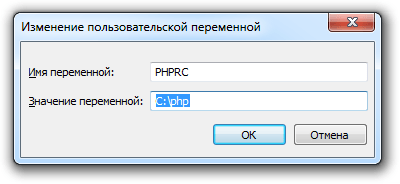
Now let's talk about how PHP will look for the configuration settings file (remember, php.ini). The documentation provides a complete search chain. To avoid unnecessary complications, I recommend immediately adding a new one to the environment variables - "PHPRC" and as a value specify the path to the directory with the configuration file. My config is located in the same directory as the main php files, therefore I specify the value of the variable -
"C:\php". A reboot will be required after making the change.
That's all for me. The first part of the manual for beginners is ready.
Web application developers may find it difficult to install the PHP scripting language on Ubuntu Server. This is due to many factors. But using this guide, everyone can avoid mistakes during installation.
Installing the PHP language in Ubuntu Server can be done in different ways - it all depends on its version and on the version of the operating system itself. And the main difference lies in the commands themselves that will need to be executed.
It is also worth noting that the PHP package includes several components that, if desired, can be installed separately from each other.
Method 1: Standard installation
A standard installation requires using the latest version of the package. It is different for each Ubuntu Server operating system:
- 12.04 LTS (Precise) - 5.3;
- 14.04 LTS (Trusty) - 5.5;
- 15.10 (Wily) - 5.6;
- 16.04 LTS (Xenial) - 7.0.
All packages are distributed through the official operating system repository, so there is no need to connect a third party. But installation of the full package is performed in two versions and depends on the OS version. So, to install PHP on Ubuntu Server 16.04, run this command:
sudo apt-get install php
And for earlier versions:
sudo apt-get install php5
If you do not need all the components of the PHP package on your system, you can install them separately. How to do this and what commands you need to execute for this will be described below.
Module for Apache HTTP Server
To install the PHP module for Apache on Ubuntu Server 16.04, you need to run the following command:
sudo apt-get install libapache2-mod-php
In earlier versions of the OS:
sudo apt-get install libapache2-mod-php5
You will be asked for a password, after entering which you must give permission to install. To do this, enter the letter "D" or "Y"(depending on the localization of Ubuntu Server) and click Enter.

To install the FPM module on an operating system version 16.04, do the following:
sudo apt-get install php-fpm
In earlier versions:
sudo apt-get install php5-fpm
In this case, the installation will begin automatically, immediately after entering the superuser password.

The CLI is necessary for developers who create console programs in PHP. To implement this very programming language into it, in Ubuntu 16.04 you need to run the command:
sudo apt-get install php-cli
In earlier versions:
sudo apt-get install php5-cli

PHP extensions
To implement all possible PHP functions, it is worth installing a number of extensions for the programs you use. The most popular commands for performing such an installation will now be presented.
Note: Below we will provide two commands for each extension, where the first is for Ubuntu Server 16.04 and the second is for earlier versions of the OS.

Apache2.2.2 distribution in the form of an installer named apache_2.2.2-win32-x86-no_ssl.msi. You can find it at www.sai.msu.su/apache/dist/httpd/binaries/win32/
Run the downloaded installer. When the installer asks you where to install Apache, tell him the directory c:/Apache2.2
Note
All further instructions will be based on the assumption that Apache is installed in the c:/Apache2.2 directory. If you are installing Apache in a different directory, you must adapt the instructions accordingly to your situation.
Installing Apache from the installer is quite transparent and does not cause any particular difficulties, as a result of which it is not rational to provide its full description in this article. Here is just one dialog box that the user needs to fill out during the installation process. This is the server name selection window. In the “Network Domain” and “ServerName” fields, write down the name of the server that Apache will be configured to work with by default.
Note
This instruction describes the installation of the Apache server on the assumption that it will only be used for local testing of sites and will not work on Intranet and Internet networks. To operate the server on Intranet and Internet networks, you must enter the real domain name that will be used by the server.
If the installation process was completed correctly, then upon completion you should already have Apache2.2 running as a service. To check if this is so, open the list of Windows services (“ Start" | "Control Panel" | "Administration" | "Services") and find the line Apache2.2 in it. (or Apache2). Service status: running or not is displayed in the third column.
If you cannot find the line Apache2.2 in the list of services, then the installation process probably failed and Apache was not installed as a service. In this case, you need to install Apache as a service yourself. To do this you will need a program with a console, such as FAR, WindowsCommander, TotalCommander, etc.
Open the program with the console, go to the c:/Apache2.2/bin directory and run the command:
C:/Apache2.2/bin/httpd.exe -k install
You should receive a message in response "The Apache2 service is successfully installed". The appearance of the console window is shown in the figure.
First start
Managing Apache (starting, stopping, restarting) is carried out either through the graphical interface for managing Windows services, or in the console by executing the httpd.exe file with certain keys.
Windows services are managed through the context menu, which is opened by right-clicking on the service name. If Apache is not yet running, then execute the “Start” command from the context menu.

If you like to work in the console, then the keys below are used to control Apache.
Apache commands via console
Httpd.exe -k start (Start the service)
httpd.exe -k stop (Stop the service)
httpd.exe -k restart (Restart)

By default, the root directory of the server is set to the directory c:/Apache2.2/htdocs. It is in it that the index.html file is located, displayed under the name localhost. The directive is responsible for determining the root directory of the site DocumentRoot in file c:/Apache2.2/conf/httpd.conf.
DocumentRoot "C:/Apache2.2/htdocs"
You can change it and make another directory the server's root directory.
However, before doing this, you should make minimal adjustments to the httpd.conf configuration file. By default, Apache is configured to deny all access to site directories and permissions must be set explicitly for each directory, as is done for the C:/Apache2.2/htdocs directory. If you move the server root directory to another directory without setting the appropriate permissions, you will receive a 403 Forbidden error and the page shown in the figure.

Therefore, if you do NOT intend to use your latest Apache to provide hosting services on the Internet or on a local network, you should immediately remove the default protection.
Find the lines in the file C:/Apache2.2/conf/httpd.conf:
Options FollowSymLinks
AllowOverride None
Order deny,allow
Deny from all
Satisfy all
Pay attention to the line Deny from all.
It prohibits all access to directories, including virtual host directories. When you try to access them, Apache will respond with a 403 Forbidden error. Its counterbalance is the “Allow from all” directive. Setting this directive overrides the "Deny from all" directive.
You can set the Allow from all directive for each directory and for each virtual host, but you can do it simpler and remove (or comment out) the “Deny from all” directive from the container.
Options FollowSymLinks
AllowOverride None
Order deny,allow
# Deny from everyone
Satisfy all
After completing these simple steps, restart Apache. How to do this is described above.
Installing PHP
A modern web server is unthinkable without support for dynamically generated pages. In Russia, the leader among technologies for creating dynamic pages and web applications is PHP technology. Below we will discuss the process of connecting PHP using version 5.3.5 as an example. If you already have this version of PHP installed, then you can go straight to the section “Connecting PHP to Apache2.2.2”.
You can download the PHP distribution from our website at . By following the link you can also familiarize yourself with the rules for choosing a distribution and why we took the liberty of offering to download the distribution from our website, and not from the official php.net. When downloading the distribution provided at the link, it is assumed that you will install PHP as a module.
Unpack the zip archive with php into the c:/php-5.3.5 directory. This completes the PHP installation. Further actions will concern setting up the PHP+Apache combination and configuring PHP itself.
Note
All further instructions will be based on the assumption that you are using php-5.3.5, which is installed in the c:/php-5.3.5 directory. If you have a different version of PHP or are installing php in a different directory, you should adapt the instructions provided to suit your situation.
Connecting PHP to Apache2.2.2
Problems connecting PHP to Apache2.2
If you try to connect the standard php5apache2.dll module to Apache2.2.2, then you will fail. Apache will not want to start, giving the message shown in the picture.

And the following messages will appear in the system and application logs:
The Apache service named reported the following error:
>>> httpd.exe: Syntax error on line 115 of C:/Apache2.2/conf/httpd.conf:
Cannot load C:/php-5.3.5/php5apache2.dll into server: \xcd\xe5 \xed\xe0\xe9
\xe4\xe5\xed \xf3\xea\xe0\xe7\xe0\xed\xed\xfb\xe9 \xec\xee\xe4\xf3\xeb\xfc.
The php5apache2.dll library is intended for Apache 2.0.X; for Apache 2.2.X you need to include the php5apache2_2.dll library (it is located next to php5apache2.dll in the distribution).
Configuring httpd.conf for PHP connection
To connect php as a module, you need to add only 3 instructions to the httpd.conf file
Instructions for connecting PHP to httpd.conf
LoadModule php5_module c:/php-5.3.5/php5apache2_2.dll
AddType application/x-httpd-php phtml php
PHPIniDir "c:/php-5.3.5/"
These lines should be placed approximately in the middle of the httpd.conf file, for example, immediately after the LoadModule directives. The exact location of these directives is not critical, but they should not be placed at the beginning or at the very end of the httpd.conf file.
- The first line loads the PHP module implemented in the php5apache2_2.dll library
- The second line sets the correspondence between files with the php extension and the application/x-httpd-php mime type, which is processed by the PHP module.
- The third line allows you to explicitly specify the location of the php.ini configuration file.
Note
The PHPIniDir directive was greatly lacking in Apache1.3, as it often caused confusion in php configuration when there were multiple copies of the php.ini file, or when placing it in the wrong directory.
The next step is to create a configuration file for PHP. In httpd.conf, the PHPIniDir directive specified the c:/php-5.3.5 directory as the location of the php configuration file. The configuration file itself should be called php.ini
The c:/php-5.3.5 directory contains several configuration file templates. Let's take the file as a basis c:/php-5.3.5/php.ini-recommended and rename it to php.ini. Thus, the PHP configuration file (php.ini) will be located in the c:/php-5.3.5 directory and this is where all PHP configuration changes should be made.
After making changes to httpd.conf and creating the php.ini file, restart Apache.
Create a test PHP script called phpinfo.php that performs the same function and save it to a directory c:/Apache2.2/htdocs.
Script phpinfo.php
echo phpinfo();
// Note that full notation syntax is used
// php script.?>
Note
The test script phpinfo.php uses the full syntax to define a PHP script. In recent PHP distributions, shorthand syntax is disabled by default. The directive is responsible for enabling the short recording mode short_open_tag in the php.ini file. It needs to be set to On.
Now access this script through your browser by entering in the address bar http://localhost/phpinfo.php. In response, you should be shown the well-known purple pages displaying the settings of php and its extensions.

If the report of the phpinfo() function in the form of “purple tables” is displayed, it means that php is successfully executed by Apache.
Possible mistakes
Apache loads, but instead of the "purple tables" it opens to a blank page.
Check: is the test script written in full syntax or in shortened syntax? Those.:
Must be recorded
echo phpinfo();
?>
instead of
echo phpinfo();
?>
The trend of switching to PHP 7 is gaining momentum. Because it works faster (objectively!), it is more convenient for development (but this is not certain, it seems).
The same WordPress has been able to work on new versions of PHP for a long time. And other popular CMSs are not far behind. Therefore, it makes sense to transfer entire servers to this version. But there is a catch: the software in the official repositories of Linux distributions is in no hurry to be updated. To install something new, you usually need to fiddle with additional repositories. There are probably no problems with this if you use virtual hosting. But if you run websites on your own servers or VPS, then you need to worry about updating and installing the latest version of PHP yourself. And since in 80% of cases the ISPmanager 5 control panel is used on servers, we will talk about setting up PHP 7 in it. Why am I writing about this and not ISPsystem support? I don't know, because their manual doesn't say anything about it.
What versions of PHP are installed by default on common Linux distributions?
Hosters usually offer the following OS for installation on VPS or Desktop:
| OS version | Default PHP version |
| Debian 7 | PHP 5.4 |
| Debian 8 | PHP 5.6 |
| Centos 6 | PHP 5.3 |
| Centos 7 | PHP 5.4 |
| Ubuntu 14.04 | PHP 5.5 |
| Ubuntu 16.04 | PHP 7.0 |
Of course, there are other options, or, on the contrary, there may not be something from this list. But almost any hoster will have the latest versions - Debian 8, Centos 7 and Ubuntu 16.04. Of these three, only the last one can boast of having PHP 7 installed. But it has other problems - it is relatively new and it can contain some strange glitches and bugs. In my experience, Ubuntu servers can use LTS versions (even 04) only 2 years after release. At a minimum, this is easier than searching for and identifying problems that, in principle, should not exist. I have repeatedly experienced this with the performance of some software in the latest versions of Ubuntu.
About Ubuntu versions
About Ubuntu versions
In general, I'm a big fan of Ubuntu. Because I dedicated many years and many servers to working with it. This is an excellent and convenient OS for websites on your server. But this was the corporate sector, where everything is assembled, debugged and configured individually. However, when I started working with webmaster client servers, I was faced with the fact that neither Ubuntu nor even Debian are as good as Centos, and Centos 7 in particular. It is also recommended by the developers of the ISPmanager control panel themselves. In practice, on deb-based systems (ubuntu is also one of them), I encountered some glitches with this panel. With centos it almost never happened.
In general, this is a question of ease of administration - there is practically no difference in the operation of the software, and especially the websites, between them. No difference in performance, anyway. But in installing and configuring software, the difference can be quite significant.
In Debian and Ubuntu, the software comes with some basic settings when installed. It even starts and works immediately after installation, and is added to startup. There is no such thing in Centos. The configs are by default, the software does not start automatically and some need to be configured first, otherwise it simply will not start. For example, the same DBMS servers - they are installed uninitialized. And they need to be initialized (create a system database) manually before launching.
The same PHP 7 - it’s easy to install in centos by simply adding an additional repository. At least in the 6th, at least in the 7th version. In Ubuntu 14.04 or Debian php 7 is also installed from the extras. repov. But it is placed there parallel to the default heel. And to make Apache work on it you need additional. setting. But when using ISPmanager 5 everything becomes much simpler.
Installing PHP 7 on Centos from additional repositories
I used this method before. The fact is that the opportunity that I am about to talk about appeared in ISPmanager relatively recently. Therefore, I had to install PHP 7 only from the Remi repository. There are others, but this one is the best. ISPmanager has the ability to install alternative PHP versions. But previously they could only be used in CGI mode. But this mode is not suitable for everyone and not for every site. (). Previously, Apache and PHP-FPM used system-wide PHP - which is called in the panel native. And his version coincides exactly with those that I gave in the table at the beginning of the article. In particular, in Centos 7 it will be 5.4. Accordingly, if native is updated to the required version, apache will work on it. This is how it was done before.
It is not difficult.
Download and install the Remi repository:
wget http://rpms.famillecollet.com/enterprise/remi-release-7.rpm
rpm -Uvh remi-release-7.rpm
We allow its use:
In file /etc/yum.repos.d/remi-php70.repo needed for the first turnip allow the possibility of use - enabled should have a value of 1. By default there is 0, which means the repository is not used. There is another way to use it, using the package installer option, but I use this one because it’s easier to remember and more understandable.

yum install -y php
This will update that same native php to version 7.0. After the update, you can restart the panel so that it “sees” the update:
/usr/local/mgr5/sbin/mgrctl -m ispmgr exit
To do this, just stop it from the console like this and re-enter the browser. Well, or you don’t have to do this, in any case, the server already has PHP 7 and it will be used in Apache or php-fpm module mode. (By the way, you can do a lot of things from the console)
But this is the path - the so-called “crutch”. For some time now it should not be used.
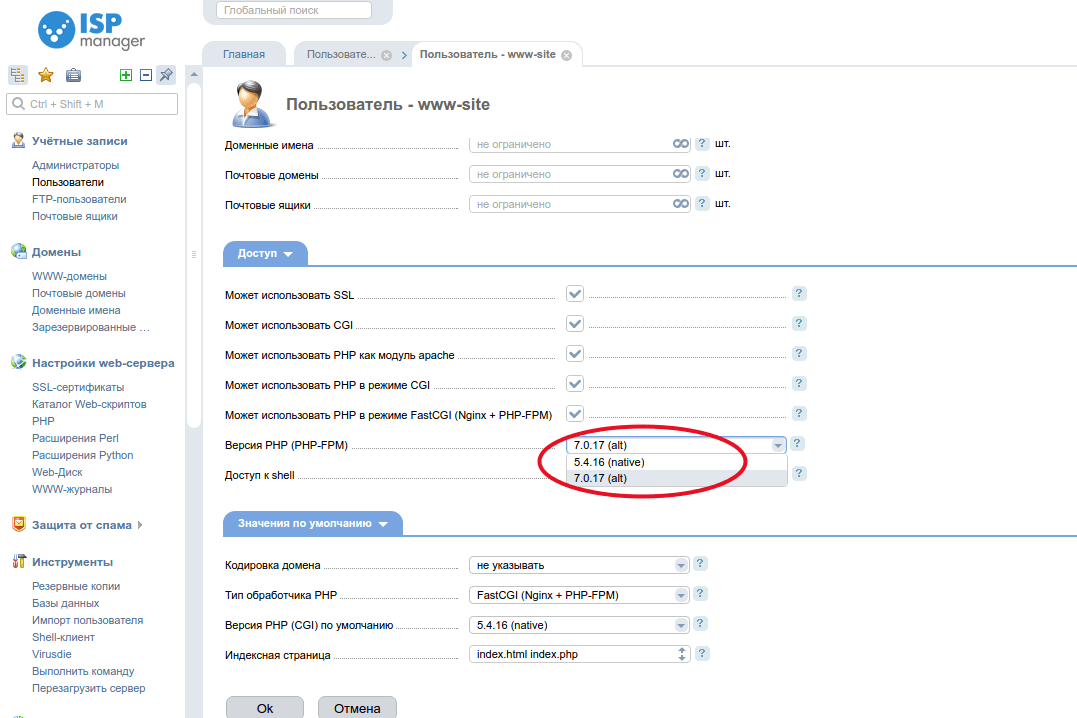
Enabling PHP 7 as an Apache module in the ISPmanager 5 panel
Since with regular updates of the panel, it became possible to use any version of PHP, from those that are installed as alternatives and were previously available only in CGI mode. The so-called PHP version selector. A great opportunity, I recommend using ISPmanager for this alone. There is no such convenience and simplicity anywhere else. This is me saying, an admin who, without false modesty, ate the dog at setting up servers without panels, and now with panels. Only here you can easily and simply set your own PHP version for each site - from the ancient 5.2, which was relevant when I had not even really started working, to the newest 7.1.
In the capabilities menu you need to install these same alternative versions. After which it will be possible to use the selector for each site, but only in CGI mode.
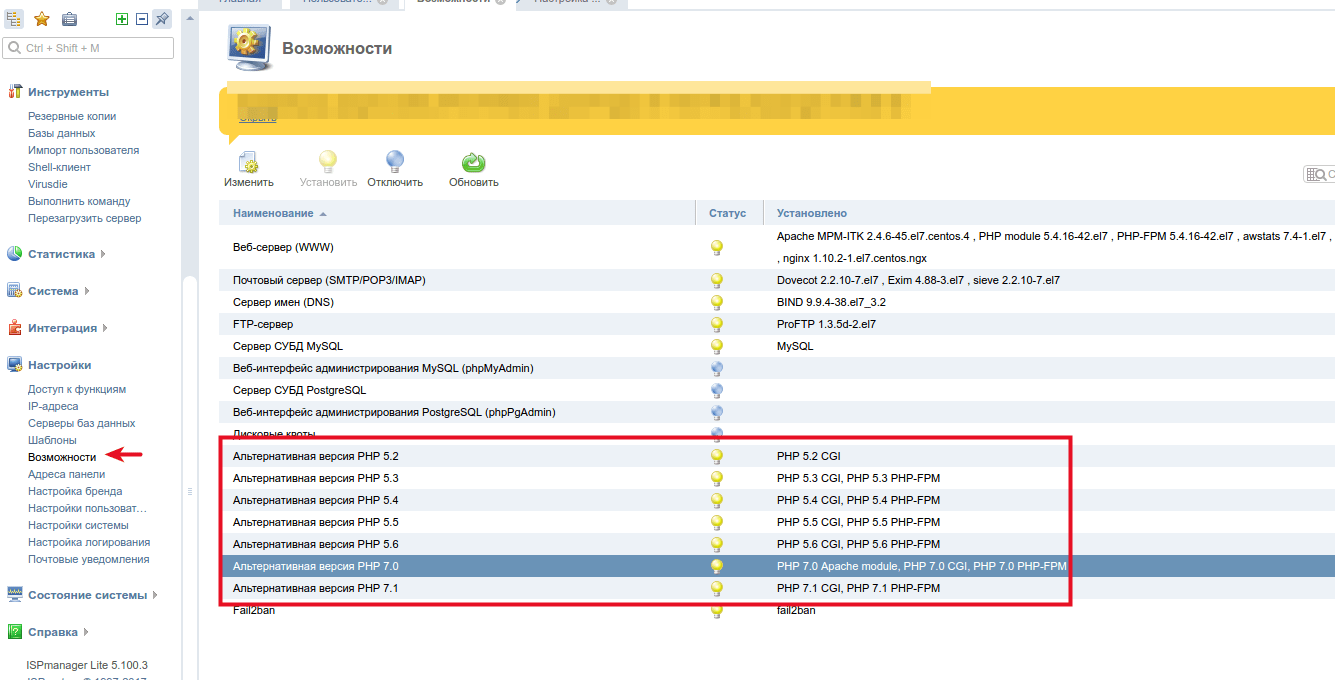
By default, alternative versions are only enabled for CGI and PHP-FPM modes (as of recently).
But you won’t be able to run these versions right away in Apache module mode. The corresponding button in the PHP menu is simply inactive.
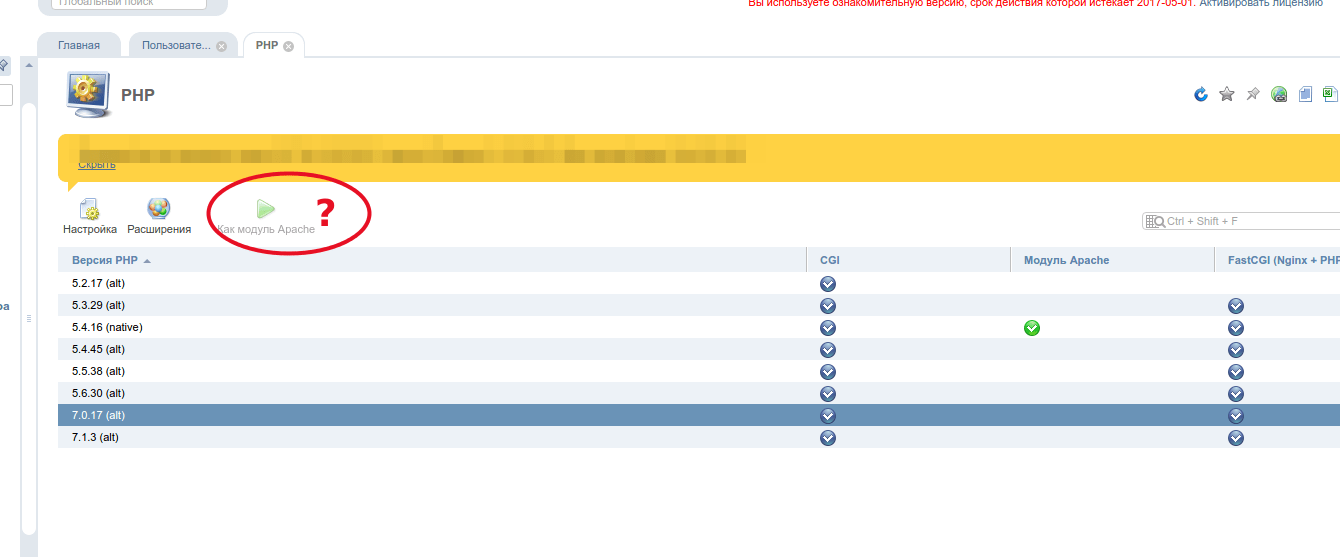
For quite a long time I could not understand why this was so, and how to still use this feature. And I simply installed the required version of PHP from Remy using the crutch method described above. Until today I asked the support - where is it? Moreover, I first conscientiously googled, found and read the official document about setting up PHP versions and found nothing in it.
It turned out that the box opened simply:

You need to double-click on the desired PHP version in the “Options” menu. Specifically 7.0. And there is a corresponding option to install this version of php as an Apache module.
Then we go back to the PHP section and there the button becomes active for the required version.
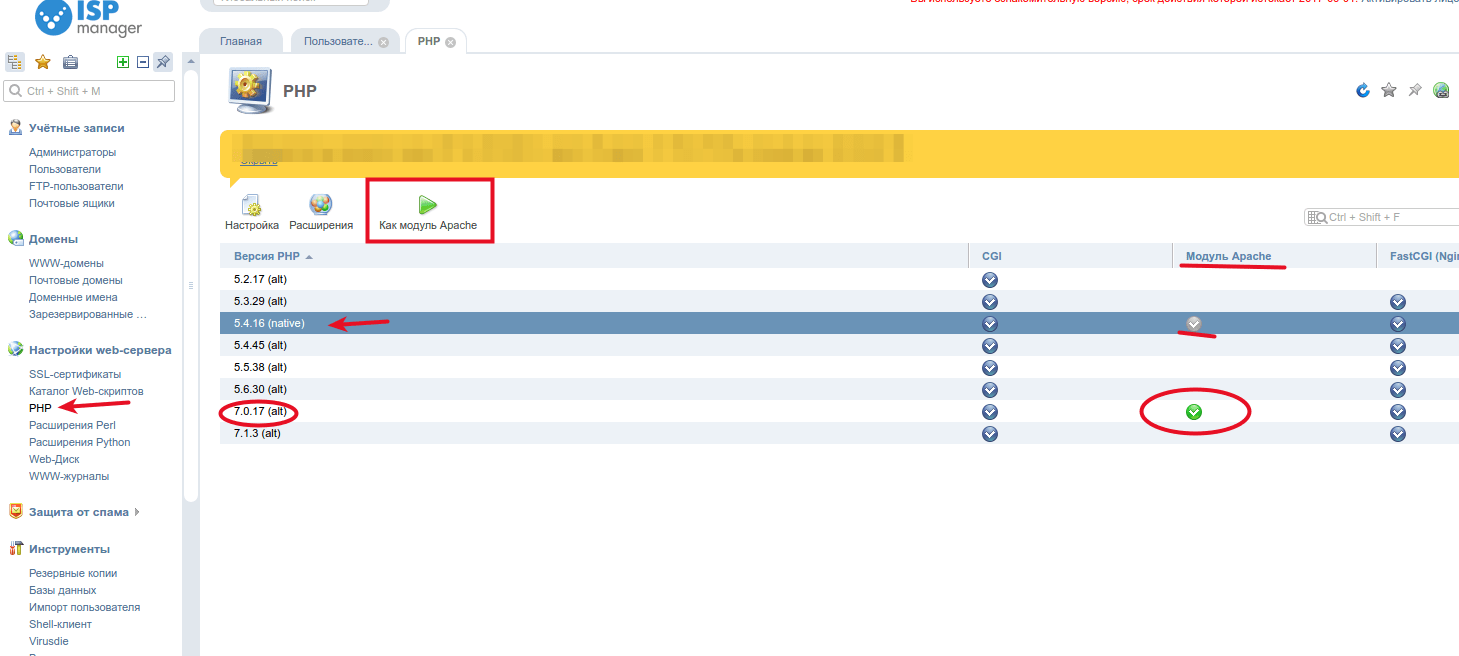
Well, here I have already switched to version 7, so I show the active button on the native version 5.4.
This entire method above should work on both Debian and Ubuntu. I haven't tested it in practice yet. Please check and write back. But the “crutch” method in these OSes will be even more crutch than in Centos, because there PHP 7 is installed in parallel with version 5 and the system ends up with TWO versions of native PHP. And here I would like to figure it out with one :) That’s why I recommend centos.
Enable an alternative version of PHP 7 for the NGINX+PHP-FPM mode in ISPmanager 5
Everything is quite simple here. After installing the alternative version, it will be installed by default for PHP-FPM. Just enable the desired version in the user settings:
After this, all sites in PHP-FPM mode for this user will work in php7.
How to check the PHP version of a specific site and where to find its settings, php.ini file?
Sometimes, if you use several versions of PHP on the server, you may have doubts that you are using exactly the version you intended. It’s also a good idea to check the presence/absence of the required modules. Or the operating mode of PHP - that it is an apache module, and not a cgi. A reliable and 100% working way to check this is to add the info.php file to the root of the desired site. Its content should be like this:
phpinfo(INFO_MODULES);
Then go to site.com/info.php and see a complete breakdown of the questions about which you had doubts:

Moreover, please note that the main configuration file of the alternative version of PHP enabled in this way is not at all where you expect. This can sometimes lead to long searches and a lack of understanding why one or another parameter in the PHP configuration cannot be changed. You are looking for it in /etc/php.ini, but the site uses PHP configured in a completely different place.
Use phpinfo in any unclear situation, it can save you from considerable loss of time and nerves.
Well, that’s all for me, we’ve sorted out the practical admin part. Next, a little philosophy.
Why do you need to use PHP 7?
Who the hell knows. I'm not a developer, I don't understand all the charms. However, it has been noticed that it executes code significantly faster than older versions. These are the results given in testing the operation of drupal on PHP7 in the probably well-known study of PHP 7 and caches on Habré:
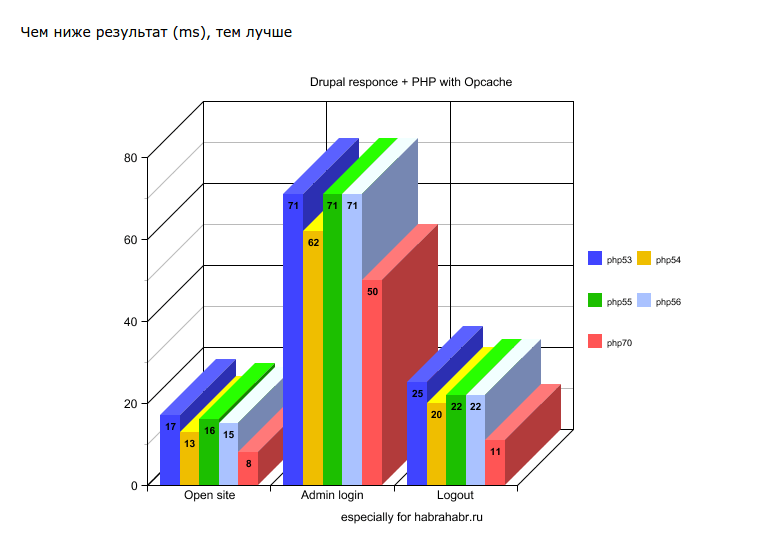
As you can see, it is almost 2 times faster than previous versions. For example, on a reference server with an SSD, a reference empty WordPress will show about 400-500 milliseconds TTFB. But on PHP 7 with the opcache wp accelerator enabled and configured, it can work with a response time of 150-250 ms. Or maybe it won’t work :) Because you can put some fucking miracle-premium template from a template monster on it, and then wonder why it takes 3-5 seconds to load (this is only TTFB, but visually there are all 10-20 May be). And also feel like an idiot, because on the developers’ demo everything flies, it opens in 100-200 ms. You don’t realize that everything there is fucking cached, they don’t need you to somehow interact with the site, they just need to sell it to you 🙂 And that wordpress itself doesn’t even participate in generating pages - everything is done by nginx, and it’s from the cache gives instantly. But this is so, a lyrical digression from a sore subject.
In general, a fair amount of experience has accumulated on the topic of optimization and acceleration of response time, and someday I will most likely pour it out on your heads, my dear readers :) Moreover, optimization and acceleration of article writers is one thing, I have already written something about this. But the topic of optimizing online stores and services is a separate conversation, and I think it should be especially interesting. So?
This material will become an indispensable instruction for novice web developers when installing a web server Apache with new versions of the PHP interpreter on your Windows computer. Typically, a simpler solution is used for this task - installing an assembly. This eliminates the need to fiddle with settings. But understanding the specifics of how a web server works, how to install and configure it correctly is one of the required skills of a web developer. Therefore, we will figure it out.
Please note: the above versions of VC11 will be very difficult, if not impossible, to run under Windows XP.
Preparation process.
First you need to make sure that the version Windows on your computer no older than version seven. In addition, the instructions given in this article for Apache 2.4 won't work for Windows XP.
First of all, remove all web servers that were installed previously. Next, you need to go to the services and make sure that among them there is no Apache or IIS. If there is any other web server, there is a high probability that the one installed in parallel will not work.
If you use Skype on this computer, then in its settings you need to disconnect from port 80.
You will need a file manager or code editor to create files of different resolutions.
As for the folder structure, it may be different, but this instruction was developed for a specific structure that should be taken into account so that everything works 100%.
Before you begin the installation procedure, you should create a separate USR folder on drive D. There you need to create folders apache, php, tmp, www, log without specifying version numbers.
Using a file manager or code editor, create in the directory www these files:
- index.html, which contains: It works!
- index.php, which contains:
If you don't have a file manager or code editor, you'll need to download them. These tools are a must-have for every developer on their PC.
In the PATH system variable we write:
| ;D:\USR\apache;D:\USR\apache\bin;D:\USR\php; |
Important!
Numbering of lines in configuration files, for different versions apache And php, may differ from the one shown.Any commands are executed only on behalf of the Administrator, and editing files is no exception.
Apache 2.4 installation process
By and large, the development process is PHP does not imply a separate web server, since it has a built-in web server and, as a rule, it is enough to develop 1 project. However, we recommend installing and configuring a web server Apache at a minimum, to learn all the intricacies of working with this web server and its configuration. This skill will certainly be useful to you in the future.
- First, let's download Apache 2.4 binaries VC11 for our system by going to:
http://www.apachelounge.com/download/VC11/. We assume that you have a 64-bit operating system, where you will need a file called:
httpd-2.4.16-win64-VC11.zip - All additional modules, if necessary, can be downloaded there. However, this is not necessary to complete a basic installation.
- From a pre-downloaded archive to D:\USR\apache unzip the contents of the folder Apache24 and please note that in D:\USR\apache it is necessary to place exactly folder contents Apache24, not itself. No installation required.
- In file value should be changed ServerRoot on " d:/USR/apache" in line 37, and the value DocumentRoot(And Direcroty) on " d:/USR/www" in lines 242 and 243. Uncomment line 218, after which it needs to be changed to ServerName localhost:80.
- The log storage parameters in this file need to be found and changed as follows:
- Installing the Ahache service. Do not forget that it is executed only on behalf of the Administrator. Open a command prompt and paste:
D:\USR\apache\bin\httpd.exe -k install - During the installation process, you must pay close attention to any pop-up error messages. If the installation is carried out correctly, they should not be there. The situation when, at the end of the execution of the line, the next one does not appear again, indicates that an error was made. To avoid errors, use the functions copy/paste.
- The next step is to create a shortcut on the desktop for D:\USR\apache\bin\ApacheMonitor.exe and placing it for loading in automatic mode. The startup window is called up like this: in WIN 8, click WIN+R, then enter shell:Startup and press Ok.
- Launch Apache Monitor. The shortcut should appear in the system tray. Left-click on it and then select Apache24 -> Start.
- Go to http://localhost/ in the browser. The inscription should be displayed here It works! If it is not there, it means something was entered incorrectly. To identify and correct the error, you need to read the logs, Google, etc.
PHP 5.6 installation process
- To install PHP 5.6, download VC11 x86 Thread Safe or VC11 x64 Thread Safe latest version by going to http://windows.php.net/download/. What is needed here is VC11 and Thread Safe. Make sure that the bit depth is identical to that of Apache. The file you need will probably have a name like this: php-5.6.11-Win32-VC11-x86.zip or php-5.6.11-Win32-VC11-x64.zip
- Next you need to extract the contents of the archive into D:\USR\php. No installation required.
- In the file D:\USR\apache\conf\httpd.conf we write:
- Meaning DirectoryIndex needs to be changed to index.html index.php on line 276.
- Next we execute the command Apache24->Restart V Apache Monitor, to restart Apache.
- In the browser we type http://localhost/index.php, go ahead and make sure PHP works.
- Copying the file D:\USR\php\php.ini-development which is called D:\USR\php\php.ini
- Go to the search to find, uncomment, and then change the parameters like this:
- Set on the command line php-m and look at the list of modules that were connected.
- Using Apache Monitor we restart Apache.
Virtual Hosts in Apache
- In a situation where several projects are postponed on one PC, the need for virtual hosts arises. For example, we use two: s1.localhost and s2.localhost. To avoid confusion, we create folders with identical names, but in reality this is not necessary.
- Remember that when using a virtual host, the DocumentRoot configuration file Apache becomes meaningless. Now the main host of the server, which is located on http://localhost/, will be the main virtual host in the configuration file.
- First we add these lines to the file c:\Windows\System32\drivers\etc\hosts:
(again, on behalf of the admin)127.0.0.1 s1.localhost 127.0.0.1 s2.localhost - At this stage, after the work has been done, a reboot will not hurt. If lack of access rights prevents you from changing the file, you can make a copy of it on your desktop and change it there, then return it back.
- Next you need to make folders for virtual hosts D:\USR\www\s1.localhost and D:\USR\www\s2.localhost, where the files will be located. In all folders you need to create files with index.html that will contain S1 and S2. This will allow you to monitor the correct operation.
- Next you need to make separate folders for logs: D:\USR\log\s1.localhost and D:\USR\log\s2.localhost- they will contain logs of all sites. It is more convenient to store logs in separate folders, but you can also store them in one common folder.
- In file D:\USR\apache\conf\httpd.conf uncomment the line Include conf/extra/httpd-vhosts.conf to enable virtual host support.
- After this we edit in d :\USR\apache\conf\extra\httpd-vhosts.conf. Each virtual host has a separate VirtualHost block:
- From now on, the first virtual host s1.localhost will become the main host of the system, because its block is the first in the configuration file and is available when you go to http://localhost/
- Through Apache Monitor restart Apache and first go to http://s1.localhost/, and then on http://s2.localhost/.
Let's summarize.
To add a new virtual host, you only need to create a separate folder for its files in D:\USR\www, for logs - in D:\USR\log, in file hosts designate its name and add the VirtualHost block to the virtual hosts configuration file.
Install MySQL 5.6
Take the time to search for utilities for this server and you will find a lot of interesting things!


