How to set up photoshop cs6 to work. Photoshop - Installation and initial settings
Before you start working with the program Adobe Photoshop on your own computer, you first need to properly configure this graphics editor to suit your needs. Thus, Photoshop in the course of subsequent work will not cause any problems or difficulties, because processing in this kind of program will be effective, fast and simple.
In all versions of Photoshop, the settings are located in the section "Editing" top menu. A fairly large number of parameters are subject to configuration. We will analyze the most useful from a user point of view.
Main
Let's go to the menu "Editing - Preferences - General". You will see the settings window. Let's take a look at the possibilities there.

Color palette- do not switch from Adobe;
Palette HUD- leave "Wheel of color tone";
Image interpolation- activate "Bicubic (best for reduction)". Quite often you have to make an image smaller in order to prepare it for posting on the web. That is why you need to choose this mode, which was created specifically for this.

Let's look at the rest of the parameters that are available in the tab "Basic".
Here you can leave almost everything unchanged, except for paragraph "Change tool with the Shift key". As a rule, to change the tool in one tab of the toolbar, we can press the key Shift and with it the hotkey assigned to this tool. This is not always convenient, because this item can be unchecked and you can activate this or that tool only by pressing one hot button. This is quite convenient, but not required.
In addition, in these settings there is an item "Zoom with mouse wheel". Optionally, you can check this item and apply the settings. Now scrolling the wheel, the scale of the photo will change. If a given function you are interested, check the appropriate box. If it has not yet been set, in order to zoom in on the image, you will have to hold down the ALT button and only then turn the mouse wheel.

Interface
When the main settings are set, you can go to the item "Interface" and view its capabilities in the program. It is better not to change anything in the main color settings, but in paragraph "The border" all items must be selected "Do not show".

What will we get in this way? By default, a shadow is drawn around the edges of the photo. This is not the most important detail, which, despite the beauty, is distracting and creates additional problems in the course of work. Sometimes there is confusion about whether this shadow actually exists, or whether it is just an effect of the program. In order to avoid this, it is recommended to turn off the display of shadows.
Further in paragraph "Options" you need to check the box next to "Auto show hidden panels» . It is better not to change other settings here. Do not forget to check also that the language of the program is set to you and the font size convenient for you is selected in the menu.

File processing
Let's go to point "File Handling". It is best to leave the settings for saving files without any changes. In the file compatibility settings, select the item "Maximize File Compatibility PSD files and PSB", set the parameter "Is always". In such a case, Photoshop won't ask when saving if it should upgrade compatibility - this action will be carried out automatically. The rest of the points are best left as is, without changing anything.

Performance
Let's move on to performance options. In the memory usage setting, you can configure the allocated random access memory specifically for Adobe Photoshop. As a rule, the majority prefers to choose the highest possible value, so that during subsequent work it will be possible to avoid possible slowdowns.

Settings item "History and Cache" also needs some minor changes. AT "Action Stories" it is best to set the value to eighty. In the course of work, maintaining a large history of changes can greatly help. Thus, we will not be afraid to make mistakes in the work, because we can always return to an earlier result.
A small history of changes will not be enough, the minimum value that will be comfortable to work with is about 60 points, but the more the better. But do not forget that this parameter can load the system somewhat, so when setting it, consider the power of your computer.

Settings item "Work Disks" is of particular importance. It is strongly not recommended to select the system disk as the working disk. "FROM" disk. It is best to choose the disk with the highest capacity free space in mind. If two (or more) disks are selected, the program will use them in the order they appear in the list.

In addition, in the settings of the processor that processes graphics, rendering should be activated. OpenGL. Here you can also configure in paragraph "Extra options", but it would still be preferable "Normal" mode".
Cursors
After tuning the performance, you can go to the tab "Cursors", here you can configure it. You can make quite serious changes, which, however, will not affect the work.

Color gamut and transparency
It is possible to configure a warning in case of going beyond the color gamut, as well as displaying the area itself with transparent background. You can play with these settings, but they will not affect performance.

Units
Here you can also adjust the rulers, columns of text and standard resolution for newly created documents. In the ruler, it is best to select the display in millimeters, "Text" it is preferable to install in "pix". This will allow you to accurately determine the size of the letters, depending on the size of the image in pixels.

A designer spends up to 80% of his time in Photoshop. He is one of his main But the brakes and glitches of the program have a negative impact on the timing of the delivery of layouts, and on the iron nerves of designers.
Therefore, now we will talk about how to properly configure Photoshop in order to increase its performance several times.
General
You can go to the settings through Edit> Preferences> General (Edit - Settings - General), or Ctrl + K. If you have MacOS: Photoshop > Preferences > General, or Cmd+K.
Image Interpolation
By default, the interpolation is set to Bicubik (best for smooth gradients). You need to change it to Bicubik Sharper (best for reduction).

I will not tell you what interpolation is, you can read about it on Wikipedia. However, it is worth noting that this parameter greatly affects the quality of the optimized images.
Export to clipboard (Export Clipboard)

The essence of this parameter is as follows: When creating a layout, you can copy it to the clipboard and paste it into any other program. On the one hand, it's convenient. But, as you know, the size of images can vary indefinitely ...
Switching tools using the Shift key (Use Shift Key For Tool Switch)
If you enable this option, then you can scroll through the tools of a certain category using Shift + tool hotkey.

If the option is turned off, moving between the tools of a certain category is carried out by several clicks on the same hot key.
ZOOM

If you want to zoom using the mouse wheel, check the box next to Zoom with scroll wheel. A checkmark next to the Zoom resizes windows parameter will allow you to automatically resize the window when you change the scale. Zoom clicked point to center - a parameter that is responsible for centering the image in the place where you clicked with the Zoom tool.
Interface
Now let me show you how to customize Photoshop's interface by going to the Interface tab.
Working field border

By default, a shadow, or a barely noticeable frame, is added to the border of the working field. In our opinion, this is not very convenient and even interferes with the comfortable development of layouts. You can disable these options by setting the Border column to None.
Document Tabs

By default, new files always open in tabs. Photoshop settings allow you to change this and open files in floating windows. To do this, simply uncheck the Open Documents as Tabs option (Open documents in tabs).
To be able to dock windows, check the Enable Floating Document Window Docking box.
Interface font size (UI Font Size)

If you have poor eyesight, you can easily increase the font size of the interface. To do this, select one of the three options in UI FONT SIZE.
File Handling
Go to the File Handling tab.
Maximum compatibility of PSD and PSB files

An important parameter that is responsible for the compatibility of the file you created with other versions of Photoshop. On the one hand, compatibility is great, but on the other? File sizes are greatly inflated when this option is enabled.
However, you should understand that by removing compatibility, you risk losing some layers when opening outdated files. By the way, you can read about how to properly organize layers in your layouts.
List of recently opened files
Just change the Recent File List setting if 10 is too low/too much for you.
Performance
The most important Photoshop settings that directly affect performance are in the Performance tab.
Memory Usage

In the matter of memory, Photoshop is insatiable like a wild animal - it will gobble up everything that you can offer it. If your computer does not have high RAM, you need to change the setting from 70% to 90%.
History and cache (History & Cache)

The parameter allows you to set allowable amount steps back. It greatly affects the amount of memory consumed, so you don’t need to get carried away.
Spare Disks (Scratch Disks)

When choosing spare disks, it is advisable not to select the one on which the program itself is installed. It is also not recommended to use USB drives due to slow connection speed.
Enable OpenGL
If you have modern video card, then it will not be superfluous to enable OpenGL. To do this, you need to install special drivers.
Units & Rules
You can correctly set the ruler units by going to the Units & Rulers tab.

If you are working with the web - put pixels, if you work with polygraphy - put cm, or mm.
Finally
It won't take you long to set up Photoshop, but it's important step on the way to speed up workflows, especially on weak PCs, especially for
The described installation instructions make it possible to use the Photoshop cs6 editor official version. But there is more a new version editor, this is Photoshop CC, it can be downloaded with installation instructions for free by clicking on the link in the menu on the right, on this moment this is the latest photoshop editor from adobe.
Despite the fact that support for the cs6 version has been stopped, it is possible to download it at the office. site if you dig deep, below is the instruction on how to download and install downloaded in 2015 and then re-uploaded because on the site the speed is terrible, and there is no instruction as such. And so let's get started...
p.s. Performing the installation of photoshop cs6 below the above points, the Internet must be turned on!
2. Open the archive (if downloaded from the site) with any 7z or winrar archiver, go to the folder Adobe CS6 launch Setup.exe(if the link is 1, then everything will be automatically unpacked there)
3. After the installation programs have been initialized, in the window that appears, select "trial version".
4. You will be required to sign in. We press enter.
 5. Click to create an Adobe ID, you can register to a fictitious e-mail(mail) as well as other options.

6. Select the components for Cs6, language, location, and click on the button " Install«

Summing up, we can say that installing this method you will get latest version Photoshop cs6. It remains only to follow the link above, which will lead you to instructions for activation and free use.
Before working with Adobe Photoshop on your computer, you first need to optimize this graphics editor. This is necessary in order to further work in the program did not cause you any difficulties or problems. Working in such an editor should be convenient, pleasant and fast. In this article, we will go through the basic settings and customize some of them for ourselves. Now to business!
Main
So let's go to the menu Editing» —> « Settings» —> « Main". After that, the settings window opens. Now we will analyze the basic settings (image can be enlarged):
- Color palette- leave on " Adobe«;
- HUD Color Picker- leave on " Color tone wheel«;
- Image interpolation- choose the mode Bicubic, sharper (best for reduction)". Very often we have to reduce our image to put it on the web or in preparation for printing. And since we often reduce our image, that's why we choose this mode.
Let's now see the following options in the " Main". We won’t change anything here, except for the item “ Change tool with Shift key". Usually to change the tool in one tab we click Shift key and at the same time , which refers to this instrument. So it's not very convenient for us. Therefore, you can uncheck this item. So you can change the tool one hot key. It is very comfortable! But if you want, you can not uncheck this item.

Also in these parameters there is an item " Scale with mouse wheel". If desired, you can check this item and save the settings. Now, when scrolling with the wheel, the photo scale will change. Pretty handy feature. If you need it, then check the box next to such a function. If you do not check the box, then to change the image scale, you will need to hold down ALT key and simultaneously scroll with the mouse wheel.
Interface
So, when we set the basic parameters, go to the tab " Interface to view settings for . We do not change anything in the main color settings. But in the settings The border" leave all points Do not show«.
What will it give us? By default, a shadow is displayed on the borders of a photo. I think this is an extra beauty of the program, but it interferes with work. It can be confusing whether this shadow is real or whether it was added with a separate effect. Therefore, in order not to be confused in the future, it is better to turn off the shadow display.
Below in the settings Panels and Documents» put a tick on « Auto show hidden panels". We do not touch any more settings here. Also make sure that your interface language is Russian and that the font size in the menu is set to small.

File Handling
Go to the tab " File Handling". We do not change the file saving parameters.
In file compatibility in paragraph "" put " Is always". Then the program will not ask us when saving whether to maximize compatibility or not. The program will do this by default. We leave everything else unchanged.

Performance
Go to Photoshop's performance settings. In the memory usage scale, you can adjust the use of RAM according to the needs of the program. Usually, the maximum value of 100% is set here so that the program does not slow down in the future.

In settings " History and cache Let's make some minor changes. In step " Action History”I put it on 80. In the process of work, it will be better if we have a big story. We can make some mistakes in working with the program and we must have good opportunity so that we can always return to the previous action. If the story is small, then this will not be enough. I recommend making a big story of at least 60 points. Usually the history is set to 100. However, I will say that this parameter loads the system a little. If you don't have much powerful computer, then set it to 60. So Photoshop will not freeze often.

And here is the tab Working discs" very important. In no case should you install a working disk system disk C. You can select other drives where you have the most free space. But we never touch the system disk.

Also in GPU settings (if it supports), you need to enable OpenGL rendering. Here you can also configure Extra options", but I left the mode in these parameters" Ordinary". It may happen that the GPU settings may not have this feature. This means that this setting is not supported by your graphics card.

Cursors
After you have configured the performance of the program, go to the tab " Cursors". Here you can customize the appearance of the cursor. Here I personally did not change anything and left everything in the standard form. If you wish, you can play around here and customize your cursor display.

Transparency and color gamut
You can set up a warning when going beyond the color gamut, as well as the display of the transparent areas themselves. I didn't change anything here either and left everything as default. If you wish, you can play with the settings.

Here you can set the units for rulers, columns for text, and the default resolution for new documents. I haven't really changed anything here. But in " Rulers» I chose to display in « mm«. « Text"I put in" pix". So I will roughly know what size my letters are, depending on the size of the image in pixels.

Guides, grid and slices
As a rule, in the tab " Guides, grid and slices» you can customize the grid to your needs. However, I personally did not change anything here, and left all the settings by default.
External modules
Here you can select a folder for plug-ins. When you add various plugins there, Photoshop will continue to refer to this folder. In step " Extension panels» All settings must be checked.

Fonts
I didn't change anything here either. Left everything as it was.

3D
In the tab " 3D» you can adjust the settings for working with 3D images. Here you can set the percentage of video card memory usage. I kept it 100%. There are also rendering settings, quality settings and other settings for working with 3D objects. I did not touch all these settings and left everything by default.
Articles in the same category
Regardless of how you got the Adobe Photoshop CC program, whether you registered on the official website and rented it or downloaded it from Torrent, in any case, you need to set up Photoshop.
Some in English, some in Russian. It doesn't matter either. Let's set it up for anyone. I will show on my Russified version.
The interface, depending on the version of the program, may differ slightly. Don't worry if a setting is missing in one section or another, it will still be reflected in another.
Photoshop setup is the following steps
Go to the menu Editing - Settings - General
In the main settings, it is better to leave everything by default.

Working window interface
In the Interface menu, set the color theme of your Photoshop. It can be completely black, it can be very light. It all depends on the taste and mood of the person.

You can also set the language and font size here. The most convenient Small, but everyone can choose from the list according to their monitor and their level of vision. We leave the rest as is.
"Synchronize settings" skip and configure file processing
This section of the settings menu does not require editing at this stage. The developers tried to set the default optimal settings. Later, when you find out what the RAW format is used for, you may need this setting. And now we leave everything as it is

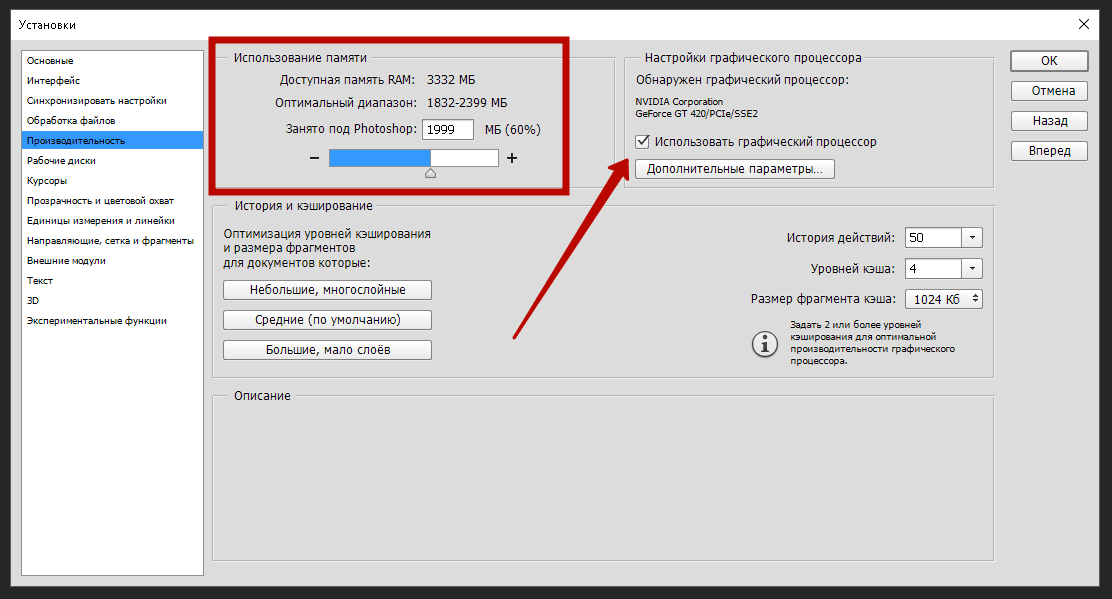
Check the Use GPU. This is to help your computer's processor.
The fact is that image processing is a process that requires a lot of resources from your computer, so it uses all its capabilities. And if you have a good video card, which also has the same GPU, and it must also be connected to the image processing work. This is where we connect it.
Memory usage. This is the setting we define to use Adobe Photoshop CC as it runs.
Available memory determines how much your computer can give you to run Photoshop at the moment. And at the same time, to give other programs the opportunity
work. This is determined by the slider, setting the memory it occupies for the program.
60% is enough for stable operation. By setting it to 100%, we will doom parallel-running programs to braking.
The rest of the parameters in this section are left as they are.
Working disks for storing archives
If you install the C drive, that is, the root, then you will boot the system, which is not desirable.

This parameter is purely creative, over time it will be needed, but for now we will leave it as it is.

"Transparency and color gamut" leave in the same form
Units and rulers
We set the units of measurement in pixels, Columns in points

We do not pay attention to the “Grid guides and fragments” yet and leave it in the same form.

“External modules”, “3D”, “Experimental functions” leave the default settings.
Make the settings for this parameter in the following way

We have successfully completed Photoshop setup, in the next article we will consider Importing photos into the program.


