How to edit toolbar in photoshop. Solve the problem with the toolbar in Photoshop
So, in a narrow small-sized panel, a large number of tools, this is, of course, very cool, but it is unlikely that you will need to use all the tools every day. You most likely use less than a third of the tools all the time, some rarely, and some never at all. And it would be great if we could customize the toolbar so that it only contains the tools we use, with the ones we use more often being the most easily accessible.
Previously, the toolbar was completely non-customizable, and only with the release of the new version did the situation change. Now we can group and ungroup tools in the order convenient for us, and simply hide unused tools. We can then completely save our own panel structure and use it as a preset!
Toolbar Editing
So, in the November 2015 release of Photoshop Creative Cloud, Adobe has finally added the ability to fully customize the toolbar using a brand new dialog box. .
There are two ways to open this window. The first is through the main menu tab Editing --> Toolbar (Edit --> Customize Toolbar).
The second is to right-click on the ellipsis icon (three small dots) at the bottom of the panel, directly below the "Scale" icon and click on the "Edit Toolbar" line:
Start editing a toolbar from the toolbar itself by right-clicking on the icon with three dots.
Toolbar Customization Dialog Box
After applying either of these two methods, a new settings dialog box will open. The dialog box consists of two main columns. The column on the left shows the tools located on the this moment in the panel, they are shown in the same order and in the same grouping.
The column on the right is called Extra Tools. To this column we drag the tools from the left column to remove them from the toolbar.

New dialog box "Customize Toolbar" in Photoshop CC 2015.
Removing a tool from the toolbox
To remove a tool from the toolbar, simply click on it in the left column and drag it to the right column.
Let's look at this with an example, for example, let's take the "Move Tool" group of tools. I'll right-click on its icon:

The group contains two tools, "Move" (Move Tool) and "Artboard" (Artboard Tool)
I want to remove the "Artboard Tool" because I rarely use it.
Open the toolbar customization dialog and drag "Artboard" from the left column to the right:

Move a tool to remove it from the panel.
Here's what the dialog box columns look like after moving them:

Columns of the dialog box.
After moving, be sure to click the "Done" button (Done), located at the top right of the dialog box, without clicking on the button, the changes will not be saved. After clicking, the window closes.
Let's look at the "Move" icon again:

As you can see, a small triangle has disappeared from the icon, located at the bottom right, this indicates that there is only one tool left in the group - "Move". Clicking on the icon with the right mouse button will no longer open any list, but only activates the "Move" tool.
View more tools
So where did the Artboard tool go? Actually, when I talked about deleting tools, this is not entirely true, in fact, tools are not completely removed. Instead, we simply move them from the main dashboard layout to another, hidden area. In other words, the tools are not deleted. but are hiding.
We can look at hidden tools, if we once again right-click (Win) on the icon with three dots in the toolbar (also, instead of right-clicking, you can left-click on the icon and hold for a couple of seconds, as you like).
Any tools that you have dragged into the More Tools column in the Customize Toolbar dialog (as I dragged "Artboard" just now) will appear in this list, below the line Edit Toolbar... (Edit Toolbar). This means that these tools are simply hidden and you can activate them at any time:

List of tools hidden from the toolbar
Restoring a Tool in the Dashboard
To restore a tool, simply click on it in the column additional tools on the right and drag it back to the column Toolbar left. Notice the blue horizontal bar that appears as you drag. It specifies in which area of the toolbar the tool will be inserted.
For example, in the image below, the Artboard tool will take its own place on the toolbar, between the Move tool and the marquee tools:

Restoring the tool to its own place on the panel, the blue bar indicates a gap between groups.
This is how the panel looks like now:

The Artboard tool has taken its own position on the toolbar
This figure shows that the blue bar is on the Move tool, so the dragged "Artboard" will take its own place on the panel this time, and one group with "Move" will be located below it:

The restored tool is placed next to the Move tool, forming a group with it.
If you now right-click on "Move", a list will open:
The group again contains two tools, "Move" (Move Tool) and "Artboard" (Artboard Tool)
Grouping and ungrouping tools
Actually, if you think about it, the Move tool and the Artboard tool have nothing to do with each other, so why are they in the same group? It would make more sense for them to appear as separate, independent tools. But then how to ungroup them?
There is nothing easier. All you need to do is click on the tool and drag it to another group until desired group no blue bar appears, then release the mouse:

In the figure, I'm moving the Artboard tool from the Move group to the Marquee tool group
In addition, I can position the tool apart from any group:

The tool moves into the gap between groups, as indicated by the blue bar.
To do this, I just need to move the desired tool in the gap between the groups. Here's what the panel looks like now:

The Artboard tool is in its own place in the panel, below the marquee tools and above the Lasso group.
Selecting the main instrument for the group
Each tool group has a tool located at the top of the group tool list, it is displayed on the toolbar and activated by clicking the left mouse button, in other words, it is the most quickly accessible in the group.
Here's what the default marquee group looks like:

Default marquee tool group view
To make another tool quickly accessible (main), you just need to raise it to the top within your group.

In the figure, I make the main tool "Oval area". By default, in this group is the main " Rectangular area"
And here's what the panel looks like now:

After moving, the Oval Area tool became the main tool in the group.
Moving whole groups
Earlier we looked at how to drag individual tools from one column to another, but we can drag entire groups in the same way. For example, let's take a group where the first tool is the "Frame" (Croop Tool). To drag this or any other group, hover your mouse over a corner of the group, which should highlight the group with a blue border, letting you know that you have selected the entire group:

Moving the entire group to the "Additional tools" column
Now the group has been moved and is missing from the toolbar, as shown in the screenshot:

The tool group has been removed from the toolbar.
Changing the order of tools on a toolbar
The new toolbar has another useful feature - you can move the tools you use most often to upper part toolbar, and those that you rarely use - move down. You can do the same with an entire group of tools.
Disabling hotkey shortcuts for additional tools
A very useful new option for tool activation hotkeys. For example, in the "Frame" group there are four tools, each of which is activated by the C key. As a rule, I use only the "Frame" tool, I rarely need the rest. That's why. it is clear that I don’t need at all that the rest of the tools in this group are not activated using the C key. Using the new panel, this is elementary. Opening the panel:

By default, all tools in the Frame group are activated with the C key.

Disabling hotkeys
Changing keyboard shortcuts for activating tools
Similarly, you can change the activation hotkey, but instead of the Backspace key, you should press one of the letter keys from A to Z:

Example quick change hotkeys for tools.
Clear Tools button
Until now, we've spent most of our time dragging and dropping tools from the left column of the main tools on the left to the tools column on the right. But if you want to keep only a few tools on the toolbar, just the ones you use all the time, click the Clear Tools button on the right upper corner dialog box, this will make the main (left) column empty and drag everything to the right:

All tools have been moved to the right column.

The figure on the left shows the dashboard as it will appear after clicking the Finish button.
Hide advanced toolbar options
At the bottom of the toolbar there are four additional icons, this is an ellipsis, including the toolbar setting, the icon for switching foreground and background colors (Foreground / Background Colors), turning on / off the Quick Mask Mode and the icon for switching screen modes (Screen Mode) . All of these icons correspond to the icons in the lower left corner of the "Customize Toolbar" panel:

Disabling additional options.
If you click on one or more icons, they will be deactivated and the corresponding additional options will be hidden:

Hide advanced toolbar options. At the moment, I have only the option to switch the foreground and background colors (Foreground/Background Colors)
Saving a Custom Toolbar Customization Template as a Preset
When you're done customizing Customize Toolbar, you can save your new layout as a preset by clicking the Save Preset button. A new window will open where give a descriptive name to the set, then click the "Save" button. You can save multiple layouts as presets, each customized for a specific task (such as photo retouching, digital painting, web design, and so on).
Restoring Toolbar Customization
To return to the original default setting, click the Restore Defaults button.
You can use Photoshop for any image editing option, such as photo editing, creating high-quality graphics, and more. In this tutorial, we'll introduce you to the Photoshop interface, including how to open a file, work with the toolbar, set up a workspace, and resize an image.
photoshop is a complex program, and perhaps a little intimidating to use for the first time. For this reason, we encourage you to study the following tutorials together by downloading ours (right click on the link to save it). The more hands-on experience you have with Photoshop, the easier it will be for you to use this program.
About this lesson
In this tutorial, in order to show you the possibilities in Photoshop, we will use . If you are using old version Photoshop, such as Photoshop CS5 or earlier - some features may work a little differently, but you should still be able to understand what is at stake. However, it's important to note that if you're using Photoshop Elements, some of the features we'll be discussing may not be available at all.
Opening files
In most cases, you want to start by opening an existing photo without creating a new one. empty file. Photoshop allows you to open and edit existing graphics files such as .jpg or .png files, as well as .psd (Photoshop) files.
To open a file:

If you haven't opened Photoshop yet, you can find and right-click on the file on your computer, and select Open with Photoshop to open this file. 
Photoshop interface overview
Since Photoshop is designed primarily for professional use, its interface can be a bit complicated and intimidating for beginners. Even if you have some experience with other software to edit images, you will find it helpful to become familiar with the various parts of the Photoshop interface.

1. Menu bar. This is where you will execute various Photoshop commands. For example, from the File menu, you can open and save files. The Picture menu allows you to various settings, such as photo size, etc. The Filter menu gives you access to more advanced tools and effects.
2. Control panel. Here you can customize the settings for the selected tool. For example, if you use the brush tool, you can change the brush size, hardness, and more.

This is one of the most important and basic places in Photoshop - this is where you will select the necessary tools for editing and processing photos. Once you have selected a tool, you can apply it to the current document.

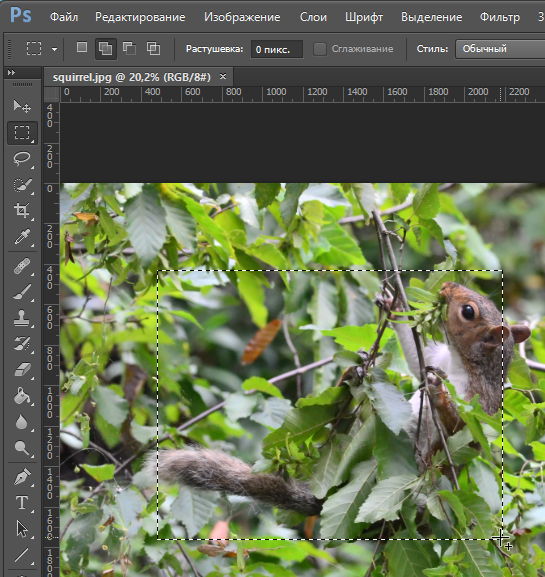
4. Selection tools. These tools allow you to select a specific area of the current document. The default will be the Rectangular Marquee tool.
Other tools such as the Lasso and Magic Wand will allow you to select specific objects without having to select a background.
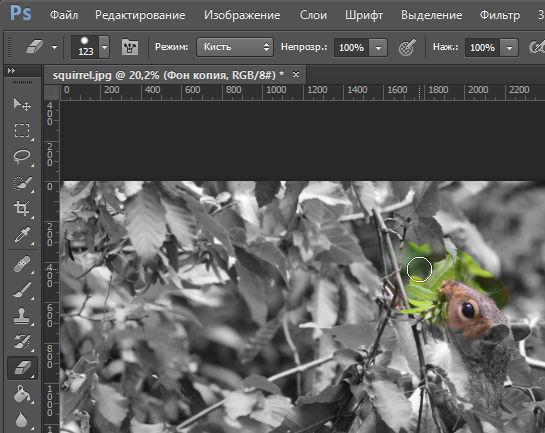
5. Drawing tools. These tools are similar to the drawing tools in real life. For example, the Brush tool or the Pencil tool lets you draw on an image, while the Eraser tool lets you erase parts of an image. For example, if you erase part of a layer, then it will display what is under this part of the layer.
In the example below, we've erased part of the black and white layer above the color layer.
6. Input tools. This tool allows you to add text to the current document. For example, you can use it to create your own invitation card.

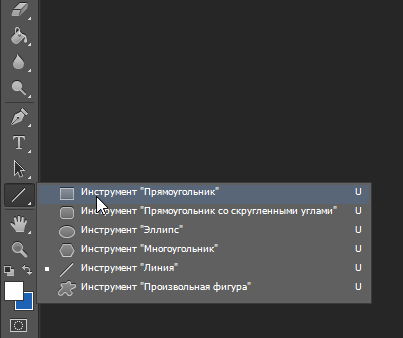
7. Tool Form. This tool allows you to insert shapes such as squares, lines, ellipses and more.
8. Color Picker Tool. Here you can choose colors for various tools such as Brush, Gradient, Fill, etc.
9. Document window. When you open an image file, it will appear in the document window. At the top of the document window, you'll see the filename along with the current scale. In our example, view the photo at 20.2% of its full size.
10. Layers panel. Here you can see the layers of the current document. You can turn the layer on or off by clicking on the eye icon. 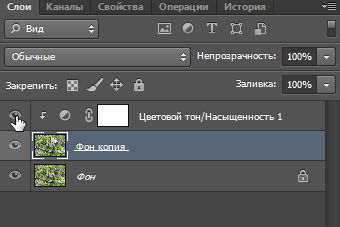
Working with tools and other panels
The toolbar is one of the most important features in Photoshop, here you can select various image editing tools. Once you have selected a tool, you can use it in the current document. The cursor will change its appearance depending on the selected tool.

To select another tool, press and hold on it, or right-click on it. For example, you can click and hold the Rectangle Tool to select other shapes such as an ellipse, a line, or a custom tool shape.
Showing and hiding the panel: You can also view and change information about the current document using other panels in the workspace, for example, you can view document layers in the panel Layers. To show or hide any panel, select from the menu Window, then select the desired panel - visible panels are indicated by a check mark. In the figure below, we use the Window menu to show the history pane in the workspace:

You can use the double arrows to expand or collapse panels. This can be useful if you want to temporarily hide a panel without removing it from the workspace.

Also you can click Tab key on the keyboard to show or hide all active panels.
If you want to change the location of a panel, you can move it by dragging the panel to a different part of the workspace.

However, if you plan to follow our tutorials, we recommend that you leave the panels in their default locations for now. To install panels in their default positions, select Window > Working environment> Reset Primary workspace. Please note that this step may differ depending on the version of Photoshop you are using. For example, in Photoshop Elements, you need to select the commands Window - Reset Panels. 
Setting up the Photoshop environment
If you want to customize Photoshop, you can customize the default application settings. Most of these options are more technical, but we would like to show you two basic settings that you may find useful.
To set the default units of measurement:
By default, document dimensions are measured in inches. If you are not editing images primarily for print, we recommend changing this setting to pixels.
- Select Editing > Preferences > Units and rulers. If you're using a Mac, choose Photoshop > Preferences > Units&Rulers.
- A dialog box will appear. In the settings block Units, click on the menu next to Rulers, select Pixels, and click OK. You may need to restart Photoshop for the changes to take effect.

To change the text size:
If you want to increase or decrease the text in Photoshop's interface, you can adjust the application's font size.
- Select Edit > Preferences > Interface(or Photoshop-Preferences-Interface on Mac).
- In the setting block Text, select the menu next to Menu Font Size, and then select the size you want. You may need to restart Photoshop for the changes to take effect.

Zooming
When editing an image in Photoshop, you will often view it at a scale less than 100% of its full size. most modern digital cameras take great pictures, high resolution. In fact, these images are so large that most computer screens simply cannot display all the pixels in the image at once. This is good, because while editing the image you will have additional details to work with.
If you want to zoom in or out just click ctrl + or ctrl-(hold Ctrl key and press the + or - button). If you're using a Mac, press Ctrl + or Command-.
In the example below, you can see the document at 20.2% of its full size. Note that you can see the current zoom level at the top of the document window as well as at the bottom left corner of the screen.

Unlike the previous one, the example below shows the same image at 100% (full size). Please note that only part of the image visible at this zoom level. Optionally, you can use the horizontal and vertical scroll bars to view other parts of the image.

To scale the image to fit the document window, click ctrl+0(hold down the Ctrl key and then press the zero key). If you're using a Mac, press Command + 0.
Depending on your computer's graphics card, some zoom levels (eg 33.33% and 66.67%) may cause images to appear jagged. If this happens, you can zoom in to 25% or 50%.
Use the keyboard shortcuts above to adjust the zoom level of the example file.
Once you've become familiar with Photoshop's interface, you're ready to start editing your images. In the next lesson, we'll talk about the basic settings you can apply, such as cropping, resizing, and rotating.
The figure below presents tools graphic editor Photoshop CS5 with their modifiers. Tools are divided into logical groups horizontal lines. Most of these tools and their modifiers are included in older versions of this program. Each a new version Photoshop is supplemented with new tools and / or modifiers, and some "old" tools may also be improved. We will not consider all the tools with their modifiers in this cycle, we will only talk about the main Photoshop tools and their modifiers, which are most often used for editing photos.
The toolbar is the main panel in this graphical editor. Almost every processing step is not complete without one or another tool from this panel. The panel can be docked to the right/left border of the Photoshop desktop. And also it can be detached from the border, and placed anywhere on the desktop of the graphic editor, see the screenshots below.

To move toolbar to another location, move the cursor to the top of the panel, press the left mouse button while holding down the key, move the panel to the editor desktop area of your choice, see the screenshot above, or attach the panel to the opposite border of the desktop, see the screenshot below.


To change the appearance of the toolbar, move the cursor to the top of the panel, and click on the arrows, the panel will become a little shorter and wider, see the screenshot above. To move the panel, hold down the left mouse button, while holding the button down, move the panel to the area of the desktop you selected, see the video below.
When such manipulations with the toolbar can come in handy? For example, you have a small monitor, but you need to open the processed file to the entire desktop so that you can enlarge the file to one or another peak of the optimal scaling percentage.
The toolbar can be completely closed by clicking on the cross in the panel header, or uncheck the box next to the "Tools" item in the "Window" menu.
To call the toolbar, you can use hot keys, after specifying the combination in the Keyboard Shortcuts settings. You can enter the keyboard shortcut settings menu using the "Edit" menu, or by typing the key combination "Alt + Shift + Ctrl + K". In the "Keyboard Shortcuts" settings, select the "Window" item, and already in it edit the "Tools" item.
We figured out the toolbar, in the next article we will proceed to a detailed examination of some of the tools of this panel. Let's start our acquaintance with the tools of Photoshop, with the tools and modifiers of the first logical group -
The toolbar is usually the most used toolbar. This panel appears on the left side of the screen when you start Photoshop. Any tool is selected at any moment of working with the program. To make it easier to work with the palette, I have compiled a list of the main tools in Russian and English. You can also read in detail about how each tool works and how they are formed into groups.
List of instruments in Russian and English
Often there is a need for a quick translation of toolbar terms into Russian. Here I have brought together the Russian and English names of the toolbar commands. Also indicated and hot key, with which you can activate the tool. 
The small black triangle in the lower right corner of the tool icon indicates that there is a tool submenu. Hovering over a tool will display a tooltip with the name of the tool and its function key on keyboard. 
All tools on the tool palette can be logically grouped into five large groups. These are the "Highlight", "Cropping", "Retouching", "Coloring", "Drawing and Text" groups. Let's look at each group in more detail. This is a set of tools for the CS3 version of Photoshop.
1. Group of tools "Selection" (Selection tools)
This group contains tools for selecting areas of various shapes, moving the selected area, quickly and accurately selecting areas of irregular shape.
The Marquee tool group is used to select rectangular, oval, one-row and one-column areas.
The Move tool moves selections, layers, and guides.
The Lasso tool group is used to create freehand, polygonal (straight-edged) and magnetic (anchored) selections.
The Quick Selection tool lets you quickly “paint” a selection with an adjustable round brush tip.
The Magic Wand tool selects areas that are colored in a similar way.
2. Crop and slice tools group
Here are tools for cropping an image and creating fragments.
The Crop tool crops images.
The Slice tool creates slices.
The Slice Select tool selects slices.
3. Retouching tools group
With these tools, you can remove defects in the image, Erase and restore the image, adjust the sharpness and blur, tone and saturation.
The Spot Healing Brush tool removes stains and objects.
The Healing Brush tool removes imperfections in an image by painting over them with swatches or patterns.
The Patch tool fixes imperfections in a selected area of an image using a swatch or pattern.
The Red Eye tool removes red highlights caused by flash photography.
The Clone Stamp tool is used to draw using a sample image.
The Pattern Stamp tool is used to draw using part of an image as a pattern.
The Eraser tool erases pixels and restores parts of an image to the state it was in when it was last saved. You can read more about the Eraser tool in the post "".
The Background Eraser tool erases areas of an image to transparency by dragging.
The Magic Eraser tool erases plainly colored areas of an image to transparency with a single click.
The Blur tool softens hard edges in an image.
The Sharpen tool sharpens the soft edges of an image.
The Smudge tool smudges the data in the image.
The Dodge tool brightens areas of an image.
The Burn tool makes areas of the image darker.
The Sponge tool changes the color saturation in an area.
4. Group of tools "Painting" (Painting tools)
Here are collected all kinds of tools for coloring, color replacement, image styling.
The Brush tool applies brush strokes. You can read more about the Brush tool in the post "".
The Pencil tool draws lines with sharp edges.
The Color Replacement tool replaces the selected color with a different one.
The History Brush tool draws a copy of the selected state or snapshot in the current image window.
The Art History brush tool draws stylized strokes that mimic various artistic styles using a selected state or snapshot.
The Gradient tools create straight, radial, conical, specular, and diamond transitions between colors.
The Paint Bucket tool fills areas that are similarly colored with the foreground color.
5. Group of tools "Drawing" and "Text" (Drawing and type tools)
This group contains tools for selecting a contour, printing text, creating arbitrary shapes.
The Path selection tool selects shapes or segments by displaying anchor points, direction lines, and direction points.
The Type tool creates text on an image. You can read more about text tools in the post "".
The Type mask tool creates selection areas in the form of text.
The Pen tool group allows you to draw paths with smooth edges.
The Shape tool group and the Line tool draw shapes and lines on a regular or shape layer.
The Custom Shape tool creates custom shapes selected from a list of custom shapes.
-photoshop-articles-photoshop-articles-photoshop-articles-photoshop-
Next lessons on working with the program Adobe Photoshop we will dedicate to tools.
The toolbar plays an important role in working with photoshop. Some commands can only be performed from the toolbar, such as working with text or drawing tools.

Consider the tools. The first group, the selection tools.
1.Rectangles Marquee Tool– (Rectangular selection). The selection is made by moving the cursor while holding down the mouse button. If we select an area and then try to select another area, the old selection will disappear. In order to add a new selection to the old one, before starting the selection, you need to press and hold the key Shift. To subtract the new selection from the old one, press and hold the key alt. If you hold the key together Shift and Alt, this will cause the selection to be the area where the old and new selections overlap.
Elliptical Marquee Tool(Elliptical selection) – allows you to select an elliptical region. Keys Alt and Shift, are used similarly to rectangular selection.
Single Column Marquee– selection of a column of pixels.
Single Rou Marquee- selection of a row of pixels.
2.Lasso Tool (Lasso)- allows you to select an arbitrary shape. The selection is made by dragging the cursor with the left mouse button pressed. After the area is set, you can subtract a specific area from it. If you hold the button alt pressed, you can select another selection area within the first block. Key combination Shift+Alt– to set the selection area.
Polygonal Lasso Tool(Polygonal lasso). Let's say we need to select a triangle. Press the left mouse button and move the cursor to the base, then release the mouse button again, press again and select the base of the triangle, release and press the button again, select the second side until the selection reaches the first side. Double-click with the left button to activate the selection.
Magnetic Lasso too l - (Magnetic lasso). Allows you to make a selection along the boundaries of contrast. Let's say we need to highlight the light on the dark. Select the magnetic lasso tool and move the cursor to Right place of your image and with the left mouse button pressed, start the selection. photoshop itself will look for areas with maximum contrast and will draw a selection outline along them. During the selection process, the program automatically sets the anchor points. By pressing a key backspace, you can delete the last anchor point and continue the selection. Repeatedly pressing this key will delete the anchor points in stages.
17 Magic Wand– (Magic wand) – a tool for selecting solid areas filled with one color. Select the Magic Wand Tool and move it to the desired area of the image. Click the left mouse button and you will have a single color area selected. The Alt and Shift key combinations work the same as with rectangular selections.
16 .move(Move). Once an area is selected, it can be moved. Choose a tool move and move the cursor to the selected area. With the left mouse button pressed, drag your area where you want. If you keep the key pressed alt, a copy of the moved area will be created. If you need to move the selected area strictly horizontally or vertically, then hold down the key Shift. Also, if you need to accurately place the selection at a certain point, then you can use the arrow keys on the keyboard, when you press the key, the selection moves by 1 pixel, and if you hold down the key Shift, then the movement will occur in increments of 10 pixels.
3.Crop(Cropping) is intended for cropping the raster area of documents, with subsequent cropping of those parts of it that are not included in this rectangular area. Choose a tool Crop and move it to the desired part of the image, and holding down the left mouse button, select the desired area. You will see that the color of the selected area is lighter than the rest of the image, and this is the area that will remain. After you have set the desired selection, press the key Enter and the conversion will be done.
18.Slice Tool(Cutting), designed to form a rectangular cut certain form. Used on the Web to reduce file size, i.e. you can cut the image into three, four, etc. parts, and apply a different format to each of the parts.
19.Brush Toll(Brush), is the main one of the drawing tools, draws lines with soft edges. We draw by moving the mouse with the left button pressed over the image. Before you draw, you need to set the tool parameters. You can choose the brush diameter, color, transparency, pixel blending mode.
Pencil Tool(Pencil), gives lines with sharp jagged edges. It has the same settings as the brush tool.
20.History Brush Tool(History Brush) - allows you to return to any previous state of the image, undoing one or more editing operations. Before using, in the history palette, you need to check the box in front of the item to which you want to return. Using the brush will erase all history items that are below the checkbox.
7. Blur Tool– (Blur). To blur local areas of the image. Put the cursor in the right place of the image, activate the blur tool. Select the desired size in the options bar, and, holding the left mouse button, blur the desired area in a circular motion.
Sharpen(Sharpness), for local image correction. Increases the sharpness of processed areas of the image. Works the same way as the blur tool.
Smudge Tool(Finger). The principle of operation is the same as that of the first two tools.
22.Dodge Tool(Lightener) is designed to locally brighten the image. Work occurs when the tool is moved over the image with the left mouse button pressed.
SpongeTool(Sponge) - designed to reduce or increase the color saturation of image areas processed by tools. In the attribute bar, you can select the parameters for this tool - brush diameter, flow- impact force Mode Saturate- increase in saturation, Desiderate- decrease in saturation. All the same, with the left mouse button pressed, we drive over the necessary sections of the image.
5.Clone Stamp Tool(Clone Stamp) allows you to copy one part of an image to another. You need to define the area of the image that will be copied. To do this, press the key alt and while holding it, click the mouse in the right place, after that you can release the key, and start drawing like a brush in the right place, only the drawing will be carried out with an image taken from the copied area.
Pattern Stamp(Pattern stamp), the stamp works similarly to the clone stamp. You just need to define the pattern first. This is done in the attribute line, in the column pattern.
6.Eraser(Eraser) is designed to remove part of the image regardless of color.
Magic Eraser– allows you to erase an area filled with one color with one click. The color that is clicked will be erased. The action of this tool is similar to the action of a magic wand, only the eraser does not select, but erases the image.
Background Eraser(eraser for background), removes everything but leaves the background if the option is enabled Protect Foreground Color.
21.Paint Bucket–(Fill) fills an area of the image with the color you specify. The foreground color is used. Pick a tool, pick a color. Then move the cursor to the place you want to fill, the cursor will take the shape of a bucket, and click the left mouse button. If there are no selections, then the entire document will be filled. To fill with a texture, select in the item pattern(Texture).
Gradient Tool(Gradient) - using this tool fills with smooth transition colors. Maybe two basic colors or more. First, select the gradient type in the attributes panel by clicking on desired type left mouse button. Then select the gradient fill method, these are the five buttons following the gradient type list. To fill, place the mouse cursor in the desired location and, holding down the left mouse button, move the cursor to the desired distance, when you release the mouse button, the image area will be filled with the selected gradient.
4.Spot Healing Brush(Spot Healing Brush), works the same as the clone tools. But unlike a stamp, the Healing Brush tool takes into account the structure, lighting and shadows of the treated area of the image. Select the Healing Brush tool, click alt by holding the left mouse button at the location of the image you defined. Move the tool over the areas of the image that need to be restored. For example, this tool is good for removing shine from some parts of the image.
Patch(Patch) - allows you to restore a selected area by cloning pixels taken from another area or sample. To get a high-quality result, choose small areas for correction.
9.Pan Tool(Pen) - allows you to draw paths, that is, anchor points are created that Photoshop automatically connects with segments.
Freeform Pan Tool- (Free pen).
Add Anchor Point Tool–(Add anchor point).
Delete Anchor Point Tool– (Delete anchor point).
Convert Point Tool- (Corner).
24.Tools for building figures:
Rectangle Tool- rectangle.
Rounded Rectangle Tool- a rectangle with rounded corners.
Ellipse- ellipse.
Polygon Tool- polygon.
line tool- line.
Custom Shape Tool- arbitrary figure. Allows you to create a variety of shapes that are immediately filled with the foreground color. To create all shapes, except for an arbitrary shape, you need to select a shape, place the cursor in the desired area of the image, and holding the left mouse button, move the cursor to create a shape. If, after the shape is created, you press the spacebar, then the shape can be moved to any point in the image. If you keep the key pressed alt during shape creation, the shape will be created from the center. To create an arbitrary figure, you need to select it in the tool settings line in the item shape. To change the rounding radius of a rectangle shape with rounded edges, in the same settings line, set the desired value in the Radius item.
8. Path Selection Tool– (Outline selection).
Direct Selection Tool– (Direct selection).
23.
Horizontal Type Tool– (Horizontal text). To enter text, select a tool. Place the cursor at the desired location in the document. Click the left mouse button, a flickering cursor will appear. Enter text using the keyboard.
Vertical Type Tool–(Vertical text) is the same, only the text will be entered vertically. In the options bar, you can set the font type, text size and paragraph formation mode, text color and format.
25 .eyedropper ( Pipette ) transfers the color of the area of the image where we clicked the mouse to the color boxes of the toolbar, or displays the digital color values in the palette Info.
color sampler(Color Comparison), allows you to set up to four points from which color values will be read. These values are displayed in the information palette info, For each new point, a new field opens in this palette in which the values for that point are entered. In order to delete all points, it is necessary to press the Clear button in the settings line.
measure tool(Ruler) - designed to measure distances and angles on the image. We click on the measurement start point, drag the cursor to the measurement end point, on the palette info the distance between the start and end points will be displayed.
10.Notes Tool-(Notes).
Audio Annotation Tool– (Sound annotation).
11.Hand( Hand ) - if the image does not fit into the screen frame, we can drag it.
26.ZoomTool(Zoom), if you move the cursor over the image, it takes the form of a cross in a circle, and with each click of the left mouse button, the image will increase. If you press the key alt, then with each click, the image will decrease.
13.Quick Mask–(Quick mask mode).
12. Color squares-basic and background colors
14 Document viewing modes. The first, standard mode, is set by default, the second is full screen with a menu bar, the third is full screen. You can also switch between modes by pressing the key. F.
15. Transferring an image to Image Ready and back.
In the next article on the Adobe Photoshop program, we will consider the line of settings, tools.


