The computer does not start the bootable USB flash drive. BIOS does not recognize bootable USB flash drive
A flash drive is an information storage device that connects to any PC via a USB interface. Quite often this device stops working normally. What should I do? Below will be discussed the most effective ways flash drive treatment and corrections of common errors when working with the device.
Follow all the steps sequentially - if the first method does not help, move on to the next one and so on.
What to do if the flash drive stops working
In the modern IT industry, the KISS principle is relevant in a narrow circle, meaning “Keep it simple!” Without special need, there is no need to edit the registry, use complex hardware methods for troubleshooting problems, or try to implement other procedures - you should start with the simplest steps.
- Try connecting the flash drive to another PC, laptop or other device to communicate via USB interface. If the flash drive does not work, then with 100 percent probability we can say that this is the problem - and it is necessary to immediately go to utilities for restoring and fixing a flash drive.
- If the flash drive works on another computer or is at least detected by Windows (but “Explorer” and “This/My Computer” do not appear), then you need to Troubleshoot problems with the OS or file system using the instructions below.
- Disconnect the drive by removing it from the USB connector.
- Shut down your PC by selecting the “Shut down” option.
- Disable system unit from a 220V power supply, press the power button for 5 seconds – this will remove the residual charge on individual modules of the motherboard.
- Connect your computer to power.
- Turn it on, wait until it loads completely and insert the USB flash drive.
- Try connecting it to a different connector, especially if remote front USBs were previously used for this task. Optimal option– rear ports
- Sometimes the cause of flash drive malfunctions is the assignment of system ID in the form of a letter, or the disappearance of this parameter altogether, to fix an OS problem, use the Disk Management utility

Utilities for flash drive recovery
Be sure to check the flash drive through utility“USB Troubleshooter” from Microsoft – it is not included with the OS, but is available for download from the official portal here free and only works with OS W7 and higher.
It’s easy to use – run the program and click “Next”. 
After which the software will try to find and fix typical problems with display of the flash drive in the system. 
If you hear a characteristic sound when connecting a device, but it does not appear in Explorer, then open Device Manager.

Often reading problem USB flash drives appears after updating the operating system - it is provoked by incorrect entries in the registry left after connecting physical storage media.
Searching for them manually takes quite a long time and is better use a special program for searching and clearing non-working keys in the registry.
Best suited for this Vit Registry Fix utility
(free and does general search and cleanup) And utility
USBOblivion
(free and clears all data on previously connected flash drives from regedit).
Main advantages:
The interface is intuitive and has Russian localization.
Download the program and run it automatic search, after its completion, start cleaning (after checking the boxes in the sections about saving all changed .reg keys in the archive, in order to “roll back” the operation if necessary).
Sometimes the flash drive does not work due to driver incompatibility for USB 2 and 3 versions. In this case, you need to download updated versions on the official website of the motherboard manufacturer.
Why doesn't it see the flash drive? If the PC does not accept any flash drives, then you need to completely reinstall all drivers for USB drives.
The easiest way to do this is through the “Device Manager” (hold Win + R and enter devmgmt.msc, click on “OK”). Find the “USB Controllers” section in the drop-down list and sequentially delete (right-click on the object, select “Delete”) the subsections USBHostController, GenericUSBHub and USB Root Hub, then update the current hardware configuration and restart the PC.
As a supplement, run full check the entire system.
- Launch the registry (hold Win+R, enter regedit and confirm the action by clicking “OK”).
- Right-click on the HKEY_CURRENT_USER section and select Find, then type Explorer in the search field. If the folder contains NoDrives, then you need to select and delete it (using the Delete button). In addition, in the same registry editor, search for the StorageDevicePolicies parameter (under the HKEY_LOCAL_MACHINE section) and delete it (if present).
Sometimes all the above methods do not give any tangible result.
If the flash drive is identified in the system (at the level of identifying an unknown connected device), then you can try to restore normal operation of the device, formatting it in a special way using a third party HDD Low Level Format Tool utility .
In this case, working with the device occurs at the level of physical sectors, and not file system(as with standard formatting), which guarantees:
- Wiping bad sectors
- Elimination of any software problems
- Permanently deletes all data from the storage device.
The program is free and available for download from the official website. After installing and launching it, select the required drive, click Continue. 
Find the Low-levelFormat tab and accept the operation by clicking on Formatthisdevice.  The duration of the procedure depends on the type of flash drive and its capacity, on modern PCs the process takes on average 30-60 minutes. Once completed, you should safely remove the device and restart your computer.
When you try to install Windows 7 OS from a flash drive, it is possible that the system will not start from this media. What needs to be done in this case will be discussed in this material.
Let's look at the most common reasons that lead to problems starting the operating system from a USB device.
Reason 1: Flash drive malfunction
Check your flash drive for functionality. Use it on any other desktop computer or laptop and check if the detection occurs external device in system.

It is possible that a flash drive that has served for many years for Windows installations, fails completely unexpectedly. Be sure to check the external drive for serviceability in order to avoid wasting large quantity time to find the cause of the problem.
Reason 2: OS distribution with an error
Reinstall the operating system distribution. You can make a flash drive bootable using specialized software solutions. How to do this is described in the lesson.

Reason 3: Faulty port
Perhaps one of your USB ports is broken. Use a different connector if you do not have a laptop, but a desktop computer - install the flash drive on the back of the case.
If you are using a USB extension cable, check it with another external storage. Perhaps the problem lies in its malfunction.
Reason 4: Motherboard
In extremely rare cases, it is also possible that the motherboard is not able to support starting the system from a USB drive. For example, a company fee Abit don't support this function. So installation on such machines will have to be done from a boot disk.

Reason 5: BIOS
There are often cases when the reason lies in the USB controller being disabled in the BIOS. To enable it, find the item "USB Controller"(Maybe, "USB Controller 2.0") and make sure that the value is set "Enabled".

If it is turned off ( "Disabled"), turn it on by setting the value "Enabled". We exit the BIOS, saving the changes made.
It so happened that recently, several times in a row, I immediately encountered the fact that when I tried install ISO images from a flash drive I couldn’t do this with various programs in Windows 10. After startup, either a cursor on a black screen or various inscriptions appeared on the monitor. Everything stopped there; attempts to wait for a while led to nothing. Nothing was loading. Installing an image from a USB drive simply froze without starting. I tried for a long time to find all sorts of solutions to this problem: I formatted the disk, downloaded the images again, re-uploaded them to other flash drives - but it was all in vain. From this I concluded that the problem, apparently, is not at all in the files or in my USB storage.
I began to guess that the problem lay in the structure of the flash drive itself. As usual, I began to google solutions to such problems. And I found a solution that has helped me out several times already. The great advantage of this method is that it is already Windows 10 ISO image recorded on a flash drive There is no need to delete it, nor do you need to format the USB drive itself.
The point, apparently, is that when creating a bootable USB flash drive we use the most different programs for burning ISO images. We often abuse the same drive with these experiments more than once. As a result, the internal layout changes, additional sectors invisible to us may appear, and existing ones may be modified. How exactly and why this happens is not important to us, as amateurs in general. It is important that neither deleting files from a flash drive, nor even completely USB formatting drive.
Of course, my solution to the problem with inability to download ISO image from a flash drive far from the only one. Perhaps your reason will be completely different. But, nevertheless, since my method described below helped me personally, and more than once, I decided to write about it on my website.
So, if you have Windows 10(or any other ISO image) no way does not want to boot from a USB drive, then you need to work with this flash drive on any computer with Windows 7, 8 or 10 installed. What is especially attractive to me personally is that we will carry out all manipulations with our removable storage exclusively using the built-in tools of the operating system itself from Microsoft, then available without downloading or installing anything third party programs, which means without the threat of catching something painful, which, of course, we don’t need. It is also IMPORTANT that it is NOT NECESSARY to delete the ISO image already recorded on the flash drive!
Step 1: Working with flash drive partitions
First, let’s check whether any additional partitions have appeared on the flash drive during operation and numerous rewrites. To do this, in any of the above operating systems, use a search to find the utility “ Creating and formatting hard disk partitions" We just start typing its name in the search bar of the Start menu (“Creating and formatting...”) and it’s found. In Windows 10, launching the tool is even easier: click on the Start menu with the RIGHT mouse button and select “Disk Management”) Let's launch this tool that helps you manage any disk space. Finding your USB drive ( Disc 1 in the image) and make sure that there is only one partition on our flash drive, and not several (as, for example, I have on Disk 0). If there is only one section, go to the next step.

If there are several sections, then determine which one is the main one. This can be done by size - the main partition on our flash drive (with the Windows 10 image or any other software) is the one whose volume matches the one displayed in Explorer. Then, in turn, stand with the mouse on each additional partition and use the right mouse button to open the menu in which we select “Delete volume”. As a result, we have unallocated (unallocated) space. It is painted black, not blue. To add it to the main partition, you need to stand on the main partition and select “Extend volume” with the right mouse button. We add all the freed space there. After that our You can now try downloading the ISO image from the flash drive again on the computer. If there were several sections, then perhaps this was the problem, why the Windows 10 image did not want to boot from a flash drive. However, personally, for the sake of reliability and saving time, I immediately recommend doing the next step No. 2.
Step #2 below, but for now small retreat: If some partitions on the flash drive are inactive and during the first step they could not be removed by any force, then all that remains is to completely format your USB storage. To do this in Windows 10, in my opinion, the easiest way is to use the program HDD LLF Low Level Format Tool. Let's move on to the official website, scroll down the page to the phrase “Download Windows Installer(most people will want this option)” - it is located immediately under social buttons. Download a file whose name ends with setup. Install and launch the program. After launch, select the third item “ Continue for free" (1). In the window that opens, find your flash drive (select by capacity in the far right column CAPACITY), select it and click “Continue” (2). Next, select the second tab LOW-LEVEL FORMAT (3) and click in it FORMAT THIS DEVICE(4). The process of completely reformatting a flash drive using this program takes a lot of time. But the result never gave me any complaints.

Step 2: Make the partition with the ISO image active
At this stage, using the command line in Windows let's designate the only partition on our flash drive as active(what else it could be and why it doesn’t matter to us). To do this, again, through the search for the Start menu, find and run with administrator rights (right mouse button) utility " cmd"(in the search we type these three abusive letters without quotes).
- We make sure that our flash drive is inserted into USB port and dial in command line « diskpart", press Enter.
- Next, enter “ list disk" + Enter. With this command we display all drives connected to the computer in the form of a list. We determine by size which one is our flash drive and remember the number. In my case it is “Disk 1”.
- Now select our disk. To do this, type “ select disk=X"(X is the number of our flash drive, which we remembered at the previous stage - for me it is 1). Press Enter.
- Next, enter the command “ list partition" + Enter. Thus, we display all the partitions already inside our flash drive (there should be one and only “Section 1.”)
- Now we need to focus on this single section. To do this, type “ select partition=1", press Enter.
- The last command we type to make this section active is: " active"+ press Enter as always.
As an example of what the whole process should look like activating a partition of our flash drive, below is a screenshot from my own example of such work on the Command Line.

Of course, the likelihood is that this instruction will help with problem launching ISO Windows image 10 (or any other software) from a flash drive, it’s far from 100 percent. However, personally, this method helped me in the vast majority of cases. As a rule, it became the last one after numerous attempts to rewrite images and boot from different USB drives. Let me remind you that it is not at all necessary to delete an already recorded image from a flash drive when carrying out the above manipulations. And, in my opinion, it’s even better not to do this, since it is unknown how our active section on the flash drive there is a program for recording the image.
You decided to install Windows: you recorded a digital copy on a flash drive, configured the BIOS, rebooted your computer or laptop, but for some reason the installation did not start. What the heck? Why doesn't the BIOS see it? bootable USB flash drive? It seems like everything was done correctly...
There are 2 most likely reasons here. The first is that the BIOS does not display the flash drive because it is not bootable. Second, you haven’t configured the BIOS quite correctly.
Although there is one more nuance - your BIOS is too old. It does not support USB drives, and therefore does not see them. In this case, you can install Windows from a disk.
As for the first two reasons, we will look at them in more detail.
Did you write the bootable USB flash drive correctly?
The fact is that it is not enough to simply copy files. In this case, it will not be considered bootable. This is why the BIOS does not see your flash drive. You only need to write it using special programs. There are plenty of them, but personally I use UltraISO. Why? Because she:
- Free (with a 30-day trial period).
- Records both Windows 7 and Windows 8.
- Easily writes images to a 4 GB flash drive (some programs only support USB drives with a capacity of 8 GB and higher).
And most importantly: creating a bootable USB flash drive in UltraISO is as easy as pie. First, you need to install the program (link to the developer's website) and connect the USB flash drive to your laptop or computer. And after that there are only a few steps left to complete:

During recording, all information from the USB flash drive will be deleted. The program will also warn you about this. Therefore, if there is important data on it, copy it to another location.
Correct BIOS setup
If you did everything according to the instructions, then rest assured that the USB flash drive was written correctly. And now it really is bootable. Try it - it may work to install Windows.
Therefore, restart your laptop or computer and go into the BIOS. To do this, you need to press a certain button several times. Most often this is Del or F2, although it may be different (depending on the motherboard model and laptop brand).
Next, you need to go to the tab whose title contains the word “Boot”. This is where you configure the boot priority of devices when you turn on your PC or laptop. By default, First Boot Device boots HDD, next comes the disk drive. In this case, you need to put the flash drive (USB-HDD) in first place, and temporarily lower the hard drive (Hard Disk) to second.

When exiting the BIOS, be sure to save the new settings! To press the button that is responsible for the “Save and Exit” item.

That's all. Now, if the USB flash drive is connected to a computer or laptop, and the BIOS is configured correctly, Windows installation will begin.
P.S. If this is all too complicated for you, then you can go to the Boot Menu. This is one of the BIOS options, which is designed specifically to quickly configure booting from a flash drive.
P.S. If the BIOS stubbornly refuses to recognize the USB flash drive, then it may be damaged. But before you throw it away, read it. Perhaps everything will work out and it will last a couple more years.
Today I will tell you how to enable booting from a flash drive in the BIOS of various manufacturers. No matter what version you have, the order of body movements will be as follows:
1. We insert our bootable USB flash drive into the USB connector of your computer. I recommend inserting it into the port located directly on motherboard, i.e. from the back of the system unit.
2. Turn on the computer and press the key Delete(or F2) to get into the BIOS. Depending on the manufacturer and BIOS version, other keys (Esc, F1, Tab) may be used, so you need to carefully read the prompts on the screen.
In Bios, we can only navigate between tabs using the keyboard.
Below I will describe this process in detail using the most commonly used BIOS versions as an example.
Attention! Please remember that if you install operating system from a flash drive or CD and selected the boot device in the BIOS, and not in the boot menu, then after the first automatic reboot Windows needs to enter the BIOS again and return to boot from hard drive. If this is not done, autoboot from a flash drive or CD will work again, and Windows will begin the first stage of the procedure again installations.
Settings Award Bios to boot from a flash drive
Award Bios:
First, let's check if the USB controller is enabled. Let's go to “Integrated Peripherals”. Use the arrow on the keyboard to move down to the “USB Controller” item. Press the “Enter” key and select “Enable” in the window that appears (also using “Enter”). Opposite “USB Controller 2.0” there should also be “Enable”.
 Exit this tab by pressing “Esc”.
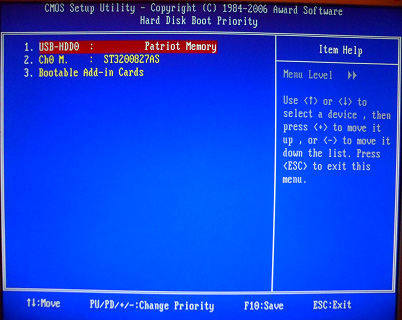
Then we go to “Advanced BIOS Features” – “Hard Disk Boot Priority”.Now in my example the hard drive comes first, but the flash drive should be there.
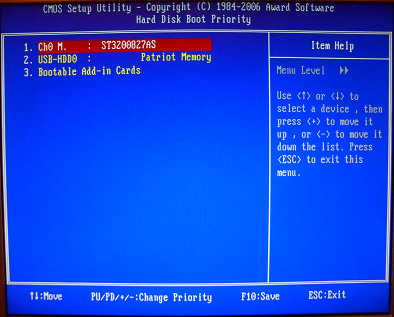 We stand on the line with the name of our flash drive (Patriot Memory) and raise it to the very top using the “+” key on the keyboard.
 We leave here by pressing “Esc”.
Setting up AMI Bios to boot from a flash drive
If, after entering Bios, you see such a screen, it means you have AMI Bios:
 First, let's check if the USB controller is enabled. Go to the “Advanced” – “USB Configuration” tab.
 Opposite the items “USB Function” and “USB 2.0 Controller” should be “Enabled”.
 If this is not the case, go to this line and press the “Enter” key. From the list that appears, select “Enabled” (also using “Enter”).
Then exit this tab by pressing “Esc”.
Let's go to the tab “Boot” – “Hard Disk Drives”.
 Now my hard drive is in first place, but I need to put a flash drive here. We go to the first line, press “Enter” and in the window that appears, select our Patriot Memory flash drive.
 It should be like this:
 We leave here via “Esc”.
Select “Boot Device Priority”. Here, the first boot device must be a flash drive.
 Press Esc.
Then we exit the Bios, saving all the settings made. To do this, go to “Exit” – “Exit & Save Changes” – “OK”.

Setting up Phoenix-Award Bios to boot from a flash drive
If, after entering Bios, you see such a screen, it means you have Phoenix-Award BIOS :
 First, let's check if the USB controller is enabled. Go to the “Peripherals” tab – opposite the “USB Controller” and “USB 2.0 Controller” items there should be “Enabled”.
 Then go to the “Advanced” tab and opposite “First Boot Device” set “USB-HDD”.
 After that, exit the Bios, saving the changes. To do this, go to “Exit” – “Save & Exit Setup” – press the “Y” – “Enter” key
 That's practically everything you need to know in order to boot from a flash drive. In my article, I described the process of setting up the BIOS of the most popular versions: Award And AMI. The third example presents Phoenix-Award Bios, which is much less common.
In different BIOS versions The described procedure may vary slightly. But the main thing is that you understand the principle of setting itself.
By the way, I would also like to add: in order to choose which device to boot your computer from, it is not necessary to change the settings in the BIOS. You can immediately call up a special menu after turning on the computer to select boot devices (this can be done by pressing the F8, F10, F11, F12 or Esc key). In order not to guess with the keys, look carefully at the monitor immediately after turning it on. We need to have time to see an inscription like this: “Press Esc to selest boot device.” In my case, it was necessary to press “Esc”.


