Activating windows 10 after changing the motherboard. Replacing the motherboard without reinstalling Windows
If one day you decide to replace your old motherboard with a new one, you don't have to reinstall the Windows 10 operating system. In this article, we'll show you how to replace your motherboard without reinstalling Windows.
Actually, this is very simple instruction, but many users do not know about this method, so they simply reinstall Windows. All you have to do is change your account Windows entry to a Microsoft account instead of a local account.
Now let's take a closer look at each step.
Step 1: Change your Windows 10 account to a Microsoft account.
What does it mean? Instead of signing into Windows 10 with a local account, you'll sign in to Windows using your Microsoft account. To do this, you need to use a Microsoft online password to log into Windows (temporarily), or set a 4-digit PIN as a password.
The key point of this step is that when you link Windows 10 with an online Microsoft account, your "activation key" operating system stored on the company's servers. This way you will be able to reactivate the OS without reinstalling it.
To switch to a Microsoft account, follow these steps:
Click the button Start» ( windows logo) and select " Options". Press " Update and Security". Then select " Activation” in the menu on the left, and click on “ Add account» 
You will need to enter your email address and account password. Microsoft records.

Step 2: Replace the motherboard and reactivate Windows 10
Once you've switched to using a Microsoft account, you can replace your motherboard. When Windows 10 boots up again, return to the section "Settings" - "Update and Security" - "Activation". You will see that Windows is not activated.


Then sign in to your Microsoft account again as shown in the image above.
On the next screen, you need to select your computer and click the " Activate»:

Windows 10 will copy " activation key from your online Microsoft account and relink it to your computer.
That's all! You can now work with your old Windows system and new motherboard using your Microsoft account. If you want to revert to a local account, follow the next step.
Step 3. Return to a local account.
You can switch back to using a local account instead of a Microsoft account. To do this, follow these steps:
1. Click " Start" and " Options».
2. Select the section " Accounts».
3. From the menu on the left, select " Your data».
4. Click on " Sign in with a local account instead».
You will need to enter your Microsoft account password and install New Password from a local account (if needed).
Voila! You just replaced your motherboard and upgraded your PC without having to reinstall Windows 10 and everything.
Often after replacement motherboard or change the operating mode of the controller hard drive in BIOS settings(Raid, Compatible, AHCI, Native SATA) the system boot starts as usual, the initial splash screen appears, then a reset, information about the BIOS POST, and again, the boot starts with the same continuation. This is usually due to the fact that the system was unable to load the boot device driver and a critical error occurred (Boot device not available)In order to get accurate information about a critical error instead of rebooting, you need to disable the automatic reboot mode in the Windows bootloader menu. This can be done if at the very beginning of the download press F8 and select the boot option - Disable automatic reboot in case of system failure
When loading in this mode, upon occurrence critical error the so-called " blue screen death" Windows or BSOD - B lue S Creen O f D eath. This term arose during the first operating systems of the Windows family, due to the fact that information about critical errors was displayed on a blue background. Such an error cannot be corrected by the means of the OS itself, and to minimize the loss of user data, its operation stops abnormally. Causes of critical errors can be hardware failures or malfunctions, errors in system components, driver errors, or lack thereof for critical devices.
Critical error STOP: 0x0000007B Inaccessible Boot Device, which occurs when replacing the motherboard, or changing the mode of operation of the hard disk controller, occurs either because the new controller is not recognized by the system as a hard disk controller, or it is not possible to launch a driver that can serve this controller.
At the very beginning of the operating system boot process, there are no drivers, including those that provide work with hard drive, is not in the computer's memory, and special BIOS subroutines are used to perform I / O operations (for working with a hard disk - interrupt functions INT 13H functions 41h - 49h and 4Eh for LBA addressing). Access to data hard disk is not performed using device drivers, but through calling BIOS routines that allow the bootloader to perform standard disk I / O operations. So, for example, to read hard disk, interrupt is used Int 13h function 42h- extended reading. Function 42h transfers sectors from a given disk area to a memory buffer. Before calling an interrupt, the following values must be written to the registers:
In AN - the value of the extended reading function is 42h;
In DL, the drive number;
In DS: SI - the address of the disk address packet ((Disk Address Packet), which contains the information necessary to search for and read data from disk media and place the results of the operation in RAM.
Then the command to call the interrupt is executed INT 13h. At the same time, the BIOS subroutine takes control, which reads data from the disk and transfers them to RAM in accordance with the parameters of the disk address package. According to the result of the operation, function 42h returns in the AH register a sign of successful (or unsuccessful) operation. Interrupter INT 13 the program again receives control and processes the received data. That is why the system starts to boot and runs normally for a while. The BIOS interrupt call allows the boot loader to perform the necessary I/O operations, including keyboard, display, and file system operations. However, at a certain stage of loading, the search and reading of drivers begins, providing Windows work, since the BIOS itself does not use BIOS interrupts to perform I / O operations. Loading into memory and initialization of drivers and system services begins, information about which is stored in the registry key
HKLM\SYSTEM\CurrentControlSet\Services
Each driver has its own key, which contains the parameter start, which determines at what stage of the system boot loading and initialization is performed this driver or services. The Start parameter can take the following values:
0 - BOOT - the driver is loaded by the bootloader.
1 - SYSTEM - the driver is loaded during kernel initialization.
2 - AUTO - the service starts automatically when the system boots.
3 - MANUAL - the service is started manually.
4 - DISABLE - the driver is disabled.
At the stage bootstrap, With system disk low-level device drivers are read and initialized, whose Start parameter is equal to 0
, including the drivers through which the Boot Device will be accessed. Thus, the system must determine the parameters of the boot device and load the driver it needs. If it is impossible to determine the boot device parameters, or it is impossible to load the required driver, then the system cannot continue, and it ends with a critical error that the boot device is not available (stop 7B).
When you replace the motherboard with a different type of motherboard, the hard disk controller, from the point of view of the operating system, will become a different, new device. During the boot process, Plug-n-Play (PnP) devices are identified by the system using a special code (PnP-ID), depending on the chipset on which the device is assembled, or chipset (chipset), and the new HDD controller, assembled on a different chipset will have a different ID. If the system "knows" the new PnP-ID of the HDD controller, and there is a driver to service it, then the motherboard will be replaced without any problems. Otherwise, the ID of the HDD controller unknown to the installed system will not allow it to load the driver required for operation. In other words, to get rid of a critical error Stop 7B you need the system to classify the new hard disk controller as a disk device class and be able to load a driver to service this class.
In light of the above information about the Windows boot process, there are 2 options for solving the problem:
Make the system work with the new hard disk controller using standard drivers from Microsoft.
- add a new hard disk controller driver from the hardware manufacturer to the non-working system.
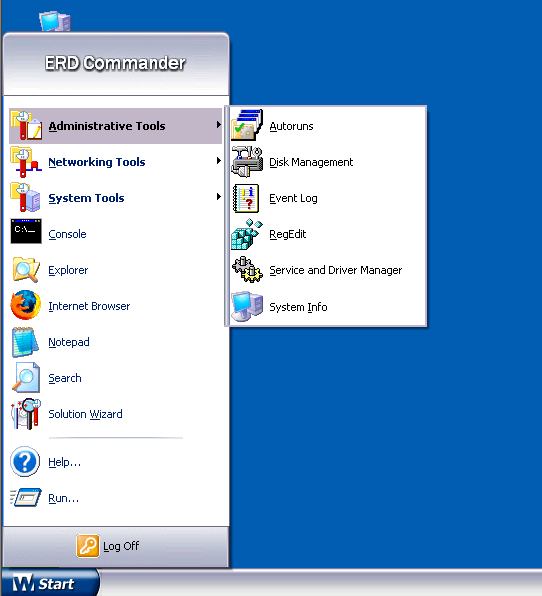
The first option is much simpler, safer, and can be easily done by simply importing a few keys into the offline system's registry, for example using a rescue disk. Microsoft DaRT, its predecessor ERD Commander or any other tool based on the Windows Preinstall Environment (Windows PE).
The second option is a little more complicated, as you not only need to add an identification entry for the HDD controller, but also associate the appropriate driver with it, and ensure that it is loaded and initialized.
One way to resolve stop error 7B is to perform the following steps in sequence:
Translation of the controller, if necessary, in the settings motherboard BIOS boards in compatibility mode (Compatible Mode) with a standard IDE - controller
Usually, this is done in the configuration section of the hard disk controller and can have different settings,
Controller Mode: Compatible
Configure SATA as: IDE
SATA Operation as ATA
AHCI Mode: Disabled
SATA Native Mode: Disable
Using standard drivers from the Windows distribution to boot the system.
Usually, this does not require any special effort, except to check a few registry values.
Windows 7 and older operating systems have standard drivers not only for compatible mode (ATA, IDE), but also for advanced mode (AHCI-Advanced Host Controller Interface), which allows you to use a simpler method for fixing the Stop 7B error, based on enabling advanced mode operation of the hard disk controller in the BIOS settings (SATA AHCI) and changing the startup mode of the standard driver.
Eliminate stop error 7B using standard drivers from Microsoft.
There is no standard driver that supports SATA AHCI controllers in Windows XP, so the hard disk controller must be set to IDE (ATA) compatible mode, but if Stop 7B error occurs in this mode, then the reason may be either use in the system (up to replacement of the motherboard) a non-standard driver from the manufacturer of the hard disk controller, or the impossibility of recognizing the new controller at the boot stage, which is not surprising for an outdated OS.The Windows XP distribution kit includes standard drivers for working with IDE (ATA) HDD controllers (atapi.sys, pciide.sys, pciidex.sys, intelide.sys), which can be used for any IDE-compatible disk controller, ensuring its recognition in as a standard IDE controller.
In rare cases, BSOD 7B may occur in Windows environment Vista / 7 due to the impossibility of recognizing the HDD controller as a hard disk controller by PnP ID. In this case, just like for Windows XP, it is necessary to ensure that the disk controller is recognized by its PnP. But most often, the reason for stop error 7B for these OS is that the standard driver that could be used has settings that do not allow it to be used at the boot stage (which will be discussed below).
First, some theory. Information about known to the system devices is created based on .inf files when new hardware is installed and is stored in the registry key:
HKEY_LOCAL_MACHINE\SYSTEM\CurrentControlSet\Control\CriticalDeviceDatabase\
Therefore, the solution to the problem of correctly recognizing the disk controller is as follows:
Determine the ID of the new hard disk controller.
- make, based on the identifier, changes in the registry of the system terminating with the error "Stop 7B" entry, allowing the use of standard drivers from the Windows distribution. In other words, indicate to the system that the device with such and such a PnP-ID is a standard ATA hard disk controller.
To solve the problem, we need any program that allows you to get a PnP device identifier, for example, in the case of Windows XP -
This utility has been developed for a long time, and before advent of Windows Vista was perhaps one of the most simple and convenient software tools definitions of PnP - identifiers. However, on this moment, the utility is outdated, does not work in the environment of operating systems Windows Vista and older, as well as in the environment of emergency recovery disks on Windows base PE2 and later (ERD Commander versions older than DaRT 5.0). As a modern alternative to the program, it is preferable to use a universal and portable program that runs on any Windows OS, including Windows PE, such as the utility from NirSoft DevManView, designed as an alternative to the standard Windows Device Manager:
The Devmanview utility does not require installation on the system and can be used in any OS of the Windows family from Windows XP \ 2000 to Windows 10. And as a tool for working with an unbootable system, you can use boot disk or a flash drive based on Windows PE, the most convenient is a disk created by Microsoft Dianostic and Recovery Toolset ( DaRT), formerly known as ERD Commander (ERDC).
ERD Commander was specially developed by Winternals Software specialists as convenient tool disaster recovery ( E mergency R epair D isk-ERD). After the acquisition of Winternals Software by Microsoft, ERDC became part of an optimization package called Microsoft Diagnostic and Recovery Toolset (MS DaRT or DaRT). However, among specialists, the old and now unofficial name is often still used - ERD Commander ( ERDC):
DaRT 5.0 - ERDC 5.0- for Windows XP
DaRT 6.0 - ERDC 6.0- for Windows Vista
DaRT 6.5 7.0 - ERDC 6.5 7.0- for Windows 7
DaRT 8.0 - ERDC 8.0- for Windows 8
DaRT 8.1 - ERDC 8.1- for Windows 8.1
DaRT 10 - ERDC 10- for Windows 10
Each release of MS DaRT allows you to work with the Windows OS corresponding to the bit depth (32 or 64).
Detailed description of ERD Commander and practical instruction for work with different versions shown on the page
MS DaRT (ERDC) is a Windows PE-based shell (for Windows Vista and later, Windows PE2 or later) that allows you to boot from a CD or other removable media, connect to a problematic Windows and get convenient access to it. components - file system, system log, registry, drivers and services, etc. The recovery environment provides the user with a set software tools(Tools) with which you can access many of the resources of the connected Windows in the same way as when you boot it normally. You can use Explorer, view system logs, disable or enable services and drivers, work with the registry editor, change local user passwords, securely destroy data on the hard drive, and so on. In addition, in the DaRT (ERD Commander) environment, it is possible to execute almost any portable program (or a program for which the absence of some entries in the Windows registry executed during application installation).
Programs DevManView(devmanview.exe) and (APciInfo.exe) can be run in the ERD Commander environment without the need to install the application. APCIinfo - Only in 32-bit environments for Windows XP or earlier operating systems. The APCIINFO archive contains the utility itself and the drivers required for its operation. After downloading, you need to unzip the contents into a folder whose name does not contain Russian alphabet characters and write it to some media, such as a flash drive, in order to be able to run the utility after loading ERDC. The media must be connected to the computer when the download starts. The DevManView archives contain the executable and help information and are used similarly without installation.
Correction of error Stop 7B for OS Widows XP /2000

If there is no suitable edition of ERD Commander, then it is quite possible to get by with any boot disk based on Windows PE, which will be discussed below.
After selecting a system, the ERDC user shell is logged in and become accessible tools to work with it through the button menu start
Run Advanced PCI Info Utility (executable module apciinfo.exe) via "Start" - "Run". The utility will display a list of PCI devices
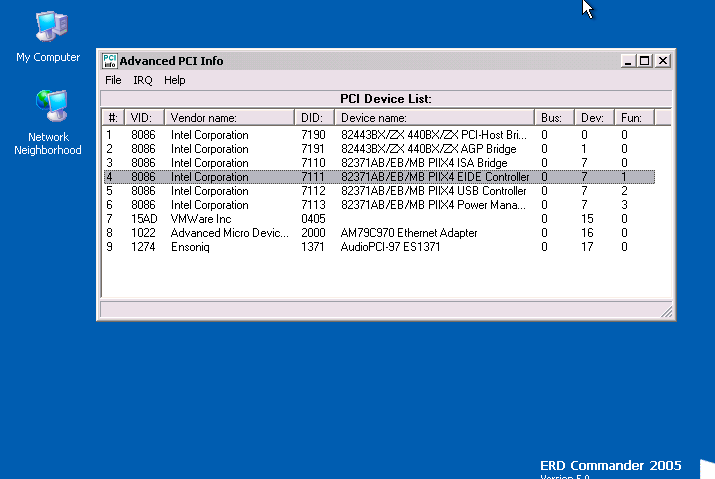
VID is the manufacturer's identifier ( Vendor ID), column DID- device ID ( device ID). Column device name is the name of the device assigned by the operating system, in this case, ERD Commander "om.
Double-click to call up the properties of the selected device.

hard disk controller this example It has Vendor/Device ID - 8086/7111.
Usage DevManView even simpler than that and also allows you to determine the PnP ID of the hard disk controller:
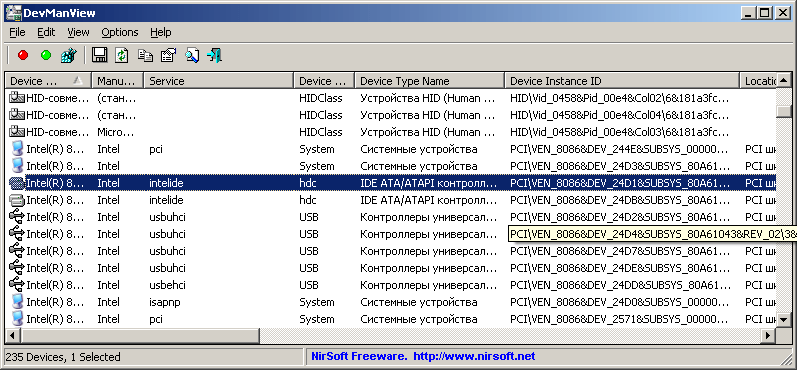
The hard disk controller in this example has Vendor ID / Device ID - 8086/24D1.
Knowing the values of the PnP device ID, you can make an entry in the section CriticalDeviceDatabase registry of the problematic system, indicating that this device belongs to the class of hard disk controllers. This action is easiest to perform by creating a .reg file, for subsequent import into the registry, with the following content:
Windows Registry Editor Version 5.00
"Service" = "intelide"
"ClassGUID" = "(4D36E96A-E325-11CE -BFC1-08002BE10318)"
Devices in Windows are divided into classes, for example - a class of video devices, printers, modems, network adapters, etc. Any device must belong to some class. Each class is identified by its unique class ID, or GUID- a globally unique identifier. The list of classes of standard Windows devices is given
Registry key name pci#ven_8086&dev_7111 corresponds to the PnP ID of our hard drive controller, and the value ClassGUID indicates that the device with the given PnP ID belongs to the Hard Disk Drive (HDD) controller class. The class identifier is written as 32 hexadecimal digits enclosed in curly braces. After adding such an entry to the registry, the system loader will be able to determine that the device with Vendor/Device ID equal to 8086/7111
is an HDD controller, and will load a standard driver for it intelide. There will be no Stop7B error.
In order not to type this data manually, you can use the contents of the pnpid.reg file, which I placed in the utility archive. You can edit its contents using the ERDC notepad ("Start" - "Notepad")
You only need to correct the PNP identifier to the one that will be obtained using the Advanced PCI Info utility or the DevManView utility. The "Service" string defines the driver that will service the device. The driver file must exist in the directory \WINDOWS\SYSTEM32\DRIVERS and be efficient. The "ClassGUID" string must indicate that the device with the given PnP-ID belongs to the hard disk controller class.
Entries have been added to the top of the pnpid.reg file to ensure that the standard or most common drivers are used. If there is no entry for the required PnP-Id, you will have to add it, or correct an existing one.
To check the availability of drivers in the system, you can use the available in the ERD Commander manager services and drivers. Runs through the menu "Start" - "Administrative Tools" - "Service and Drivers Manager"
To import data into the registry of the problematic system, launch the ERDC registry editor through
Start - Administrative Tools - Regedit
In the ERD Commander environment, the registry editor will not work with the registry of the ERDC itself, but with the registry of the system that we connected in the login window when loading ERD Commander. The import will be done into the registry of the non-booting system and, on reboot, the new hard disk controller will be correctly recognized as the hard disk controller.
The pnpid.reg file mentioned above has entries to add standard drivers pciide.sys, intelide.sys, atapi.sys. These files and the pciidex.sys file must be present in the drivers directory \WINDOWS\SYSTEM32\DRIVERS. Usually, with a standard installation, they are present there. If not, you can take it from the distribution kit or from the directory of a similar OS.
Correction of error Stop 7B for operating systems Windows Vista, 7,8,10
Usually, the “blue screen of death” with the error code STOP 0x0000007B “INACCESSIBLE_BOOT_DEVICE” does not appear under standard Windows settings, and the system automatically reboots on a critical error. For Windows 7-10 operating systems, in the vast majority of cases, the problem of a critical STOP 7B error when replacing the motherboard or changing the operating mode of the hard drive controller is easier to solve than in the case of Windows XP. Usually, HDD controllers are correctly recognized as hard disk controller class devices, but often, standard drivers are either disabled or set to start mode. after download completed. The order in which the drivers are started is determined by the parameter start, stored in the registry for each of them. To initialize the driver during the boot process, this parameter must be equal to 0 . As part of modern Windows operating systems, there is almost always a set of drivers that provide standard work with HDD controllers as in advanced mode AHCI, as well as in the standard IDE, but the parameter start for them 3-4 matters, i.e. the driver is started manually (Start is 3) or disabled (Start is 4).
An example of a registry entry for a standard driver SATA controller AHCI msahci with parameters that are created during the installation of Windows7 (registry key HKLM\SYSTEM\Current ControlSet\Services\msahci):
"Group"="SCSI Miniport"
"ImagePath"=\SystemRoot\system32\drivers\msahci.sys
"ErrorControl"=dword:00000003
"Start"=dword:00000004
"Type"=dword:00000001
Starting with Windows 8, the standard SATA AHCI controller is named storahci Therefore, you need to work with the section
The Microsoft Standard SATA AHCI Driver parameter set may differ depending on the different versions Windows, however, the setting start is mandatory for all, without exception, component drivers stored in the Windows registry. Meaning start determines at what stage of loading and functioning of the system each specific driver will be loaded. As mentioned above, the driver having the parameter start equal to zero is loaded by the bootstrapper.
As you can see, in this example, the parameter start equals 4 - which means the driver is disabled. Even with a healthy device and a driver installed on the system, the bootloader will not be able to start it, because it only loads drivers with a Start parameter of zero, and the system will end with a “blue screen of death” STOP 0x0000007B “INACCESSIBLE_BOOT_DEVICE”. Even if the driver is not disabled, but its startup mode is set to a value such as "Automatic" or "Manual", Windows cannot boot further. It is for this reason that the Stop 7b critical error most often occurs when changing motherboards on computers with relatively new versions of Windows. If the system has a standard SATA AHCI driver from Microsoft, it cannot be started by the bootloader if the driver from the manufacturer was installed before the motherboard was replaced, and the standard one was disabled, or its startup mode was changed. However, the driver msahci.sys for Windows 7 or storahci.sys for Windows 8 and older, will boot successfully if its setting is start has a value equal to 0 . Therefore, in order to get rid of the critical error Stop 7B in the vast majority of cases of replacing the motherboards of computers running Windows 7 and later, it is enough to change the parameter start standard AHCI driver. If the system could be booted, at least in safe mode, then such a task would be solved without the slightest effort, but the error Stop 7B occurs much before initialization starts safe mode(as well as any other). That is, changing the parameter start the registry of the problematic Windows must be executed from some other system. This is quite easy to do using the Windows PE-based Rescue Disk Registry Editor and, in particular, using the same ERD Commander (MS DaRT). In cases where you have a boot disk or flash drive of the MS DaRT version (7.0-10) corresponding to the Windows you are using, you can even do without editing the registry by setting the startup type Boot (Bootable) for driver msahci or driver storahci through the "Computer Management" menu, and the "Service and Driver Manager" section. You can use registry editing in the MS DaRT environment by setting the value of the parameter start equal to 0 .
To enable driver download mode, for example msahci, you can do without MS DaRT (ERD Commander), for which it is enough to boot into any OS with the ability to edit the registry, for example, in Windows PE from a CD or flash drive. You can even, temporarily, connect a disk with a problematic Windows to a working computer and manually fix the Start parameter using a regular registry editor regedit.exe
The standard Windows registry editor allows you to work not only with the data of "your" registry, but also process files that are the registry of another operating system. For this
Boot into another operating system with the ability to launch the registry editor.
- Start the registry editor.
- In the left part of the window, where the registry tree is displayed, click on the HKEY_LOCAL_MACHINE key.
- On the menu Registry(In other versions of the Registry Editor, this menu item may be called " File") select command "Load Hive".
- select bush system on a drive with unbootable Windows (a file named system without extension, which is located in the \windows\system32\config folder).
- Press the button Open.
- In field Chapter enter a temporary name that will be given to the loaded hive in the Registry Editor tree. For example, 123
.
After pressing OK, select the section with the assigned name 123
and find subsection \SYSTEM\ControlSet00x\services\msahci in case of “repair” blue Windows screen 7 and \SYSTEM\ControlSet00x\services\storahci in case of Windows 8-10. As ControlSet00x, you need to select the section with the maximum value x, i.e. if the registry section connected to the editor contains ControlSet001 and ControlSet002, then you need to edit the driver parameters in the section \SYSTEM\ControlSet002\services\msahci

After changing the parameter start, on the left side of the Registry Editor window, select the mounted hive ( 123 ) and execute the menu item "Unload Bush". Changed parameter value start equal to 0 will be stored in the registry of the problematic Windows.
In cases where enabling the driver startup mode msahci or storahci Windows bootloader did not allow to get rid of the blue screen Stop 7B, you can try to set the parameter start set to zero for the following drivers:
atapi
dataport
pciide
intelide
iaStorA
iaStorF
iaStorV
Loading an extra driver is not a serious problem with Windows and in reality does not affect its operation in any way. Although, to save resources and reduce boot time, it is advisable not to include extra drivers. After the Stop 7B error has been resolved, the list of actually used drivers can be viewed in the device manager, and unnecessary drivers can be disabled (Start=4) or switched to manual startup mode (Start=3).
If you do not have sufficient qualifications to work with ERD Commander, or if you have difficulty in determining the correct driver, you can use a very simple method:
Booting on a new motherboard in any system where it is possible. As a last resort, you can even temporarily install Windows on another partition or drive connected to this HDD controller. Then you need to export to the section content file
HKEY_LOCAL_MACHINE\SYSTEM\CurrentControlSet\Control\CriticalDeviceDatabase
The contents of this section will give a list of PnP identifiers, among which there will necessarily be one that corresponds to the HDD controller installed system.
Also, you can determine which drivers service the hard disk controller.
Loading into ERDC and importing data from the file created in the previous paragraph into the registry of the problem system. In case of using msahci.sys, storahci.sys, iaStor… drivers for Windows 7-10, it is necessary to check or change the parameter start
After the Stop7B error is resolved, the additionally installed system can be removed by first configuring the system boot loader to boot the corrected Windows by default.
And, the problem is solved quite simply if you have the opportunity to get the exported data CriticalDeviceDatabase from the operating system of another computer with the same motherboard, or rather, even with the same PnP ID of the hard disk controller. If in the BIOS settings for the same motherboards, is set different mode controllers, for example, on one AHCI, and on the other IDE, they will have different PnP IDs and be served by different drivers.
To transfer the list of PnP identifiers, it is enough to simply import this data into the registry of the problematic Windows and the Stop7B error will be resolved if the problem was caused by recognition of the HDD controller. If the problem is caused by the Start parameter, then you can get a list of driver files of a similar working Windows, serving this controller, using the usual device manager - "Properties" - "Driver" - click the "Details" button

In this example, the hard disk controller is served by drivers atapi.sys, ataport.sys, msahci.sys and pciidex.sys. Not all drivers listed may have entries in the registry key HKLM\System\CurrentControlSet\Services, for example, in this case, the attribute Start, equal to 0, must be msahci and atapi, and the rest are loaded as an addition to them. The presence of a non-zero Start parameter for any driver listed will result in a “blue screen of death”
Correction of Stop 7B error when transferring the system to virtual machines.
In cases where it is required, for example, to transfer the saved configuration of a real computer to a virtual machine, as a rule, the same “blue screen of death” problem occurs STOP 0x0000007B "INACCESSIBLE_BOOT_DEVICE". The reason for the error, as in the case of replacing the motherboard, is the impossibility of correctly identifying the hard disk controller and loading the driver necessary for it. This situation often occurs when in a VMware Workstaion or Oracle VM Virtualbox environment, you need to restore the state of a real computer from AOMEI Backupper or Acronis True Image images as a virtual machine. Usually, in such cases, a new virtual machine is created with an empty disk, and a CD / DVD drive with an image or a recovery disk (for example, an Acronis True Image image) is used as a boot device. The recovery image is mounted either as a removable USB disk, or by local network. Recovery is performed in the same way as on real hardware, but with a high degree of probability, loading the virtual machine will end with a stop error STOP 0x0000007B "INACCESSIBLE_BOOT_DEVICE". The situation is quite predictable, but has a simpler solution, due to the fact that the virtualization system emulates a virtual hard disk with a predefined PnP identifier. So, for example, Oracle VM VirtualBox creates a virtual SATA disk by default:

In addition, in the VirtualBox environment, standard Intel chipsets- PIIX3 or ICH9, which allows you to prepare in advance the appropriate reg-files to fix the Stop 7B error for the specified chipsets. In the environment VMware Workstation virtual disks can be emulated as SATA, SCSI or IDE. By default, SCSI is used. Just as in the case of using real hard disk controllers for the VMware Workstation environment, you can use the standard drivers from Microsoft for IDE – ”Intel(R) 82371AB/EB PCI Bus Master IDE Controller” (intelide.sys), for SATA – ”Standard SATA AHCI Controller” (msahci or storahci depending on Windows version) and for SCSI – “LSI Adapter, SAS 3000 series, 8-port with 1068”. You can clarify information about the disk devices used by the virtual machine using the utility mentioned earlier DevManView.exe:

AT general case, the problem with the Stop 7B error when transferring a real computer image to a virtual machine can be solved by adding all emulated hard disk controllers to the list of critical devices and enabling the loading of all standard drivers that provide hard work disk.
Troubleshoot Stop 7B error with Acronis Universal Restore.
Acronis Universal Restore finds and installs drivers for the devices needed to run the restored operating system on new hardware. In practice, Acronis Universal Restore allows you to perform in a few clicks most of the steps to eliminate the Stop 7B critical error that were described above. Before applying Universal Restore to the Windows operating system, you need to prepare a set of drivers for the new hard disk controller and chipset (motherboard chipset). These drivers are critical to running the operating system. The driver files must have INF extensions, SYS or OEM. If the drivers were downloaded in EXE, CAB, or ZIP format, extract them using third party application, for example, the free archiver 7-Zip. With a large number of computers, it is advisable to create your own driver repository, sorted by device types or computer hardware configurations. A copy of the repository is best used on standard removable media supported by almost any operating system - on CD / DVD disks and flash drives.
Acronis Universal Restore is free, but only owners of registered Acronis Backup and Acronis Backup Advanced products can download it from the developer's official website. Also, at least for representatives of educational institutions, there is an opportunity to register on the company's website and get a 30-day version of these products, including Acronis Universal Restore as part of the Acronis Backup or Acronis Backup Advanced package. Acronis Backup versions are not compatible with Acronis True Image and c with the help of Universal Restore OS cannot be restored Linux families.
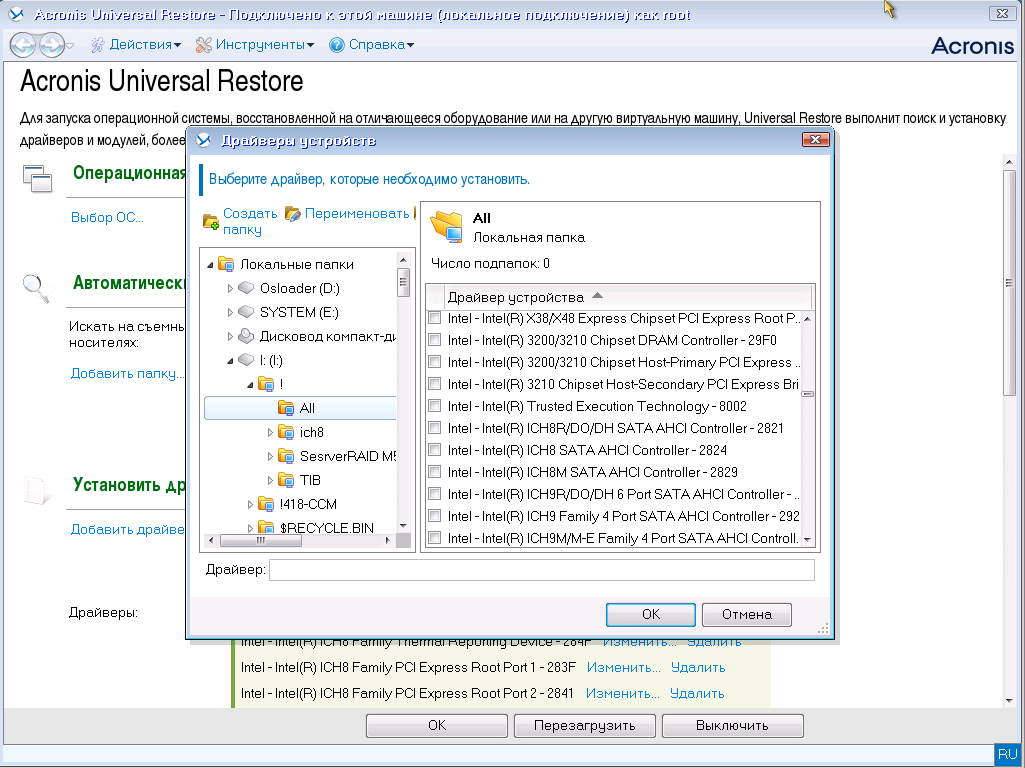
After loading the Acronis Universal Restore environment, the main window is displayed, conditionally divided into 3 parts:

The program displays the found Windows OS for which recovery will be performed, and also allows you to specify the search sources for drivers of the Hardware Access Layer (HAL), hard drive controller and network adapters. If the drivers are on a manufacturer's disc or other removable media, check the box Search on removable media . If the drivers are in the local or network folder, specify the path to this folder by clicking the button Add folder.
While running, Acronus Universal Restore searches for and standard folder storage of Windows drivers (usually this is a folder \WINDOWS\INF).
Setting Install mass storage drivers anyway allows you to specify specific drivers to be installed on the system. This is usually required if you have special hard disk controllers - SCSI, SAS, Raid, etc.
After pressing the button Add Driver you need to specify the path to the driver files and tick the ones you need for mandatory installation:
After specifying the above parameters, click the button OK. The task will begin to install the drivers required by the system. If Acronis Universal Restore does not find a compatible driver in the specified locations, a prompt will appear with the PnP ID of the problematic device and suggestions for further installation - repeat the prompt after adding the required driver to the location, skip installing it, or stop working. After the driver installation job completes, you can change the installation settings and retry the job. As a rule, on standard hardware configurations, Acronis Universal Restore quickly and easily restores Windows to a working state. After the system boots, other drivers are installed in the standard way.
In addition to disk subsystem drivers, Acronis Universal Restore installs network adapter drivers. The network adapter driver will install silently if it is digitally signed by Microsoft. Otherwise, Windows will display a standard message asking you to confirm the installation of the unsigned driver.
In conclusion, I will add that the Stop 7B error can also be caused by a hardware malfunction, damage to the logical data structure on the disk, accidental deletion of driver files or registry entries, etc. However, in reality, such cases are extremely rare.
Questions about activating Windows 10 are among the most frequently asked by users: how the system is activated, where to get an activation key for a clean installation of Windows 10 on a computer, why different users have the same keys, and other similar comments have to be answered regularly.
And now, two months after the release, Microsoft published official instructions with information on the process of activating the new operating system, I will outline all the main points from it related to the activation of Windows 10 below. You can also use Windows 10 without activation, see .
Official information confirms what was previously known: those users who upgraded from Windows 7 and 8.1 to Windows 10 for free or bought an upgrade from the Windows Store, as well as those who participate in Windows program Insiders receive activation without the need to enter an activation key, by linking the license to the equipment (in the Microsoft article this is called Digital Entitlement, I don’t know what the official translation will be yet). Update: It's officially called Digital Resolution.

What does this mean for ordinary user A: After you've upgraded to Windows 10 once on your PC, it will automatically activate on subsequent clean installs (if you've upgraded from a license).
And in the future, you do not need to study instructions on the topic "". At any time you can create bootable flash drive or a disk with Windows 10 using official tools and run a clean installation (reinstallation) of the OS on the same computer or laptop, skipping entering the key wherever it is required: the system will be activated automatically after connecting to the Internet.

In theory, entering the key that was seen earlier after updating the key during installation or after it in the computer properties in theory can even do harm.

Important note: unfortunately, not everything always goes smoothly (although usually - yes). In case something goes wrong with activation, there is another instruction from Microsoft (already in Russian) - help on Windows 10 activation errors, available at http://windows.microsoft.com/ru-ru/windows-10 /activation-errors-windows-10
Who needs a Windows 10 activation key
Now, regarding the activation key: as already mentioned, users who received Windows 10 by updating do not need this key (moreover, as many may have noticed, on different computers and different users may have the same key, if you look at it in one of the known ways), since successful activation depends on it.
A product key for installation and activation is required in cases where:
- You bought a boxed version of Windows 10 from the store (the key is inside the box).
- You bought a copy of Windows 10 from an authorized retailer (online store)
- You purchased Windows 10 through Volume Licensing or MSDN
- You have purchased a new device with Windows 10 preinstalled (they promise a sticker or a key card included).
As you can see, at the current moment in time, few people need a key, and those who need it most likely have the question of where to find the activation key is not worth it.
Activation after hardware configuration change
An important question that many were interested in: how will activation “tied” to equipment work if one or another equipment is changed, especially if the replacement concerns key computer components?
Microsoft responds to this as well: “If you upgraded to Windows 10 using the free upgrade and then made major hardware changes to your device, such as replacing the motherboard, Windows 10 may no longer activate. For assistance with activation, please contact support."
Update 2016: according to available information, since August of this year Windows license 10 received as part of the update can be linked to your Microsoft account. This is done in order to facilitate the activation of the system when changing the hardware configuration, but we'll see how exactly it will work. Perhaps it will be possible to transfer the activation to a completely different hardware.
Conclusion
First, I note that all this applies only to users of licensed versions of systems. And now a brief squeeze on all issues related to activation:
- For most users, the key is not required at the moment, its entry should be skipped during a clean installation, if it was required. But this will only work after you have already received Windows 10 by updating on the same computer, and the system has been activated.
- If your a copy of Windows 10 requires activation with a key, then either you already have it, or some error has occurred on the side of the activation center (see error help, above).
- If you change the hardware configuration, activation may not work, in which case you need to contact Microsoft support.
- If you are an Insider Preview member, then all the latest builds will be activated automatically for your Microsoft account (I have not personally verified if this works for several computers, from available information also remains unclear).
In my opinion, everything is clear and understandable. If something is not clear in my interpretation, see the official instructions, and also ask clarifying questions below in the comments.
Users of personal computer operating systems have their own preferences and work habits. One uses standard applications Windows with default settings. For other users, it is extremely important to personalize the interface of the operating system, use a large number applications and programs with personal settings.
When you reinstall Windows, the custom interface is removed. Therefore, users are not eager to "demolish" the old operating system. However, progress is constantly moving forward, hardware quickly becomes obsolete and the moment comes to replace some components.
And if the replacement of RAM, graphics adapter, power supply or processor can be done without installing a new system while maintaining all information and integrity Windows settings, then, in case of failure or updating of the motherboard and hard drive, you cannot avoid installing a new OS.
Preliminary steps for saving Windows settings
To protect yourself from possible failure during the motherboard replacement procedure, you must have a copy of the installed system. To date, there is a huge variety of software with which you can create a rescue disk with an old operating system.
In order to trick the system when replacing the motherboard, you must remove all drivers. After all, the main problem when replacing the "motherboard" is the incompatibility of drivers, and the ATA / SATA controller is considered the most capricious.
Windows has special program(sysprep) to clean unique data from the system, using which you can painlessly replace the motherboard. Particular attention must be paid to the fact that this program should be run before replacing old components.
So, we can start deleting data using the sysprep utility. To call the program, you must simultaneously press the "Win + R" keys, in the window that appears, enter the address: "C:\windows\system32\sysprep\sysprep.exe" and click the "ok" button.
After the dialog box with the program settings appears on the monitor, you need to do the following manipulations:
- in the menu "Actions to clean up the system" select the item "Go to the system welcome window (OOBE)";
- check the box "Preparing for use";
- in the "Shutdown Options" menu, select "Shutdown";
- press the “OK” button.
The computer will automatically turn off as soon as the utility performs all the necessary operations. The next step is the process of replacing the motherboard and running the computer with the new hardware.
Restoring Windows 7 when the motherboard fails
However, it is not always possible to prepare for a "painless" replacement of the motherboard. Sometimes there are sudden failures in the equipment, and it is no longer possible to boot the working system.
In this situation, the special ERD-Commander program will help, which can be easily downloaded on the Internet and then burned to a CD. After installing a new motherboard, follow step by step instructions:
- Boot from a pre-recorded disc.
- In the menu, select "ERD Commander 6.5 for Windows 7".
- In the pop-up window with a question about connecting to the network, click "No".
- We answer “Yes” to the program’s request to reassign drive letters.
- We indicate our Windows7, click next.
- Looking forward to the automatic fix.
- In the "System Recovery Options" window, select the lowest item "Run various MSDaRT recovery tools".
- Next, we call the registry editor.
- We find the branch "MountedDevices" and delete it.
- Go to the "HKLM\SYSTEM\CurrentControlSet\services" branch and edit the values in the Start parameter to "0".
Board replacement process
At the first Windows boot will ask for a username. You must create a new account, which you can easily delete later, and you will use your old data. Further, the system itself installs the necessary drivers or asks the user for those that are not in the database.
The only downside this method is reactivation of Windows, as the operating system is sometimes tied to previously installed hardware.
If you are going to upgrade/replace the motherboard, but don't want to reinstall Windows, drivers, programs, or you want to switch SATA controller modes from IDE to AHCI or RAID (or vice versa), then this article is just for you!
Often, when changing the motherboard and starting the PC without reinstalling Windows, you can see a blue screen of death (BSOD) with the error STOP 0x0000007B INACCESSABLE_BOOT_DEVICE.
The reason for this unpleasant picture is the inability of Windows itself to find the proper drivers for the SATA controller. This problem can be easily fixed without reinstalling Windows. To do this, all you need to do is "order" the operating system to use the standard SATA controller driver at startup, which is loaded after a clean reinstall of Windows. And the registry editor will help us with this.
Run "old" Windows on a new motherboard
To make changes to the Windows Registry, simply follow the instructions below:
Before proceeding further, you need to decide on the following:
1. You are just about to replace the motherboard or change the IDE / AHCI operating mode and your PC is working in the usual normal mode, Windows starts
2. You have already replaced the motherboard and Windows won't start. In this case, you will have to use the offline registry editor.
1. Change registry before updating motherboard or controller settings
This section is suitable for those whose PC starts up normally and you are just about to replace the motherboard. Open , to do this, press the buttons " Win+R" and in the window that appears, type "", then click Enter.
We open the registry editor. It looks like a "tree" with a bunch of folders and settings:

We need to go to the branch:
HKEY_LOCAL_MACHINE\SYSTEM\CurrentControlSet\services\msahci
We find the Start parameter there and set its value to " 0 ” (zero) and press the button “ OK»
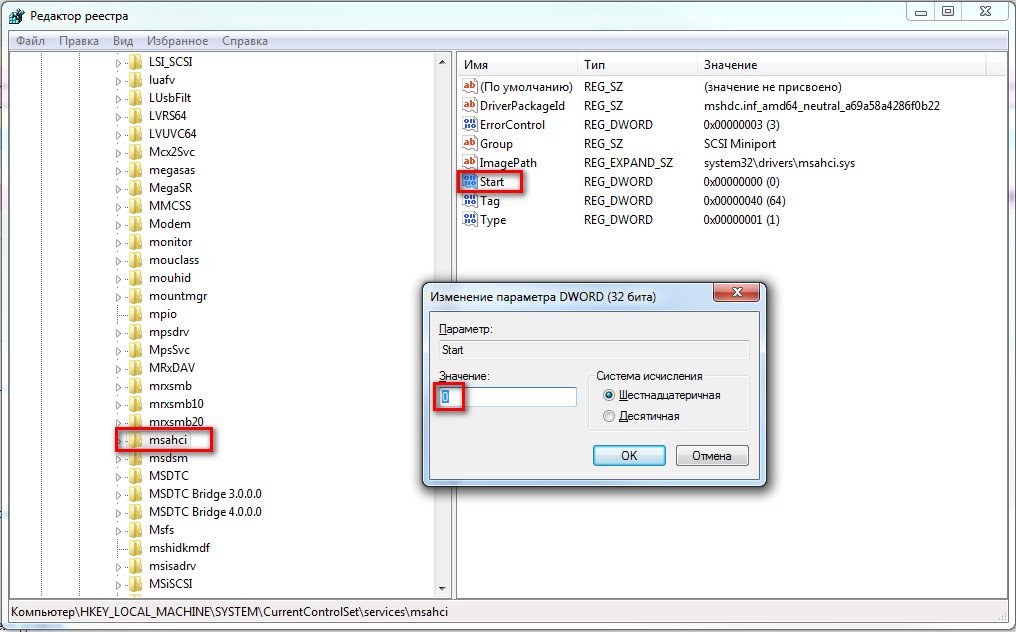
HKEY_LOCAL_MACHINE\SYSTEM\CurrentControlSet\services\pciide
and do the same with the Start parameter

If you are using Raid (if not, then skip this step) then you need to do the same in the next branch:
HKEY_LOCAL_MACHINE\SYSTEM\CurrentControlSet\services\iaStorV
This completes the preparation. Now you can install a new motherboard or change the parameters of the SATA controller. At the next Windows startup boot from standard drivers sata controller. After starting, the drivers for the new controller will be installed automatically. After downloading don't forget to install new driver from the motherboard that come with the kit, or download them from the Internet. It is best to download the original drivers from your motherboard manufacturer's website.
2. Changing the registry after updating the motherboard (windows does not start)
If you have already changed the motherboard and there is no way to boot Windows, for example, the old one is out of order, then in this case you need to use the offline registry editor. For this task, I prefer to use the recovery environment, which can be accessed, for example, using the disk to install the operating system.
To open Registry Editor using the installation DVD or USB drive, boot your computer using the installation disc. You may need to select DVD/CD or USB as the first boot device in the BIOS settings.
After booting up, on the very first screen, click "Next" and then select "System Restore".

If you have Windows 7 then on the first screen click next, note run command line
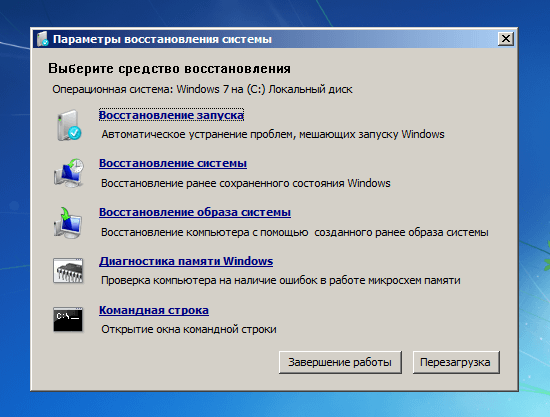
If you are using Windows 8.x or Windows 10, then you need to select Diagnostics -\u003e Advanced Options -\u003e Command Prompt.

At the command prompt, type and press Enter.

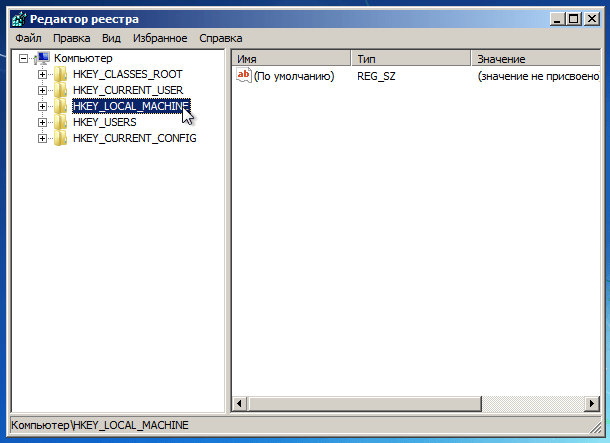
In the registry editor, select the branch HKEY_LOCAL_MACHINE, and on the File menu, click Load Hive.
Open the drive where the operating system is installed.
Navigate to the Windows\system32\config directory, select the file system and click "Open".

Enter a name for the section (for example, Offline) and click OK.

Expanding the HKEY_LOCAL_MACHINE branch, you will see the created partition (in our example it is called Offline).

Expand the new section and navigate to the following subsection:
HKEY_LOCAL_MACHINE\Offline\ControlSet001\services\msahci
Open the Start parameter, change its value to 0 (zero), press OK.

Perform the same operation on the subsection:
HKEY_LOCAL_MACHINE\Offline\ControlSet001\services\pciide
Close Registry Editor, Command Prompt, and restart your computer. Extract installation disk so that the operating system can boot normally. Windows should now start without any problems and then install the necessary hard disk controller drivers. Don't forget to install the drivers from your new motherboard afterwards!
Conclusion
With such a simple method, you can save your working Windows operating system and all the programs installed on it when changing the motherboard or when changing the parameters of the sata controller without reinstalling the system.
I hope this article was helpful!


