What to do if the key is broken. Is it possible to fix a key on a laptop?
Having learned the structure of the button and a number of simple operations for removing and installing it, the user will be able to independently fix a minor breakdown or replace the faulty key with a new one.
Laptop, unlike personal computer, has a built-in dialing device, the cost of which is significantly higher due to its compact dimensions and integral design. That is why its repair, including independent repairs, is constantly in demand and economically justified.
With prolonged use and active use, parts of the keyboard fall out or break, requiring replacement, quite often.
However, before you run to service center, let's try to figure out whether it is possible to insert a button into the laptop keyboard yourself at home and, perhaps, save money and personal time.
Possible reasons
There can be many possible reasons for keys breaking or falling out:

To understand what this leads to and determine the likelihood of self-repair, consider the following cases when one or more keys have fallen out or do not work:
- the upper part simply jumped out of the mounts, got stuck, the plastic mount broke, or the fixing lugs on the aluminum base of the keyboard were bent. - We install, repair or replace ourselves;
- there was a short circuit and/or destruction of the conductive paths due to a manufacturing defect, liquid ingress or other outside interference. - It is worth contacting the service if you do not have certain skills;
- damage to the connecting motherboard plume. - Replacement (preferably by a specialist) of the film or the entire device.
Taking into account the fact that most users are amateurs, we will consider only fixing the failures of the first case: mechanical damage.

To do this you may need:
- a regular needle or a syringe;
- paper clip;
- glue;
- knife, small screwdriver;
- wire cutters and pliers;
- thin soldering iron and lighter;
- small vice.
The first two positions of the list are enough to simply insert the dropped item, and the rest may be needed for minor repairs.
Important: Please note right away that all work must be carried out ONLY with the device disconnected from the network and the battery removed.
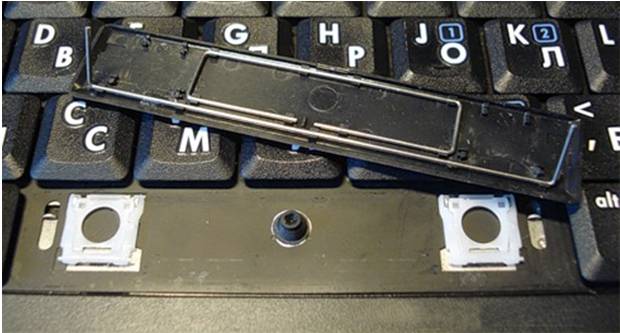
Photo: Parsing the assembly of keys
Button and its design
Before inserting a button into the laptop keyboard yourself, we recommend that you become familiar with its design. This will help you carry out repairs correctly, as well as make installation easy and simple. It should be remembered and taken into account that, unlike a stationary one, a laptop keyboard has a shorter stroke.
They consist of:
- directly the lid with latches - a rectangular piece of plastic that is pressed with your finger (hereinafter simply “lid”). On the inside there are two pairs of fasteners: latches and grooves, and on the long ones there is also a metal stiffness stabilizer;

- folding X-shaped mechanism with latches that hold the lid. It is commonly called a "swing", "lift" or "cot". Please note that each of the two parts of the folding mechanism is attached to the key in two places;

- a spring element that raises and lowers the key, and also directly closes the electrical contact - a rubber nipple cone (hereinafter simply “spring”);
- films containing contact conductive pads and tracks.
- At the first stage we install the stabilizer.

We insert the ends of the fastening into special holes and fix them in the grooves that are located directly on the keyboard body;

- on the second - we press and connect the lower part of the surface of the lid with the clamshell;

- at the third stage, lightly pressing and snapping the upper latches on the lid and the swing, we put it in place.
- put it back “as is”, without changes;
- purchase and install a new one (used is also possible);
- make minor repairs or replace parts from the “donor” and continue operation.
- assembly and installation of the popped-out parts of the mechanism into the grooves (quite often the clamshell “crumbles”);
- correction of bent lugs in the metal base of the keyboard (for example, when a heavy object falls on the keyboard);
- gluing cracks and broken fasteners.
A typical keyboard base in a laptop is an aluminum plate, stamped with ears for good fixation of the clamshell and the contact pad, under which there are three layers of film with conductive graphite tracks.

Reliable fastening of the swing ensures uniform movement and the absence of distortions when pressing the key.
Please note that different manufacturers may have slight design differences in the shape and types of clamps.
Therefore, if you need to disassemble it yourself for the first time, proceed carefully.
Disassembly procedure
There are often situations when it becomes necessary to completely remove and disassemble the button. For example, sinking, lack of response on the screen when it is pressed, or deformation of the folding bed mounting ears. Removing, disassembling and inserting a button into a laptop keyboard is quite easy.
To do this, you will need a thin, flat instrument, such as a dental hook. As you know from the previous section, the swing is attached to the lid in four places. You can’t just bend it and “rip it off” - this will deform the swing and lead to damage.
That's why:

Inserting a button on a laptop is very easy
First, we carefully inspect all the fasteners, ears, antennae and grooves again. If you have carefully studied the device and design, read the disassembly procedure, then putting the popped element back in place will not be difficult.
This process involves two simple steps:

Please note that sometimes the lid will fall out along with the swing. In such a case, you should disassemble it, carry out an inspection, and only then install it. Moreover, first we insert the folding mechanism, and then the lid itself.
The described process may seem complicated, but you just have to try it once and you will see for yourself that inserting a button into a laptop keyboard is very simple!

Installing large buttons
Function keys (space, register, tab, enter, etc.) are larger than the others. It is this property that requires a slightly different order of installation. The reason for this is the presence of a metal stabilizer, which ensures even pressure.

There are additional lugs on the keyboard backing for reliable fixation of the rigidity amplifier itself.
And although everything else is exactly the same as described above, we install long buttons on the folding bed in three stages:
Please note that some long keys (for example, the spacebar) are fixed by two folding mechanisms and a rigidity amplifier.


We repair keys
As a rule, it is better not to start complex and time-consuming repairs yourself.
Having disassembled a faulty, poorly functioning or torn out key, you will have to, based on its careful examination, make one of three decisions:
For the last point, you may find the tools we talked about above useful.

Minor mechanical repairs include:
It is not worth repairing the damage to the latches and hinge joint of the clamshell - it is better, if possible, to find a “donor” or replace the entire key. The smoothness, softness and quietness of its operation depends on this.

A rubber spring is usually glued to a film with conductive tracks. Sometimes it happens that it falls out. In this case, before inserting the button into the laptop keyboard, you should carefully install its wide part towards the bottom, strictly in the center. Displacement of the spring during installation is not allowed.
Having a problem with the keys? Try to solve it yourself if possible. It is not difficult! All you need is attentiveness, perseverance, accuracy and a little time.
Having acquired the necessary skills, you can, on occasion, save the life of your pet by promptly eliminating the consequences of moisture ingress or significantly extend it by performing a general cleaning of dust and crumbs.
Helpful advice: By the way, before completely disassembling the keyboard of your laptop, we strongly recommend taking a photo, just in case, of the order of the keys. This will help greatly simplify and speed up the reassembly process!
This need arose for me due to the fact that a number of keys in different rows, both alphabetic and numeric, stopped working. Most of all I was afraid that the controller was damaged and I wouldn’t be able to repair the laptop keyboard, but I still hoped that the problem was in the keyboard itself
In this article I will describe my actions, accompanying the text with photographs that I took specifically to make an informative, easy-to-understand article about repairing a laptop keyboard.
Since I know firsthand that the laptop keyboard is the most often damaged part of the laptop. Perhaps there are people among the readers who are ready to repair their laptop keyboard themselves, so I decided to write this article in a style that is understandable to the reader
First, you will need to remove the keyboard; the procedure will vary depending on the laptop model. Most often, the keyboard is screwed onto the front panel; access to the bolts is usually closed by the front cover under the screen, which can be removed without much effort.

The keyboard keys are mounted on elevators, so to speak, which have four attachment points, both to the key and to the keyboard pad.
To remove a key, you need to carefully slide a small screwdriver or a suitable tool under it and make a force, lifting the key upward. In this case, the key will be released from the elevator locks and removed.
Be extremely careful, the mechanism of both the elevator and the key mounts is plastic and breaking it will not be difficult, especially if you have no experience

After you remove all the keys, you will have to remove the film from the keyboard body and divide it into two parts.
The film is usually a book that unfolds and has a transition on one side. It is better to separate the film after pre-warming it, for example with a hairdryer, since the parts are usually glued quite well

To restore damaged tracks, you will need a special glue with high conductivity, ideally containing silver; you can find such glue on the radio market or in specialized stores that sell everything for repairing equipment and electronics. The price is not expensive, it cost me only 100 rubles to buy glue containing silver, Kontaktol
Next, using a multimeter, on the probes of which I soldered needles, we look for damage and breaks, carefully piercing the tracks to make contact with the track. The tracks on the keyboard are covered with microfilm, so you can’t do without piercing them with a probe needle
After you find the damaged parts of the track, all that remains is to clean these places and carefully draw the track with silver Kontaktol and let it dry
Basically everything. We put it back together in reverse order and rejoice. The price of a laptop keyboard is on average 2000 rubles, the repair cost me 100 rubles - the price of Kontaktol, there’s even a lot of it left for the future if anything...
We constantly use mobile PCs in our Everyday life. In it, the keyboard is the part of the device that takes on the most mechanical stress.
The most common causes of breakdowns
The keyboard on a mobile PC has approximately the same structure as on a personal PC. It, like any device, is very sensitive to all kinds of dirt, animal hair, crumbs, and especially liquid spilled on it. After a certain time of using the keyboard, the buttons on the mobile PC fail or simply fall off.
Also, the cause of breakage of the buttons on a mobile PC can be a simple banal cleaning of the keyboard using a vacuum cleaner for this purpose. Or Small child may accidentally tear off a key. Also, the cause of such a breakdown can be pets that live with you. This also happens quite often. But you don’t need to immediately take your laptop for repair. Very often you can do everything yourself.

Button structure
Before you consider how to insert a button on a laptop, you need to know its structure and mounting features.
A button consists of the key itself, a mechanism for holding it and a spring element with which it can be raised and lowered. There is also a special film with platforms and tracks.
The mount consists of two parts. These two parts are fastened together in the center by small “antennae”. They come out of the inner part of the mount and are inserted into special grooves in the outer part. Thanks to this design, they can move when you press them. The button itself is attached to opposite sides.
Let's look at how to insert a button on a laptop
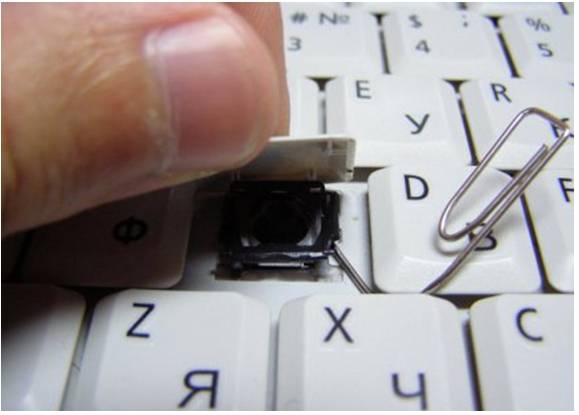
If a button falls out on your mobile PC, there is no need to panic right away. In many cases, the problem resolves itself. At home, you can also solve the problem of how to insert a button into a laptop. To do this, it is enough to have a simple paper clip with you. Before inserting the button into the laptop to replace it, the old part must be removed from the keyboard. Working with buttons on a mobile PC requires more care, as they are flatter and can be damaged if pressed hard. Removing an element goes like this. It is necessary to bend the paperclip into a straight line and pass it under the lower platform of the keys. Now you need to pull it towards you, and the key will jump off its base.

Now let’s figure out how to insert a button on a laptop, provided that all the “antennae” located on the “rocker” and the grooves are not damaged. This is the easiest way. To do this, the button must be installed in the upper position on the base under the required mount. After it is in place, the key must be gently pressed down.
It should be noted that you do not need to use force when installing the keys. Any pressing must be done smoothly and easily.
After installation, you need to carefully check the fastening of the replaced key. When purchasing new buttons, you need to check whether they will fit your laptop model. If you need to change several parts, it is better to do it gradually. So as not to confuse the location on the keyboard.
Before inserting a button on a laptop, you need to carefully check that the plastic mount, which is located under the key itself, is in its place. It may immediately seem that it is very difficult to connect everything. But in fact, this is not entirely true, because in reality there can only be one correct option. You can't install anything differently.

How to insert a large button
Let's look at how to insert a button on a large laptop. These are keys such as Space, Tab, Shift, Enter. In addition to the “rocker”, which is made of plastic, they may also have a metal stabilizer. It is necessary to ensure that the key is pressed evenly. On the inside there are two ears necessary for attaching the stabilizer to them. You need to tie up the ends right away. Next, insert the antennae of the “rocker” into the grooves and put the button in its place by lightly pressing it.
The space bar is supported by several “rockers” and a stabilizer. A situation may arise that the “rocker” may be disassembled. It is easy to assemble using a needle or toothpick. One side needs to be inserted into the groove, and the other is installed using a needle.
Let's look at how to insert a button on a laptop in which the mount is made using metal brackets instead of plastic swings. The mounting here is also simple. Just note that it will be noisier.
How to fix a button on a laptop
It is necessary to clearly understand that there will most often be only one attempt to repair the button. This must be taken into account before installing a button on the laptop. Before starting the necessary work, you need to have the following tools available:

We place the broken mount on it workplace. Take a needle and a soldering iron. We apply the needle to the place of the broken antennae and make sure that it goes there a few millimeters. We heat it with a soldering iron and fuse it into the mount. We bite off the unnecessary part of the needle. Clean off excess plastic.
Let's consider another option on how to install a button on a laptop. We heat the needle with a lighter and make a groove with it, into which you can place, for example, lint or something like that. Place it in the groove and glue it with superglue
How to make a new button yourself
If the button stops working, there is no need to rush to throw it away immediately. Maybe she's just sunk and can be put in her place. If not, then first you need to carefully examine the button. If it is just a little cracked, then it can be glued together with simple superglue. The only most important thing is that her contact is in the same place.

If the key cannot be glued, you can make it yourself. Let's look at how to make a button on a laptop yourself. To do this, you need to have plasticine with you. You need to make the necessary shape from plasticine and fill it with resin. You also need to put the contact there. It must be installed correctly. To make it even, it can be trimmed with ordinary sandpaper. So, we figured out how to make a button on a laptop at home. In some cases, this is easier than taking your mobile PC for repair.
If the button just fell out
If a button falls out of a laptop, you need to perform the following steps. On its reverse side there are grooves and latches. They contain “rocker ears”. Their purpose is to connect the button to the keyboard. If the rocker key falls out, they need to be disconnected. Then the “rocker” is installed. There will be a button cover on it. They are connected to each other by the grooves that are located on them.
So, we figured out how to install a button on a laptop. As you can see, this is not very difficult to do, and in many cases you can solve the problem without contacting a service center.
With the advent of laptops, one of the most common questions has become - how to fix the keyboard on a laptop yourself? Careful handling makes a laptop a virtually indestructible device, but physical damage always remains the main cause of all breakdowns.
When starting to repair your keyboard yourself, you should definitely consider the following rules:
1. Repair operations should only be carried out after disconnecting the laptop from the power supply and first removing the battery;
2. General design of the keyboard structure different manufacturers may differ slightly from each other and the rules for its maintenance are naturally also different;
3. Do not use force.
How to fix a laptop keyboard when the button cover has fallen out?
The essence of this repair is very simple - the cover just needs to be returned to its place. The main difficulty is that due to the compact size of the device itself, the fasteners are also very small, especially the grooves and latches.
Keyboard repair should begin by inspecting the damage site for chips and cracks on the cover and at the place where it is attached. If everything is fine, you just need to install it back. There are 2 latches and 2 grooves symmetrically located on the lid, but on the elevator itself, which is attached to the keyboard, there are 2 elevators and 2 locks. It is necessary to connect the lid grooves quite tightly with the elevator protrusions, and then, without using force, install the latches into the locks until a characteristic click appears. It is worth considering that these manipulations must be carried out first with the bottom part of the button, and then with the top - without mixing it up! During the installation process, you need to ensure that the button is placed so that it does not move to one side: the fasteners are very fragile and incorrect movement will lead to their breakage.
When problems arise with the following keys: “enter”, “space” or “shift”, general scheme installation adds one more manipulation. The fact is that the large buttons are equipped with a special stabilizer that controls uniform pressing. After all, in the process of work we do not always end up exactly in the center of the button. It is worth clarifying that the stabilizer is a small element made of rigid wire, which is attached to the inside of the button. Both of its ends are brought together into special lugs, which are located on both sides of the elevator. After which, the lid simply snaps into place.
Modern products mainly use plastic, but some manufacturers do not skimp on metal. This distinctive feature is especially characteristic of Apple production. But every day, even this company produces more and more products from inexpensive plastic. If you are lucky enough to own a device with metal parts, it is worth remembering that initially a wire is installed at the mounting location, and only after that the key cover itself.
How to return a fallen elevator cover back to its place?
It happens that the cover remained fastened to the elevator and, along with it, became unfastened from the fasteners on the keyboard. If there is no damage, such a breakdown can be repaired in a few minutes: first we fix the elevator in place, after which we install the cover itself. Of course, they need to be carefully separated in advance, releasing the latches and protrusions. There are always metal elevator mounts on the keyboard - one wide ear on the bottom and two small ones on top. Often, after the cover is torn off, the ears become bent and need to be carefully aligned. In this matter, the main thing is not to overdo it and not break off the bent ears, which will force you to buy new keyboard. It is better to choose a flat-head screwdriver and gradually align all the deformed parts.
When nothing interferes with the repair, you need to insert a wide eye into a suitable hole in the elevator, simultaneously correcting the direction of the parts and smoothly lowering it until correct installation. If the key does not fall into place, you need to check again whether the elevator is warped or the fasteners are bent. It’s worth trying again and everything will fall into place.
Do not worry if, when separating the elevator from the button cover, the elevator splits into two parts - it can be easily returned to its previous state by connecting the grooves and protrusions on both sides. Sometimes, for such jewelry work it is better to use a needle or match. You need to act in the following sequence: you need to insert the protrusion into the corresponding groove on one side, and then form a “swing” on the other. Then we simply fasten it in place. When the elevator is in place, we attach the cover itself. Be sure to remember - first the lower grooves, and then the upper ones. When finished, it is important to check the functionality of the key. At first it may seem like a very long process. But even a beginner who understands all the intricacies can cope with such a trivial breakdown in a couple of minutes without financial expenses.
The laptop keyboard button is cracked or broken, what should I do?
A broken button, lift or fasteners can no longer be repaired. You can try to replace them by purchasing failed parts in specialized stores. But this option is suitable for a short time. Don't try to glue the lid to the elevator. Since just one accidentally spilled drop of glue and the entire keyboard must be replaced.
If a laptop keyboard key gets stuck?
In this case, the sloppy owner who loves to eat and drink on his laptop is to blame. A keyboard that is clogged or filled with liquid often begins to show various “tricks” that cannot be corrected by simply reassembling the keys. All that remains is to disassemble and thoroughly clean, and sometimes even change the keyboard itself.
If the button sticks and does not return to its intended place, the cause may be accumulated debris or a broken elevator. We remove the lid, see what's wrong and remove all the debris. A key can get stuck due to accumulated debris under the rubber cap, which simply sticks to the board and contacts. In this case, you need to start cleaning the keyboard and not clog it again.
Having learned the structure of the button and a number of simple operations for removing and installing it, the user will be able to independently fix a minor breakdown or replace the faulty key with a new one.
How to insert a button into the keyboard on a laptop
A laptop, unlike a personal computer, has a built-in dialing device, the cost of which is significantly higher due to its compact size and integral design. That is why its repair, including independent repairs, is constantly in demand and economically justified.
With prolonged use and active use, parts of the keyboard fall out or break, requiring replacement, quite often.
However, before you run to the service center, let’s try to figure out whether you can insert a button into the laptop keyboard yourself at home and, perhaps, save money and personal time.
Possible reasons
There can be many possible reasons for keys breaking or falling out:

To understand what this leads to and determine the likelihood of self-repair, consider the following cases when one or more keys have fallen out or do not work:
- the upper part simply jumped out of the mounts, got stuck, the plastic mount broke, or the fixing lugs on the aluminum base of the keyboard were bent. - We install, repair or replace ourselves;
- there was a short circuit and/or destruction of the conductive paths due to a manufacturing defect, liquid ingress or other outside interference. - It is worth contacting the service if you do not have certain skills;
- damage to the cable connecting to the motherboard. - Replacement (preferably by a specialist) of the film or the entire device.
Taking into account the fact that the majority of users are amateurs, we will consider only the correction of breakdowns in the first case: mechanical damage.

To do this you may need:
- a regular needle or a syringe;
- paper clip;
- glue;
- knife, small screwdriver;
- wire cutters and pliers;
- thin soldering iron and lighter;
- small vice.
The first two positions of the list are enough to simply insert the dropped item, and the rest may be needed for minor repairs.
Important: Please note right away that all work must be carried out ONLY with the device disconnected from the network and the battery removed.
Photo: Parsing the assembly of keys
Button and its design
Before inserting a button into the laptop keyboard yourself, we recommend that you become familiar with its design. This will help you carry out repairs correctly, as well as make installation easy and simple. It should be remembered and taken into account that, unlike a stationary one, a laptop keyboard has a shorter stroke.
They consist of:

A typical keyboard base in a laptop is an aluminum plate, stamped with ears for good fixation of the clamshell and the contact pad, under which there are three layers of film with conductive graphite tracks.

Reliable fastening of the swing ensures uniform movement and the absence of distortions when pressing the key.
Please note that different manufacturers may have slight design differences in the shape and types of clamps.
Therefore, if you need to disassemble it yourself for the first time, proceed carefully.
Disassembly procedure
There are often situations when it becomes necessary to completely remove and disassemble the button. For example, sinking, lack of response on the screen when it is pressed, or deformation of the folding bed mounting ears. Removing, disassembling and inserting a button into a laptop keyboard is quite easy.
To do this, you will need a thin, flat instrument, such as a dental hook. As you know from the previous section, the swing is attached to the lid in four places. You can’t just bend it and “rip it off” - this will deform the swing and lead to damage.
That's why:

Inserting a button on a laptop is very easy
First, we carefully inspect all the fasteners, ears, antennae and grooves again. If you have carefully studied the device and design, read the disassembly procedure, then putting the popped element back in place will not be difficult.
This process involves two simple steps:

Please note that sometimes the lid will fall out along with the swing. In such a case, you should disassemble it, carry out an inspection, and only then install it. Moreover, first we insert the folding mechanism, and then the lid itself.

The described process may seem complicated, but you just have to try it once and you will see for yourself that inserting a button into a laptop keyboard is very simple!

Installing large buttons
Function keys (space, register, tab, enter, etc.) are larger than the others. It is this property that requires a slightly different order of installation. The reason for this is the presence of a metal stabilizer, which ensures even pressure.

There are additional lugs on the keyboard backing for reliable fixation of the rigidity amplifier itself.
And although everything else is exactly the same as described above, we install long buttons on the folding bed in three stages:

Please note that some long keys (for example, the spacebar) are fixed by two folding mechanisms and a rigidity amplifier.


We repair keys
As a rule, it is better not to start complex and time-consuming repairs yourself.
Having disassembled a faulty, poorly functioning or torn out key, you will have to, based on its careful examination, make one of three decisions:
- put it back “as is”, without changes;
- purchase and install a new one (used is also possible);
- make minor repairs or replace parts from the “donor” and continue operation.
For the last point, you may find the tools we talked about above useful.

Minor mechanical repairs include:
- assembly and installation of the popped-out parts of the mechanism into the grooves (quite often the clamshell “crumbles”);
- correction of bent lugs in the metal base of the keyboard (for example, when a heavy object falls on the keyboard);
- gluing cracks and broken fasteners.
It is not worth repairing the damage to the latches and hinge joint of the clamshell - it is better, if possible, to find a “donor” or replace the entire key. The smoothness, softness and quietness of its operation depends on this.

A rubber spring is usually glued to a film with conductive tracks. Sometimes it happens that it falls out. In this case, before inserting the button into the laptop keyboard, you should carefully install its wide part towards the bottom, strictly in the center. Displacement of the spring during installation is not allowed.
Having a problem with the keys? Try to solve it yourself if possible. It is not difficult! All you need is attentiveness, perseverance, accuracy and a little time.
Having acquired the necessary skills, you can, on occasion, save the life of your pet by promptly eliminating the consequences of moisture ingress or significantly extend it by performing a general cleaning of dust and crumbs.
Helpful advice: By the way, before completely disassembling the keyboard of your laptop, we strongly recommend taking a photo, just in case, of the order of the keys. This will help greatly simplify and speed up the reassembly process!


