How to easily create your Apple ID. How to register a new iPhone instructions How to register a new iPhone 5
Buying a device from Apple is a joyful event. But after turning on the device for the first time, the user may encounter a number of problems. For example, with gadget activation. Not everyone knows about this operation. We have to figure out how to activate the iPhone 5S. What is needed to bring an idea to life? If you carefully follow the simplest instructions and also read the text on the phone display, you will be able to do this in the shortest possible time. Where to begin?
What's useful
Let's start with preparation. Activating an iPhone 5S is impossible without some details. Typically, users have no problems preparing for activation. In particular, among Apple fans.
In general, this will require:
- SIM card;
- connection to a network via Wi-Fi (or a computer with the Internet and iTunes);
- power supply;
- phone charger;
- SIM card clip;
- USB cable.
This will be enough to activate the Apple device in any way. Getting an iPhone 5S to work isn't that difficult. Next we will look at the activation procedure in detail.
Activation steps
How to activate iPhone 5S? More on this later.
First, you should pay attention to the fact that this process consists of several stages. Namely:
- inclusion;
- selecting basic phone settings;
- direct activation;
- launching the device for the first time.
We will definitely be able to learn about all these stages further. Everyone can get started with the iPhone 5S without much difficulty.

Sim card
The first thing to do is insert a SIM card into the phone. Apple devices excel in this regard. They provide a special process for connecting a SIM card.
How exactly to proceed? The owner of an Apple phone must:
- Take a paper clip for the SIM card.
- Insert the mentioned component into a special hole on the side panel of the smartphone.
- Click on the paper clip.
- Remove the SIM card slot.
- Insert the SIM card into the slot.
- Return the component back to the phone.
Turning on the device
The next step is to turn on the smartphone. To do this, the user must first connect the device to the charger and plug it into an outlet. With zero (or minimal) battery charge remaining, activation will not be possible. It will simply stop. To successfully cope with the task, you need to have a charge of at least 20-30%.

How to activate iPhone 5S? On the top panel of the Apple phone, you need to press the power button. After holding it pressed for several seconds, the device will start.
If everything is done correctly, a silver apple will light up on the display. This is a sure sign that it's time to take the next step.
Basis
Did the person buy a phone from Apple? The iPhone 5S, like any other Apple device, will have to be activated. Otherwise, it will not be possible to work with him. Fortunately, everything is not as difficult as it seems at first glance.
The activation instructions for iPhone 5S are divided into several simple steps. After turning on the device you will have to set basic settings phone. It is proposed to do this as follows:
- Swipe from left to right along the bottom of the display. You need to do this when the welcome screen lights up. It will say "Hello" in different languages.
- Select the desired system language. Just tap on the corresponding line.
- Indicate the citizen's country of residence.
- Connect to the Internet. For example, by clicking on the “Select network” hyperlink and then specifying a particular Wi-Fi.
By the way, you need to be extremely careful when connecting to the network. After all, the further activation of the iPhone 5S will depend a little on this. First, let's look at the situation with connecting to Wi-Fi. This is the most common layout.

Basic steps
How to activate iPhone 5S with a SIM card? As soon as the user connects to the Internet, a form will be available for him to fill out. It will help you configure your phone for the first time.
The iPhone activation guide looks like this:
- Enable or disable geolocation. To do this, click on the appropriate line.
- Select the "Like New" option.
- Create an AppleID profile.
- Click on the "I agree" button. It is located at the bottom right of the display.
- Click on the words “Install now” and place your finger on the selected area on the screen. This step can be postponed. Just click on the appropriate button.
- Set a password for working with an Apple device.
- Click on the "Allow sending data to the Apple server" or "Do not allow" button. It all depends on personal preference.
Ready! If everything is done correctly, the message “Welcome!” will appear on the screen. It will inform you that the device has been successfully activated. But what if there is no Wi-Fi network? Then you will have to carry out the procedure through a computer.

iTunes, PC and iPhone
In reality, everything is much simpler than it might seem initially. We already know how to activate an iPhone 5S. If the user cannot find Wi-Fi network, he will have to carry out the procedure using a computer or laptop.
Under these circumstances, it all starts with installing a program called iTunes. All owners of Apple gadgets should have it. You will have to download the latest version of the program. Otherwise, the application may malfunction.
Installation iTunes file downloaded from any available source, after which the exe document is launched on the computer. The installation wizard is activated. By following the instructions on the screen, a person will be able to complete the initialization of the software. It's absolutely free.
Connecting to a computer
How to activate iPhone 5S without a SIM card? You can operate through a computer and iTunes. This technique also helps to cope with the task if there is no Wi-Fi connection.
You need to properly connect your Apple device to your computer. How it's done?
The following type of instructions will help you cope with this task:
- Take a USB cable.
- Insert one end of the cable into the appropriate connector on the phone.
- Plug the other end of the cord into the USB port on the computer.
- Launch iTunes.
- Wait a little.
This way, not only will the connection occur, but also the devices will be synchronized. It is very comfortable. Especially considering that now the user will be able to activate the iPhone 5S without much difficulty.
What exactly should I do? Follow the instructions on the screen. They are no different from the steps listed earlier. The only difference is that when connecting via a PC, you do not have to insert a SIM into the device, and there is no need to turn on Wi-Fi.
Without iTunes
How to activate an iPhone 5S if a person does not have a SIM card? There may be problems with this operation. Especially if the user does not want to work with iTunes.

Without a SIM card it is almost impossible to cope with the task. Although experts recommend working with iTunes to bring your idea to life. Or you should follow the instructions below.
It has approximately the following structure:
- Turn on the phone.
- Press the "Home" button on your mobile device.
- Select "Emergency call".
- Dial "112".
- Press the call button.
- Click on the "Turn off" button.
- Select the "Cancel" option.
- End the call.
It is done! Now the user will have a fully working device. But, as a rule, sometimes iPhone activation fails. What difficulties might you encounter under certain circumstances?
Problems
Apple smartphones are the most common technology. It's high quality, but even it sometimes fails. What difficulties might users encounter when thinking about how to activate the iPhone 5S?
The following situations and ways to solve them can be distinguished:
- If you do not remove the film from mobile device, the "Home" button will be difficult to press. Because of this, the device may be blocked. The solution is simple - you can press the “Enable” button on the gadget during auto-locking.
- Absent Wi-Fi connection. In this case, only connecting an Apple mobile phone to a computer with iTunes will help cope with the task.
- Problems with device synchronization. They usually disappear if you update iTunes on your computer.
- iTunes update failed. Removing it is as easy as shelling pears. It is enough to first close the application completely. Only then is it allowed to update it.
- Inability to take fingerprints. To achieve this task, you need to remove the factory default from the screen. protective film. The mentioned operation will not work with her. The sensor simply will not be able to recognize fingerprints.
These are the most common problems. Now it’s clear how to deal with them. Activation iPhone more will not cause any trouble or hassle.
Results
We figured out how to get an Apple phone to work for the first time. The instructions below will help you activate any iPhone. The main thing is to properly prepare for the procedure.

At first, you can refuse to create an AppleID. Without this profile, the phone owner simply will not have the right to use Apple services. For example, iCloud or AppStore. Therefore, it is advisable to immediately start Apple ID.
Apple ID is a multifunctional identifier that allows access to entertainment services iTunes Store, digital store App Store, cloud iCloud storage, Game Center and instant messengers iMessage and FaceTime. The identifier is officially intended for use on the operating systems iOS, MacOS, WatchOS and Apple TV, therefore the registration of an Apple ID occurs even when the device is turned on for the first time. And it doesn’t matter which one - neither iPhone, nor iPad, Apple Watch will not work without an identifier the way the developers intended: half of the services will be inaccessible. And if for some reason the registration step is left behind and it is no longer possible to go back, then you will have to use alternative methods.
Registration via iCloud cloud storage
You can register for an Apple ID through the browser of a computer running Windows, Linux or MacOS (you won’t be able to access the iCloud page from iOS: you will be instantly redirected to the page digital store Appstore, where separate software is downloaded), according to the following algorithm:
First of all, you will have to switch to official page cloud storage (https://www.icloud.com/) and at the bottom of the interface click on the “Create an Apple ID account” button.
After the entry form appears on the screen personal information, start filling out the text fields.

You will have to indicate a lot - your first and last name, and your region of residence. At the point with the email address, you can either experiment by inventing a non-standard combination of a nickname and a domain following the @ symbol, or fill in the field with an existing Google or Mail email address. Regardless of the choice, the main thing is to show individuality. The service will not allow combinations that have already been added to the database to be used again.
The last step is to enter a password, which must consist of 8 characters (only the Latin alphabet is suitable), uppercase and lowercase letters and numbers.
Next, the service will offer to prepare three security questions and, as practice suggests, such a step should be approached thoroughly. If you forget both security questions and prepared answers, then the chances of regaining access to your Apple ID are close to zero. This means you will have to make a new, second account.

The test questions are versatile - no one bothers you to choose your favorite musical group, indicate your hometown or the name of your first pet. The main thing is to focus on those things that are easy to remember.
The penultimate stage of registration is subscribing to news and information mailings (checking the boxes is optional, but this is where Apple developers share the latest movies and music, talk about announcements, discounts and special offers, such as a free 3-month subscription to the service streaming Apple Music) and solving an encrypted image with letters or numbers.

And if you can’t pass the “humanity” test, you should click on the “ New code"or the option "For the visually impaired." In the latter case, the combination will be dictated orally.
Registration ends with verification account using a 6-digit verification code that the developers will send to your email address.

After verification, access to entertainment services and pages of the Apple storage is automatically unlocked within 10–15 minutes.
Registration via iTunes
iTunes is Apple's proprietary media player, capable of playing music and movies, interacting with iPhone, iPad, iPod Touch and Mac(transfer and copy information), organize backups, carry out spot synchronization and help with updates operating system to the current version.

iTunes will also handle registering an Apple ID, the main thing is to repeat the simple procedure:
First of all, the media player will have to be downloaded from the official website (https://www.apple.com/ru/itunes/) (it is important to check in advance which address is indicated in the search bar - the Chinese analogue of the official service should be avoided immediately).

iTunes download available for operating systems Windows systems 32 and 64-bit. You can find out which version to install in the “Properties” of your computer (right-click on the shortcut and call up a drop-down menu with the specified action).

The information will appear as an inscription in the “System Type” section.

To download the iTunes distribution, you need to click on the “Download” button located in the right top corner.

And then, in case you don’t have a computer or laptop with Windows 10, click on the “Other versions” button.

The last step is to download the appropriate version and begin installation. The process is intuitive and standard. You can safely click on the “Next” button until the media player unpacks and loads Latest updates and will not appear in its original form.

If there are no problems with preparing iTunes, then it’s time to move on to the main thing – registration.

Here it is important to find the “Account” button at the top of the interface and select “Login”.

After the new login form appears, all that remains is to click on the “Create Apple ID” button and begin the already familiar procedure for transferring confidential information.

As in the case of iCloud, you will have to select an e-mail and fill out the “Password” text field, then decide on the region.

After that you can’t do without security questions, last name, first name and patronymic. The registration procedure is practically no different from that described above (similar information, mandatory verification procedure using an email address). The only exception is the need to use not a browser, but separate software that will have to be downloaded, and even choose the right version.
And if iTunes is not used for its intended purpose and does not help with organizing a media library on your computer, you can safely discard this option and settle on using the iCloud method.
Registration on iPhone
You can also prepare an Apple ID account on your phone (tablet and even player), and the option is the same for all operating versions iOS systems and smartphones - both iPhone 7 and iPhone 6s are on equal terms: you will have to repeat a simple algorithm of actions and understand the small nuances (registration occurs without a map and choosing a geographic location - developers have not required such information for a long time):
An ID is created using the “Settings” section (the default shortcut is available on the desktop in the form of a gear) in the “Passwords and Accounts” category.

Here, Apple developers offer to store passwords for websites and software, synchronize and prepare backup copies.

In cases where the “Accounts” item is empty, you need to click on the “Add” button and proceed with registration.

The first step is choosing a service. There are a lot of options - Exchange, Google, Yahoo, Outlook. There is also iCloud, which you will have to choose.
Further actions are already standard, but with some nuances.

First, you will have to select your date of birth (depending on the specified age, adult materials and articles intended for an audience of 18+ may be blocked).
Secondly, indicate your first and last name.

Then decide on the choice of email address (you can choose between using an existing option or receiving an exclusive free offer from Apple).

The last step is to specify your e-mail, sort out subscriptions and answers to security questions.

The procedure is officially completed - access to cloud storage and Apple services will appear automatically.
Alternative option
On iPhone 5S, iPhone SE, iPhone 4S, which have not yet been updated to the latest iOS versions(versions 11 and 12) or are no longer officially supported by the developers and do not have access to new versions of the operating system, registration occurs not from the “Passwords and Accounts” section, but directly from the App Store digital store according to the following scenario:
First of all, you will have to use the search, charts or the “Selection” section to find an application that you would like to download to internal memory iPhone.

Regardless of your choice, it is important to click on the button responsible for downloading the software (if the application is distributed without payment, the button is called “Free”, but if it is paid, a specific price will appear.
After accessing the button on the screen, you will see an authorization form that contains three buttons: “Cancel”, “Enter information about an existing account”, “Register a new account”.

The option located in the center of the form – “Create an Apple ID” is the one you need.
The further procedure is already relatively familiar.

You will have to select the store, and sometimes the translation language, and click on the “Next” button.
Then scroll through the terms and conditions of the privacy policy.

It is not necessary to read every line, but you will have to move the slider located on the right side of the interface to the bottom edge, and then the “Accept” button will no longer be gray and will become available for interaction.
The final touch is the transition to the standard and previously described registration using a password, e-mail and other information that Apple developers require.

As a rule, you will additionally have to indicate your first and last name, date of birth, and at the same time payment information.
Getting an Apple ID is easier than it seems at first glance. The developers offer a choice of using a browser, iTunes media player, smartphones, tablets, and players, and updated to different versions iOS. There will be no problems filling out the available text fields; the main thing is not to rush anywhere, carefully check the information being added and do not deviate from the algorithm of actions described above. Were there any errors during registration? No one is stopping you from starting the procedure again.
Greetings, dear reader.
Lately, I have been asked more and more often about Apple ID.
Due to Apple products in Russia it is becoming more and more popular, there are more and more happy owners Apple devices(doesn't matter iPhone/iPad or iPod).
Naturally, everyone needs to download various applications for your devices. This is where the problems begin; when downloading, you need to indicate your Apple ID, but it doesn’t say where to get it. How to register it?
There are two ways to create an Apple ID: using personal computer With installed program iTunes and, directly, using your iPad/iPhone/iPod device. I'll look at both of these options.
Creating an Apple ID via iTunes (from a computer)
1. Launch iTunes. If you do not have this program, then read this () article, from which you will learn what iTunes is and where to get this program;
2. From the iTunes program, you need to log into the iTunes Store, to do this, click on the “iTunes Store” button in the upper right corner or, if the button is not visible, press the key combination CTRL+SHIFT+H;

3. Click on the “Login” button. This button is located in the upper left corner of the window;

4. In the window that opens, click on the “Create Apple ID” button;

5. In the window that appears, click on the “Continue” button. Check the box next to “I have read…”, click the “Accept” button;

6. After you accept the terms of use, fill in all the necessary information: e-mail, Apple ID password (you need to come up with one) Secret Question(you can use any), date of birth, click on the “Continue” button;
7. At the next stage, you need to indicate your number bank card, expiration date and security code. Without a card, you will not be able to register an account.
If YOU DO NOT have a card, then this is not a problem, now we will create a virtual one for you, which can also be successfully used.
How to create a virtual card
1. Go to the website of the QIWI payment system () and click on the “Register” button.
3. When you log into your account, click on the “Maps” link in the menu.
4. Go to the very bottom of the page and click on the “Buy Visa Virtual” button;

5. Next, you need to indicate your phone number (to which the card will be registered). Select a payment method (issuing a card costs 25 rubles). Click pay. The card number, security code and expiration date will be sent to you via SMS to the phone number you specified.
You can pay for the card issue from your QIWI account; to do this, top it up with the required amount, this is done in the top up section.
After you receive all the card data, we return to creating an Apple ID.
To get an ID, you only need to go through one step: enter the card information in the appropriate fields and click the “Create Apple ID” button.

Registering an Apple ID via iPad/iPhone (from your device)
So, let's move on to the process of creating an Apple ID using your device. I will show by example tablet computer iPad.
1. Look for an application called “App Store” on your device and launch it;


3. Click on the “Create Apple ID” button;

4. Select the country and click on the “Next” button;

5. In the next window we are asked to read the license agreement, read it and click “I Accept”;

6. In the next window, enter your email address, select three security questions, date of birth and click “Next”;

7. In the next window you will be asked to enter information for your bank card, enter it. If you DO NOT have a card, then I told you above how to get a virtual card.

Will be created when the gadget is activated. However, when setting up a smartphone for the first time, users often skip this step for one reason - the device requires plastic card data. Russian users, accustomed to suspecting fraud in everything, are delaying the creation Apple ID, trying to find a way to do without a card.
There are several options for registering an iPhone “account” - among them there is one in which you do not need to enter your credit card information.
Without Apple ID the user will not be able to:
About full using iPhone without Apple ID out of the question. The legendary versatility of this smartphone is due to the huge amount of diverse software available in the AppStore. iPhone no apps– just a stylish and well-assembled gadget, but by no means Not multitool, able to cope with any task.
How to create a new account through iTunes?
If you don't have iTunes, you should start by downloading latest version this program from the official Apple website. Once you download and install the media harvester, proceed as follows:
Step 1. Open iTunes and click on the tab " Account" V horizontal menu above.
Step 2. Select " To come in…".

Step 3. In the window that appears, click " Create new Apple ID».

Step 4. You will be taken to the welcome page iTunes Store– here you need to click on the blue button “ Continue».

Step 5. At this point you need to read the document called " " and check the box next to " I have become acquainted...”

If you do not confirm that you have read it, registration will not be completed.
If you can't read Apple's position immediately you should use the “Print Version” link. An HTML document will appear in your browser, which you should print so you can read it whenever you have some free time.

After confirming that you have read the terms and conditions, click " Accept».
Step 6. Fill out the form - you must enter the following data:
- E-mail address. It is important that the address is valid and that you have access to it. If desired, you can specify an additional postal address.
- Date of Birth. By date, you must be over 21 years old - otherwise you will not be able to purchase content and software in the AppStore and iTunes Store.
- Created password. The password requirements for an Apple account are very strict: it must contain numbers, lowercase and uppercase letters. Plus, one character cannot be repeated three times in a row.

The user will also have to answer three questions - for example, What was the name of my childhood best friend? This measure is necessary to ensure account security.
Step 7 Unsubscribe from the mailing list if you do not want to receive information about Apple company products and film and music releases on Mailbox. To do this, you need to uncheck the boxes next to “ Recommendations and information...».

Then click " Continue».
Step 8. Select a payment method for purchases and enter the required details. note that Entering your credit card details into iTunes does not in any way pose a threat to your well-being. Money will be written off only if you purchase content or software and only with your consent.

If you have chosen a plastic card as a payment method, you will have to enter its number, expiration date, and CVC2 - the security code on the back. If you preferred the option " Mobile phone ", just indicate cell number and confirm it via SMS.
Step 9. Fill in the fields of the block " Billing address" You must specify:
- Last name and first name.
- City code and name.
- Street of residence and zip code.
- Contact phone number.
- Application form (“ Mr." or " Mrs.»).

Once you have completed the required fields, click " Create an Apple ID" You will see a window directing you to your email.

Step 10. In your mailbox you will find the following letter:

You should click " Confirm address", after which you can assume that Apple ID successfully formed.
How to create an Apple ID without a PC?
You can create an Apple account without a computer, but in this case you need the device to be connected to 3G or Wi-Fi. Once you have access to the Internet, proceed as follows:
Step 1. IN " Settings"iPhone, look for the section " iTunes Store, App Store" and go into it.

Step 2. Click on the button " Create a new Apple ID».

Step 3. On the next screen you will see a list of countries - Russia is selected by default. Without changing anything, click " Further».

Step 4. You should read the document entitled " Multimedia Terms and Conditions Apple services " The document is quite capacious - on an iPhone it turns out to be 29 pages of small print; that is why most users neglect to read it.

Either way, confirm that you have read " Provisions"and agree to the terms, you have to. To do this, click " Accept» in the lower right corner and then click on the button of the same name in the window that appears.

If you want to read the terms, but not from the phone screen, but from paper, use the “Send by e-mail” link. You can print the document from your email.
Step 5. Fill in the form. You will have to enter the same data as when registering an account in iTunes– e-mail, password, date of birth, questions and answers necessary to ensure security.

If you don't want to subscribe to news about Apple services, apps, or content, switch the sliders below to inactive.

Step 6. Select a payment method and enter payment details. The same data is required as when registering via iTunes.

After you have provided the required information, click on “ Further».
Step 7. Go to email, which was indicated during registration Apple ID, and press " Confirm address».
Account creation Apple ID in the “Settings” of the device and registration via iTunes– similar procedures: the same information is required in both cases.
You can also access the Apple account creation service through the App Store. Go to the app store and scroll to the bottom of the home page. Click on " To come in».
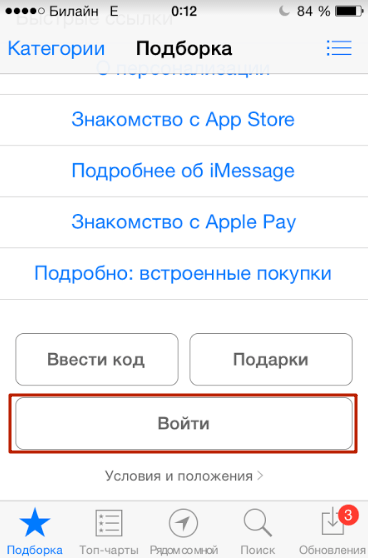
Then click " Create an Apple ID».

How to create an account on iPhone without a credit card?
At least one way to create Apple ID without a “credit card” there is. If you don't want to share your payment details with Apple, do the following:
Step 1. Go to iTunes and select " Programs».

Step 2. Find free application (any) on home page and click on its icon.
Step 3. Once the app description opens, click " Download».
Step 4. In the window that appears, click on the button “ Create a new Apple ID" - this will start the account creation procedure.

Continue registration as usual until you decide on a payment method.
Step 7. On the page " Specify payment method"instead of a bank card, select the option " No».

With this choice, you will be spared the need to enter payment details. However, numerous fields in the block " Billing address"You still have to fill it out.
Conclusion
Create Apple ID possible both with the help of a PC and without it. However, if you use a computer to perform this task and iTunes, less time will be spent - you will have to type a lot, and it’s more convenient to do it on a PC keyboard.
In addition, when registering from a computer, you will be able to do without specifying the details of the selected payment method. This is important because many domestic users of Apple equipment are suspicious of the requirement to leave card data.
Hello everyone! We have already become acquainted with the identifier in the apple company system (). And at the end of the article, we came to the conclusion that we need to register an Apple ID to create our own unique account. And if it’s necessary, we’ll do it! Moreover, if you follow these instructions exactly, the whole process will not take you much time, and your efforts will be minimal.
By the way, the article will discuss registering an Apple ID without any card (credit card). Why without it? In fact, you can come up with a lot of reasons. I won’t go too deep and will list only a few of them.
And here they are:
- The simplest one is that not everyone has this same credit card.
- Many people are afraid to enter their card details (although it is completely safe).
- For some it's enough just free applications in the App Store.
If all these three points are not relevant to you, then at a certain stage (at which stage? all the details are below in the text), you will need to enter the “plastic” data.
In general, you can register an Apple ID at absolutely any time, both when you first turn on the device and after it. The scheme is almost the same everywhere. Here we will consider the second option, namely creating an account on an iPhone or iPad that we have already used for some time.
That is, we need:
- Activated iPhone, iPod, iPad - the instructions here are universal, regardless of the gadget.
- Wi-Fi connection or inserted SIM card (nothing will work without the Internet).
All is ready? Begin!
Take your device, unlock it and find the App Store icon in the menu, click.
Select any free game or application and install it. Attention! A free application is required.

Then we need a menu item to create an Apple ID.

A window to create a new account will appear. We see the choice of country or region, leaving Russia.

“Terms and conditions...” – we simply accept. It’s hard for me to imagine a person who will read this - it’s 60 pages after all :) Although, perhaps I don’t have a rich enough imagination :)


A data entry window opens.

A few important clarifications:
- Be sure to enter a real email.
- The password must contain at least 8 characters: numbers, letters of the English alphabet, and at least one capital letter. Write down or remember the password!
- Age – you must indicate that you are at least 18 years old. If you have not yet reached adulthood, lie blatantly.
Very important! The specified e-mail and password will be your Apple ID! Save them, write them down on a piece of paper, and never show them to anyone.
Remember, this data is the only proof that the device belongs to you. To understand the seriousness of the situation, I advise you to read (especially pay attention to the last paragraph). Is everything done? Go ahead…
Payment information – select no (if you do not intend to use a credit card). Or (if you want to use the App Store to its full potential) we indicate payment system, then enter all the necessary information. The item “iTunes gift cards...” is optional. Fill in the rest of the information.


A letter has been sent to the mailbox indicated above - open it, and of course follow the link to complete the process.


Congratulations, Apple ID registration (and completely free) is completed! And now you can use the App Store by installing freely distributed (or paid for) applications and games.
In my opinion, the instructions turned out to be quite detailed, but if you are tormented and haunted by various questions, then I always welcome them in the comments. Feel free to tell us about your problem - I will help, as they say, in any way I can :)
Updated! An article has appeared that summarizes all the errors that may interfere with the creation of an Apple ID. Therefore, if something doesn’t work out, .
P.S. By the way, for full and correct registration of Apple ID you need to click on the buttons social networks and like the article - try it, it really works!


