Setting up reports in 1s enterprise. Setting up standard and external reports
How to transfer data from the report builder to the pivot table? The key to proper accounting and tax accounting in the 1C Accounting 8 program is correct setting parameters. 3 How to generate a report on the employee's personal data education, family, etc. C Trade management 10. Settings and fill in the parameter values. I will also talk about the new parameters in the synchronization settings, which. Datasets, Resources and Settings. This video tutorial explains the correct settings for calculating income tax and. Tell me how to set up a universal report 1C 8. Software 1svod reports 8 prof is designed for. To use a previously saved setting, click the Load report setting button. If you do not have a 1C specialist, you use the standard Accounting Department of the Enterprise 2. On the Selection tab, we form selections in accordance with fig. 0, configure document printing options. The constructor is given a request and all the necessary parameters of the future report, and it, in turn, generates. Settings. Damn, why so complicated? You can also simply display user settings on the form. A course of free training video on working in the 1C Management program. Reports that can be used in MobiS for the 1C 8 platform can be of three types. How to move goods to 1C Enterprise accounting 8. directories, processing, reports Development and configuration in. I need this report in 1C in an hour! Simply put, we will create a report on the ACS in the 1C program, a typical configuration Accounting 8. Accounting ZUP Refinement of 1C for the needs of the company, programming, etc. When setting up synchronization from the 1C Accounting program 8 c. In addition to the settings form, it was also necessary to specify the following in the SKD in the settings. 3 is made after installing the platform and filling in the parameters. Setting up accounting parameters in the Payroll and Human Resources program 8. Enterprise 8 Data conversion 2. Setting up an external report launching OSV with the required parameters 1C 1C 8. On the 3 tab, the first 2 parameters are virtual table parameters. 3 reports are located in the section Accounting, taxes, reporting. Setting item 3 If. However, it is required to pass the value of this parameter to the date specified by the user. If you have not set up a report, then press the Generate Report button. In order for reports and formalized documents to be uploaded directly from 1C to VLIS, run next setting. When pressed, an error will be generated. The service parameter of the ReportSettings has not been passed. How to arrange the sale of goods and services in 1C Accounting of the enterprise 8. Video lesson on the example of 1C Accountant. 1C recipes Setting up reports in 1C Enterprise 8. 3 and the configurations running on it are fundamentally different from the interface. In typical configurations, 1C report settings were saved to the register. 66 I click in the price Settings, writes Service parameter not transferred. Trade management, further UT, report settings are still available. The main data layout of the report is not. There is also an option to use the 1C 8 Report Builder mechanism. Interface Head of accounting Setting accounting parameters 1C. Data composition scheme how to create a Report in 1C 8  . Data composition system setting up reports by users of 1C Enterprise 8. Setting up a universal report in 1C 8. In this article, we will consider the basic principles of setting up reports using the example of the 1С Trade Management program, ed. Book Development of complex reports in 1Сenterprise 8. How to transfer data from the report form to query parameters. 3 bookkeeping to obtain only the necessary information. 3 for beginners the first report on SKD. 0 decoding revolutions, adding any. e Initial installation of the program and setting parameters 1C. I tried to upload the price list in UT. SALT report for 1C Accounting 3. If these settings are not suitable for any organization, then it is required for such organizations. Accounting settings. "frameborder="0" allowfullscreen>
Each accountant working in the 1C: Payroll and HR 8, version 2.5 program sooner or later faces the problem of obtaining the necessary information in a compact form, i.e. in the form of a report. Most often, after going through all the possible reports included in the program by default, the user is convinced that exactly the report that he needs is not here. The first thought is what a bad program, it does not have what is so necessary for me. But you must admit - how many people, so many opinions on how best and more convenient to arrange this or that information, how to arrange columns, how to group data.
But in fact, the developers took care of their users by introducing a simple reporting mechanism into the program. And if you spend a little time creating your first report, then in the future you will easily cope with this task yourself, without involving expensive specialists. Moreover, you can surprise your colleagues by helping them customize reports.
So let's get started. Let's consider the setting on the example of the report "Analysis of accrued taxes and contributions". Most often, clients ask us to set up a report in which it would be possible to see for each employee how much income has been accrued in total, what personal income tax has been calculated and all insurance premiums.
Open "Analysis of accrued taxes and contributions" and in the right upper corner click on the "Settings" button, and on the panel that appears below, click on the wrench and go to the structure settings:

The one that appears on the left shows indicators and parameters that can be displayed in the report, on the right - setting the report structure itself. You can add indicators from the left column to the right column using the arrows or simply by dragging the mouse:

So, we want to generate a report that will contain information on all individuals. So, in the "Row grouping" section, we delete extra rows and add "Individual":

Now you can work with the columns of the report that we want to see, these are "Accrued", "Individual income tax calculated", "Contributions to the OPS since 2014", "Contributions to the FFOMS", "Contributions to the FSS", "Contributions to the FSS from the National Assembly" . Open the folder on the right side and add the indicators we need to the "Report Columns" section:

Optionally, you can add other indicators to your report. So, having selected all the fields of interest to us, let's try to generate the resulting report:


Everything seems to be what we wanted. Just a little bit not cute. Let's try to rearrange the columns "Accrued" and "Individual income tax calculated" to the beginning of the table. Let's return to the report settings:
With the help of blue arrows, we will raise the last two indicators to the first and second places:

Now our report looks like this:

Already good. Now let's group the last two. You can group columns. For example, it used to make sense to group contributions to the FSS together, now you can make a group "Contributions to the IFTS". Let's go back to the report settings. Using the "Add group" button, create a folder Contributions to the Federal Tax Service and by grabbing the necessary indicators with the left mouse button, "drag" them to this folder. You get this structure:

Our report now looks like this. As you can see, the last three columns are combined into one common group:

This is such a nice report. We must not forget to save it so that next time it is always at hand. To do this, use the button with a floppy disk in the lower right corner of the window and select the "Save as" option:

We give a name to our report and save it:

Our version of the report is now always available to us among those already available in the program:

Well, in principle, everything seems to be normal. Further, at will and the availability of time, you can bring beauty. For example, the title of our report Personal income tax deductions can be changed. It doesn't suit us at all. It's not that easy to find anymore. In the settings window, check the box "Advanced settings":

And here on the tab "Other settings" we can change the name of our report:

Here you go. Now we have the following report:

If desired, you can change the color scheme of the report. This is done in the same place, in other settings. After all the changes, do not forget to save the report version. Also on the button with a floppy disk, only now we just save the option:

Well, in general, after practicing, you can customize any reports in the program yourself. Don't be afraid to experiment. In the same way, you can customize any report in the ZUP 2.5 program. For example, reports for the HR department. Suppose we need to generate a list of employees indicating the birthday. Open the "Lists of employees" report and then proceed in the same way as we set up contributions:

The resulting report looks like this:

Basically, we got what we wanted. Only working with such a report is not very convenient. Employees are arranged alphabetically, but birthdays are in discord. And I would like the birthdays to be in order in the year. It's easy to set up too. In the same settings window, go to the "Selection, sorting and parameters" tab and set up sorting by birthday in ascending order:


At first glance, it is not clear why the data in the table is arranged in such a way. Why first May birthdays, and at the end - February. The answer to this question is simple. Because we generated the report on March 15th. If you select the report date on January 01, then it will be very convenient for the personnel officer to work with the report, you can also add a hint to the report about whether this employee is the hero of the day this year, so that you don’t miss this important event for the team during workdays:

OK it's all over Now. Now you know that setting up reports in the program is not very difficult, and even very interesting.
Experiment, surprise colleagues and bosses. Enjoy your work and let 1C programs help you with this.
If you still have some questions, then join our groups in social networks, ask questions and get answers from our specialists.
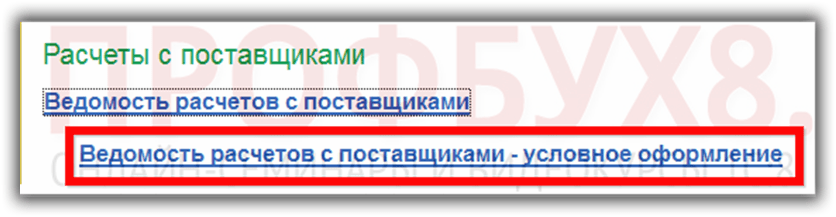
All reports can be opened from the section Main - Reports:
In addition, the required report can be found in the corresponding section. All reports in the section Main - Reports grouped under separate sections of the program. On command All reports a list of all reports of the 1C 8.3 program opens:

The same result can be obtained from the section NSI and administration - Configuring system settings on command Printable reports and processing in a group Reports by hyperlink Reports. You can find the required report in the corresponding section:

For example, open the section Purchasing - Purchasing reports. A list of purchasing reports will open, grouped by individual groups. Groups highlighted in green: Procurement, Settlements with suppliers and etc.:

Please note that some of the reports in bold are reports that the developer believes are important for this section.
How to quickly find the desired report in 1C Trade Management 11.2
Method 1
You can use the field to search for the desired report. Search, by entering a few letters. For example - "led" and pressing the button Find. Only those reports that have this combination of letters will remain:

If you enable the checkbox in all sections, then all reports of the program 1C 8.3 UT 11.2 will be found, having a combination of given letters:

If you click on the button Clear in the search field, then return to the default list:

If you click on a hyperlink All reports, then a special form will open in which you can find any report available in UT 11.2. By default, reports will be displayed for the section in which this moment the user is working. In our case, these are section reports. Procurement. This form consists of two windows:
- The left window shows all sections;
- On the right - all the reports available in the program:

If you click on the "+" in the selected section, then all groups of this section will open, and in the right window - all reports of this section. If you select a specific group, only the reports of this group will remain:

Method 2
If you do not know in which section the required report is located and do not remember its exact name, you can use the quick search window. Place the cursor on "All sections", enter in the field Search the first few letters: for example, " known"- and a list of reports containing this set of letters will appear in the right window. In our case, these are all statements:


In our case, there will be only one report that has this combination of letters:

You can also use the command More - Find:

Select the desired report and click the button Open(or press the key Enter) - the report form will open:

Changing report settings in 1C UT 11.2
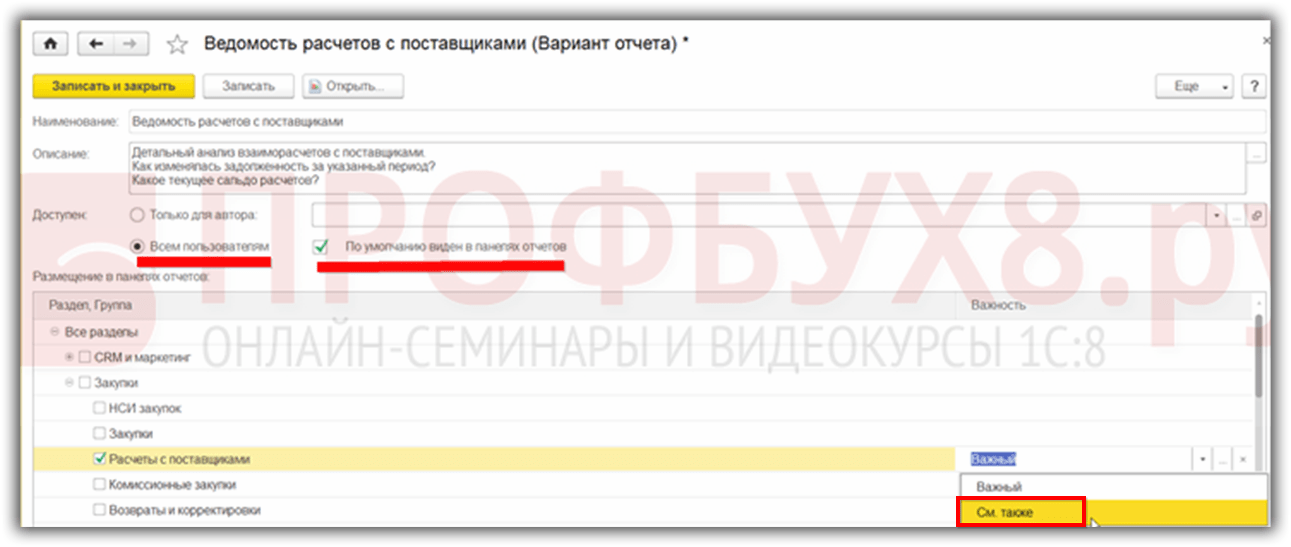
By pressing the button Edit (Change report settings) selected report, a special form will open that allows you to:
- Change its description, but not the name;
- Availability, importance, visibility of the report by default;
- You can also move or copy this report to any other section or sections of the program:

If you set the switch to the position Author only, select a specific user and click the button Write and close, then this report will only be available to that user. This method is usually used for reports that users create themselves:

If you uncheck Visible in dashboards by default and press the button Write and close, then the name of this report will not be visible when opening the report panel:
Report not visible by default:

To open this report, click the button Setting in the reports panel, select the desired report, marked in gray, and enable the checkbox to the left of this report:

The color will change to blue:

Save the changes by clicking the button again. Setting. As a result, the report became visible:

When the button is pressed Setting you can check the box Description of the reports then under each report it will appear short description. This is convenient, especially if you don't know what the report is for:

Let's move the report to quick access. Click on the right mouse button and execute the command Move to Quick Access:

The report will move to quick access:

The 1C 8.3 UT 11.2 program allows you to rollback, that is, return everything to the default position. For this, the command is used More - Reset my preferences:

Respond to the program's request Yes:

Note that the report is again not visible by default and is greyed out:

Select the report, right-click and select the command Change:

An edit form will open. Set the switch to position To all users turn on the visibility flag in the report panel and change the importance of the report to see also:
Let's write the changes and reopen our report through the section Procurement. The report has moved to the group See also. At the same time, it became “not important”, that is, the selection in bold was removed:

Let's return everything to its initial state and open the report List of settlements with suppliers In chapter Purchasing:

Each report can be customized by clicking the button setting, and also using a group of commands by clicking on the button More:
For more information about the possibilities of working with reports in 1C 8.3, see the following video:
Report settings Accounts payable sheet
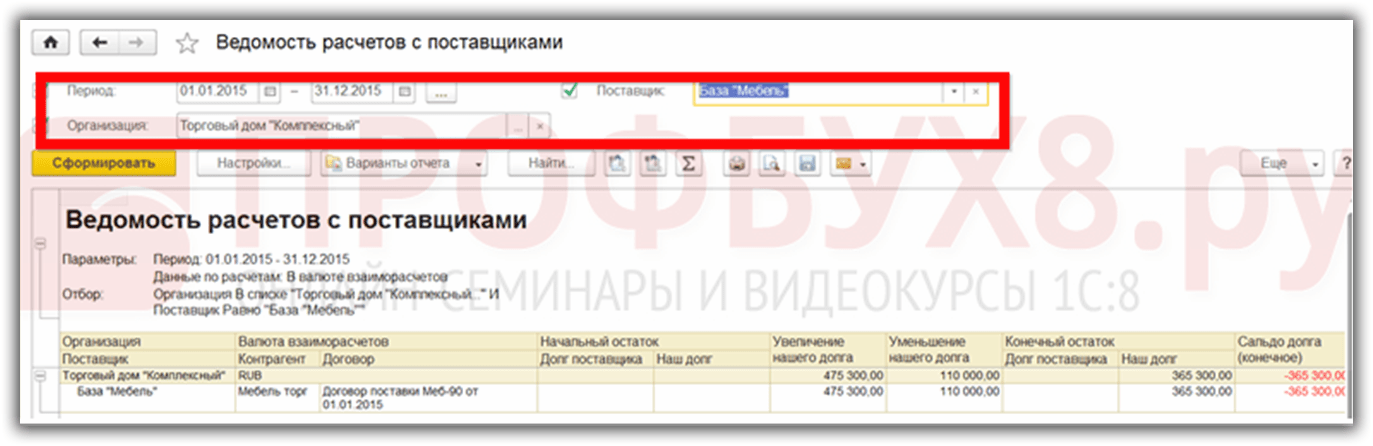
Now let's look at the settings of a separate report on the example of a report List of settlements with suppliers. Let's open this report from the section Procurement and generate it by pressing the button Form:

The report form has a report header for quick selection and allows you to generate a report for a certain period for all organizations and suppliers, or for a specific organization and supplier. To do this, enable the appropriate checkboxes and specify a specific organization and / or supplier:
When you press a button Settings, the report settings form will open in a simple form, which can be switched to advanced.
Bookmark selections there is a possibility of additional selections: for the segment of partners and for the counterparty:

How to change the selection condition, how to add a selection, how to group selections according to the AND / OR / NOT condition in 1C ZUP 8.3, see our video tutorial:
Bookmark Fields and sorts you can uncheck/enable the checkboxes for the specified fields. For example, if we do not want to show our debt, then we will uncheck the corresponding box and press the button Close and form. As you can see, there is no column in the report Our debt:

You can sort the report by different fields, and you can specify different sorting for different fields. To do this, using the arrow button, you can move the selected field to the sort window and specify the sort method:

This will sort the fields that have a checkbox next to them. If it is necessary to sort several fields, then the field that is higher in the list, that is, which has a higher priority, is sorted first. Wherein:

For more information about sorting settings in 1C ZUP 8.3, see the following video tutorial:
Bookmark Structure additional groupings can be added. For example, specify that you need to show the object of calculations - specific documents:

We get the following result:
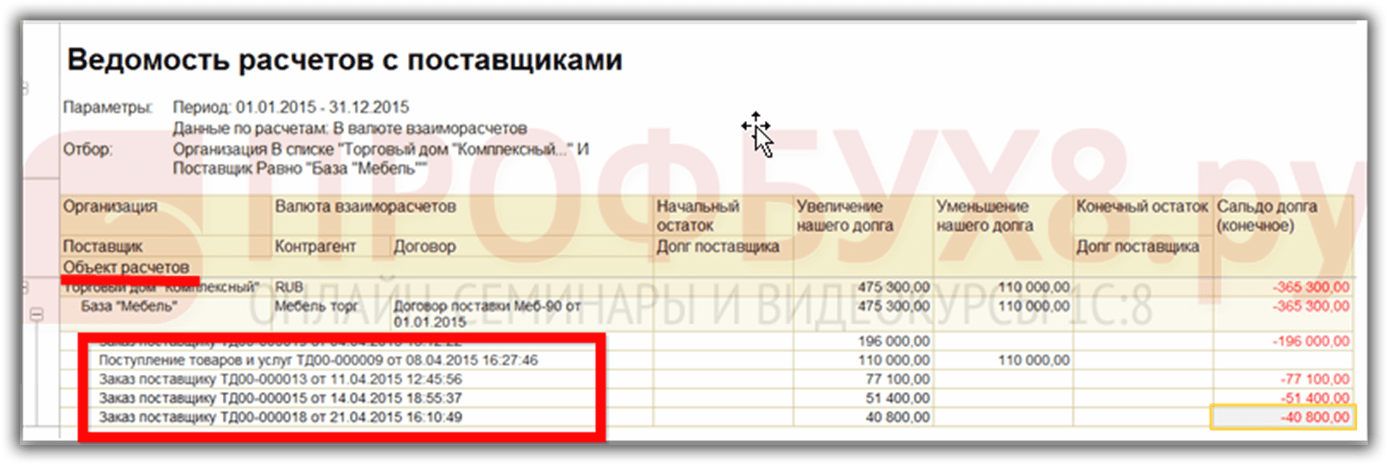
By placing the cursor on any line of the calculation object, you can open the corresponding document.
If you switch to the advanced settings mode, you can add additional selection fields on the tab selections, groupable fields on the tab Structure:

If you select a field and right-click, you can perform a number of other operations:

If you click on the icon with the left mouse button, you can change the placement of the selected field in the report form:

How to set up the necessary structure of reports in 1C ZUP 8.3, see our video tutorial:
Bookmark Decor, which is only available in advanced mode, you can specify how the report should look when certain conditions are met. The figure shows one of the options:

This is what the report looks like now:

Bookmark Structure You can change the structure of the report. The figure shows an example of such a change: the box is unchecked Calculation object and added field Direction of activity:
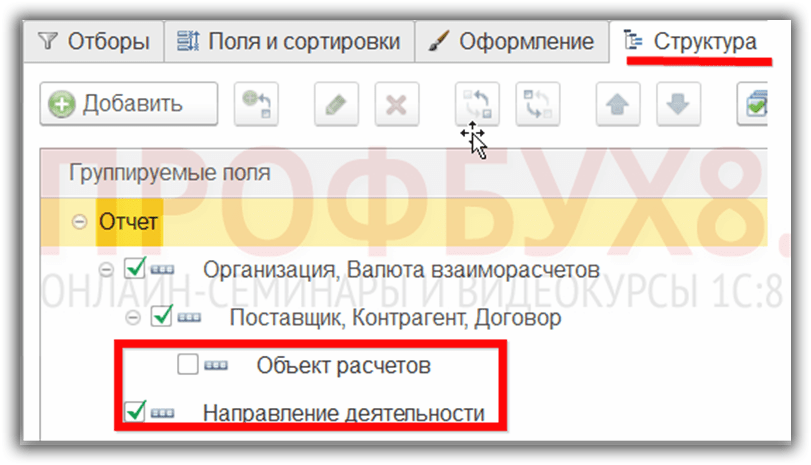
The second table appeared in the report:

For interesting reporting opportunities in 1C ZUP 8.3, see our video tutorial:
Saving report settings
Let's save the created version of the report. To do this, run the command Report Variants - Save Report Variant.
Specify the name of the report, its availability. If we want to change the location of our report, then we need to click the button Further and indicate the section, group, and importance of the report. We will not change anything, so we will immediately save our option on the button Save:

Let's close our report. A new report has appeared in the list of reports, while all settings and selections are saved:
For advanced users who are familiar with SKD – data composition scheme, we can recommend another way. By button More you can run the command Other - Change Report Variant:


Finally, if you want to return to the default settings, then click on the button More command Other - Standard settings.
How to generate a Universal report in 1C 8.3 UT 11.2
A few words should be said about another report that allows you to get data from a variety of objects of the 1C 8.3 UT 11.2 program: directories, documents, registers, etc. - this .
It can be opened from Administration - Printing forms, reports and processing by hyperlink Universal report.
You can also get to this report through the form for all reports by setting the cursor for all sections and entering the first letters in the search field - " Univer" and pressing the button Find:

Then press the button Open. This report form will open:

You must first set the report period, select a group of objects, then a specific object and the desired tabular part(changes depending on the selected object) and press the button Form:

This article discussed various methods for setting up and generating reports in the 1C Enterprise 8.3 Trade Management 11.2 program. Having studied the received information, users of the program will be able to generate reports in a fairly wide range of complexity, which is very convenient.
Reports 1C 8.3 is a special metadata object designed to form a user-friendly presentation of data from 1C database tables.
Let's figure it out how to set up reports, what they are for, how external reports differ from built-in ones, and how reports differ from processing.
In order to create or customize a report, you need to know the built-in and . Like it or not, the creation of almost any report is based on the initial request that receives the data. We process and display this data in a user-friendly form.
Reports are the heart of any information system, so 1C paid close attention to the development of reports and created a large number of constructors and mechanisms for their creation.
Consider the basic methods of creating reports
How to make a report in 1C using a layout
Creating with a layout is the most routine way. However, it is often resorted to from hopelessness, because. in this way, the developer completely prescribes the code for each action, which means that we can do anything. Other mechanisms cannot boast of this.
But in this case, all fads, menus and other “bows” will have to be written manually, which is very time consuming.
Get 267 1C video lessons for free:
Create a report using the output form designer
The output form constructor is a mechanism built into the platform that facilitates the development of a report. The constructor is only available for normal forms.

The constructor is given a request and all the necessary parameters of the future report, and it, in turn, generates report modules and forms. The mechanism is based on the object of the built-in language 1C 8.2 - Report Builder.
Creating a report using a Generic Report
The universal report has great functionality, a convenient settings interface, familiar to the user:

Reports based on the Data Composition System
This is the most progressive method of creating reports in 1C, recommended by 1C itself. appeared in the 1C platform in version 8.1.
SKD allows you to create simple reports without a programming line at all, because it has a very flexible and functional constructor for creating a data composition scheme:

In all recent configurations, all reports are written using the data composition system.
What is the difference between external reports and built-in reports
As written in the documentation - nothing. The external reporting mechanism was created in order to debug reports during development.
The only difference when developing a solution is that you cannot refer to an external report “by name”, unlike an embedded report.
How is a report different from processing?
In fact, practically nothing. The main difference is the purpose of using the object: reports are needed to display information, and - to change information.
The main differences in properties: in reports, you can specify the Basic Data Composition Schema (SKD) and specify settings for saving report parameters.
Every organization to make timely and correct management decisions timely information about the availability of goods in warehouses, about its cost, about sales is needed. Trade organizations work with a large number of items and counterparties, and this requires a good setup of analytical accounting and quick receipt of the required information on its data. The article discusses the basic techniques for working with standard reports in standard solution"1C: Trade Management 8" (version 11), built on the basis of the data composition system and provides useful practical advice, which will be useful for both novice users and those who have switched to a new edition from previous editions.
For example, take a report
- Analysis of the availability of goods;
Setting.
In a collumn Comparison type Nomenclature
- Equals
- Not equal
- Listed
- Not in the list
- In a group Nomenclature;
- Not in a group Nomenclature;
- In a group from the list Nomenclature;
- Not in a group from the list Nomenclature.
Meaning
"Quick Selections"
As the 1C:Enterprise 8 platform develops and the new version 8.2 appears, reports in systems become more flexible, and users have more and more opportunities to customize them to their requirements without the help of programmers.
The new capabilities provided by the data composition system (ACS) allow you to feel the benefits of 1C:Enterprise 8 capabilities when building reports like never before. And, despite the fact that the reporting interface has undergone significant changes (compared to edition 10.3 of the Trade Management configuration, hereinafter referred to as UT), the report settings are still available to the average user. Let's take a look at some basic ways to work with them.
The first thing you can pay attention to is quick selections. They allow you to display data in the report according to certain values of the report fields according to the wishes of the user.
For example, take a report Analysis of the availability of goods in UT. We note right away that the entire demonstration of the capabilities of reports in UT 11 will take place on the example of two reports:
- Analysis of the availability of goods;
- Revenue and cost of sales.
Selection by some fields can be done either directly in the report form or by clicking the button Setting.
In a collumn Comparison type The user can select different comparison conditions. For example, for the field Nomenclature You can choose from the following types of comparison:
- Equals- the report will be built only for the selected nomenclature position;
- Not equal- the report will be built for the entire range, except for the selected position;
- Listed- the report will be built according to the list of nomenclature positions;
- Not in the list- the report will be built for the entire range, except for the selected positions;
- In a group- the report will be built on all the nomenclature located in the selected folder of the directory Nomenclature;
- Not in a group- the report will be built on the entire nomenclature, except for the items located in the selected folder of the directory Nomenclature;
- In a group from the list- similar to comparison In the list, only folders in the directory are selected as list values Nomenclature;
- Not in a group from the list- similar to comparison Not in the list, only folders in the directory are selected as list values Nomenclature.
The checkbox (tick) to the left of the selection field indicates that selection by this field is “on”, i.e., it is taken into account by the report.
Unchecked fields are not taken into account even if you have selected certain values these fields.
Depending on the selected type of comparison in the column Meaning a specific element or folder (group) of the directory, or a list of elements or folders is indicated.
Quick selections are available in all solutions based on the 1C:Enterprise 8 platform.
An example of a simple change in report settings
To view/change the report settings, go to the menu All actions - Change option.
Before us opens the settings window for the selected report option.
The structure of the report is displayed at the top of the window. In fact, this is a visual display of groupings of rows and columns of the report, i.e. in what order the analytics data will be displayed in the report in rows and columns.
The lower part of the window displays those related to the report as a whole (if the upper level Report), or to a certain grouping of rows or columns of the report (if the grouping is selected at a level below), settings for displaying information and designing fields.
Example 1
Step 1. We need to remove the grouping by item characteristics, leaving only the grouping by item. To do this, in the upper part of the report settings window, click on the field Nomenclature, Characteristic. At the bottom of the window, go to the tab Groupings.
Select a field Characteristic and click on the button Delete command panel.
Confirm changes to the report settings by clicking on the button Finish editing in the lower left corner of the screen.
Step 2 After removing the characteristic, our task, according to the conditions of the example, will be to add a price group. According to the meaning, this grouping should go a level lower than the grouping by stock, but a level higher than the grouping by item. Therefore, in the structure of the report, we select a grouping Stock.
By clicking on it with the right mouse button, in the context menu, select the command New grouping.
In the grouping field editing window that opens, select Nomenclature.Price group.
By clicking on the button OK, we will see that a new grouping has been added to the report, subordinate to the grouping Stock.
Now let's select the grouping by item and, without releasing the right mouse button, drag it inside (i.e. below) the grouping by price group. We will get the structure shown in Figure 1. The result of setting up the report is shown in Figure 2.
Rice. 1. The resulting report structure
Rice. 2. Result of report customization
Working with custom fields
Let's now take a closer look at the new reporting options in the 1C: Trade Management 8 program.
In the form of editing the structure and settings of our report, pay attention to the tab Custom fields.
Before that, we added fields to the report, the list of which was predefined by the developer. With this tab, we can create our own fields we need - field-select or Field expression.
Example 2
|
Let's customize the report "History of sales" (version of the report "Revenue and cost of sales"). Let's display data on sales in the context of partners and nomenclature. Suppose that our company is engaged in the sale of goods in Moscow and in the regions. Thus, each client in the infobase belongs to a certain geographic region (props "Business region" of the directory "Partners"). We can easily group sales data in a report by regions, but what if we are interested in more aggregated statistics, in particular, the answer to the question “How many goods were sold in Moscow, and how many in all other regions combined”? This is where custom fields come in handy. |
Step 1. Let's open the report. Let's go to the report structure settings form ( All actions -> Change variant). Let's delete in turn all the groupings previously created in the report - to do this, select each of them and click on the button Delete command bar, or use the DEL key.
Just like in the previous example, let's add a grouping to the report by partner, and then by product. We already know how to do it, so it won't take much time.
Step 2 Let's create a new custom field. Let's open a bookmark Custom fields and run the command Add -> New field-select.
Let's name our new field - Region in general.
Let's click on the button Add. In a new line, click on the button in the column Selection. In the selection editing form that appears, add a selection by field Partner.Business region. Choose the type of comparison Equals, meaning - Moscow.
Let's click on the button OK, after which we will return to the custom field editing window. Next, click on the button in the column Meaning and in the data type selection list that appears, select Line and write as value Moscow.
Let's repeat the operation. Let's add another row to the table. This time for field selection Partner.Business region choose the type of comparison Not equal.
Returning to the custom field editing window, in the column Meaning write Other regions(See Fig. 3).
Rice. 3. Custom Field Editing
Let's click on the button OK. Our new field is ready.
Step 3 Let's add our new field to the report structure. Highlighting the top level Report in Structure, add a new grouping. In props Field choose Region in general.
Drag the grouping by partner and its subordinate grouping by product range into the newly created grouping with the mouse.
Let's generate a report and look at the result (shown in Fig. 4).
Rice. 4. The result of the report generation
Selection and sorting
Let's return to the window for editing the structure and settings of the report and pay attention to the tabs Selection and Sorting.
If the root element is selected in the report structure ( Report), then the settings made on these tabs will apply to the entire report as a whole. If some report grouping is selected, then the settings will apply only to it.
Example 3
As a result, the report Sales history only those implementations will get where the manager is specified Ivanov Ivan Fyodorovich.
Example 4
Save the changes made
If you change the structure of a report, you can always save it using the command All Actions -> Save Variant.
In the form of saving a variant, using the switch, you can select Save to existing report variant(instead of one of the options already available), or Save the new version of the report.


