Restore iphone 4. The easiest way to help you restore iPhone without iTunes
Hello everyone, dear iOS lovers gadgets. Today we will touch on the topic - like (4s, 5, 5s, 6) or iPad (2, 3, 4, Mini). To reflash means to update, reinstall operating system on an iOS device. Update process mobile iOS The gadget may be needed if various problems arise with the iPhone (4s, 5, 5s, 6) or iPad (2, 3, 4, Mini). Reflashing can solve some problems if your gadget is unstable.
This is done very simply, all the work happens in three stages:
. At this stage, you will need to select and download the file with the required firmware version for your iPhone (4s, 5, 5s, 6) or iPad (2, 3, 4, Mini). In principle, you can: either install an updated version of the operating system, or (but not too old). I want to say right away that return iOS old version(older than iOS 7) will not work, because Apple has stopped signing and activating early iOS versions.So, let's take a closer look at each of the above points..
Downloading the firmware file
First, let's move on to downloading the file with the firmware version you need. This is very easy to do, follow these steps::
- Go to www.getios.com. In the “Your device” field, select the name of your device.
- In the second step, you need to select the device model. To select, use the drop-down list called “The Model”.
- In the third step, you need to select the version of the iOS operating system that you want to install on your mobile gadget iPhone (4s, 5, 5s, 6) or iPad (2, 3, 4, Mini).
- Next, click the “Download” button. The file with the firmware will begin downloading; the file size, depending on the selected iOS version, can take up several gigabytes.

Save the downloaded file with the operating system to your desktop or to the folder in which it is convenient for you to save.
Setting up iTunes to work
Before you proceed to flashing your device, you need to download, install and configure iTunes:
- First of all, follow the link - apple.com/itunes/download and download latest version iTunes programs. Run the downloaded program file and install the program.
- Connect your gadget to personal computer by using USB cable. Launch iTunes.
- In the side menu (if the side menu is not visible, you need to press the key combination CTRL + S) in the “Devices” field, select your gadget, previously connected to a personal computer.

Before you start flashing your gadget, I recommend making a backup copy of your operating system settings. To do this you need to do a few simple steps:
- Connect the gadget to your personal computer using a USB cable.
- Launch iTunes (if the program does not start automatically after connecting) and in the side menu (if the side menu is not displayed, you simultaneously press CTRL+S) select your iPhone (4s, 5, 5s, 6) or iPad (2, 3 , 4, Mini).
- Go to the “Browse” tab, find the “Create a copy now” button and left-click on it.
In the next step we will go to the lesson and try to reflash your gadget.
Flashing
Go to (4s, 5, 5s, 6) or iPad. To do this, follow these steps::
- Hold down the SHIFT key (if you have Windows) or ALT key (if you have a Mac) and left-click on the “Restore iPad” button.
- In order to reflash the device, in the window that opens, select the previously downloaded file with the firmware.

Sometimes you may face a lot of problems as an iPhone user. For example, you accidentally delete iPhone, update your operating system but lose some valuable files, or recover old iPhone data from a saved file backup copy due to buying a new one.
If you are facing the above problems, you may be thinking "how to recover my iPhone data in the easiest way."
The reason iTunes doesn't want to restore iPhone
Although iTunes seems really in a good way provided by Apple to help you recover iPhone data from a backup file, there may be some problems that may occur when using iTunes for recovery.
- 1. If you don't have enough time to backup your iPhone data to iTunes, there is no option to restore your iPhone from using iTunes.
- 2. If your hardware has some problems, it will show you an error message. For example, your cable does not work well when connecting your iPhone and PC. If you have security settings/software installed on your computer that has a big impact on how your phone communicates with servers Apple updates, you need to try to update it again and again.
- 3, iPhone will not recover data to iTunes after a failed jailbreak attempt.
- 4. When you recover iPhone data using iTunes, it has the possibility of the recovery stopping suddenly when the download bar disappears and an error message appears.
There is another unfortunate possibility with which iPhone users meet when they restore their iPhone using iTunes.
To avoid unnecessary problems, this article will introduce you to the easiest way to solve “how to restore iPhone without iTunes”.
How to Restore iPhone without iTunes
iOS Data Recovery is a third-party software that can do what only iTunes does, even has more powerful features in recovering iPhone data without iTunes. You can use this program to restore iPhone directly and from backup files without iTunes.
Part 1: Restore iPhone Directly
Install the software and open it.
Download this iPhone recovery software (it supports Win and Mac). Open it and connect your iPhone to it. Select " Recover from iOS devices "which can help you restore iPhone without iTunes in the easiest way.
Attention: When you open the software, you can see three options on the main interface. Apart from restoring from iOS device, you can also select "recover from backup file" iTunes copies/iCloud" to automatically recover iPhone data with this software. (You can read part 2/3 to learn how to restore iPhone from iTunes/iCloud backup without iTunes app)

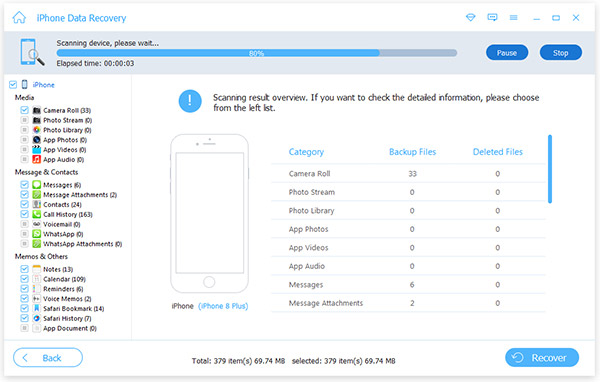
Start scanning your iPhone
If successful iPhone connection click " Start scanning"to scan your iPhone. There is a process bar on the top interface that shows the scanning speed.

View and Recover iPhone Data
On the left interface, you can see the file classification list. Click the data you want to recover, such as "Contacts", you can see all detailed information about the middle and right interface. Then you can preview you wanted it.
When you are sure that all the files you want to recover, you just need to click the " Restore“A dialog box will appear asking you to specify the path to save the recovered file. Then click "Restore" again to finish it.
Note: In the left interface there is 18 file types you can view and restore, e.g. text messages, photos, notes and much more.

Part 2: Restore iPhone from iTunes Backup without iTunes App
You can restore iPhone from iTunes backup with this software and without iTunes app.
Scan iTunes Backup File
When you enter " Recovering from an iTunes Backup File", select which device you want to restore if you are producing backup it contains various device data. Click "Start Scan".
Recover iPhone Data Before Watching
Select the file you want to recover and view them if you need to recover, click " Restore"and select the path to save it. After that, click the "recover" button to recover iPhone data on computer without iTunes.

Part 3: Recover iPhone from iCloud Backup File
You can easily restore iPhone from iCloud backup using this software.
Today we will look at several ways to restore an iPhone using iTunes. After reading this manual, each Iphone owner will be able to restore data to mobile device. So let's begin.
Recovery methods
Before any iPhone restoration, do not forget to backup your phone. Without this, the recovery process is impossible. In general, among the recovery methods via iTunes, there are 2 methods:
- return to factory settings;
- recovery of user data.
Keep in mind that if you previously backed up your data using iCloud, iTunes will not help you recover it. This is important to take into account before taking action.
iTunes
Let's start with the backup iOS copies. Without it, as I wrote earlier, it will not be possible to restore the previous data.

First of all, we check whether iTunes is installed on the computer, if not, then download it from here and watch the installation video from here.
If iTunes asks for an update after launch, then we agree and update. After this, we proceed to create a copy of the data.
Create a backup copy
Below are the steps to create a backup. You need to know that all copy data will be saved on your PC in the BackUp folder.
So here are the steps:
- Download the latest version of iTunes onto your computer and install it (if it has not been installed previously).
- We connect the phone when USB help to a PC or laptop.
- Let's launch the application.
- Click Trust this computer.
- We are waiting for synchronization.
- We go through authorization with AppleID (you can only log in on 4 computers in total).
- Open the “General” tab in the left menu of the program.
- On the right side of the window, click on the “Create a copy” button.
- We wait a few minutes.
After all these steps, a copy will appear on your computer iPhone data. And now you can start restoring the OS.

Factory reset
Now let's talk about how to return your phone to factory settings.
This is the easiest way to return your iPhone to normal operation. This happens full reset data to factory settings. No user data is saved in this case. iTunes really allows you to return your device to its original settings.
The instructions will be as follows:
- Launch iTunes. We connect the iPhone via a USB cable.
- We synchronize with a mobile phone.
- Go to the “General” tab.
- On the right side of the window, select the “Restore iPhone” button and click on it.
- When requested, we authenticate using AppleID (it does not always prompt again).
- We carefully study the pop-up window warning about the consequences of actions and if everything is ok, then we agree with the operation.

After this the process will begin iOS rollback. It usually takes from 10 to 40 minutes (it all depends on the amount of memory in the iPhone).
After the operation is completed, the phone will reboot and recover. All data will be erased and the settings will be restored to factory settings.
Recovering data on iPhone
Now let's move on to data recovery on iOS. This is a fairly simple operation that will only take a few minutes.
So, recovery instructions:
- Launch iTunes (if not already launched).
- We connect the phone via a USB cable to the computer.
- Select the connected device in the “Devices” menu. To do this, click on the name of the device.
- Go to the menu item “File” - “Devices”.
- Select "Restore from backup".
- In the field that appears, mark the line with the desired copy of the data. There may be several of them. Attention, all copies have the date and time of creation.
- We confirm the operation and wait.
After this, the recovery process will begin. We do not touch the phone at this time, we do not turn it off under any circumstances, and we do not work on it. After some time, iOS will be restored and the device will reboot.
Restoring an iPhone is a standard return operation Apple smartphone V operational state after various failures. Unsuccessful firmware, an incorrectly executed jailbreak, an incorrect iOS update - if you know how to restore an iPhone, you can fix almost any problems that arise during the operation of this device.
Recovery procedure
To restore your iPhone, you need to enter Recovery Mode. It's easy to do:
When the iPhone is ready for the rollback and error correction procedure, click the “Restore” button. 
iTunes will find it on its own current version firmware and install it on the smartphone, returning it to the state in which it was immediately after purchase.
Working in DFU mode
If in Recovery Mode iPhone recovery does not work, you must enter the device into DFU mode. This mode is used when there are software errors - for example, when the iPhone does not turn on. DFU mode works at the hardware level, so it helps to reset all settings even in the most difficult cases. To enter DFU mode:
- Connect your device to your computer.
- Press and hold Power and Home for 10 seconds.
- After counting to 10, release Power while continuing to hold the Home button.
It's difficult to enter DFU mode the first time because nothing changes on the screen. If recovery mode detects itself iTunes icon, then in DFU the phone does not seem to turn on. Therefore, you need to look at the computer screen where iTunes is running. As soon as the iPhone enters DFU mode, a notification will appear in iTunes informing you that the program has detected the device in recovery mode, and you need to reset all settings and content to continue working with your smartphone. 
If you need to install another firmware, hold down Shift and click “Restore”. An explorer will appear through which you need to specify the path to the previously downloaded firmware.
Recovery without a computer
If you don’t have your computer at hand, it won’t turn on, or you can’t connect your iPhone to it, then try resetting all settings through the device settings. As a result of this operation, you will receive a clean smartphone without settings and user information, so be sure to make a backup before resetting. If the smartphone turns on normally:

It is not necessary to delete user files. If the iPhone turns on, then you can troubleshoot its operation simple reset settings. In this case, the user’s personal data will remain intact.
Recovery after reset
If you need to restore your iPhone after resetting all settings and deleting content, you won’t be able to do this without a backup copy. The presence of a backup file with information stored in the device’s memory is the main point that needs to be checked before performing a reset. After restoring the iPhone to its factory state, all personal data of the user is erased from it.
Creating a backup before resetting:

After the reset, the iPhone will be like new: no content or settings will remain on it. To get all the information back, you need to connect the device to your computer and restore from the backup via iTunes. Choose the most recent backup, as it stores the most current information. 
You can also restore all settings after a reset via iCloud, provided that you stored backups on the cloud. In this case, when setting up your iPhone, you need to select the “Restore a copy from iCloud” option and specify a suitable backup.
Problems during recovery
If after normal recovery the phone does not turn on, then it makes sense to put it in DFU mode and try to restore it through iTunes again. This time you should not trust iTunes: download official firmware and select it in the Explorer window by holding Shift and clicking on the “Restore” button. 
Sometimes the TinyUmbrella utility helps solve the problem that the smartphone does not turn on after resetting the settings via iTunes. This program has an “Exit Recovery” button. If the iPhone does not turn on after recovery, you need to select it in the TinyUmbrella window and click “Exit Recovery”. 
During the operation of iPhone 4, problems may arise: the phone does not work correctly or does not work at all. The reason may be
- unsuccessful flashing;
- unsuccessful jailbreak;
- unsuccessfully installed new software.
It is also possible that you wanted to give up a successful jailbreak. In any case, the device must be restored to its original state.
How to return to default settings
- Download the latest version of iTunes and run it.
- Connect iPhone 4 to computer with a USB cable.
- Create a backup copy of all phone data, all content in the program, synchronize.
- In iCloud Settings, disable Find My iPhone.
- Select your device from the iTunes list.
- “Review”, “Restore”.
- Confirm recovery.
- Once your iPhone 4 reboots, the “Set Up” message will appear.
You can configure again or use a backup copy. Official content should be restored.
Possible mistakes
 If you receive an error message while working, you can try the following:
- Check iTunes. If you have outdated version, you need to download a new one.
- Update your computer's operating system.
- Check your security settings. If necessary, download the update or disable it while working with iPhone 4.
- If other devices other than the iPhone are connected to the computer, turn it off (leave only the keyboard and mouse).
- Restart iPhone 4 and computer.
- Perform synchronization and recovery again.
In iTunes “Settings” - “General” - “About Device” you can check your firmware version. It may be that Apple no longer supports it (for example, iOS 4.0.1) or does not support it yet (the version is under development).
Error codes 
- If there are problems with communication, an error code from 3000 to 3999, 1004, 1013, 1638 is displayed.
- In case of conflict with security settings – 2, 4, 6, 9, 1000, 1611, 9006, 9807, 9844.
- When not working USB connection: 13, 14, from 1600 to 1629, from 1643 to 1650, from 2000 to 2009, from 4000. In this case you need
- change the USB cable;
- connect the cable to another port;
- use a different dock connector.
What to do if you can't connect to iTunes
 In the most serious cases, when the iPhone 4 does not boot at all, you can try restoring the firmware via DFU.
- Turn off your iPhone.
- Launch iTunes.
- Connect iPhone 4 with a USB cable to your computer.
- Hold down the Home and Power buttons for 10 seconds.
- Release Power, hold Home for another ten seconds - until the program detects the phone (a message will appear about this).
- If there is no result, repeat all these steps again.
- After rebooting your iPhone 4, restore its contents from the backup.
- Synchronize.
Copying must be complete. The process can last about three hours. If you do not restore all the contents of your phone's memory on the first try, the copying will also be incomplete on subsequent attempts.
Why you need to back up to iTunes
 It is necessary to create a backup of your phone’s contents for several reasons:
- To restore the firmware and functionality of the device if necessary.
- To avoid losing content in case of permanent breakdown or loss of the phone.
- When selling/transferring the device, its settings, contacts, programs and files can be transferred to the new device from the computer.
If you have automatic synchronization configured, a backup will be created by default every time you connect your smartphone. If there is no automatic synchronization, then a backup copy is created at the user’s command.


