How to save an image in photoshop format. How to save images correctly in Photoshop? Consider the most common graphic formats for saving files in Photoshop
Adobe Photoshop- a popular multifunctional graphics editor. Many users face it, especially when processing photos and pictures. How to save a document in Photoshop? This is one of the main functions graphic editor. Next, all possible methods for saving pictures will be considered. The tips offered to your attention will greatly facilitate the process of working with Photoshop. They are easy to learn and put into practice.
Regular save
How to save a photo in Photoshop? The first option available in the graphics editor is the "Save" command. It is usually used when processing a previously opened document. During the execution of the command, the previously existing object will be replaced by the edited image.
- Open the photo and edit it to your liking.
- Click on the "File" button. It is located on the toolbar at the top of the screen.
- Click the "Save..." button.
Important: if the user has created a graphic document from scratch, after the actions taken, a save log will appear on the screen. Here you have to specify the name of the document, its storage format and the intended location on the computer.
"Save as..." option
The second way to save graphic files is to use the "Save As..." command. This technique is similar to the previously studied algorithm of actions. It features a variety of save options. The method is great for duplicating pictures.

- Click on "File" after editing the document.
- Select "Save As..." from the menu that appears.
- Specify the name of the saved document.
- Select a save format. It's in the "File Type" line.
- Specify where to save the graphic document.
- Click on "Save".
- Specify photo options. Usually, the image quality and format type are selected here. You can specify standard or improved optimization, or with a gradual improvement in image quality as it loads.
- Click on the "OK" button.
It is done. We learned another way to save documents through Photoshop. To quickly activate the option, you can press Ctrl + Shift + S.
With file close

- Go to the tab with the selected image.
- Move cursor to right upper corner tabs with the corresponding document.
- Click on the cross with the left mouse button.
- Agree to save the document by clicking on "Yes".
Important: If you click No, Photoshop will close without saving changes to the document. "Cancel" will return the user to the editor without any changes.
For Web resources
Often "Photoshop" is used when creating graphics for Web sites. It remains only to correctly save the document. What is needed for this?
- Select "File" - "Save for Web...".
- Specify the graphic set and save format.
- Set background options.
- Specify the image quality and size.
- Click on the "Finish" button.
Quick access to the option is carried out using a combination Alt keys+ Shift + Ctrl + S.
Saving the background and picture without it
How to save a background in Photoshop? This is a fairly simple task. The thing is that the user can use any image as a background. It remains only to set it as the mentioned element of the picture.

Creating a background in Photoshop is done like this:
- Open or create a graphic document.
- Click on the "Add New Layer" button.
- Copy the image used as the background.
- Paste the picture on the created new layer.
Now it remains to make the necessary adjustments to the image, and then move the background layer to the very bottom.
How to save an image in Photoshop without a background? To do this, you will need to create a .gif or .tiff document. It is preferable to work with the first option. To do this, you will have to activate the "Save for Web ..." option, and then in the save options put a checkmark next to "Transparent".
Working with a graphic editor Adobe Photoshop for 5 years now, I was surprised to learn that not everyone knows about the importance and necessity of saving images correctly. Searching the internet, I really didn't find up-to-date and correct information on this topic. For this reason, I figured out the issue and want to tell you how to save images properly.
Who needs to know and why?
Everyone - who works with a graphic editor, not necessarily Adobe Photoshop. Illustrator, artist, graphic designer, web designer, interface designer, photographer, student, schoolboy - by learning how to save images correctly, reducing the file size, you save not only your own, but also other people's time.
What time are we talking about?
First, let's clarify one thing:
By using the internet you are wasting time - a lot of time
Loading pages on the Internet is not instantaneous and takes time, but over the years of being on the Internet, you are used to not noticing this. Let's say average speed page load 3 seconds, where 2 of them are for image uploads. Illustrations, interface elements, photographs, banner ads, a PDF presentation, or even a picture of a cute cat, depending on the file size, will take time for the browser to display the image on the screen.
Don't be fooled by "megabytes per second"
Chances are your ISP is promising you 100 Mbps- this is a brilliant advertising ploy (read as: deception) that has given rise to many misconceptions, including in the topic of site loading speed. I measured the connection speed with a server located in Moscow, the result is:
But the page loading speed from the site is much lower:
How many images per day do you view?
Dozens? Hundreds? As an active Internet user, I view several hundred images a day, and most of them high definition. If you reduce the weight of these images and increase the download speed accordingly, at least by 1 second, multiplying by 500 images per day, we get about 8 minutes a day and 4 hours per month.
4 hours a month I wait for the picture to load
Everything you need to know about saving images
With rare exceptions, there is no need to save the final result in the same way as PSD, in this case, an additional and extra information from the date of creation and the name of the graphic editor to the weather and camera model.
It's a bad habit to set quality to value 100 , but compared to 80 differs visible quality almost zero, but the difference in weight palpable.

To place an image on a website, send it by mail, save it in the cloud, send it in a messenger, etc. - you must use Save for web.


JPEG or PNG?
JPEG - for images with large quantity colors and complex figures: illustrations, paintings, photographs.
PNG - for vector images or images containing text, simple geometric shapes with transparency and a small number of colors: logos, screenshots, stickers, icons.
What quality (Quality) to choose?
For most images, the optimal value will be 80 , for some simple images where a clear transition between colors is not important. you can set the value 60 .
Optimization
The function includes an additional color conversion algorithm, it is recommended include always, except when the smallest details are important (for example, Pixel Art).
Convert to sRGB(Convert to sRGB)
Converting image colors to the appropriate sRGB table.
sRGB is the standard for the internet
Resolution(Image Size)
The most common screen resolution is: 1366×768- for computer and 720×1280- for smartphone. Keep this in mind and don't save images longer than 1920 in width.
Metadata
Extra information, which I already mentioned. No need to specify additional information about the image, which only increase the file size.
When was the last time you looked at the details of a downloaded image?
Using this method, I managed to reduce the weight of the image by half.
Of course, there are rare exceptions when you may need detailed information or increased granularity, but in most cases these rules will be appropriate and save hundreds of hours.
Thanks Vladislav.
In the world digital technologies there are many tools that make our life easier. In the last 10 years, since the beginning of the use of digital cameras, a question has arisen in the processing of images using a computer. And the main basics are the preservation of images and their processing. All these image processing are done in popular program Photoshop. For many, it will seem complicated and incomprehensible, but we have made this process as simple and clear as possible.
How to save a photo in Photoshop?
In this manual, we will consider three options for saving images using Photoshop:
1.
Normal save to png format, jpg etc.
2.
Saving in PSD format (project saving format, with which we can continue to work in the future).
3.
Saving for web devices (a method that allows you to reduce the size of the image).
I'll tell you a little before the options for saving images important information which will be useful to you in the future:
The difference between png and jpg is that png allows you to save images with a transparent background. Jpg format keeps transparent background areas white. Example. If you want to save an image without a background, Jpg format will not work.
PSD is a format in which we can work with layers, texts, etc. If you are working with projects (PSD) You can always save the image in any format.
Saving images for Web devices should be considered carefully. Any reduction in quality is reflected in the image. Unless necessary, I advise you not to use this save option.
Let's get started with saving images.
1
. Open the Photoshop program.
2.
Click File (File) -> Open (Open). We select the image we need on the computer and click Open (Open).
Option 1. Normal saving as jpg, png, etc.
1. Click File (File) -> Save As .. (Save as). We choose the place where we want to save the image, write the name, select the format from the drop-down list (JPEG - the most convenient or another one you need). Click Save.

2. We select the quality with the slider, the higher the quality, the larger the size. And click "OK".

Option 2. Save the project in PSD format.

Now, at any time convenient for us, we can continue working with our project.
Option 3: Save for Web Devices.
1. Click File (File) -> Save for Web & Devices (Save for Web devices). Select from the dropdown list jpeg format, GIF or PNG. Select Quality (quality level) using the slider.
Today we will talk about how to properly save and optimize an image in Photoshop and in what format it is better to do it. But the correct choice of the save format greatly affects the quality and appearance images, as well as the weight of the image in kilobytes. This is especially important for those who take into account traffic consumption. So, let's deal with jpg, gif and png in order.
1. In what formats to save pictures
After you have opened your favorite photo in Photoshop and somehow conjured over it or, in general, created a collage of your own production from scratch, you have to save this file on your computer. There are three most common formats for saving a file.
jpg format. Perhaps the most common format. Suitable for storing complex graphic images with many colors and shades and rich texture. That is, photos are best saved in this format. Among its disadvantages is that it does not support transparency and is very sensitive to red. 
gif format. In this format it is very good to save files with a limited number of colors. For example, text pages, tables, diagrams, logos, simple pictures. It turns out much clearer and weighs less. Plus, the format supports transparency and animation. However, the format is morally obsolete and is already inferior to the png format. 
png format. Similar to the previous format, but more advanced and more efficient in compressing pictures. In png it is very convenient to save clipart on transparent background. Exists in two png-8 formats (for simple pictures, supports 256 colors) and png-24 (for more complex images, supports colors well). 
2. Save using the "Save as ..." (Save as ...)
You can save the picture using the good old way through the menu "File" -> "Save as ..." (Save as ...) or the key combination "Shift + Ctrl + S". In the drop-down menu, select the file format in which we want to save the file. (See the picture below) This method is used when the saved image will remain on your computer and is not intended for publication on the Internet. 
3. Save using the "Save for Web" (Save for Web ...)
If your picture is intended to be posted on the Internet, then it is better to use the "Save for Web" (Save for Web ...) function. With this method, the picture is better and better saved specifically for the Internet, and plus there are several convenient features. Select in the menu "File" -> "Save for Web ..." (Save for Web ...) or the key combination "Alt + Shift + Ctrl + S". A dialog box will open.
In order to save the image in jpg format, select the JPEG format in the drop-down menu (1). We set the quality of preservation (2) from 75% to 95%. I always put 75%. Set, if necessary, the required dimensions of the image (3). The boxes on the left show the original image size (4) and the optimized image size (5). After that, click "Save". 
In order to save the picture in gif format, in the drop-down menu (1) select the GIF format. Select the number of colors to save (2). Set, if necessary, the required dimensions of the image (3). The boxes on the left show the original image size (4) and the optimized image size (5). After that, click "Save". 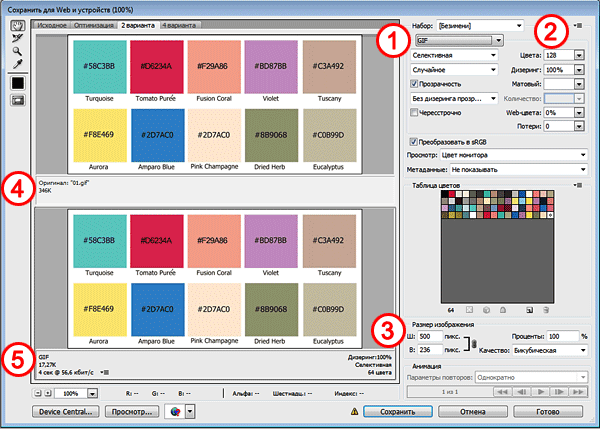
In order to save the image in png format, in the drop-down menu (1) select the PNG-8 format. Select the number of colors to save (2). Set, if necessary, the required dimensions of the image (3). The boxes on the left show the original image size (4) and the optimized image size (5). Put a tick in the checkbox "Transparency" (6) so that the background is transparent. After that, click "Save". 
If it is not immediately clear in which mode to save, it is best to try all the save modes, determining by eye the combination of image quality and its weight that is optimal for you after optimization. In general, it is useful to experiment with the settings in order to understand how a particular function works.
In this lesson, you will learn how to save a document in photoshop. After the photo has been edited, most likely you wondered how to save it? To do this, Photoshop provides three commands: Save (Save), Save As (Save as) and Save for Web & Devices (Save for Web and devices):
Basic information
All three commands can be executed via the File menu:

The Save command allows you to save the document in the format in which it was originally opened. It is recommended to use it when you are editing an image, so that if the program freezes, you will not lose the results. The next command, Save As, will be the most useful for you, it allows you to select the save format, quality and name. The Save for Web & Devices command is useful for saving an image of a web resource or any device, allowing you to highly compress and resize the image. To learn the settings of this command, you will need a separate lesson.
Saving a file as a JPEG
One of the most common formats of our time. Received great popularity for the fact that even with a small size it retains colors well. JPEG is supported by almost all multimedia devices and all web browsers.
To save the image in this format, select File (File) - Save As (Save As), after which a window with save settings will open, which will be described in detail below:

- At the top there is a window for choosing a location to save to your hard drive.
- Changing the file name
- In the Format field, you can select the format for the file. Select JPEG format and click save.
A window with file settings will open in front of you:

In the Image Options section, you can select the quality and compression ratio: Low (Low), Medium (Medium), High (High) and Maximum (Maximum). The easiest way to do this is with the slider. Remember that the more compression, the worse quality. On the left is the file size. In the Format Options section, you can choose one of three compression methods:
- Baseline Standard (Basic Standard) this compression method is the most common, perfectly understood format for devices and web browsers.
- Baseline Optimizes (Basic optimized) a method that allows you to compress the image, but at the same time maintain clarity and color.
- Progressive (Extended) using this method, the image will not load line by line, but in several passes as it loads. Each of them will display the full image, improving from pass to pass. Some browsers and devices do not work well with it.
Leave Baseline Standard and click OK
Save the file as a PSD
When saving a file in PSD format, all editing processes are saved, including layers, masks, filters, etc. Therefore, if you open this format in Photoshop, you can easily make changes.


