Comment frame with css corner. Corner and border styling with CSS
Your attention is a beautiful selection of corners and frames that are designed for information blocks, which is used using HTML and CSS. Also in this note you can choose the design style that is made on the corners, which comes with a hover effect and a default setting without any effects, just a stylish design.As an example, you can take one variation, where the block has curved corners, and it looks completely different from the standard one. On some there is an option for placing various ribbons or installing an image that is installed in the block inside.
All presented material comes in an adaptive form for different resolutions, which is for a large monitor or the smallest screen. After installation, a change will occur on the site, where they are mainly placed to attract attention, because initially there is only a structure that can complement the main style.
First option:

css
Ugoinsa_utomatio_npones (
display: inline-block
width: 295px;
position: relative;
border: 1.5px solid #1b629e;
transition: all .3s ease;
margin: 5px
cursor:pointer;
}
.ugoinsa_utomatio_npones:before, .ugoinsa_utomatio_npones:after (
content: "";
z-index: -1;
display:block;
position: absolute;
background: #FFF;
top: 50%;
left: 50%
transform: translate(-50%, -50%);
animation-iteration-count: 1;
transform-origin: 50% 50%;
}
.ugoinsa_utomatio_npones:before (
width:calc(100% + 4px);
height: 75%;
z-index: 1;
transition: height 0.6s;
}
.ugoinsa_utomatio_npones:after (
height:calc(100% + 4px);
width: 85%
z-index: 1;
transition: width 0.7s;
}
.ugoinsa_utomatio_npones:hover:before, .ugoinsa_utomatio_npones:focus:before (
height: 50%;
}
.ugoinsa_utomatio_npones:hover:after, .ugoinsa_utomatio_npones:focus:after (
width: 74%
}
.sequupok_egulaned_demob (
padding: 29px
z-index: 2;
position: relative;
text-align: center;
}
Here we independently create an installation for our resource and make it more noticeable, depending on what action.
Second option:

ZorNet - webmaster portal
css
Pvobamoco-mpaensive (
position: relative;
display: inline-block
width: 283px
margin: 7px0 37px0;
padding: 28px
color: #f3eaea;
text-align: center;
background: #2b22a0;
background: linear-gradient(to left bottom, transparent 50%, rgba(16, 16, 16, 0.4) 0) no-repeat 100% 0 / 30px 30px, linear-gradient(-135deg, rgba(0, 0, 0 , 0) 20px, #334ab9 0);
filter: drop-shadow(18px 28px rgba(14, 14, 14, 0.1));
}
.pvobamoco-mpaensive::before (
content: " ";
position: absolute;
top: 30px;
right: 0;
background: linear-gradient(to left bottom, rgba(0, 0, 0, 0) 50%, rgba(14, 14, 14, 0.1) 0) 100% 0 no-repeat;
width: 28px
height: 28px;
transform: rotate(180deg);
}
Here, the effect was not initially registered, but a beautiful shadow was made, which you can independently increase and change the color gamut.
Third option:

Zornet.Ru
Zornet.Ru
Set the description
css
keculosubes_aspectsiveb (
position: relative;
display: inline-block
width: 295px;
padding: 30px
margin: 9px
min-height: 91px;
border: 2px solid #BFE2FF;
text-align: center;
}
.malugeke_deculos(
width: 148px;
height: 148px;
overflow: hidden;
position: absolute;
}
.malugeke_deculos::before, .malugeke_deculos::after (
position: absolute;
z-index: -1;
content: "";
display:block;
border: 5px solid #2980b9;
}
.malugeke_deculos span(
position: absolute;
display:block;
width: 223px;
padding: 15px 0;
background-color: #337AB7;
box-shadow: 0 5px 10px rgba(12, 12, 12, 0.1);
color: #f3f0f0;
font: 700 18px/1 "Lato", sans-serif;
text-shadow: 0 1px 1px rgba(8, 8, 8, 0.1);
text-transform: uppercase;
text-align: center;
}
.malugeke_deculos-top-left (
top: -10px;
left: -10px
}
.malugeke_deculos-top-left::before, .malugeke_deculos-top-left::after (
border-left-color: transparent;
}
.malugeke_deculos-top-left::before (
top: 0;
right: 0;
}
.malugeke_deculos-top-left::after (
left: 0;
bottom: 0;
}
.malugeke_deculos-top-left span (
right: -25px;
top: 30px;
transform: rotate(-45deg);
}
.malugeke_deculos-top-right(
top: -10px;
right: -10px;
}
.malugeke_deculos-top-right::before, .malugeke_deculos-top-right::after (
border-top-color: transparent;
border-right-color: transparent;
}
.malugeke_deculos-top-right::before (
top: 0;
left: 0;
}
.malugeke_deculos-top-right::after (
right: 0;
bottom: 0;
}
.malugeke_deculos-top-right span (
left: -25px;
top: 30px;
transform: rotate(45deg);
}
It remains to choose the right or left tape in order to install it on the block, where the tape itself will serve to write the title on it. Also change the color or initially set the default block that is installed under the tape.
Here, a web developer can beautifully design, because for this the frame is already completely, that some put shadows, it all depends on the color palette of the Internet resource and in general where you will be and for what purpose to place such an original frame.
CSS3 frame extends the formatting capabilities of element borders with properties that allow round corners element, and also use Images to style the borders of an element.
Rounded corners and picture frames
1. Rounding corners with border-radius
Browser Support
IE: 9.0
Firefox: 4.0
Chrome: 4.0
safari: 5.0, 3.1 -webkit-
opera: 10.5
iOS Safari: 7.1
Opera Mini: —
Android Browser: 4.1
Chrome for Android: 44

This property allows you to round the corners of inline and block elements. The curve for each corner is defined with one or two radii defining its shape − circle or ellipse. The radius extends to the entire background, even if the element has no border, the exact position of the secant is determined using the background-clip property.
The border-radius property allows you to round all corners at the same time, and using the properties border-top-left-radius , border-top-right-radius , border-bottom-right-radius , border-bottom-left-radius you can round each corner separately .
If you set two values for the border-radius property, the first value will round top left And lower right corner, and the second is top right And bottom left.
Values given via / define horizontal And vertical radii. The property is not inherited.
Options
Div (width: 100px; height: 100px; border: 5px solid;) .r1 (border-radius: 0 0 20px 20px;) .r2 (border-radius: 0 10px 20px;) .r3 (border-radius: 10px 20px ;) .r4 (border-radius: 10px/20px;) .r5 (border-radius: 5px 10px 15px 30px/30px 15px 10px 5px;) .r6 (border-radius: 10px 20px 30px 40px/30px;) .r7 ( border-radius: 50%;) .r8 (border-top: none; border-bottom: none; border-radius: 30px/90px;) .r9 (border-bottom-left-radius: 100px;) .r10 (border -radius: 0 100%;) .r11 (border-radius: 0 50% 50% 50%;) .r12 (border-top-left-radius: 100% 20px; border-bottom-right-radius: 100% 20px ;)
Rice. 1. Examples of different options for rounding the corners of the block
2. border-image
Browser Support
IE: 11.0
Firefox: 15.0, 3.5 -moz-
Chrome: 16.0, 7.0 -webkit-
safari: 6.0, 3.0 -webkit-
opera: 15.0, 11.0 -o-
iOS Safari: 7.1
Opera Mini: 8-o-
Android Browser: 4.4, 4.1 -webkit-
Chrome for Android: 42
The property allows you to set an image as the border of an element. The main requirement for the image is that it must be symmetrical. The property includes the following values: (border-image: width source slice repeat outset;) .
Using such a simple image, you can get these borders for an element.
/* Example 1 */ div ( width: 260px; height: 100px; border-style: solid; border-image-width: 15px; border-image-source: url(border_round.png); border-image-slice: 30 ; border-image-repeat: stretch; ) /* Example 2 */ div ( width: 260px; height: 100px; border-style: solid; border-image-width: 15px; border-image-source: url(border_round. png); border-image-slice: 30; border-image-repeat: round; ) 


 Rice. 2. An example of designing block borders using an image
Slices A - B - C - D form the corners of the frame, and the part of the pattern located between them fills the remaining space of the frame in accordance with set value properties border-image-repeat . The size of the corner piece (in this example, the number 30) is set using the value of the border-image-slice property.
2.1. border-image-width
The property sets the image width for the element's border. If no width is specified, it defaults to 1 .
| border-image-width | |
|---|---|
| Values: | |
| length | Sets the width of the frame in units of length - px / em . You can set from one to four values at the same time. If one value is given, then the width of all sides of the frame is the same, two values specify the width of the top-bottom and right-left, and so on. |
| number | The numeric value by which the value of border-width is multiplied. |
| % | The width of the element's frame is calculated relative to the size of the image. Horizontal relative to width, vertical relative to height. |
| auto | Corresponds to the border-image-slice value. |
| initial | |
| inherit | |
Syntax
Div (border-image-width: 30px;) 3. An example of setting the width of the frame-image using various types values
2.2. border-image-source
The property specifies the path to the image that will be used to decorate the borders of the block.
Syntax
Div (border-image-source: url(border.png);)
2.3. border-image-slice elements
The property determines the size of the parts of the image used to decorate the borders of the element and divides the image into nine parts: four corners, four edges between the corners, and a central part.
| Values: | |
| number | Frame parts can be sized using one, two, three, or four values. One value sets boundaries the same size for each side of the element. Two values: the first determines the size of the top and bottom borders, the second - the right and left. Three values: the first determines the size of the top border, the second - the right and left, and the third - the bottom border. Four values: Specifies the size of the top, right, bottom, and left borders. The numeric value represents the number of px . |
| % | Border sizes are calculated relative to the image size. Horizontal relative to width, vertical relative to height. |
| fill | The value is specified along with a number or percentage value. If set, the image is not clipped by the inner edge of the frame, but also fills the area inside the frame. |
| initial | Sets this property to its default value. |
| inherit | Inherits the value of this property from the parent element. |
Syntax
Div (border-image-slice: 50 20;) 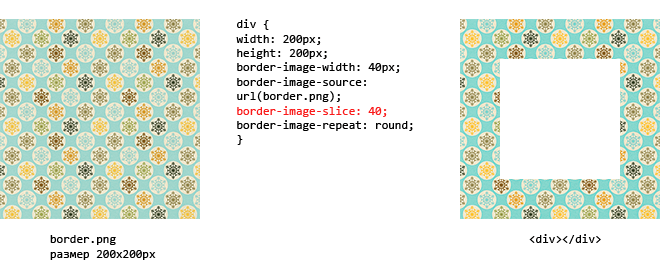 Rice. 4. An example of setting image frame slices
2.4. border-image-repeat
The property controls how the background image fills the space between the corners of the frame. It can be set either with a single value or with a pair of values.
Syntax
Div (border-image-repeat: repeat;) 5. An example of repeating the central part of an image frame using different types of values
2.5. border-image-outset
The property allows you to move the image-frame outside the borders of the element by the specified length. It can be set using either one or four values.
Syntax
Div (border-image-outset: 10px;) 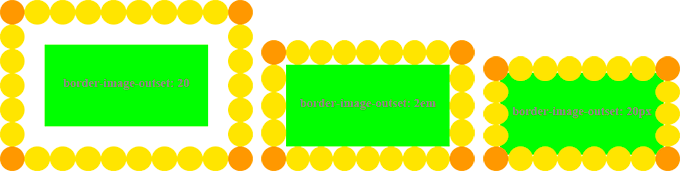 Rice. 6. An example of shifting the frame-image using different types of values
3. Gradient frame
The value of border-image can be not only an image, but also a gradient fill.
Translucent frame
One of the colors is transparent . In this way, you can set borders for all sides of an element at once or separately for each side. The border width is controlled by the border-width property.
Postal envelope
In this tutorial, we will create a curled corner effect without the use of images and additional markup. It works great in all modern browsers and works well for website designs with simple color schemes.
This effect was used in the demo for the tutorial "Multiple backgrounds and strokes using CSS2". In addition, the use of folded corners in the design of a real site can be seen on the example of Yiibu. But the Yiibu site uses images, and we use pseudo-elements and CSS.


Start
Nothing complicated. Any element will do and no additional markup is required. It all starts with a simple colored rectangle. Browsers that don't support pseudo-elements (IE6 and IE7) will display it too.
Adding the position:relative property makes absolute positioning of pseudo-elements possible.
Note ( position:relative; width:30%; padding:1em 1.5em; margin:2em auto; color:#fff; background:#97C02F; )
The dog-corner is created using a pseudo-element that is positioned at upper corner rectangle. The pseudo-element has no width or height, but it has a thick stroke. By changing the thickness of the stroke, we will change the size of the folded corner.
In this example, the top and right sides of the stroke have colors that match the background color of the parent rectangle. The left and bottom parts of the stroke are either darker or lighter than the rectangle's background color.
Note:before ( content:""; position:absolute; top:0; right:0; border-width:0 16px 16px 0; border-style:solid; border-color:#658E15 #fff; )
That's all it takes to create a simple curled corner effect similar to the one used on the Yiibu site.
Firefox 3.0 does not allow positioning pseudo-elements. You can use a couple of properties to correct the position in a given browser.
Note:before ( ... display:block; width:0; )
Adding a Light Shadow
The appearance of the corner can be slightly improved by adding the box-shadow property (for those browsers that support it) to the pseudo-element. Setting the overflow:hidden property on the element class hides the portion of the shadow that breaks the dog-corner effect.
Note:before ( ... -webkit-box-shadow:0 1px 1px rgba(0,0,0,0.3), -1px 1px 1px rgba(0,0,0,0.2); -moz-box-shadow: 0 1px 1px rgba(0,0,0,0.3), -1px 1px 1px rgba(0,0,0,0.2); box-shadow:0 1px 1px rgba(0,0,0,0.3), -1px 1px 1px rgba(0,0,0,0.2); )
Rounded corners
It is also relatively easy to use this technique along with rounded corners. Unfortunately, every modern browser has some kind of bug related to the border-radius property (including those using the unprefixed property). This situation means that additional work is needed.
Only Webkit browsers can make rounded corners on pseudo-elements if they only have 2 stroke parts. Opera 11 and Firefox 3.6 make for an eye-catching bunch. Moreover, Opera 11 has the maximum error in this process.
Using all four sides eliminates problems in Opera 11 and Firefox 3.6. But this method solution leads to an error in Safari 5, which is reflected in the output of a diagonal line with teeth. get around this problem You can set the color for at least one part of the stroke to transparent .
The background color will be visible through the transparent stroke. Ideally, this approach will form an effect and contain a minimum of code. But Opera 11 shows background color through a transparent stroke only if the border-radius property is set.
Note-rounded:before ( content:""; position:absolute; top:0; right:0; border-width:8px; border-color:#fff #fff transparent transparent; background:#658E15; -webkit-border- bottom-left-radius:5px; -moz-border-radius:0 0 0 5px; border-radius:0 0 0 5px; display:block; width:0; )
The CSS file for the demo page contains comments that are useful to work with. Each browser is different when using the border-radius property or stroking elements without a width or height.
Final code
Below is all the CSS required to create a curled corner effect with subtle shadows using only one HTML element.
position:relative; width:30%; padding:1em 1.5em; margin:2emauto; color:#fff; background:#97C02F; overflow:hidden; ) .note:before ( content:""; position:absolute; top:0; right:0; border-width:0 16px 16px 0; border-style:solid; border-color:#fff #fff #658E15 #658E15 ; background:#658E15; -webkit-box-shadow:0 1px 1px rgba(0,0,0,0.3), -1px 1px 1px rgba(0,0,0,0.2); -moz-box-shadow:0 1px 1px rgba(0,0,0,0.3), -1px 1px 1px rgba(0,0,0,0.2); box-shadow:0 1px 1px rgba(0,0,0,0.3), -1px 1px 1px rgba(0,0,0,0.2); display:block; width:0; /* Overcome Firefox 3.0 limitations */ ) .note.rounded ( -webkit-border-radius:5px; -moz-border-radius:5px ; border-radius:5px; ) .note.rounded:before ( border-width:8px; border-color:#fff #fff transparent transparent; -webkit-border-bottom-left-radius:5px; -moz-border- radius:0 0 0 5px; border-radius:0 0 0 5px; )
Conclusion
The demo page contains examples using different colors to make sure the effect is easy to use.
Keep in mind that this technique works worse when using an image as a background for an element than when using a simple color. But other methods of organizing folded corners also have such limitations.
, , - CSS properties - (Transparent) — CSS property. Responsible for creating the diagonal border
- "px" — value in pixels
In this article we will talk with you about creating frames, but not the usual square ones, but rounded ones. They have more beautiful view than regular square frames without rounding.
Property
In this article, we will take a closer look at creating round frames and more. CSS has such a thing as triangular borders, but more on that below.
Rounding frames with
 html( margin: 0; padding: 15vh 0 0 0; ) #content( border: 5px solid red; height: 70vh; width: 80%; border-radius: 15px; margin: 0 auto )
 This CSS property allows you to round the borders of an element. Some developers use it without creating visible borders, to create layouts on a round "body" container.
Using standard radii, you can create rounded shapes, such as a circle or an oval.
To track your work given property, it is enough to set the property
The property itself
simple property
Rounding can be applied to all HTML elements, but not in all cases. Some browsers do not recognize it when loading frames that have the property
You can use different values to define the radius of a corner, but the most common value is in pixels. This is because they are best suited for detailing small-sized elements.
In addition to the usual rounding, you can use an additional radius, for example, to create an ellipse.
To do this, you need to divide the values \u200b\u200bin a fraction.
Property - examples:


Now we will show a couple of examples of creating a rounded border. To study them in more detail, download our sources.
Creating triangles with

To create triangles, you need to use the property
First, set a zero width and height for the triangle element.
After that, write down a few properties. The first is the main property of the frame. It is created in almost the same way as usual. Set the width, line type and enter the value "transparent". It is responsible for creating a triangle.

In order to create a flat side of the triangle, you need to create a separate frame line for this side.
Conclusion
Now you know all about property
At first it may seem very difficult, but with practice, everything is easier than you think. Download our sources and study their code for a better understanding of how the property works. We wish you good luck in your studies!
Tags:Vlad Merzhevich
On websites, triangles are used all the time as part of the design of elements, for example, they serve as a pointer to some object, directing the reader's attention to Right place. Triangles also perform decorative functions, making the blocks where they are used more elegant and modern. On fig. 1 shows an example of using a triangle in a design.
Rice. 1. Triangles in web design
Directly make a triangle using CSS you can't, so there are two methods available to add it - via border and transform .
Using border
Although the borders created through the border property are not directly related to triangles, it is the border that is most often used for this. If we set the width and height of the element to zero, as well as set a sufficiently thick border, then we will see a set of four triangles (Fig. 2). For clarity, the borders on all sides are set in different colors.
Rice. 2. Adding a border to an element
Leaving only the desired border, and making the rest transparent, we get a triangle of the desired color (Fig. 3).
Rice. 3. Element with transparent borders
Example 1 shows the addition of a triangle to a block via the ::after pseudo-element.
Example 1. Block with a triangle
For absolutely positioned elements, zero width and height are optional.
By combining borders, you can get four more types of triangles, which, in combination with those already mentioned, gives us eight options. Their form and the required code are given in Table. 1.
| View | Style |
|---|---|
| border: 20px solid transparent; border-top: 20px solid green; | |
| border: 20px solid transparent; border-right: 20px solid green; | |
| border: 20px solid transparent; border-bottom: 20px solid green; | |
| border: 20px solid transparent; border-left: 20px solid green; | |
| border: 20px solid transparent; border-top: 20px solid green; border-right: 20px solid green; | |
| border: 20px solid transparent; border-right: 20px solid green; border-bottom: 20px solid green; | |
| border: 20px solid transparent; border-bottom: 20px solid green; border-left: 20px solid green; | |
| border: 20px solid transparent; border-left: 20px solid green; border-top: 20px solid green; |
The table shows that invisible borders take up space, so keep this in mind when positioning elements. The style also needs to be supplemented with a zero width and height, or use the position property, as was done in example 1.
A triangle can also be made in a different shape if you set different border thicknesses. For example, the block creation code shown in Fig. 4 is shown in example 2.

Rice. 4. Sharp triangle
Example 2. Acute triangle
With border we get solid colored triangles to create the border shown in fig. 5 has to go to the trick and impose one element on top of the other with a slight offset. Again, the :before and :after pseudo-elements will help us here (example 3).
Rice. 5. Frame with corner
Example 3 - Triangle overlay
Due to the fact that we are overlaying one solid color element on top of another, this method is only suitable for solid color fills and is not suitable for gradients or background images.
Using transformation
With the help of transformation, we can rotate the square element by 45º and get a rhombus out of it. This is not yet a triangle as such, so we leave the protruding part we need in sight, and hide the rest behind another element (example 4).
Example 3. Transformation
Result this example shown in fig. 6.

Rice. 6. Triangle with shadow


