Eac ops utility bills. Closing the operating shift
TRAINING MATERIAL: "General Procedures for Working in the EAS OPS" October 2014 Consumer Relations Department
 IN THIS TRAINING MATERIAL CONTENTS YOU WILL GET ANSWERS TO THE FOLLOWING QUESTIONS: 1. What are the basic rules for working with the system? 2. What is the system boot order? 3. How does the opening / closing operating shift? 4. How is the main checkout window used? 5. How is the activation and return of funds? 6. How is the work with retail trade operations? 7. How to work with the RPO journal? 8. How to log out of the System? 2
 1. What are the basic rules for working with the system? q Designations in the training material: - names of fields, buttons, screen forms - in quotation marks "Exit" - names of keys - in bold Enter q - transition from one field to another on screen forms: Tab key Block of arrows, Entering a numeric value from the keyboard 1, 2, … q The serial number of the selected field is highlighted in orange q F key 4 - open subforms for data entry q Tab + Shift key combination - return to the previous screen field q "OK" and "Cancel" buttons » correspond to pressing the Enter and Esc keys q The button on the right upper corner any form, in order to background information for working in the System q The drop-down list is displayed by pressing the Space button (space) or by clicking the mouse q Buttons on the forms in the displayed lists "Down" - one position / to the end of the list, respectively. The Up buttons do the opposite. At the bottom of some slides there is a ruler with the name of the screen forms (tabs), in order to visually display at what stage of the operation the user / menu transition sequence is.
 2. What is the boot order of the system (data and programs)? We click on the shortcut on the desktop Without a fiscal printer, the system cannot work!!! Starting the system. Checking connected equipment. If problems are found, messages are displayed Connected successfully Displays the user authorization window. Select your account from the list provided. (Keys, ↓, Pg. Up, Pg. Dn or mouse click) Press Enter See next. slide To log out
 2. What is the boot order of the system (data and programs)? (Continued) See slide above User authorization completed Password entry Pressing Esc returns to operator selection In case of a password entry error, the System displays a message and prompts you to re-enter the password Keypad entry, if the password is only numeric, it can be entered using provided keyboard.
 3. How does the opening / closing of the operating shift take place? Shift opening In case the shift was closed. Current date ≠ date of existing shift, System displays diagnostic message "Unable to use existing shift, close previous shift and open new shift" . After authorization, there is a check for closing the previous shift If the previous shift was not closed. Log in to the System under an already used shift ( account) employee registration data operator. Printing, if necessary, on the KKM X-report. Opening a new operating shift After clicking, the current form is closed, the transition to the “User authorization” form Displaying the main form “Operations selection menu” (see slide above) Using the current shift Closing the current shift (see slide below)
 Closing a shift Going through the menu: Main menu Other operations(5) Closing a shift (6) Operation completed. Click on “OK” with the Enter key Click on the “Close shift” button and confirm the operation The shift is closed. Formation and printing of the Z-report. Blocking the execution of operations in the current shift. Cancellation of the operation "Closing the shift". Return to the main menu. Print X-Report and Z-Report When you click the Yes button, diagnostic messages may be displayed. After completing the actions, the closing of the shift continues. Other operations 1. 2. Close the shift Exit to the "User authorization" form (see description above)
 4. How is the main checkout window used? Switching to the main window of the cash desk from the main menu - pressing the button "Window of the main cash desk (7)" It is intended for making payments for goods and services after entering data on all operations necessary for the client. Table with the content of goods and services prepared for payment Functional menu (similar to the main menu). The composition of services is also determined by the access rights settings. Total check indicators Payment buttons: - “Cash (A)” - acceptance of payment in cash, with change; called by Alt+A key combinations - "Without change (B)" - acceptance of payment in cash, without change; called by the key combinations Alt + B - "Card (C)" - accepting payment using a card; is called by the Alt + B key combinations. Select the payment method - Enter the amount from the keyboard and confirm by clicking on "Continue" or by pressing Enter. - Display on the screen the amount of change. - Fixing the fact of payment and printing a fiscal receipt. Accelerated registration of the fact of payment for goods. - Fixing the fact of payment and printing a fiscal receipt. "Cancel" - return to the main window of the cash register without registering the fact of payment for services (goods). Standard payment transactions bank card
 5. How is the activation and return of funds? View log form Displaying information on all cash transactions performed Select: Main menu Window of the main cash register View log Buttons on the form Search for a receipt/operation by certain parameters. When clicked, the "Journal Search" form opens (see slide below). Carrying out the operation to create a return record. When pressed, the “Returned Goods” form opens (see slide below) List of completed cash transactions Displaying information (composition of the check) on the selected operation from the list. Closing the screen form and switching to the main menu - the cash window. Resetting the previously set parameters for searching for a check. Checkout window View log Search by log Returned goods Posting a return
 “Journal search” form Search for returned / canceled checks by the characteristics of returned goods and services (SHI / SPI for RPO, transfer number, telegram number, contract code for subscribing cells, etc.) Click on the “Search” button on the form "Journal View" Displaying search results in the "Journal View" form in the main list Entering parameters in the search fields in the "Journal Search" form Input from the keyboard Selecting a value from the drop-down list, (opening the list, Space button, space; Select - Enter) Format Entering the operation code depends on the selection in the "Type of operation" field. Buttons on the form. Selecting a date for searching for sold services / goods from the drop-down calendar. search in the log and return to the screen form "View Log"; . Search by journal Returned goods Set flag to search by current date Post return
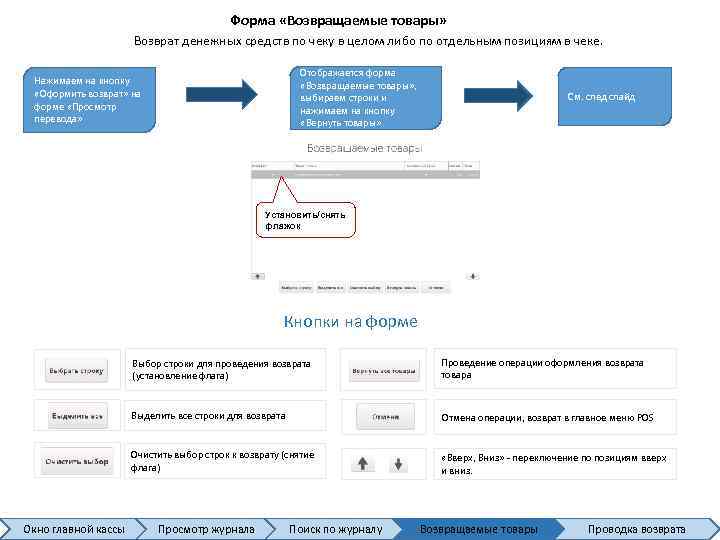 Form "Returned Goods" Return of funds on the check as a whole or on separate positions in the check. The form “Returned goods” is displayed, select the lines and click on the “Return goods” button Click on the “Issue a return” button on the “Translation View” form Select all lines to be returned Cancel the operation, return to the POS main menu Clear the selection of lines to be returned (uncheck the flag) Main cash register window Carry out the operation of registering the return of goods “Up, Down” - switching up and down positions. View log Search by log Returned goods Return posting
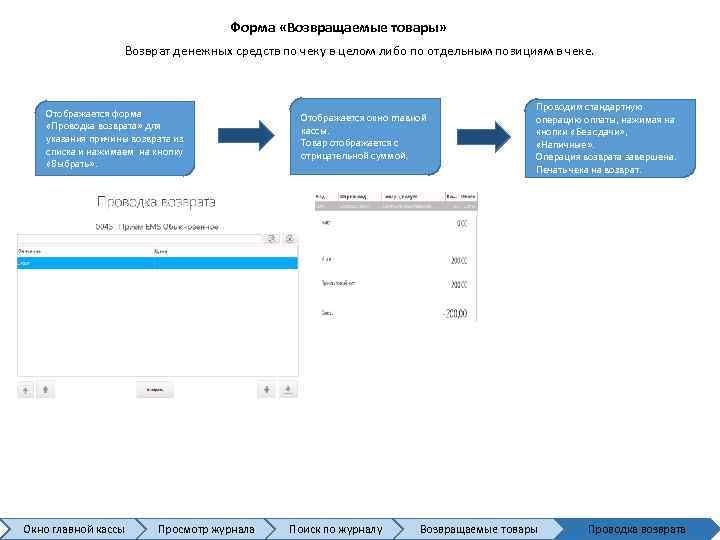 Form "Returned Goods" Return of funds on the check as a whole or on separate positions in the check. The form "Return Posting" is displayed to indicate the reason for the return from the list and click on the button "Select". Main cash register window View log The main cash register window is displayed. The product is displayed with a negative amount. Search in the magazine We carry out a standard payment operation by clicking on the buttons "Without change" , "Cash" . Return operation completed. Printing a return receipt. Returned goods Return posting
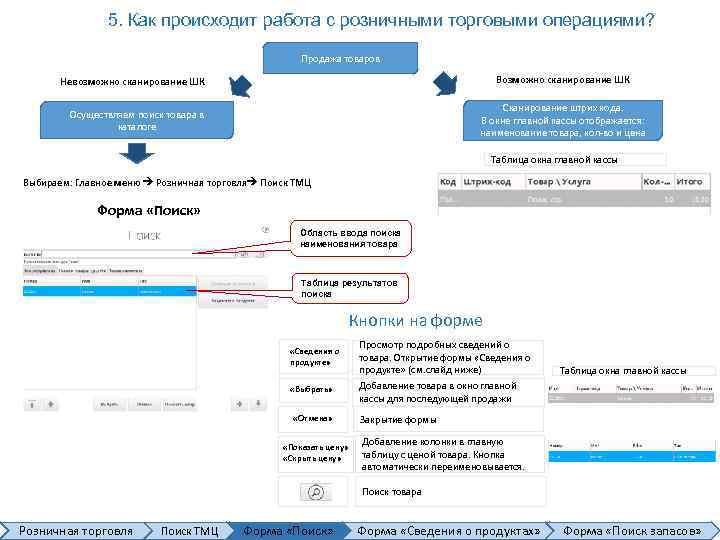 5. How is the work with retail trade operations? Sale of goods Barcode scanning possible Barcode scanning impossible Barcode scanning. The window of the main cash register displays: product name, quantity and price Search for goods in the catalog Table of the main cash desk window Select: Main menu Retail Trade Inventory search Form “Search” Search input area for the product name Search results table Buttons on the “Product information” form » View detailed product information. Opening the “Product Details” form (see slide below) “Select” Adding a product to the main checkout window for subsequent sale “Cancel” “Show price” “Hide price” Table of the main checkout window Closing the form Adding a column to the main table with the price of the product . The button is automatically renamed. Product Search Retail Trade Inventory Search Form "Search" Form "Product Details" Form "Inventory Search"
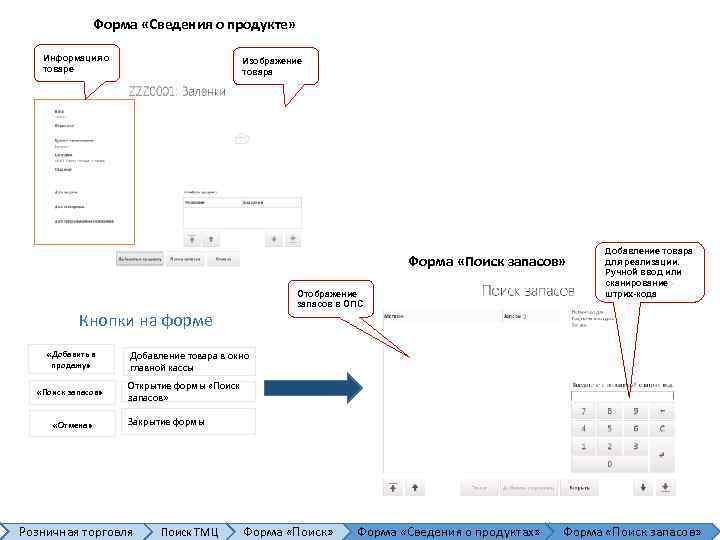 Product Details Form Product Information Product Image Inventory Search Form Displaying Inventory in the FTA Buttons on the Add to Sale Form Inventory Search Cancel Adding an item for sale. Manually enter or scan a barcode Add an item to the main checkout window Open the Inventory Search form Close the Retail Trade Inventory Search Form Search Form Product Details Form Inventory Search Form
 7. How to work with the RPO journal? Form "Register of RPO" Formation of data on all transactions made with RPO for the reporting period: by date / time of the operation with RPO, number of the operating window, type of RPO, ShPI, category of RPO, type of RPO, class of RPO Search area according to specified criteria. 1. Manual data entry or selection from drop-down lists, with a flag set next to the selected parameter. 2. Possibility of multiple selection 3. Open/Close - key F 4. 4. Selecting a date from the drop-down calendar. Move in it with the arrow keys, the choice is Enter. Drop-down list Drop-down calendar Buttons on the form "Clear" "Search" Post services Clear the previous search parameters to implement a new one Perform a search by the specified parameters RPO journals Print the displayed list, open the “Printing” form “Print” “Finish” The “RPO Journal” form Close the “RPO Journal” form The “RPO Journal ( Details)» Printing
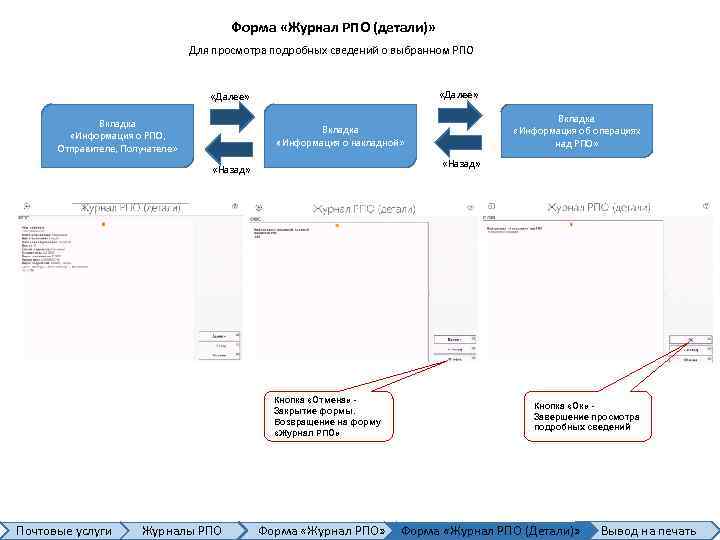 RPO Log (details) form To view detailed information about the selected RPO "Next" "Information about RPO, Sender, Recipient" tab "Back" "Cancel" button Closes the form. Return to the RPO Journal form Postal services Invoice information tab Invoice information tab RPO journals RPO Journal form OK button Finish viewing detailed information RPO Journal (Details) form Printout
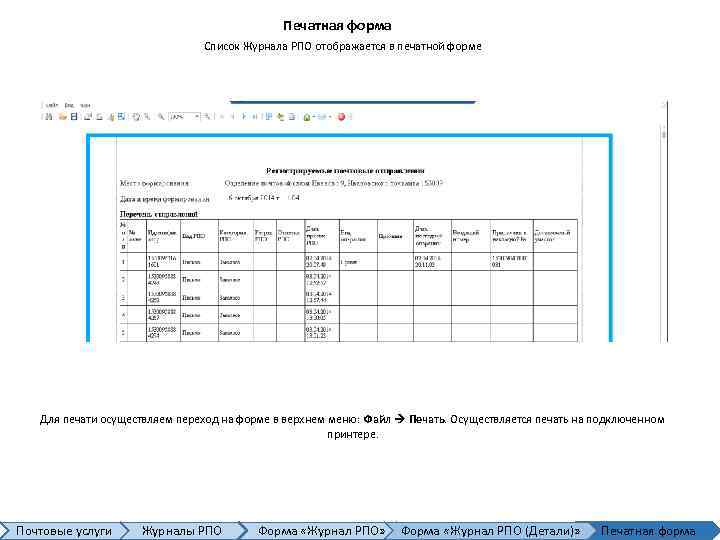 Print form The list of the RPO Journal is displayed in print form. To print, we go to the form in the top menu: File Print. The connected printer is printing. Postal services RPO magazines RPO Magazine form RPO Magazine (Details) form Printed form
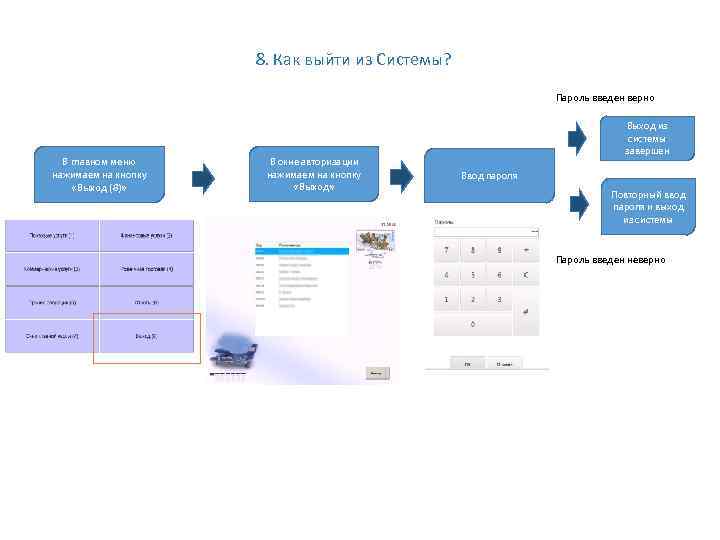 8. How to log out of the System? The password is entered correctly In the main menu, click on the “Exit (8)” button In the authorization window, click on the “Exit” button Logout is completed Entering the password Re-entering the password and logging out The password is entered incorrectly
Brief instruction
User to work in the EAS OPS system
post office level
(release 5.5.3.)
Moscow 2016
General procedures
Starting the System
To start working with the System, you need to click on the shortcut:
When the program is launched, the connected POS equipment is checked. In case of detection of not connected equipment or other problems, the System will display diagnostic messages.
After checking the composition of the connected equipment, the System displays the user authorization form.
In case of an incorrect password entry, the System displays a diagnostic message about an incorrectly entered password and prompts you to re-enter it.

In case of malfunctions in the operation of the EAS OPS, the corresponding diagnostic messages are displayed on the screen, with information about the problems that have arisen.
Opening of the operating shift
After authorization (verification) of the user in the System, a check is made for the closing of the previous shift. If the previous shift of this employee was closed, the System will display the form "Opening a new operating shift".
This screen contains the following buttons:
- « Open a new shift» - the function of opening a new operating shift;
- « » - performance of operations not related to the cash register (fiscal registrar);
- « Cancel»
Opening a new operating shift is carried out by pressing a button « Open a new shift » . After pressing the "Open a new shift" button, the System will register the operator's data and print a receipt on the POS printer indicating readiness for work.
As a result of successful opening of a new operational shift for an employee, the System will display the main menu containing a set of menu items in accordance with user rights.
If a worker's previous operational shift was not closed, the diagnostic message "Close shift and open a new one" will be displayed. Without closing the shift, any transactions are impossible.”
The diagnostic message screen contains the following buttons:
- « Use existing shift» - log in to the System using the current shift of an employee;
- « Perform an operation that is not related to the cash drawer» - for operations not related to the cash drawer;
- « Cancel» - close the current form and go to the operator authorization form.
To continue working, press the button « Use existing shift » . After clicking, the system will display the main menu.
If the current date does not match the date of the existing shift, the System will display the diagnostic message "Unable to use the existing shift, close the previous shift and open a new shift."
Closing the operating shift
To close a shift in the Main Menu, press the “Other Operations (5)” button, then the “Shift Closing (6)” button, after which the Shift Closing menu will appear on the screen:
- "X - report (1)"- formation and printing of X-report;
- "Close Shift (2)"- Closing the operating shift;
- "Back (3)"- return to the previous menu;
- "Main Menu (4)"- go to the main menu.
In the Close Shift menu, click the Close Shift (2) button, the system will display the Close Shift screen.

The “Shift closing” screen form consists of the following fields:
- "Closing the shift at the terminal" - the name of the current terminal;
- "Remaining FR" - the balance of funds in the memory of the fiscal registrar;
- "Total balance by items" - the total balance in the System and below in the context of "Pension payments", "Other cash";
Button "Surrender DS"- the button for the regular transfer of funds to the boss, is active in the normal mode. Not active in emergency. The process is described below.
Button "Close"- closing the form;
Button « » - exit to the main menu.
Note:
In the event that the balance of funds in the fiscal registrar and the System converges, the operator has an active button "Submit CA". At the same time, receipts are printed on the delivery of funds to the Head of the OPS and an entry is created in the DDS journal on the transfer of funds to the head. In the event of a discrepancy in funds between the System and the fiscal registrar, the "Submit CA" button becomes inactive. To close the shift at the terminal, the Head of the OPS or his deputy must be authorized.
From the screen form of the Operator, given form differs by the presence of the “Close shift without passing the DS” button - this button becomes active in the window of the Head of the OPS in cases of discrepancy between funds in the System and the fiscal registrar and allows you to close the shift on the Operator’s window, warning with a message and printing the Discrepancy Act The system informs about the presence of non-closed cash desk sessions for the payment of pensions and benefits and proposes to close the shift .
Note:
If the balance of funds in the fiscal registrar and the System diverges, it is necessary to transfer funds through the DDS journal in the normal mode through the DDS journal. The amount of the discrepancy itself will be canceled, the corresponding act for the amount of the discrepancy will be automatically printed

In addition to performing the shift closing operation in the normal mode, without discrepancies in amounts, the System will perform the following operations:
Formation of a receipt for the delivery of funds to the head;
Formation and printing of the Z-report;
Prohibition to perform operations in the current shift.
In the event of a cash discrepancy, only the Discrepancy Statement is printed. Receipts are printed during the transfer of funds by the regular funds of the cash flow journal (DDS).
After closing the shift, the System will display a message and display the operator authorization form.
Sign Out
The exit is made from the main menu of the System. Press key 8 or press the "Exit (8)" button. A form similar to the authorization form of the System operator will appear on the screen.
To log out of the System, click the button  .
.
The button is also intended to go to sections that are not related to the operation of the EAS OPS:
Information about the system;
Restarting the computer;
Turning off the computer.
This button is not used when logging in to the System.
To confirm the exit, the System will require you to enter the User's password. If the password is entered correctly, the system will shut down.
After the introduction of a new operating system EAS OPS, which cost 890 million rubles, the time of customer service in the post offices of the region doubled
It seems that the time has come to add a third to Russia's two main troubles - torment in queues at the post office. The work of this organization has been the talk of the tongue before. The service and speed of customer service in post offices can be legendary. If you want to lose time and wind up your nerves, go to the post office, preferably from the first to the tenth, during the payment of utility bills.
After a long standing to the only window where they give out pensions, parcels, registered letters, accept utility bills and perform a bunch of other operations (having a very indirect relation to the mail), any normal person has a chance to turn into a patient of a medical institution. And if last year we somehow endured it, losing an hour, a maximum of an hour and a half in the queue, then recently this queue simply does not move, you can stand here for two or three hours and still leave without salty slurping. What happened?
In December 2015, GMCS won a tender held by Russian Post for the implementation of a new operating system (EAS OPS). The company began developing this “miracle” back in 2013, and by the time the tender was held, the new system had been implemented and tested in 100 branches of the Russian Post. Despite the negative feedback from the field that the system is "raw", unfinished, the company easily wins the tender and concludes a contract for 890 million rubles. According to the contract, the system is planned to be installed in 25 postal departments, 15,000 branches and 274 post offices (19,500 workplaces in total).
After the expiration of the contract with GMCS, Russian Post expects to independently continue to implement the EAS OPS and install it in 42,000 branches across the country. With the help of the EAS, the OPS is planned to double the process of customer service (including by saving customer history), as well as to make the introduction and distribution of new products and services across the post office network more efficient.
So, simply and tastefully - to cover the whole mother Russia with this know-how, for the benefit of customers, that is, you and me, and solve all problems at once. But in reality, everything turned out exactly the opposite. The EAC still has an unplowed field for corrections and improvements! "Computers" hang, operations that used to take a second can be performed for a minute, or even two. As a result, the customer service time did not decrease, as the developers promised, but doubled! Add to this the "old" diseases of the post office - the eternal shortage of employees, not new equipment, and the picture turns out to be completely bleak.
People are outraged, turn to the postal workers with claims. But they can't do anything. Since all provisioning, settings come from the parent branch. Most of the working day is spent on calls and coordination to eliminate "jambs". It also takes time to train the staff, and try learning how to play the piano when the piano is out of tune. Postal services are now working in extreme conditions. This situation is not only in the Nizhny Novgorod region, but may soon become nationwide, given the speed of implementation of the system.

It seems that the time has come to add a third to the two main troubles of Russia - torment in queues at the post office
“Post “Russia” is not controlled by local authorities. And the local authorities have the right to shrug their shoulders and say that this is not our problem. Maybe somewhere such a position of the authorities is considered normal, but not in Balakhna.
Meeting with residents of the district, the head of LSG Alexander Glushkov repeatedly listened to their fair claims to the work of the post office. Seriously approaching this issue, he put it for discussion in the Zemsky Assembly. It was decided to contact Moscow and get an answer - what measures are being taken to normalize the situation, and when the EAC system will function without failures.
“It is unacceptable when what should work for people causes them a lot of inconvenience,” Alexander Glushkov comments on his actions, “we cannot stand aside and must protect our citizens.
The Moscow "implementers" of the system replied that they were making every effort in this direction and the problem would soon be solved. Whether this is true or not, the near future will show. But a precedent has already been created - the local authorities stood up for the protection of residents on an issue that is not within their competence. And if other heads of districts follow the example of Glushkov?
Egor Krylov
By May 2017, the Russian Post had connected more than half of its branches across the country (over 21,000) to the Unified Automated System of Post Offices (EAS OPS). It was developed by the Russian Post on the principle of "single window" and replaces more than 15 different software products previously used.
In 2016, the Russian Post installed 30,000 sets of workstations (AWS) to replicate the EAS OPS system in 17,200 post offices. This year, the corresponding equipment and software have been installed in almost 4,000 post offices.
In particular, in Moscow, 95% of branches have already been transferred to the new system, which can significantly improve the quality of customer service, ensure reliability and information security ongoing operations, including protection from potential outside interference.
By moving to a new one-stop-shop platform, Russian Post has been able to significantly reduce operator errors, increase process automation, and make all types of services available across all post office windows, allowing for faster customer service. On average, the time of servicing one client was reduced by 2-3 times, depending on the type of service.
Installation in branches across the country of a single software opens a new stage of large-scale IT modernization of the postal network, which will cover all 42,000 branches of the Russian Post, linking them into a single information system. The new software fundamentally changes the architecture of the approach of the Russian Post to the transfer of the entire customer service system to information and digital technologies. Any product, whether it is launched online (through a portal or mobile app) or offline (at the post office), adapts and integrates into universal online service united by the Unified Automated System.
Russian Post will complete the automation of its branches by four integrators
On January 20, 2017, the Russian Post summed up the results of the competition for the execution of works on replication of the Unified automated system post offices (EAS OPS). New system replaces more than 15 different software products previously used by the enterprise.
GMCS was involved in the creation and piloting of this solution under a contract dated April 2013. As of December 2015, the system has been implemented and tested in 100 Post offices.
In December 2015, another tender was held, which was also won by GMCS. Under this contract, the system was to be installed in 25 postal departments, 15,000 branches and 274 post offices (in total - at 19,500 workplaces).
On January 25, 2017, the postal operator announced that the EAS OPS was installed in 17,200 post offices.
A new tender with an initial contract price of 1.15 billion rubles, which ended in January 2017, meant replicating the system in 25 departments and 24,600 post offices. According to the protocol of the tender commission, one proposal from the collective participant was submitted for the procedure for considering applications. The leader of the consortium was GMCS, the other participants were Lanit, Informzashchita and NST.
The application was recognized as meeting the requirements of the documentation, so the tender committee recommended that the Russian Post conclude an agreement. Changes in the initial purchase price were not reported.
The EAS OPS system was created on the basis of a platform solution by adjusting the basic functionality and developing new software modules. The EAS OPS is designed in three configurations that differ in their purpose. These are the OPS level configuration, the “Central Office” configuration - Post Office, FPS, and the “Federal Headquarters” configuration - AUP (Enterprise Management Apparatus).
Within 1.5 years, the contract executors will have to organize monitoring of all stages of replication of the EAS OPS, deploy the system in post offices and departments, and train users.
Recall also that in March 2016, the "Russian Post" workstations for post offices. Each set cost the postal operator 44,000 rubles.
2015: Development and replication of EAS OPS in 15 thousand branches
In December 2015, GMCS won the Russian Post tender and for 1.5 years had to develop and replicate the Unified Automated System of Post Offices (EAS OPS). The contract value was about 890 million rubles.
“The new software product for post offices of the EAS OPS is designed on the principle of a “single window” and will combine more than 15 different software products that were previously used by operators in post offices as individual applications", - told TAdviser in Russian Post.
With the help of EAS OPS, employees of the enterprise can register incoming and outgoing mail, arrange receipt and payment money transfers(including Forsage and Western Union), subscription to printed publications, pay pensions and benefits, arrange insurance, brokerage services, bank deposits, loans and microloans, sell lottery, air and railway tickets, issue services telegraph and voice communications.
Thanks to the synchronization of the EAS OPS with the database postal items the operator can online track the status of the passage of the shipment, noted in the "Mail". The system allows for multi-level control of the passage of funds, which guarantees their additional safety for the client.
The system allows transferring the provision of some services to “blank-free technology” (filling in information only in electronic form).
In addition, with the help of the EAS, it was planned to solve the tasks of creating and maintaining a time sheet, accounting for the output of branch personnel, and also significantly simplify reporting due to the receipt of unified information in electronic form.
With the help of EAS OPS, they said at the enterprise, it is planned to double the process of customer service (including by saving customer history), as well as to make the introduction and distribution of new products and services through the post office network more efficient.
The creation and piloting of the EAS OPS under a contract dated April 2013 was also carried out by the GMCS company (its amount could not be reported in the Post at the time of publication). As of December 2015, the system has been implemented and tested in 100 Post offices.
LEARNING MATERIAL:"General procedures for working in the EAS OPS"
October 2014
Consumer Relations Department IN THIS
TRAINING MATERIAL
CONTENT
YOU WILL GET ANSWERS TO THE FOLLOWING QUESTIONS:
1. What are the basic rules for working with the system?
2. What is the system boot order?
3. How does the opening / closing of the operating shift take place?
4. How is the main checkout window used?
5. How is the activation and return of funds?
6. How is the work with retail trade operations?
7. How to work with the RPO journal?
8. How to log out of the System?
21. What are the basic rules for working with the system?
Notation in the training material:
- names of fields, buttons, screen forms - in quotation marks "Exit"
- the name of the keys - in bold Enter
– transition from one field to another on screen forms:
Tab key
arrow block,
Keypad numeric input 1, 2, …
The serial number of the selected field is highlighted in orange
F4 key - open subforms for data entry
Keyboard shortcut Tab + Shift - return to the previous screen field
The "OK" and "Cancel" buttons correspond to pressing the Enter and Esc keys
Button
in the upper right corner of any form, for background information on
work in the system
The dropdown list is displayed by pressing the Space button (space) or by clicking the mouse
Buttons on forms in display lists
"Down" - one position / to the end
list, respectively. Buttons
"Up" do the opposite.
At the bottom of some slides there is a ruler with the name of screen forms (tabs), in
in order to visually display at what stage of the operation the user is /
menu sequence.
Click on
label on
working
table
Without fiscal
printer work
systems
impossible!!!
Starting the system. Examination
connected
equipment. When
troubleshooting
messages are displayed
successful
connection
Display authorization window
user. Choosing your account
entries from the list.
(Keys, ↓, PgUp, PgDn or
mouse click)
Click
on Enter
See next slide
To exit
systems 2. What is the boot order of the system (data and programs)?
(Continuation)
See slide above
Authorization
user
completed
Password entry
Pressing Esc
- return to selection
operator
In case of error
password entry,
The system displays
message and
proposes anew
enter password
Entering data from
keyboard, if
digital only
password format, then
can be entered with
submitted
keyboards. 3. How does the opening / closing of the operating shift take place?
Opening shift
In case the shift was closed.
Current date ≠ existing shift date,
The system displays diagnostic
message "Unable to use
existing shift, close
previous shift and open a new one
change."
After authorization, there is a check
at the end of the previous shift
In case the previous shift is not
was closed.
Log in under
already in use
change (account
record) of an employee
Data logging
operator.
Print, when
necessary, on KKM
X-report.
Opening
new
operating room
shifts
After pressing
going on
closing the current
forms, transition to
form
"Authorization
user"
Output of the main form
"Selection menu
operations"
(see slide above)
Usage
current shift
closure
current
shifts (see
slide below) Closing the shift
Menu navigation:
Main menu
Other operations(5)
Closing the shift
(6)
Click on
"Close" button
shift" and
confirm
operation
Operation
completed.
Click on
"OK" key
Enter
Change is closed.
Shaping and printing
Z-report.
blocking
performing operations in
current shift.
Cancellation of the "Closing shift" operation.
Return to the main menu.
Printing an X report
and Z-report
By clicking on
the "Yes" button
displayed
diagnostic
messages. After
fulfillment
action
continues
closing shift.
Other operations
1.
2.
close shift
Exit to
form
"Authorization
user"
(see description
above) 4. How is the main checkout window used?
Switching to the main window of the cash desk from the main menu - pressing the button "Window of the main cash desk (7)"
It is intended for carrying out payment for goods and services after entering data on all operations necessary for the client.
Table with content prepared for payment
goods and services
functional
menu (analogue
main menu).
Composition of services
determined
same way
settings
access rights.
Check totals
Payment buttons:
- "Cash (A)" - accepting cash payments,
with change; invoked by keyboard shortcuts
Alt+A
- "Without change (B)" - accepting cash payments,
no change; invoked by keyboard shortcuts
Alt+B
- "Card (B)" - accepting payment using
cards; invoked by keyboard shortcuts Alt+B
Choose a payment method
- Keyboard input
amounts and confirm
by clicking on
"Continue" or
the Enter key.
- Screen display
surrender amounts.
- Fixing the fact of payment and
fiscal receipt printing.
accelerated
fact registration
payment for goods.
- Fixing a fact
payment and printing
fiscal check.
"Cancel" - return to the main window of the cashier without
registration of the fact of payment for services (goods)
In case of failures in the operation of the post-cash equipment, the following is displayed
message.
Standard
operations for
payment
banking
card 5. How is the activation and return of funds?
View log form
Displaying information on all conducted cash transactions
Choose: Main menu Main cash register window View log
Buttons on the form
Search for a receipt/operation by certain parameters.
When clicked, the "Journal Search" form opens.
(see slide below)
Reprinting of the check is possible only on the same day
performing an operation.
Carrying out the operation to create a return record.
When clicked, the form "Returned
goods” (see slide below)
List of held
cash transactions
Information display
(composition of the check) for the selected
operations from the list
Closing the screen form and moving to the main menu -
checkout window.
Resetting the previously set parameters for searching for a check.
Main checkout window
View log
Journal search
Returned goods
Return posting Journal search form
Search for returned / canceled checks by the characteristics of returned goods and services (SHI / SPI for RPO,
transfer number, number for telegrams, contract code for subscribing cells, etc.)
Click on
"Search" button on
form "View
magazine"
Display
search results in
form "View
magazine" in
main list
Entering parameters in
search fields in
form "Search by
magazine"
Input from
keyboards
Value selection
from the dropdown
list
Selecting a value from
dropdown list,
(opening the list button Space, space;
Select - Enter)
Code entry format
operation depends
from the selection in the field
"Type of transaction"
Buttons on the form
Selecting a date to search
sold services / goods
from the dropdown calendar
"Search" - search for the specified
parameters
"Clear" - delete
the specified parameter in the field
Main checkout window
View log
Journal search
Closing the search form
log and return to the screen
log view form.
Establishment
flag to search
by current date
Returned goods
Return posting Returned Goods Form
Form is displayed
"Returned Goods"
select rows and
press the button
"Return items"
Click on the button
"Make a refund"
form "View
translation"
See next slide
Install/Remove
checkbox
Buttons on the form
Main checkout window
Selecting a line to carry out a return
(setting the flag)
Carrying out a return process
goods
Select all rows to return
Cancel operation, return to POS main menu
Clear selection of rows to return (remove
flag)
"Up, Down" - switching up the positions
and down.
View log
Journal search
Returned goods
Return posting Returned Goods Form
Refund of funds on the check as a whole or on separate positions in the check.
Form is displayed
"Return Posting" for
indication of the reason for the return from
list and click on the button
"Choose".
Main checkout window
View log
The main window is displayed.
cash desks.
Product displayed with
negative amount.
Journal search
We carry out a standard
payment transaction by clicking on
buttons "No change",
"Cash".
Return operation completed.
Printing a return receipt.
Returned goods
Return posting 5. How is the work with retail trade operations?
Sale of goods
Barcode scanning possible
Unable to scan barcode
Barcode scanning.
The window of the main cash desk displays:
product name, quantity and price
Searching for a product in the catalog
Main cash desk window table
Choose: Main menu Retail trade Search for goods and materials
Search Form
Search input area
product name
Results table
search
Buttons on the form
"Information about
product"
Viewing details about
goods. Opening the form "Information about
product" (see slide below)
"Choose"
Adding a product to the main window
cash registers for resale
"Cancel"
"Show price"
"Hide price"
Main cash desk window table
Closing a Form
Adding a column to the main
table with the price of goods. Button
is automatically renamed.
Product search
Retail
Search for goods and materials
Search Form
Product Information Form
Stock search form Product Details Form
Information about
goods
Image
goods
Stock search form
Display
reserves in the OPS
Adding a product
for implementation.
Manual entry or
scanning
barcode
Buttons on the form
"Add to
sale"
"Stock Search"
"Cancel"
Adding a product to the window
main cash desk
Opening the "Search" form
reserves"
Closing a Form
Retail
Search for goods and materials
Search Form
Product Information Form
Stock search form 7. How to work with the RPO journal?
Form "Journal of RPO"
Formation of data on all operations performed with RPO for the reporting period: by the date / time of the operation with RPO,
operating window number, RPO type, ShPI, RPO category, RPO type, RPO class
Search area according to the specified criteria.
1. Manual data entry or selection from dropdowns
lists, with a flag set next to the selected
parameter.
2. Possibility of multiple choice
3. Open/Close - key F4.
4. Selecting a date from the drop-down calendar. moving
in it with the arrow keys
, choice - Enter.
Drop-down list
Drop down calendar
Buttons on the form
"Clear"
"Search"
Post services
Clear previous options
search for a new
Performing a search by specified
parameters
RPO journals
Printing out the displayed list,
Opening the printout form
"Seal"
"To complete"
Form "Journal of RPO"
Closing the form "Journal of RPO"
Form "Journal of RPO (Details)"
Printout Form "Journal of RPO (details)"
To view detailed information about the selected RPO
"Further"
"Further"
tab
"Information about RPO,
Sender, Recipient"
"Back"
"Back"
Cancel button Closes the form.
Return to form
"Journal of RPO"
Post services
tab
"Information about operations
over RPO"
tab
"Invoice Information"
RPO journals
Form "Journal of RPO"
OK button End browsing
details
Form "Journal of RPO (Details)"
Printout Print form
The list of the RPO Journal is displayed in printed form
To print, we go to the form in the top menu: File Print. Printing on the connected
printer.
Post services
RPO journals
Form "Journal of RPO"
Form "Journal of RPO (Details)"
Print form 8. How to log out of the System?
Password entered correctly
On the main menu
press the button
"Exit (8)"
In the authorization window
press the button
"Exit"
exit from
systems
completed
Password entry
Re-entry
password and exit
from the system
Password entered incorrectly


