History of opening files in windows xp. Ways to view recent activities on a computer through a system or browser
How to clear history on computer
opened files and documents.
At the moment when you open documents on your personal computer, view photos, or play videos, all these files are remembered in the recent list. open documents, which is easy to call using the menu Start - Recent Documents.
If you don't want anyone to see which documents you're viewing, it's best to clear this list of recent documents.
If the menu item "Recent Documents" you do not have, then it is disabled in the settings. How to include it in the menu Start, written at the end of this lesson.
To clear the list of recent documents, click on the button Start and in the menu that opens, right-click on the item "Recent Documents". Then you need to select the item "Clear Recent Items List".
After that, the list of recently created documents will be cleared. By the way, the user may not clear this list completely, but remove only certain lines from it on his own.
In order to do this, you need to go to the menu Start - Recent Documents and select the document you wish to delete. Now it remains to click on it with the right mouse button and select the item "Delete". All other lines that are in this list will be saved, and the one you have selected will be deleted without a trace.

If your menu Start item missing "Recent Documents", you can return it. To do this, right-click on the menu Start, select an item there "Properties" and in the window that opens, click the button "Tune".

To monitor computer activity and track down the causes of errors, Windows keeps a record of the latest events and activities in the system. With this feature, you can see which applications have been installed on the system recently, when the last login sessions were made, and what activities were performed.
You can view recent activity on your computer using your browser history and the date some files were last opened. You can also view recent documents in the corresponding section of the Start menu.
Quick article navigation
Windows log
In order to view the latest events on your computer using the Windows Log, you must:
- Open the start menu.
- Enter "View event logs" in the search bar.
- Select the application of the same name in the search results.
- Wait for the window to load and build the list of events.
- Open the Windows Logs tab.
- Open the desired log by double clicking and view the events.
Recent Documents
View recently open files You can use the system menu "Recent Documents". By default, this section is disabled in Windows 7, but the user has the option to enable it. For this you need:
- Right-click on the "Start" button.
- Select in context menu item "Properties".
- Go to the "Start Menu" tab.
- Press the "Setup" button.
- Find the line "Recent Documents" in the list and tick it.
- Save changes by pressing the "OK" button.
Browser history
To see history open pages in the browser you need:
- Launch web browser.
- Press the key combination "Ctrl" + "H".
- Select, if necessary, the period of the displayed history.
- View open sites and the date the page was visited.
File opening date
By using standard means operating room Windows systems You can see the date the file was last opened. For this you should:
- Right click on the file.
- Select "Properties" from the menu that appears.
- On the General tab, view the file's opening date.
- Go to the "Details" tab and see the date the file was saved or modified.
All people are naturally curious. Therefore, they are always very interested in knowing what others are doing for personal computer. There are several ways to view your browsing history. It all depends on what exactly you need. You can look at pages on the Internet or track what kind of correspondence a person has had, and so on. You can see what programs were launched on the computer, what is the history of browsing sites.
Another situation may also arise. For example, you read some interesting article on the Internet. You liked her, but you did not add her to your favorites. It was not possible to find this page again, especially if you got to it completely by accident. This is where browsing history is needed. In it you can see a list of all visited Internet projects. In a browser, browsing history includes the browser cache and cookies.
How to view deleted browsing history

In order to find out the browsing history of sites, you can use special program. For example: DiscDigger, Easy File Undelete, Recuva. After downloading and installing the program, you need to run and find special file called Places, which has the extension sqlite. This is the history of viewing Internet projects.
You need to know that if the user deleted such a list using specialized programs, then it will be very difficult to restore it. In this case, the browsing history will be lost forever.
To view it in a browser, press Ctrl+H. The entire history is stored in the memory of a personal PC in the form of files. When you remove it, you are, in other words, removing certain files With hard drive. You just need to know where they are located.

If used Explorer browser, then given file located here: C:\Users\user\AppData\Local\Microsoft\Windows\History
AT Firefox browser: C:\Users\user\AppData\Roaming\Mozilla\Firefox\Profiles\
AT Google Chrome the file is located here: C:\Users\user\AppData\Local\Google\Chrome\User Data\Default
Here it is necessary to replace the “user” with the name of the one whose history we need.
Another interesting history viewer
Consider another option with which you can see the history. To do this, you can use a program called Punto Switcher. This program has a very handy feature. It's called Keeping a Diary. It is there that everything that the user did on his PC is recorded. To ensure that only you have such access, you can set a password for it. It must be remembered that this file must be cleaned periodically, otherwise the program may not work correctly.
site views
Any browser installed on a computer keeps a history of visits and movements of users on the Internet. This happens by default and is available for viewing by anyone. If you need to delete these entries, the browser itself provides such an opportunity.

Let's see how to do it in the most popular browsers
- If you need to clear the history in Opera browser, then follow these steps. Open the browser menu and find the "Settings" section. Here you need to select the option "Delete personal data". In the settings window, the settings are hidden by default. They must be deployed by clicking on the "Detailed settings" link. You need to check the box next to the item "Clear browsing history". You also need to carefully look so as not to delete something necessary.
- We do this in Firefox. We find the section called "Tools", and there we will need the line "Settings". A new window will open, and in it we need the "Privacy" tab. In it, click on "Clear immediately." Next, a window called "Delete unnecessary data" will open. In it, we check that there is a label on the item of the visit log. Select what you want to remove and click on the "Delete" button.
- If you have Explorer installed, the history is named "Browser History". To get there, you need to find a section called "Service" in the menu and select the line "Delete log" there. After that, a new window will open, and there we find "Delete History".
- AT Google browser Chrome can be done like this: use the key combination Ctrl + Shift + Del. And you can do it differently. Go to the "Tools" section and find the "Delete data about viewed documents" button. The browser deletes the history to a depth that you can specify yourself. This can be done from the drop down list. Check the box next to "Clear history" and click on the delete button.
- If you use it, there is a separate section called "History". It is located in the browser menu.
How to delete history in Yandex
Yandex also provides many opportunities for users. It saves every visited internet project. If necessary, you can see both the history of visits and the history of downloads.
To delete visited Internet pages, open the browser and click on the icon that looks like a wrench. It is located at the top right after Here we find the item "History", and there will be a list of all visited pages. We put a tick on those pages that need to be deleted, and delete them.
File History in Windows 10
File history - mechanism Reserve copy data that appeared in Windows 8. Unlike classic backup systems, file history is a rather highly specialized thing. With its help, you cannot create a system image or backup a disk, the main purpose of the file history is to provide the user with the most simple and fast way recovering deleted/modified files.
Interestingly, initially the history of the files came to replace the technology ″cut out″ from the G8. However, in Windows 10, Pervious Versions was returned to its original place, so that the user has the choice between these two technologies. And today we will figure out how to use the file history, and also talk a little about the principle of its operation and the intricacies of settings.
Power on and setup
You can open the file history different ways, the fastest is to press Win+R and run the command filehistory.
File History is not enabled by default, so the first time you sign in, you'll be prompted to follow a link and set it up.

The first thing to do is to make sure you have a disk to store your backups. If the system does not find a suitable disk, then a corresponding warning is displayed, and the power button is inactive.
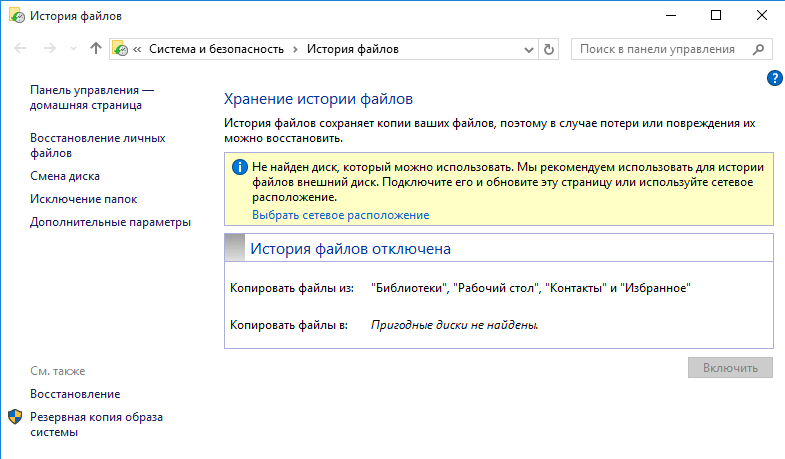
To select a disk, go to the "Change disk" section and specify the location for storing backups. For archiving, you can use:
Any partition of the current hard disk (except for the system one);
Any partition of another physical disk;
External USB hard disk or a flash drive;
network folder.

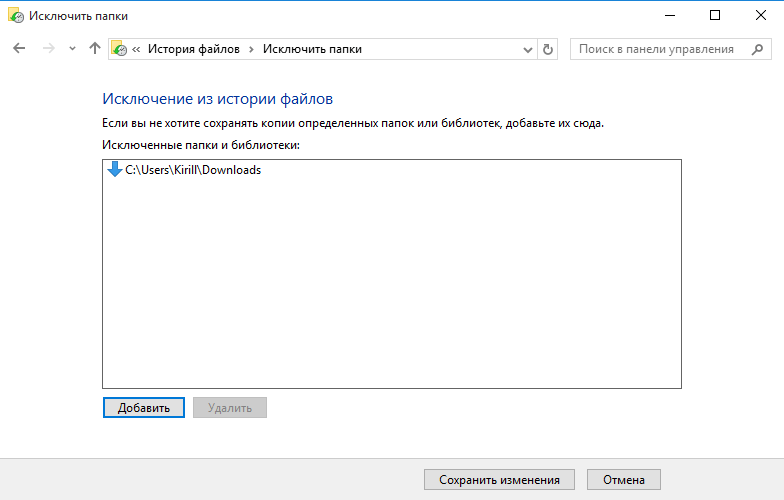
By default, the backup includes all user profile content - Libraries, Desktop, Contacts, and Favorites, as well as cloud storage content. OneDrive storage(if it is connected). If necessary, some individual folders can be excluded from the backup. To do this, go to the "Exclude folders" section and select folders that do not need to be included in the backup.
Also in the "Advanced Options" section, you need to configure the frequency of backups. By default, copies are created every hour, but you can specify an interval from 10 minutes to 1 day.

In the same place, we indicate the duration of storage of backups - from 1 month to infinity. By default, this time is not limited and depends only on availability. free space on disk.

After all the settings, it remains only to click the "Enable" button and activate the file history.

After switching on, the process of initial archiving starts immediately. Then the backup is performed according to a specified schedule, and you can also start it manually at any time.

You can also configure File History from the new control panel by going to the Start menu -> Settings -> Update and Security -> Backup Service.

Here you can make all the same settings - specify the backup frequency and retention period,

select a drive and exclude unnecessary folders.

And also from here you can add to the backup any arbitrary folder. So for example, I added the C:\Documents folder, which is not included in the user profile.

Recovery
You can open the file history recovery window with the filehistory command, or select the file / folder that needs to be restored in the explorer and click on the icon on the ribbon.

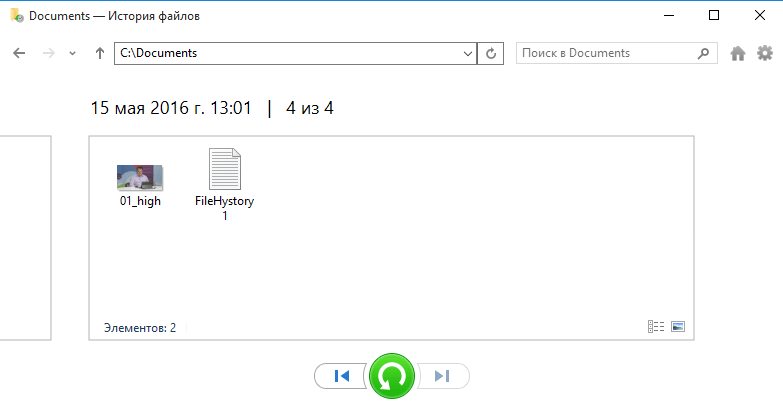
The recovery window is a kind of mixture of an explorer with a media player. Content can be arranged as needed desired view(icons, table, etc.), use the search. Backups are sorted by creation date, navigation through them is done using the arrows located at the bottom of the window.

You can navigate through the versions both in the main section and inside each folder, which is very convenient. Each folder shows the files that were in it at the time of the backup. For example, if the file was in the Documents folder and was deleted at 13:05, then it can be found in the folder at 13:01.
Finding desired file, you can view it directly in the recovery window. This is very handy if you need to find specific version file. Preview works for text files, images, and audio and video files (which can be opened by Windows media player). If the file cannot be opened using built-in Windows Tools, you will not be able to view it, but you will be prompted to open it with a suitable program.

Once you've decided on the version, you can restore the file to its original folder, or choose a different location.

Principle of operation
File History does not use the shadow copy mechanism (VSS) to create backup copies, a special service is responsible for its operation fhsvc. This service is enabled by default and works whether File History is active or not.
Backup is performed not at the block level (as with traditional backup systems), but at the file level. Those. instead of completely scanning all directories and files for changes, the service simply checks the change log file system NTFS (usn change journal) and compiles a list of changed files that need to be copied. Accordingly, only files that have changed since the last backup are included in the backup.

The data is stored on the backup disk in the FileHistory\UserName\ComputerName\Data folder. This scheme allows you to store backups of different users in one location and (when using a shared network storage) with different computers. It is noteworthy that the initial division is made by username, not computer.

The backup storage structure completely repeats the structure of the folders included in the file history. Each folder contains all the available versions of the files. Each file contains the date the backup was created in UTC format in its name. For example, in the original Documents folder there are 2 files - FileHistory1.txt and 01_high.mp4. Looking at the contents of the backup storage, we can conclude that 01_high.mp4 was changed once, while FileHistory1.txt was changed twice.
Note that backups are not stored with compression. This approach helps speed up navigation and content browsing, but requires a lot of disk space. This point should be taken into account when setting the backup frequency, especially if there are a large number frequently changed files.

However, if there is not enough space, extra copies can be deleted manually. To do this, go to the advanced options section, click on the "Clear versions" link and specify the versions that can be deleted.

In addition to user folders, a Configuration folder is created for each computer, which stores the file history configuration. The EDB file is supposed to contain a list of paths and filenames, and in XML file backup settings are stored. Both files have two versions. Empirically, it was found that the version with a prefix of 2 is the original version, and the version with a prefix of 1 contains the latest changes.

Offline Cache
Another important point to be aware of. In case it is not available external drive or network folder on which are stored backups, File History uses temporary storage, or offline cache (offline cache). This cache is located in the user profile, in the C:\Users\username\AppData\Local\Microsoft\Windows\FileHistory directory. While the disk is not available, backup copies of files are stored in the cache, and as soon as the connection to the disk is restored, all its contents are transferred to the disk and the cache is cleared. The cache also stores configuration files, which allows the file history to continue working even when the disk is disconnected.
Interestingly, in Windows 8.1 there was a setting that allowed you to set the cache size as a percentage of the disk size (from 2% to 20%). However, this parameter is absent in Windows 10, apparently the developers considered this information unnecessary for the user. However, if desired, these settings can be found in the configuration file, in the section StagingArea, which specifies the allowed cache sizes and location.

Control
Oddly enough, there are no tools for centralized management of file history, at least I did not find them. Apparently this functionality is intended solely for individual use, since there is no utility command line, no PowerShell module, no group policies - just a graphical snap-in. The only thing I managed to dig out is the parameter group policy, which allows you to disable the use of file history. It is located in Computer Configuration\Administrative Templates\Windows Components\File History\Windows Components\Windows Components\File History.

If this option is enabled, then file history cannot be used; if disabled or not set (default value), then you can.

The same setting is located in the registry under HKLM\Software\Policies\Microsoft\Windows\FileHistory. It is responsible for the DWORD type parameter with the name Disabled, which has two meanings:
0 - file history is available for inclusion;
1 - file history is disabled.

Conclusion
In conclusion, a few important points to be aware of when using file history:
It is not recommended to store backups on the same physical disk as the original files, because if the disk fails, all files will be lost;
File History does not support the use of EFS (Encrypting File System). If encryption is required, BitLocker can be used;
File History does not back up OneDrive content until it is available offline;
Unlike traditional backup systems, file history does not require the user to administrative rights when setting up and using. Any computer user can set up a backup of their files to a convenient location;
And just in case, let me remind you that the file history is not a full-fledged backup system and can only be used as an addition to a full system backup, and not instead of it.
Opera to delete history, you need to go to the “Settings” section in the “Main Menu”, and select the “Delete personal data” item in it. Selecting this item is a dialog box where you need to expand the complete list of data stored by the browser that can be assigned for deletion. To do this, click on the "Detailed" label and check all the data types that you need. The item "Clear browsing history" is also on this list. Pay special attention to the option to delete passwords - uncheck this item if you want to keep them. Finally, click the "OK" button.
AT Mozilla FireFox to clear the history of visits. If you need to delete other data - make the appropriate marks. Then click the "Delete Now" button.

AT Internet Explorer to get to the "Delete Browsing" option, you need to select the "Delete Browsing History" item in the "Tools" section. This will open a window with several sections. In the "History" section, you need to click the "Delete History" button. The browser will require confirmation of the operation - click "Yes".

In the Google Chrome browser, just press the combination CTRL keys+ SHIFT + DEL to open a window titled "Clear browsing data". You can also choose a long path - click the wrench icon in the right upper corner, select the "Tools" section in the menu, and in it the item "Delete data about viewed documents". In the window for clearing browsing data, you need to specify the period and check the box next to "Clear browsing history", and then click the "Clear browsing data" button.


