How to check an atx power supply. Checking the computer power supply with a multimeter
If your computer often freezes or constantly requires a restart, or does not turn on at all, then possible reason Such problems indicate a malfunction of the power supply.
There are a number of signs characteristic of a malfunctioning battery. The power supply does not operate in the desired mode under the following conditions:
- Pressing the power button does not start working system unit. There is no light or sound response to switching on. Coolers do not rotate. In such a situation, there may be a malfunction of the power supply or there may be breaks in the wires, weak AC supply from the network;
- The computer does not turn on the first time. The problem is either in the power supply, or in a loose connection of the connectors, or in a malfunction of the power button;
- Computer without apparent reason turns off during boot phase operating system . The reason for this may be intermittent transmission of voltage from the power supply to other computer components. This malfunction may also indicate that the power supply is overheating and, as a result, it is forced to shut down.
- Presence of a blue screen.
- Presence of a burning smell.
Inspection of the block
Checking the correct operation of the computer power supply involves carrying out certain manipulations under voltage. Be extremely careful to avoid accidents. Before starting the test, inspect the integrity of each cable. Do not touch parts with wet, unprotected hands.
1 Visual check of the power supply.
This is the first and easiest way to check.
- Unscrew 4 (or 6) screws, disconnect the unit from the computer case;
- Unscrew the screws that are in the unit body and disassemble it;
- Carefully inspect the power supply chip. Pay close attention to the capacitors.
If any of them are swollen, then the power supply protection is faulty. Urgent replacement of parts is required.
If no problems are found in the capacitors, we recommend removing dust from the power supply, lubricating the fan and reassembling the device, and then try connecting the computer.
Power check
Read also: TOP 15 Programs for checking your hard drive for errors and bad sectors | Windows (7/8/10)
This test is carried out by turning on the power supply without connecting to motherboard.
- Turn off your computer. Then turn off the switch on the back of the computer's power supply.
- Remove the computer cover. Disconnect the power supply from other parts of the computer. Disconnect each cable. Be sure to remember or take a photo of the order in which all the elements are connected so that you can reconnect all the cables later.
- Take the motherboard power cable that comes from the power supply. Find the green wire.
- It must be connected to any of the black wires. Do this using a paperclip or a small piece of wire.
- Connect any device to the power supply. For example, an old unnecessary hard drive. This is necessary to give the power supply a certain load, the absence of which can lead to damage to the unit.
- Connect the power supply to the network and press the power button on the unit body.
If the fan starts to rotate, it means the power supply is working.
Even if this test method showed that the power supply is working, this does not mean that it is completely working.
Checking with a multimeter
Read also: TOP 15 Best programs for data recovery from a flash drive | 2019
Now you need to check whether the power supply is transmitting constant pressure in full. For this:
- Unplug the power supply and use a paperclip or piece of wire to short-circuit the motherboard cable. This will bring the unit into working condition.
- Apply any external load to the power supply. Connect a floppy drive, hard drive or cooler to it;
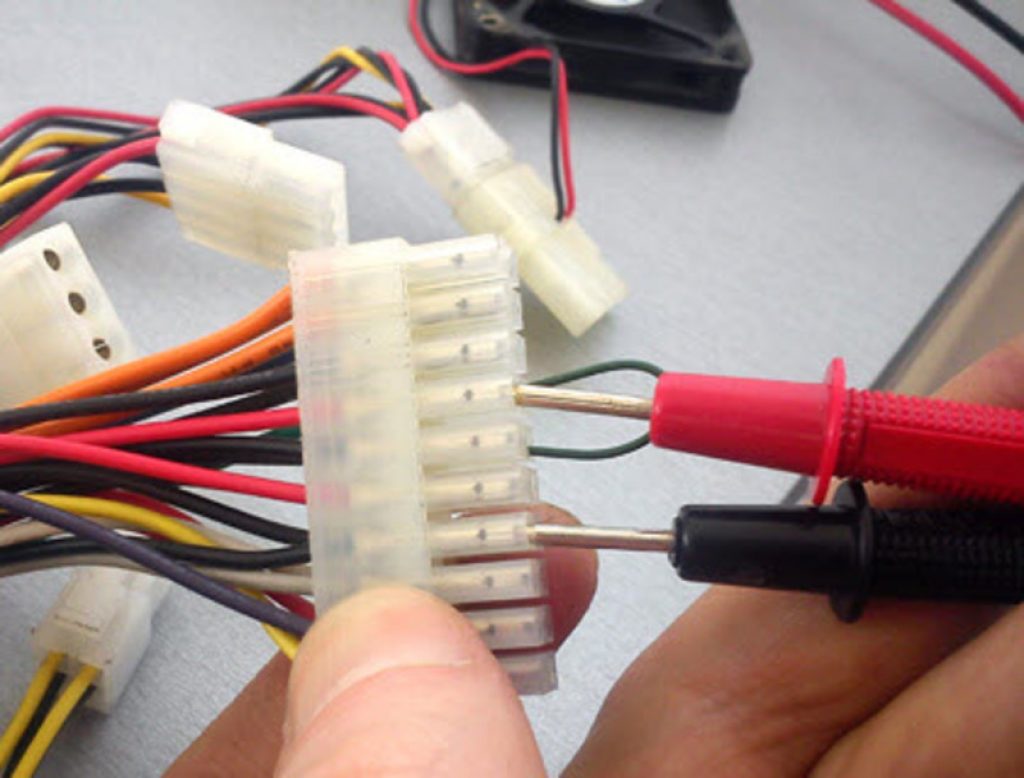
- Take a multimeter - this is a universal tester that measures current strength. Set the tester to DC voltage test mode.
- Check the voltage between the orange and black wires, between the red and black wires, and between the yellow and black wires.
- We plug the black probe of the multimeter into the connector opposite the black wire, and connect the red probe of the tester in turn to the connector contacts to which the wires of the colors we need fit.
A functioning power supply will produce the following voltage values:
- 3 Volts for orange wire;
- 5 Volts for red wire;
- 12 Volts for yellow wire.
If the test you carried out shows that the power supply is faulty, you can disassemble it and repair it. After completing the work, collect all the contacts and install them correctly.
If the test showed that your power supply is working, but difficulties with the computer continue, then most likely the reason is something else.
Software check
Read also: Checking RAM: Basic methods for all operating systems | 2019
You can check the operation of the power supply using the specialized SpeedFan program.
This utility checks the temperature and voltage of the power supply.
When indicating the temperature of the power supply, this program operates with an internal thermal diode.
This allows you to more accurately determine the temperature.
Download
- Universal program for the test. If the power supply does not overheat, then there are no problems. It is noteworthy that during heating the program loads not only the processor, but also the video card. You can set your own monitoring of voltage and temperature of the power supply - S&M. This utility heavily loads the processor, causing the devices to heat up to the maximum.
Testing with this utility may cause the device to overheat and break if the components are of poor quality.


How to check your computer's power supply for functionality
If your computer often freezes or constantly requires a reboot, or does not turn on at all, then a possible cause of such problems is a faulty power supply.
The power supply supplies power to all components of the computer case. It transforms the incoming alternating voltage into direct voltage.
Symptoms of malfunction

There are a number of signs characteristic of a malfunctioning battery. The power supply does not operate in the desired mode under the following conditions:
- Pressing the power button does not start the system unit. There is no light or sound response to switching on. Coolers do not rotate. In such a situation, there may be a malfunction of the power supply or there may be breaks in the wires, weak AC supply from the network;
- The computer does not turn on the first time. The problem is either in the power supply, or in a loose connection of the connectors, or in a malfunction of the power button;
- The computer turns off for no apparent reason when the operating system is loading. The reason for this may be intermittent transmission of voltage from the power supply to other computer components. This malfunction may also indicate that the power supply is overheating and, as a result, it is forced to shut down.
- Presence of a blue screen.
- Presence of a burning smell.
Inspection of the block

Checking the correct operation of the computer power supply involves carrying out certain manipulations under voltage. Be extremely careful to avoid accidents. Before starting the test, inspect the integrity of each cable. Do not touch parts with wet, unprotected hands.
Visual check of the power supply.
This is the first and easiest way to check.
- Unscrew 4 (or 6) screws, disconnect the unit from the computer case;
- Unscrew the screws that are in the unit body and disassemble it;
- Carefully inspect the power supply chip. Pay close attention to the capacitors.
If any of them are swollen, then the power supply protection is faulty. Urgent replacement of parts is required.
If no problems are found in the capacitors, we recommend removing dust from the power supply, lubricating the fan and reassembling the device, and then try connecting the computer.
Power check
This test is carried out by turning on the power supply without connecting it to the motherboard.
- Turn off your computer. Then turn off the switch on the back of the computer's power supply.
- Remove the computer cover. Disconnect the power supply from other parts of the computer. Disconnect each cable. Be sure to remember or take a photo of the order in which all the elements are connected so that you can reconnect all the cables later.
- Take the motherboard power cable that comes from the power supply. Find the green wire.
- It must be connected to any of the black wires. Do this using a paperclip or a small piece of wire.
- Connect any device to the power supply. For example, an old unnecessary hard drive. This is necessary to give the power supply a certain load, the absence of which can lead to damage to the unit.
- Connect the power supply to the network and press the power button on the unit body.
If the fan starts to rotate, it means the power supply is working.
Even if this test method showed that the power supply is working, this does not mean that it is completely working.
Checking with a multimeter
Now you need to check whether the power supply transmits full DC voltage. For this:
- Unplug the power supply and use a paperclip or piece of wire to short-circuit the motherboard cable. This will bring the unit into working condition.
- Apply any external load to the power supply. Connect a floppy drive, hard drive or cooler to it;
- Take a multimeter - this is a universal tester that measures current strength. Set the tester to DC voltage test mode.
- Check the voltage between the orange and black wires, between the red and black wires, and between the yellow and black wires.
- We plug the black probe of the multimeter into the connector opposite the black wire, and connect the red probe of the tester in turn to the connector contacts to which the wires of the colors we need fit.
A functioning power supply will produce the following voltage values:
- 3 Volts for orange wire;
- 5 Volts for red wire;
- 12 Volts for yellow wire.
If the test you carried out shows that the power supply is faulty, you can disassemble it and repair it. After completing the work, collect all the contacts and install them correctly.
If the test showed that your power supply is working, but difficulties with the computer continue, then most likely the reason is something else.
Software check
You can check the operation of the power supply using the specialized SpeedFan program.
This utility checks the temperature and voltage of the power supply.
When indicating the temperature of the power supply, this program operates with an internal thermal diode.
This allows you to more accurately determine the temperature.

- Universal test program. If the power supply does not overheat, then there are no problems. It is noteworthy that during heating the program loads not only the processor, but also the video card. You can set your own monitoring of voltage and temperature of the power supply - S&M. This utility heavily loads the processor, causing the devices to heat up to the maximum.
Testing with this utility may cause the device to overheat and break if the components are of poor quality.
Checking the power supply using the OCCT program
This utility also causes maximum load on system elements.
Inside the utility there are several tabs responsible for the video card, processor, and power supply. All you have to do is choose the one you need.
Certain rules must be followed safe use computer power supply so that testing it does not become a frequent process.
- Make sure that the power supply is securely and firmly secured.
- When installing components of higher power, the load on the unit increases accordingly. It is imperative to ensure that conductor and semiconductor components do not experience overheating.
- Even at the stage of purchasing a computer, choose a power supply with a power reserve.
- Ensure and always check that the AC voltage is constant.
- Consider protection against unplanned shutdown. Just install an uninterruptible power supply.
- Make sure the fan is working properly, which is responsible for cooling the power supply.
- Systematically clean and change the lubricant in the power system.
The above, unfortunately, does not guarantee that your computer is insured against breakdown.
Try to test whenever you suspect a faulty power supply. In this case, the chance of fixing the problem is much higher.
We looked at several ways to check the power supply for functionality. This can be done independently, having basic knowledge of electronics.
VIDEO: How to check the computer's power supply? Checking and diagnosing power supply
How to check the computer's power supply? Checking and diagnosing power supply
[Instructions] How to check the computer power supply for functionality
Computer won't turn on? In this material you will find the answer to the question: how to check the computer power supply.
The thesis solution to this problem is in one of our previous articles.
Read about how to check its performance in our article today.
Power supply (PSU) is a secondary power source (the primary source is a socket), the purpose of which is to convert alternating voltage to direct voltage, as well as provide power to computer nodes at a given level.
Thus, the BP acts as an intermediate link between electrical network and, accordingly, the performance of the remaining components depends on its serviceability and correct operation.
Causes and symptoms of power supply failure
As a rule, the reasons why power supplies fail can be:
low quality of network voltage (frequent voltage drops in the network, as well as its output beyond the operating range of the power supply unit);
low quality of components and manufacturing in general (this point is relevant for cheap power supplies);
You can determine whether the power supply or some other component has failed by the following signs:
after pressing the power button of the system unit, nothing happens - there is no light or sound indication, the cooling fans do not rotate;
the computer turns on every other time;
Checking the power supply can be done in several ways.
We will talk about the sequence of each of the checks below, but now we will only limit ourselves short information to understand what we will do.
The essence of the first method is to check the voltage supply and at this stage we perform a rough check whether there is voltage or not.
The second method is to check the output voltage; we have already mentioned that the voltage must be strictly within certain limits and deviation in any direction is unacceptable.
The third method is to visually inspect the power supply for swollen capacitors.
For ease of understanding, the algorithm for each check will be presented in the form step by step instructions.
Checking the power supply voltage
Step 1.
Step 2.
Remember or, for convenience, take a photo of how the power is connected to each of the components (motherboard, hard drives, optical drive, etc.) after which they should be disconnected from the power supply.

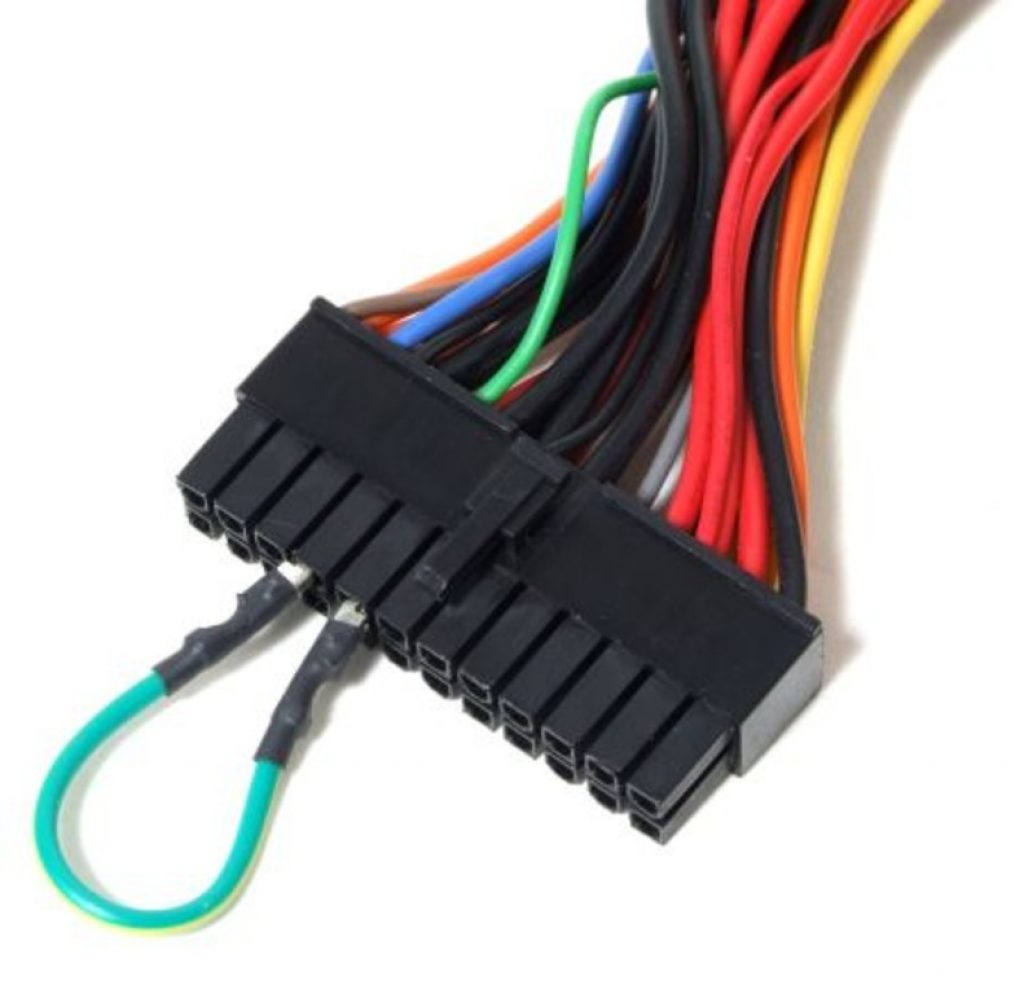
Step 3. Find a paper clip. We will use a paper clip to close the contacts on the power supply, and if it is not at hand, a wire similar in length and diameter to the paper clip will do.
After this, the paper clip must be bent in the shape of the Latin letter “U”.
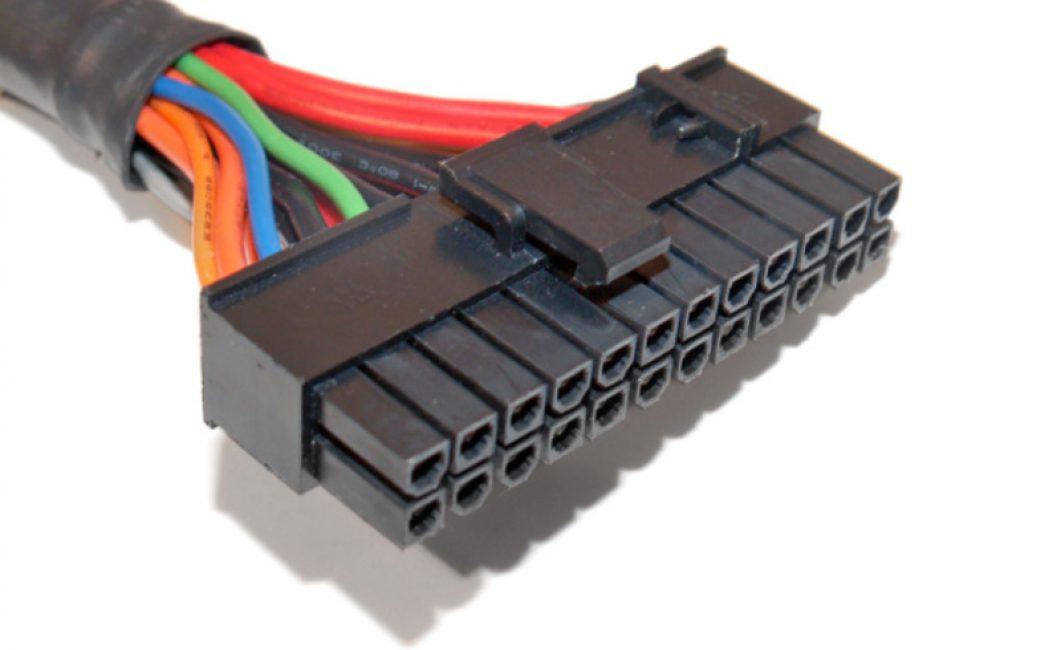
Step 4. Find the 20/24 pin power connector. This connector is very easy to find - it is a harness of 20 or 24 wires, respectively, that come from the power supply and are connected to the PC motherboard.

Step 5. Find the green and black wire connectors on the connector. You must insert a paperclip into the connectors to which these wires are connected.
The paper clip must be securely fixed and in contact with the corresponding connectors.

Step 6.
Step 7 Checking the functionality of the power supply fan. If the device is working and conducts current, then the fan located in the power supply housing should rotate when voltage is applied.
If the fan does not rotate, check the contact of a paper clip with the green and black connectors of the 20/24-pin connector.
As mentioned above, this check does not guarantee that the device is working. This check allows you to determine that the power supply is turning on.
For a more accurate diagnosis, the following test must be performed.
Checking the correct operation of the power supply
Step 1. Turn off computer. It must be remembered that the computer's power supply operates with a voltage that is dangerous to humans - 220V.

Step 2. Open the side cover of the system unit.
Remember or for convenience take a photo of how the power is connected to each of the components (motherboard, hard drives, optical drive, etc.) after which they should be disconnected from the power supply.
Step 3. Find the 20/24 pin power connector.
This connector is very easy to find due to its larger size - it is a harness of 20 or 24 wires, respectively, that come from the power supply and are connected to the PC motherboard.
Step 4. Find the connectors of the black, red, yellow, pink wires on the 20/24 pin connector.
Step 5. Load the power supply. In the future, we will measure the output voltage of the power supply.
In normal mode, the power supply operates under load, providing power to the motherboard, hard drives, optical drives, and fans.
Measuring the output voltage of a power supply that is not under load can lead to a fairly high error.
Note! An external 12V fan can be used as a load, drive optical disks or an old hard drive, as well as combinations of these devices.
Step 6. Turn on the power supply. We supply power to the power supply (do not forget to turn on the power button on the power supply itself, if it was turned off in Step 1).
Step 7 Take a voltmeter and measure the output voltage of the power supply. We will measure the output voltage of the power supply unit on the pairs of wires specified in Step 3. The reference voltage value for the black and pink wires is 3.3V, black and red - 5V, black and yellow - 12V.
The deviation of the specified values is allowed in the amount of ±5%. So the voltage is:
3.3V should be within 3.14 - 3.47V;
5V should be within 4.75 - 5.25V;
12V should be between 11.4 - 12.6V.

Visual inspection of the power supply
Step 1. Turn off computer. It must be remembered that the computer's power supply operates with a voltage that is dangerous to humans - 220V.
Step 2. Open the side cover of the system unit.
Remember or, for convenience, take a photo of how the power is connected to each of the components (motherboard, hard drives, optical drive, etc.) after which they should be disconnected from the power supply.
Hello, dear readers! Today we will deal with a purely practical matter. If you are interested in computer hardware, then it’s good to consolidate your theoretical knowledge with practice, right?
Let's say you bought a new computer. Or you want to replace a burnt out unit with another used one.
You can install it right away (and play the lottery), but it’s better to check before installing. You want to know how to do this, don't you?
Standby voltage source
First, a little theory. Where would we be without her?
Computer contains standby voltage source(+5 VSB).
If the power supply plug is inserted into the network, this voltage will be present on pin 21 of the main connector (if the connector is 24-pin).
This standby power supply starts the main inverter. The purple (most often) wire comes to this contact.
You need to measure this voltage relative to the common wire (usually black) with a digital multimeter.
![]() It should be within + 5 + -5%, i.e. be in the range 4.75 to 5.25 V.
It should be within + 5 + -5%, i.e. be in the range 4.75 to 5.25 V.
If it is less, the computer may not turn on (or will turn on “every once”). If it is higher, the computer may freeze.
![]() If this voltage is missing, the power supply will not start!
If this voltage is missing, the power supply will not start!
Lighter power supply load
If the standby voltage is normal, you need to connect a load to one of the connectors in the form of powerful resistors(see photo).
 A resistor of 1 - 2 Ohm can be connected to the +5 V bus, and a resistor of 3 - 4 Ohm can be connected to the +12 V bus.
The resistor power must be at least 25 W.
This is far from the full load. In addition, the + 3.3 V bus remains completely unloaded.
But this is the necessary minimum at which the power supply unit (if it is working) should start without “harm to its health.”
The resistors should be soldered to the mating part of the connector, which can be taken, for example, from a faulty external case fan.
Starting the power supply
 After the load is connected, you should close the PS-ON contact (usually green) with the adjacent common (usually black) conductor.
The PS-ON contact is the fourth from the left in the top row if the key is located at the top.
You can close it using a paper clip. The power supply should start. This will cause the cooling fan blades to rotate.
We remind you that it is better not to turn on the computer power supply without load!
First, it has protection and control circuits that may prevent the main inverter from starting. Secondly, in “lightweight” blocks these chains may be completely absent. In the worst case scenario, a cheap power supply may fail. Therefore, do not buy cheap power supplies!
Output voltage monitoring
Output voltages will appear on all connectors. All output voltages should be measured. They must be within 5% tolerance:voltage + 5 V should be within + 4.75 - 5.25 V,
voltage +12 V - within 11.4 - 12.6 V,
voltage +3.3 V - within 3.14 - 3.47 V
![]() The voltage value in the + 3.3 V channel may be higher than + 3.47 V. This is due to the fact that this channel remains unloaded.
The voltage value in the + 3.3 V channel may be higher than + 3.47 V. This is due to the fact that this channel remains unloaded.
But, if the other voltages are within normal limits, then with a high degree of probability we can expect that the voltage in the + 3.3 V channel under load will be within normal limits.
![]() Note that the 5% tolerance on the upper side for a voltage of + 12 V is too large.
Note that the 5% tolerance on the upper side for a voltage of + 12 V is too large.
This voltage powers the spindles of the hard drives. At a voltage of + 12.6 V (the upper limit of the permissible range), the driver microcircuit that controls the spindle overheats greatly and may fail. Therefore, it is desirable that this voltage be lower - 12.2 - 12.3 V (of course, under load).
 It should be said that there may be cases when the unit works at this load, but at the real one (which is significantly higher), the voltage “sags”.
But this happens relatively rarely; it is caused by hidden faults. You can make, so to speak, an “honest” load that simulates the real operating mode.
But it's not that simple! Modern power supplies can deliver power of 400 - 600 W or more. To check operation with a variable load, you will need to switch powerful resistors.
Powerful switching elements are required. All this will heat up...
A preliminary conclusion about performance can be made even under light load, and this conclusion will be reliable in more than 90% of cases.
A few words about fans
 If a used one makes a lot of noise, it most likely needs lubrication. Or, if it is very worn, replaced.
This applies most of all to small fans with a diameter of 80 mm, which are installed on the rear wall of the power supply.
To ensure the required air flow, a fan with a diameter of 120-140 mm rotates at a lower speed and therefore makes less noise.
In conclusion, we note that a high-quality power supply has a “smart” control circuit that controls fan speed depending on temperature or load. If the temperature of the radiators with power elements (or the load) is low, the fan rotates at minimum speed.
As the temperature rises or the load current increases, the fan speed increases. This reduces noise.
Victor Geronda was with you.
Hello, friends! In this article, we will diagnose components using the most powerful computer stability test - OCCT. The OCCT test stands for OverClock Checking Tool. This special utility capable of maximally loading the components of your computer by subjecting them to all possible tests to identify errors. In other words, using OCCT you can perform computer stress test for stability.
OCCT notifies the user of any errors found. If any are found, then something is really wrong. In everyday work, errors may not be noticeable, since you are not subjecting your computer to such loads. But it is highly likely to appear in the future sooner or later. It is possible that it will be in the form of . To avoid such surprises, you can and should test your new or updated computer.
According to the developer of OCCT, a 30-minute test will be enough for most users. But for greater reliability, it is advisable to run tests lasting 1 hour.
You can and should download OCCT from the official website http://www.ocbase.com/
Go to the Download tab and at the very bottom there will be download links

I like Zip Version since it does not require installation.
Launch OCCT.exe
You can see the appearance of the program in the figure below.

The monitoring window on the right may vary slightly. This window is configurable. To do this, click on the orange button in the left window
In the options that open, in the last column you can configure what will be displayed in the Monitoring window

You can see my settings in the picture above
After these settings, the Monitoring window takes on the following form:

At the end of the test, Explorer will open at C:\Users\Anton\Documents\OCCT\
There will be graphs in the folder with the current date various parameters from loading . Everything is clearly shown there.
If errors are found during the test, you will see a warning. Read what to do in this case in the Conclusion.
CPU test - CPU:LINPACK
This test only heavily loads the processor. It warms it up better than CPU:OCCT
Test type choose Auto. Leave the duration and periods of inactivity as is.

Memory we leave it the same way as it is.
If you have 64 bit system check the appropriate box.
If your processor supports the AVX command system extension, check the appropriate box.
Here is an excerpt from Wikipedia

I have a Sandy Bridge processor that supports AVX, so I check the box.
We also install if the Use all logical cores is not checked.
We run the test and do not touch the computer for one hour.
At the end of the test, we look at the temperature graphs. If no errors were found during the test and the temperatures are normal, then everything is in order. Otherwise, look at the Conclusion.
Graphics adapter test - GPU:3D
Then check the boxes to enable full screen mode and enable error checking.
Shader complexity. When you hover over this field with the mouse, a hint is shown below in the Help section

That is for AMD video cards select 7, for NVIDIA - 3. Since I have integrated graphics from Intel, I leave it by default.
Memory usage. Memory limit for testing. It seems to me that it is advisable not to check the box. Let him use as much as he needs.
Frame limiter I leave it the same way default.
I run the test and don’t touch the computer for an hour. Then I look to see if there were any errors and look at the temperature graphs. If there were no errors, I don't worry. IN otherwise see Conclusion.
Power supply test - POWER SUPPLY
Go to the last tab POWER SUPPLY. In this test, everything that is possible is loaded and diagnostics are performed due to this. Whether it holds the load or not.
Set the settings as usual

If you have Windows 64 bit, check the 64 bit Linpack checkbox. If they are not checked, check the rest of the boxes as well.
Let's run the test

I couldn’t stand it for an hour, I stopped the test much earlier because with built-in graphics it’s impossible to properly test a 500 W power supply.
After the test is completed, we look to see if there were any errors and look at the graphs. If everything is fine, then you can continue working. Otherwise, see Conclusion.
Conclusion
What to do, if computer stability test ended with errors or overheating was detected? First of all, the simplest thing is possible. Then, if this does not give the desired result, you can. If the video card is under warranty, it is better to take it to service center. If the warranty has passed, you can replace the thermal paste on the graphics chip.
To exclude the power supply from suspicion, you can install another, more powerful one during the test. If the test does not pass, it is necessary to remove overclocking, if any. If the processor or video card has not been overclocked and malfunctions during testing, it must be covered under warranty. If the last one is over, then you can try to reduce clock speeds(this can be done using utilities for the motherboard and using ). If it doesn’t help, then you should think about replacing your computer or upgrading it.
You can see my opinion on the normal temperature of components.


