How to upload photos to instagram from computer. How to upload photos to Instagram from a computer? Detailed instructions! But for starters...
Instagram is not just a social hit of 2018, it is a lifestyle, it is a business, it is an excellent tool for finding friends and “wiping the nose” of spiteful critics. Yes, but it's too complicated for you because you don't know how to post to Instagram from a computer? Now let's tell you, because it's quite simple to please subscribers without using mobile gadgets and applications!
Can I post on Instagram from a computer?
So you don't have powerful smartphone with a large “diagonal”, you don’t want to post “raw”, unprocessed photos in Photoshop, or you just have a “weak Internet” - whatever it is, but you want, you need to use a computer to work with this social network. Or a laptop. Well, if you want - get it, here are three ideas for solving the problem.
gramblr- free program posts to Instagram for OS X and Windows
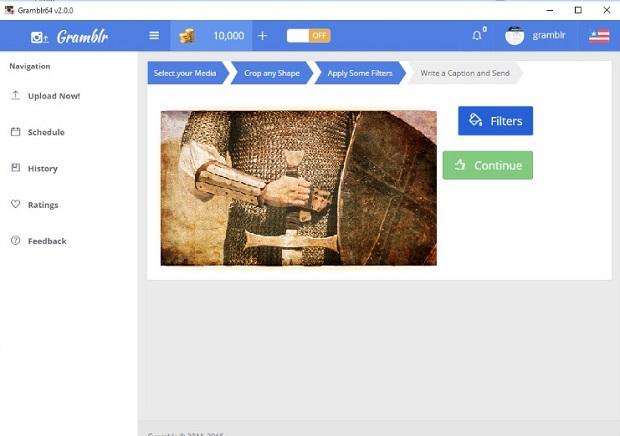
Small in "weight", with an intuitive interface and without unnecessary "bells and whistles", the program allows you to post photos quickly and for free. By launching Gramblr, all you have to do is crop the image by a square, apply standard Instagram filters, mark tags and send a message to your friends on the World Wide Web.
More pluses:
- does not require installation;
- automatically fixed frame;
- you can add a description to the frame;
- there is a history of posts;
- scheduled download (via the Schedule button).
Cons of the utility:
- little functionality;
- in the set - only standard filters;
- Photos are uploaded only when a stationary PC or laptop is turned on.

What is an emulator? If it’s very simple, then this is an imitation of one device using another. As for the BlueStacks program, after installing it, the computer "turns" into an "android smartphone" - with the full functionality of a mobile gadget.
Pros:
- no real Android problems;
- great functionality;
- available system requirements;
- free download and installation.
Minuses:
- slows down;
- a lot of annoying ads;
- large "weight" of the program;
- introduction into car services without the knowledge of the owner;
- it takes time to get used to the settings for convenient operation with emulator.
In general, BlueStacks is an excellent imitation of a smartphone, especially since you can use the program not only to communicate in social network: the possibilities and full functionality of it can be described oh how long.
Difficult? Then remember the password for accessing e-mail - it's time to get acquainted with online tools for posting pictures and videos on your favorite Instagram.

This resource is one of the most demanded and popular among users of the social network. with its help, posting photos to Instagram from a computer is simplified to a couple of clicks.
Pros:
- it is not necessary to make a square from a rectangular photo before posting;
- high image quality after auto-editing;
- the ability to choose the part of the photo that should be displayed on your page;
- does not “eat up” traffic and does not “slow down”;
- multi-format pictures;
- reposting to Odnoklassniki (groups and profile), Facebook (communities and page), VKontakte (groups, publics, profile);
- good set of filters;
- the ability to specify tags;
- Support for simultaneous work with multiple accounts.
Minuses:
Every program, every web service, every website and every gadget has its downsides. To evaluate the pros and cons, you need to try, you need to test the tools. From network "horror stories":
- Instmsk.ru steals passwords to social network accounts and “hijacks” pages;
- when uploading, an inscription appears that the picture is posted using Instmsk.ru, so you can’t talk about the uniqueness of the content.
Funny. So there is a reason to try this service - at least you will laugh 🙂
Publishing to Instagram from a computer: planning and auto-posting
Well, the programs are good, but not everyone likes to download, install, study the features of the work. And, to be honest, many simply cannot do it - Instagram in 2018 is actively mastered by pensioners, blondes, and children. Therefore, we suggest that you pay attention to the online services Onlypult, Smmplanner and Smmbox, with which you can not only upload photos and videos right now, but also make pending publications. Convenient - both for gardeners and content managers.

We put this service first, because it is really good, and we recommend getting acquainted with the resources for delayed posting to a social network with Onlypult. If only because it has a week free trial period.
More pluses:
- professional editor with text overlay, filters, crop-to-size, etc.;
- placement of the description with selection of paragraphs (!);
- automatic "pulling up" of hashtags;
- adding comments;
- convenient choice of the date of delayed publication;
- nice interface;
- availability of a calendar and a glider (can be placed according to the media plan);
- there is engagement analytics - likes, comments;
- delegation of work to the involved manager;
- saving time.
There are practically no disadvantages of this resource: if you look at the reviews and thematic forums, then you can hear little and read bad things about Onlypult. The biggest disadvantage, according to users (usually beginners and schoolchildren) is the publication of Instagram through a computer for money, for a monthly fee. But after all, the functionality here is almost perfect, so why not pay developers a dozen or two dollars for the opportunity to save themselves from transferring photos from a mobile phone to a computer and back? Yes, and "free" products are far from being as good as they seem: you have to pay for free access by viewing intrusive ads. With all the ensuing…
So sign up, take a trial period, try it, calculate the benefit in terms of free time and ... And rejoice, the system is really great!

Smmplanner.com - take it on a pencil!
It is also one of the best online resources to reach your goals. If your friends say: “We post to Instagram from a computer using SmmPlanner, join us!” – succumb to persuasion and test the system. Because the pros here are pretty "fat":
- support for multiple accounts;
- reasonable subscription fee;
- the first week of work is free;
- 50 posts monthly as a gift to subscribers on VKontakte or Facebook;
- a good catalog of ideograms and emoticons (emoji);
- good usability.
Of the minuses - the same unwillingness of users to pay for functionality, time savings and security. Smmplanner proposes to solve the issue with 50 free posts allocated monthly by the system, but ... But we are sure that it is better to pay at least for the minimum tariff - they ask for little money, but the benefits are obvious. Another disadvantage is inconvenient navigation, although we noted it in the pros. The taste and color, as they say ...

Smmbox.com is simple but interesting!
There are quite a lot of online projects that allow you to quickly publish pictures from a PC to Insta - both domestic and bourgeois. It makes no sense to study everything, so here's another sensible project for you:. The guys on the market have gained a foothold, matured, and every time they offer more and more professional, more and more interesting opportunities for working with social networks.
Pros:
- thoughtful navigation;
- intuitive interface;
- two weeks of test period (generous!);
- free search for thematic content on Facebook, Odnoklassniki, VKontakte, etc.;
- automatic watermarking of your images;
- posting a post in one click in several social networks at once;
- fast content planning.
The disadvantages are the same as above: a subscription fee for using the service and a difficult-to-understand algorithm of actions on the site. In fact, you can deal with the functionality of Smmbox very quickly, everything is simple and affordable. And technical support is responsive - this is true, information just in case.
That's all, now you know how to post on Instagram from a computer. Come, download, register, test programs and services, conquer new heights and collect likes and comments, . Good luck!
PS: if you still know of any programs or services that were not listed here, then we hope to see them in your comments. Do not be lazy and add to the list of tools for posting on Instagram.
And now a little bonus
Almost eight months have passed, and only now I decided to supplement the article with a small life hack that will be useful to those who post on Instagram not very often and can set aside a couple of minutes for this on any given day. The method is really very simple and will save you money on all of the above services and does not require the installation of emulators. We will post directly from the browser.

Since I am an amateur myself Google Chrome, then I'll show you how it's done. I started writing at first, but I got tired and decided to just record a small video. We look.
There are many ways to post photos on Instagram. The application is intended primarily for mobile devices, but you can also upload pictures through a regular computer.
Quick shot on Instagram
Click on the camera icon in the Instagram menu and then on the blue circle to take a quick photo. Then you can choose filters and other photo editor settings to make the photo look the way you want.
In the settings section, you can also zoom in on an area of the photo by sliding your fingers on the screen, or stretch / flatten the photo by moving to the right or left on the perspective scale. Pressing the right arrow will take you to the publishing menu.


Adding a photo from the gallery
To add a photo from your phone's memory, tap the camera icon and select Gallery. In the list of photos presented as small icons, tap the desired one. Select the area to be cropped by dragging the photo with your finger and tap the arrow at the top of the screen to go to the photo editor. When you have finished manipulating the filters and image settings, click on the arrow again to go to the publishing menu.

Upload from computer via Dropbox
It is not necessary to connect the phone to the computer via USB every time in order to transfer the photo first to the memory card, and then to Instagram. It is much more convenient to use the DropBox program. Go to the application website and click "Register".
Enter first name, last name, address Email and password. Check the service agreement box. The program will download automatically. Open the setup file and follow the instructions of the installer. After installation, a page will open where you click "Open my Dropbox folder".
The Dropbox folder will now be available in File Explorer and System Tray. Go to the folder with photos, highlight the ones you want, right-click and select "Copy". By clicking the same mouse button on Dropbox folder in File Explorer, select Paste. Your pictures are now cloud storage Dropbox, they will be available for any device connected to the Internet.


Go from phone to Play market and search for "Dropbox". On the application page, click "Install". After installation, click "Open". You will see photos posted from your computer.


Touch any photo and click the dotted icon at the bottom. Select "Export". Select Instagram from the list. The download will begin, after which you will go to the social network for publication.


Download from computer via Gramblr
This little program will instantly upload photos from your PC to Instagram, and also suggest posting to other social networks. You can download the application. Open the downloaded archive, run the installer and follow its instructions. After installation, the Gramblr window will open.


Enter your Instagram username and password and click Login. Next, click on "Choose File" and select a photo to upload. Its resolution should not exceed 650x650 px.


In the Caption field, enter the name of the photo / hashtag and click "Save Caption". The image will be instantly posted to Instagram. To upload more pictures, click Upload Another.


In addition to Gramblr, there are many Instagram clients, incl. With big set functions. For example, BlueStacks or Instagram. But if your goal is only quick publications, the methods described above are perfect.
In this article, we will tell you how to add a photo to Instagram (instagram.com). In fact, since given function is the main one in this social network, you should not experience any particular difficulties, but let's talk about everything in order.
Getting ready…
Before you figure out how to upload photos to Instagram, you should make sure that you have everything you need for this. First, make sure you have installed the app for your mobile phone or tablet. You can find detailed installation instructions on our website, the main thing is to know the platform of your device (iOS, Android, WindowsPhone or something else).
We note right away that uploading a photo from a computer can cause certain difficulties. If you find yourself in this situation, read the article on installing Instagram on a computer - you will find everything you need there.
Let's get started...
To find the answer to the question of how to add photos to Instagram, you need to launch the client and find the camera button in it. It looks something like this:
You can find this button at the bottom of the screen, it is located strictly in the center.
After you click on it, the answer to the question of how to add photos to Instagram can be found by itself, however, if something is still not clear to you, let's move on.
Using the screen as a viewfinder, point the camera at the subject you want to capture. Now, to take a photo, click on the round button in the center. The picture will be taken, and after specifying the description (which is not necessary at all), it will be added to your feed.
Perhaps now you are wondering how to add a photo on Instagram, but take it from the folder, and not take a picture. Everything is simple! You just need to open the gallery. You can do this by clicking on the corresponding icon on the left (in the screenshot in this place there is a photo of a dog). Then you just need to select the photo you are interested in, crop it to a "square" size and you're done - now you know the answer to the question of how to upload photos to Instagram.
If you are wondering how to put a photo on an avatar on Instagram, then there are no difficulties here either. Open the settings and select "Change profile photo", then select from existing photos or take a new one.
Sending…
We found out how to upload a picture to the service, now we will deal with sending it by private message. To do this, click the Direct button (it is located in the upper right corner), then the Instagram Direct Messaging window will open. We take a photo to send it to selected friends. The application will offer you various image editing filters (enlargement, straightening, color correction). If necessary, do it, and then click the “Next.”
Press the green button “Send To”. Ready!
Now you know how to insert and send photos to Instagram!
Sometimes you need to upload photos to Instagram from your computer. In the online version of the social network instagram.com you can only view the feed, leave comments, edit your profile, but you can’t create new posts. You can download photos to your phone by connecting it to a PC with a wire, or copy files to a memory card if your smartphone has one. If these methods do not suit you, read below how to add a photo to using third party services and programs.
The free Instagram app is available on the Microsoft Store for Windows 10 users. Uploading photos to a regular post is not yet implemented in it, but you can upload Stories, broadcast Live, use Direct messages.
To publish photos from your computer to History, install and run the application. Click on the camera icon in upper corner, select pictures posted in folders in the last 24 hours. You can allow access to the camera and microphone to broadcast live.
In the store, users leave numerous requests to the application developers to implement direct photo upload from PC, so this feature may be added soon.
Android Emulator
An emulator is a program that simulates mobile device on your computer. The popular BlueStacks emulator http://www.bluestacks.com/en/index.html completely recreates the Android OS on a PC under Windows control and Mac OS X. To post a photo, all you have to do is install the Instagram app and use all of its features.
How to post photos to Instagram using BlueStacks from a computer:

Gramblr program

You can also download videos in MP4 using the service.
A more professional service https://instaplus.me is designed to promote your account. Knows how to not only post your photos from your computer to Instagram, but also schedule publications, increase the number of subscribers. Free trial period - 5 days. 
To upload multiple photos at once, select Add Gallery. There is a built-in photo editor, for frames you can add a description with hashtags, choose a publication date.
Despite the fact that the Instagram application exists only for mobile operating systems, we know how to add photos to Instagram from a computer, and we are happy to share this knowledge with you.
So, unfortunately, Instagram still does not have an official Windows client or the ability to upload photos via the web interface. However, the problem has at least two solutions.
First, you can use the operating system emulator Android systems, which allows you to fully work with Instagram on the screen personal computer, the word you are using a mobile gadget.
The most popular program of this kind is BlueStacks.
Secondly, there are special applications designed specifically for uploading photos to Instagram. How to upload photos to Instagram from a computer using popular program Gramblr, we will also tell below.
But for starters...
Looking ahead, we note that the best way is still to work with BlueStacks. There are two reasons for that. Firstly, android emulator allows you to work with Instagram fully - not just add photos, but use all the features of the service, just like on a smartphone screen.
Secondly, Gramblr is very unstable (although BlueStacks is not perfect in this regard). It is not uncommon for users to complain about the blocking of accounts that they worked with through Gramblr. By the way, another common complaint is the blocking of hashtags in the accounts of users uploading photos through this program.
However, there are also feedbacks on the network, so if for some reason you want to work with the application, and not with the emulator, try it.
How to post photos to Instagram from a computer using BlueStacks?

Working with this emulator is quite simple and convenient. First, you need to download the program from its official website: www.bluestacks.com
We have already described how to download BlueStacks and install Instagram on a computer using it. Briefly repeat: the program is loaded directly from home page site, its installation is elementary - just click "Next" and wait a bit.
Now it remains to do a few simple preparatory steps:
- The program will prompt you to enter an existing Google account, or create a new one;
- After authorization, click on the "Search" button, and enter "Instagram" in the line;
- Download and install Instagram - just like you would on a mobile gadget by clicking on the "Install" button. The program will be available through the interface of the emulator, it is also possible to launch it through a separate shortcut in Windows.
In case you have problems with switching to the English layout, go to "Settings" and add the English keyboard through the corresponding menu item.
How to add a photo? Extremely simple: just drag the desired image stored on your computer directly into the emulator window. At the same time, BlueStacks will prompt you to select the Android application in which to import the photo.

Choose Instagram - and it's done!
Working with Gramblr
There are versions for Windows and for computers running OSX. The installation is not fraught with any secrets and subtleties. How to work with the program? The algorithm is simple.
- Enter your Instagram username and password when you enter the application.
- Click on the button to select a file to upload.
- It remains to click on the "Upload" button, and the photo will be uploaded to your Instagram account. You will also immediately receive links to the uploaded photo and an embed code.

There are, however, a number of shortcomings, in addition to those already voiced at the beginning of the article. You will have to crop the photo yourself to fit 650x650 pixels, and you will not be able to apply Instagram filters. Although it is possible to insert a description of a photo with hashtags in the Caption field, it often does not work correctly.
So Grumbler is hard to recommend as The best way upload photos to Instagram from a computer - we recommend using this program only if it is not possible to work with the emulator described above. Gramblr's only real advantage is that it's easier and faster to use than BlueStacks, but its instability and cutbacks largely negate it.
We hope our tips have been helpful to you!


