Create a new role in 1s 8.3. Accounting info
The issue with access rights arises in connection with the need to restrict the rights of a user in 1C (or a group of users), which implies a ban on performing any actions with certain objects such as viewing, recording, editing, etc. Or, on the contrary, due to the need to give (expand) user rights in 1C, which in reality most often follows the system's message about an access violation (for example, there are not enough rights to view) and the user's request to administrators about it.
To make adjustments to the access rules and change the rights to view a particular section or to any other action, you need to go to the "User and Rights Settings", which can be done with the user mode enabled on the "Administration" tab (provided, of course, that there are rights to it).


As already mentioned, access groups include specific users, and the groups themselves correspond to access group profiles that combine roles. In essence, a role is metadata, the variety and quantity of which depends on the configuration. As a rule, there are quite a lot of roles and it is easy to get confused in them. It is worth remembering that one extra assigned role can open access to objects to unwanted users.

A description of user rights is available on the Description tab.
 Roles are viewed through the "Users" directory element, which can be accessed by clicking on a specific user.

It also generates a report on access rights, which displays the status of access to specific system objects.

The rightmost column "Restrictions at the level of records" are additional conditions that restrict actions with database objects. In essence, this is a request that is executed at the time of work and tells whether it is possible or not to work with the object.
The screenshot shows that the document "Entering initial balances" is available to the user, but access is possible only to certain warehouses.

Thus, you can set access or change rights in 1C by adding a user to a particular group in user mode.

The group itself can also be modified, for example by adding a value to the access restriction.

Administrator rights allow you to manage rights in the configurator mode, where typical roles are already set. For example, a role with a much-explaining name "Basic rights" usually allows you to only read or only view an object.

Special roles for adding/modifying data are provided to manage the rights to modify objects.

If you know which object the user does not have enough rights to, you can:
- From the opposite: look at the "rights" tab for a specific object, while at the top we will see all the roles available in the configuration, and in the lower window - rights. The presence of certain rights to the object is marked with a “tick”. The rights for new objects are set in the same way.

- Open the role assigned to the user, and, having selected a specific object in the left window, see the list of rights in the right window, that is, the actions that a user with this role can do with this object - reading, adding, viewing, etc.

Thus, all possible rights in the system are predetermined. Reading, adding, modifying, viewing, editing and other rights can be enabled or disabled in any role for any object. It is not possible to assign rights separately without using roles. To differentiate user rights, you must assign the appropriate role. A convenient tool for analyzing rights and roles is the "All roles" table, which is formed in the configurator.

The screenshot shows that the "Full rights" role has the maximum amount of rights. And if the task of restricting users in rights is not worth it at all, you can safely assign this role to all users, forever getting rid of user questions.
In practice, as a rule, in most cases, "protection from a fool" is still necessary. All more or less large companies need to insure themselves against unwanted data changes. Here the built-in 1C roles come to the rescue. Understanding the variety of roles is not easy, it takes a lot of time. Therefore, creating your own role to solve practical problems can often be the only way out. Let's consider this point in more detail. You can add a role in the metadata tree.

In a new role, you can differentiate rights by simply checking the boxes next to the corresponding right.

The checkboxes at the bottom of the window indicate that the rights will be automatically assigned to new metadata objects/attributes and tabular parts the object for which the rights are assigned, as well as whether the rights will be inherited relative to the parent object.
Access rights restrictions are set in the lower right window of the new role. This is a powerful tool that allows you to restrict rights at the record level, i.e. provide access to the required data. If a simple assignment of rights can only “straightforward” give or take away rights to actions with an object, then the restriction mechanism allows you to flexibly configure access rights regarding data. For example, limit reading and viewing data for only one organization.

The data access restrictions constructor allows you to create a condition that will restrict access.

Restriction of access rights is described in the form of language constructs. To facilitate their creation, the use of constraint templates is provided. It should be noted that the use of this mechanism directly affects performance, because the system, when accessing any object, needs to read and fulfill these restrictions. This process takes up computer resources and slows down the work.
In conclusion, I would like to note that 1C, as a developer, took care of the availability of wide opportunities for administrators in terms of editing rights in their software solutions. And if at first glance these tools may seem complicated and redundant, then in the future, especially when trying to build an effective access scheme in a multi-level, branched structure of personnel in an enterprise or organization, it becomes clear that the functionality of the program fully corresponds to real needs.
How to set access rights in the 1C 8.3 program?
In this article, we will consider how to work with users in 1C Accounting 8.3:
- create a new user
- configure rights - profiles, roles and access groups
- how to set up a restriction of rights at the record level (RLS) in 1C 8.3 - for example, by organization
The instruction is suitable not only for the accounting program, but also for many others built on the basis of BSP 2.x: 1C Trade Management 11, Payroll and HR 3.0, ERP 2.0, Small Business Management and others.
In the interface of the 1C program, user management is carried out in the "Administration" section, in the "Setting up users and rights" item:
How to create a new user in 1C
In order to create a new user in 1C Accounting 3.0 and assign certain access rights to him, in the "Administration" menu there is an item "User and rights settings". We go there:

The list of users is managed in the "Users" section. Here you can create a new user (or group of users), or edit an existing one. Only a user with administrative rights can manage the user list.
Let's create a user group with the name "Accounting", and in it two users: "Accountant 1" and "Accountant 2".

To create a group, press the button that is highlighted in the figure above and enter a name. If there are other users in the infobase who are suitable for the role of an accountant, you can immediately add them to the group. In our example, there are none, so we click "Save and close."
Now let's create users. Place the cursor on our group and click the "Create" button:

Enter “Accountant 1” in the full name, set the login name to “Account1” (it will be displayed when entering the program). The password will be "1".
Be sure to make sure that the checkboxes "Login to the program is allowed" and "Show in the selection list" are checked, otherwise the user will not see himself during authorization.
Leave "Startup Mode" as "Auto".
Setting access rights - roles, profiles
Now you need to specify "Permissions" for this user. But first you need to write it down, otherwise a warning window will appear, as shown in the figure above. Click "Write", then "Permissions":

Select the profile "Accountant". This profile is standard and configured for the basic rights required by an accountant. Click "Record" and close the window.
In the "User (Create)" window, click "Save and Close". We also create a second accountant. We make sure that users are logged in and can work:

It should be noted that the same user can belong to several groups.
We chose access rights for accountants from those that were included in the program by default. But there are situations when it is necessary to add or remove some right. To do this, it is possible to create your own profile with a set of necessary access rights.
Let's go to the "Access group profiles" section.
Let's say we need to allow our accountants to view the ledger.
Creating a profile from scratch is quite laborious, so let's copy the "Accountant" profile:

And we will make the necessary changes to it - we will add the role "View registration log":

Give the new profile a different name. For example, "Accountant with additions." And check the box "View registration log".
Now you need to change the profile of the users we created earlier.
Restriction of rights at the record level in 1C 8.3 (RLS)
Let's figure out what it means to restrict rights at the recording level or as they call it in 1C - RLS (Record Level Security). To get this feature, you need to check the corresponding box:

The program will require confirmation of the action and will report that such settings can greatly slow down the system. It is often necessary that some users do not see documents of certain organizations. Just for such cases, there is an access setting at the record level.
We go back to the profile management section, double-click on the “Accountant with add-ons” profile and go to the “Access restrictions” tab:

"Access Type" select "Organizations", "Access Values" select "Everyone is allowed, exceptions are assigned in access groups". Click "Save and Close".
Now we return to the "Users" section and select, for example, the user "Accountant 1". Click the "Permissions" button:
Through the "Add" button, select the organization, the data for which will be seen by "Accountant 1".
Note! Using the mechanism of rights differentiation at the record level can affect the performance of the program as a whole. Note for the programmer: the essence of RLS is that the 1C system adds an additional condition to each request, requesting information about whether the user is allowed to read this information.
Other settings
The sections “Copying settings” and “Clearing settings” do not cause questions; their names speak for themselves. These are settings for the appearance of the program and reports. For example, if you set up a beautiful appearance reference book "Nomenclature" - it can be replicated to other users.
In the "User Settings" section, you can change the appearance of the program and make additional settings for convenience.
The "Allow access to external users" checkbox allows you to add and configure external users. For example, you want to organize an online store based on 1C. Store customers will just be external users. Access rights are configured in the same way as ordinary users.
Source: programmer1s.ru
In this article I will look at how to work with users in:
- create a new user;
- configure rights - profiles, roles and access groups;
- how to set up a restriction of rights at the record level () in 1C 8.3 - for example, by organization.
The instruction is suitable not only for the accounting program, but also for many others built on the basis of BSP 2.x: 1C Trade Management 11, Payroll and Human Resources Management 3.0, Small Business Management and others.
If you are interested in setting permissions from a programmer's point of view, read.
In the interface of the 1C program, user management is carried out in the "Administration" section, in the "Setting up users and rights" item:
To create a new user in 1C Accounting 3.0 and assign certain access rights to him, in the "Administration" menu there is an item "User and rights settings". We go there:

The list of users is managed in the "Users" section. Here you can create a new user (or group of users) or edit an existing one. Only a user with administrative rights can manage the user list.
Let's create a user group with the name "Accounting", and in it two users: "Accountant 1" and "Accountant 2".

To create a group, press the button, which is highlighted in the figure above, and enter a name. If there are other users in the infobase who are suitable for the role of an accountant, you can immediately add them to the group. In our example, there are none, so we click "Save and close."
Now let's create users. Place the cursor on our group and click the "Create" button:

Enter “Accountant 1” in the full name, set the login name to “Account1” (it will be displayed when entering the program). The password will be "1".
Be sure to make sure that the checkboxes "Login to the program is allowed" and "Show in the selection list" are checked, otherwise the user will not see himself during authorization.
Get 267 1C video lessons for free:
Leave "Startup Mode" as "Auto".
Setting access rights - roles, profiles
Now you need to specify "Permissions" for this user. But first you need to write it down, otherwise a warning window will appear, as shown in the figure above. Click "Write", then "Permissions":

Select the profile "Accountant". This profile is standard and configured for the basic rights required by an accountant. Click "Record" and close the window.
In the "User (Create)" window, click "Save and Close". We also create a second accountant. We make sure that users are logged in and can work:

It should be noted that the same user can belong to several groups.
We chose the access rights for accountants from those that were included in the program by default. But there are situations when it is necessary to add or remove some right. To do this, it is possible to create your own profile with a set of necessary access rights.
Let's go to the "Access group profiles" section.
Let's say we need to allow our accountants to view the ledger.
Creating a profile from scratch is quite laborious, so let's copy the "Accountant" profile:

And we will make the necessary changes to it - add the role " ":

Give the new profile a different name. For example, "Accountant with additions." And check the box "View registration log".
Now you need to change the profile of the users we created earlier.
Restriction of rights at the record level in 1C 8.3 (RLS)
Let's figure out what it means to restrict rights at the recording level, or, as they call it in 1C, RLS (Record Level Security). To get this feature, you need to check the corresponding box:

The program will require confirmation of the action and will report that such settings can greatly slow down the system. Often there is a need for some users not to see documents of certain organizations. Just for such cases, there is an access setting at the record level.
We go back to the profile management section, double-click on the “Accountant with add-ons” profile and go to the “Access restrictions” tab:

"Access Type" select "Organizations", "Access Values" select "Everyone is allowed, exceptions are assigned in access groups". Click "Save and Close".
Now we return to the "Users" section and select, for example, the user "Accountant 1". Click the "Permissions" button:
Through the "Add" button, select the organization, the data for which will be seen by "Accountant 1".
Note! Using the mechanism of rights differentiation at the record level can affect the performance of the program as a whole. Note for the programmer: the essence of RLS is that the 1C system adds an additional condition to each request, requesting information about whether the user is allowed to read this information.
Other settings
The sections "Copy settings" and "Clear settings" do not cause questions, their names speak for themselves. These are settings for the appearance of the program and reports. For example, if you have set up a beautiful appearance of the "Nomenclature" reference book, it can be replicated for other users.
Before every novice administrator of 1C infobases, sooner or later the question arises: how to add a user to 1C. And if in version 7 of the program the answer to this question could be given unambiguously: through the Configurator, then in version 8, depending on the version of the program, the methods for adding a user can vary significantly.
What is the need for user differentiation?
Each infobase user has a set of specific rights and roles. To restrict access to specific configuration objects and exclusions conflict situations associated with incorrect input and correction of information, and there is a list of users.
In addition, the list of users allows you to:
- Adjust the program interface, excluding from the visual display those elements that you do not need access to;
- Commit changes to the database in the context of this list.
The main rule when editing this list is that a user with full (administrative) rights should always be added first.
Adding a user through the Configurator
In fact, from the programmer's point of view, the main list of users is stored in the Configurator. It can be opened by going to the Administration-> Users menu (Fig. 1)
In the table that opens, two columns "Name" and "Full name" of the user will be visible. Actions with an existing user (limiting and adding rights, changing the password, etc.) can be performed by activating the line by double-clicking the mouse.
To add a new user, you must click the icon on the command panel of the table or the Insert (Ins) button on the keyboard, as a result, a dialog box will open (Fig. 2)
 Rice. 2
Briefly on the form elements on the "Basic" tab:
- Name – contains textual information that will be displayed in the user selection list when logging in; the name of the current user can be read in the code of the program modules using the Username() method;
- Full name - can be the same as the username, most often the full name of the employee is written here.
- Internal means of the program, for which you need to set a user password;
- means operating system;
- With the help of OpenID.
The "Show in the selection list" checkbox set in the "1C Enterprise Authentication" submenu indicates that the user will be displayed in the list called at system startup. If it is not set, then to enter this user, he will have to enter his name (as it is set in the Configurator) using the keyboard in the corresponding window.
 Rice. 3
There are only four elements on the “Other” tab (Fig. 3):
- Available roles (by setting certain checkboxes, you can significantly limit or increase the possibilities for changing information);
- Main interface (you can adjust the visual display of the system);
- Language (main language of the program);
- Launch mode (managed or regular application).
Adding a user in 1C Enterprise mode
Starting from platform 8.2, adding new users has become available in 1C Enterprise mode. To do this, the corresponding directory "Users" was added to the database.
In thin client mode, access to it can be obtained by going to the “Administration” tab (Fig. 4) -> User and rights settings -> Users
 Rice. four
In the form that opens, to create a new user, click the "Create" button. A window will appear (Fig.5)
 Rice. 5
As you can see, some of the elements of this window coincide with the window for creating a new employee in the Configurator. Significant differences of this method of adding:
- The user can be assigned a specific individual from the relevant directory;
- By checking the “Require password setting at login” checkbox, you can additionally protect the database from unauthorized access (the protection mechanism is as follows: an administrator who adds new element sets simplest password and tells it to the user, when you first enter the system, this password is entered, and when the system starts, a window appears requesting new identification data, so no one except the user will be able to log in to the system);
- Specific access permissions for a particular user are not issued by turning on and off his roles, but by adding him to certain access groups, where you can get by activating the corresponding link on the form.
The profile that defines the set of rights is stored in the "User Groups" directory; you can change and add a profile in the "User Group Profiles" directory. Thus, the Administrator does not need to control each specific user, changing access parameters is carried out for the entire group as a whole.
In the normal application mode, the "Users" references can be found in the Operations->References menu (Fig. 6)
 Rice. 6
In principle, the window for adding a new performer in this mode differs little from those presented above and there is no need to re-describe each of its elements.
We would like to draw attention to the menu in the article " additional information» (Fig.7)
 Rice. 7
It contains 4 items:
- User Settings;
- Contact Information;
- Access groups;
- Additional rights (not available when the user has a profile specified).
The first menu item allows you to automate some actions of the performer: set up auto-substitution of document details, display calendars and events, prefixes, etc.
As the experience of using the 1C system shows, the "Additional rights" menu is most often required to be able to enable editing of printed forms of documents. It is here that the corresponding checkbox is located.
The user created in the program will be automatically added to the list in the Configurator. Feedback new versions of the program do not, which is extremely inconvenient and unusual for administrators working in the old fashioned way.
Working in the 1C program allows different users to assign functional access to documents and directories of the base. For example:
- If the user works as an accountant, then he is assigned the appropriate role in 1C, which allows you to add, change, delete documents and reference books on business activities.
- If a 1C user works only with reports and views the database data, for example, a manager, then he is given the rights to read the data.
- A user who can work with all objects of the 1C - Administrator program has full rights and gets unlimited access to work with the database in 1C.
Access rights can only be configured Administrator- a 1C user who has been assigned Full rights.
Setting access rights in 1C 8.3 Accounting 3.0
In 1C: Accounting 8 ed. 3.0 there are 4 main profiles for working with the program:
- Administrator;
- Accountant;
- Chief Accountant;
- Synchronization with other programs;
- Only reading.
To understand the principle of setting rights in 1C, let's turn to the configurator. When analyzing configuration objects, we will see a special branch Roles, which lists all the possible accesses to the database data specified by the 1C developers:
Each role corresponds to a set of capabilities for working with configuration objects, these are
- Reading;
- Addition;
- holding;
- Cancellation of the event;
- Editing;
- Removal.
If you open some given role, then for each object you can view what you can do with each configuration object:

It is important to know that a 1C user can be assigned any set of roles from the list specified by the developers. At the same time, if in some role it is impossible to change the object, but in another role added to this user it is possible, then the resulting user rights will be - you can “change”. The roles complement each other. In order for an object not to be modified by the user, none of the roles assigned to it should have "Modify".
Setting access rights in 1C 8.3 Accounting
Setting access rights in 1C 8.3 is carried out in the Administration - User and rights settings section:
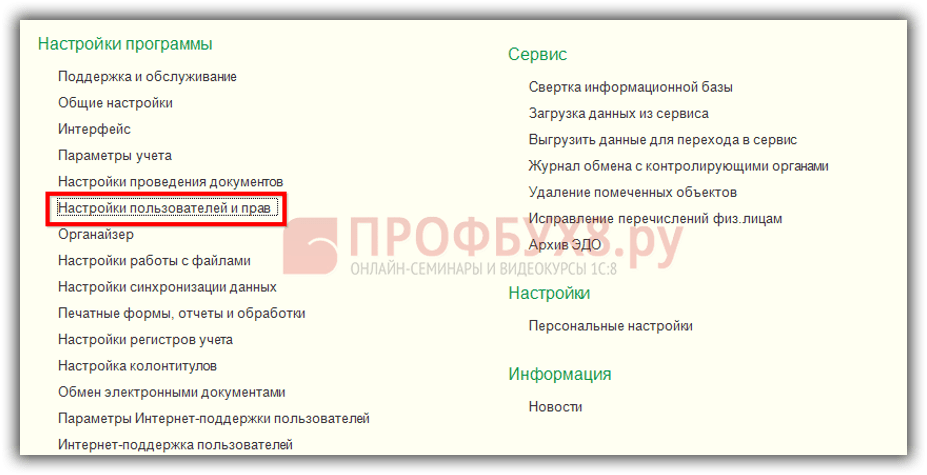
The User and Rights Settings window opens:

Consider the possibilities of setting up access in 1C.
How to create a new user in 1C 8.3

By default, the 1C program sets Login to the program is allowed, Show in selection list and entering the program using the login and password set in 1C. You can set the password yourself, or you can offer to set it to the program. As a rule, the password set by the 1C program corresponds to a more serious level of verification and it is more difficult to pick up such a password when hacking the system.
The password must be remembered! If the password is lost, only the Administrator can reset it. If the passwords are lost and the database cannot be entered, then you will have to “hack” the entrance to the database.
Specialists use a HEX editor for this and right places change the information responsible for working with users. It is possible, but not desirable, to do so.
How to set up access rights based on typical profiles in 1C 8.3
Each user (Administration - User and Rights Settings - Users) is assigned Access Rights from the list of profiles, which is in the configuration. For example, for the accountant Petrova S.B. assign the accountant profile:

Here we can also transfer the settings to a new user from a user already working in 1C: Functionality settings, internal report settings, etc., so as not to waste time and do not type everything manually:

We mark the settings for transferring to a new user Accountant Petrova from the user Administrator:

We transfer personal settings, print settings and Favorites:

We press the book. Select and in the settings selection form "Copy and close". All settings for the new user from the Administrator user have been migrated.
Setting access rights with the addition of new profiles in 1C 8.3
We create new profile With limited access to manuals and documents. Access group profiles - Create:

It is convenient to create a new profile according to 1C subsystems. For example, for the rights of the Calculator, we can note the following functionality:
- Reflection of salary in accounting;
- Reading taxes and contributions;
- Mutual settlements with employees;
- Personalized accounting;
- Payroll accounting:
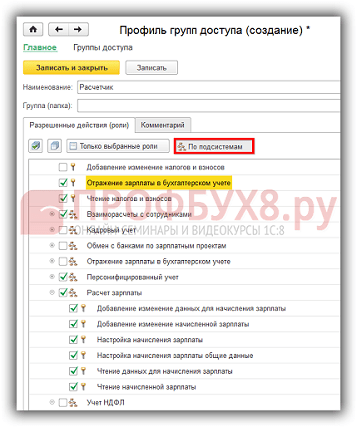
According to the book Only selected roles a list of selected user roles is displayed. Personnel accounting can be set separately for the HR profile.
How to set up additional access rights to existing standard profiles in 1C 8.3
A specific 1C user with a selected profile can add functionality. For example, for the user Petrov, in the Accountant profile, the command is not available All features, but we can add it to this user. Go to Administration - User and Rights Settings - Access Group Profiles. Book. Create - All functions mode - add rights "All functions" mode:

We add a new profile to the accountant Petrova S.B.:

Setting up additional access rights to individual documents and directories in 1C 8.3
This setting provides for working with the configuration extension. Let's say you need to set up access for a 1C user to an arbitrary set of documents and directories. The set of these documents and reference books may be different - 1C developers are not able to provide all the options for suitable roles that users may need in practice. Moreover, requests for data access can be completely extraordinary.
In 1C 8.2, we had to remove the prohibition of editing from the configuration and add a new role to the Role objects, assigning access to the necessary directories and documents, and, accordingly, there were difficulties with the subsequent update of 1C. Such configurations were no longer automatically updated, so only users of organizations with 1C programmers on staff could afford such pleasure.
In 1C 8.3, due to the emergence of a new opportunity to work with configuration applications, we can realize our task of delimiting user rights without removing the prohibition of editing from the main configuration and leaving it completely standard. How to do this - now and consider:
- For reference Users we will introduce an additional attribute "Access_Sales_of_Goods", which will take the values "Yes" or "No".
We go Administration - General settings - Additional details and information. We enable the ability to work with "Details and information with a common list of values":

- Opening a hyperlink Additional details.
In the left column of the lists of configuration objects we find Users and click on the book. Add. Fill out the form that opens as shown below. The new attribute will have two values: "Yes" and "No". Combine the values in the "Access" group. Fill in the Main tab:

Fill in the Values tab:

- Now let's fill in this requisite for our users.
"Accountant Petrova" - No:

"Administrator" - Yes:

All the necessary actions in the 1C 8.3 base have been done, now we will work with configuration extension.
- We enter the database configurator: Configuration - Configuration extensions:

Adding a new configuration extension by book. +:

We agree with the default extension data or set our own:

Open the extension configuration by the book. :

Now we will transfer the data necessary for work from the main configuration. The created configuration extension "Extension 1" is still empty:

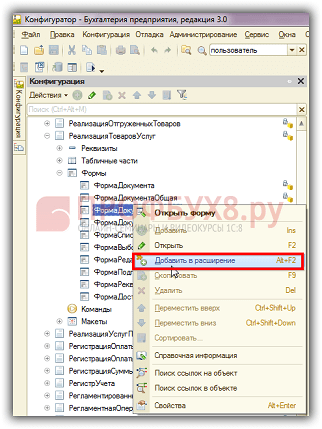
In the main configuration, we find in the documents - the document Sales of goods and services, and transfer the form with which we will work. For example, let's add "FormDocumentProducts" to the configuration extension by clicking on the name of the form and right-clicking on it. mice. From the drop-down menu, select the "Add to extension" command:
Open the form in the configuration extension and create an event handler Before Recording. When creating an event handler, the 1C 8.3 program will ask you to indicate where to create the program code. Choose: Create on the client and procedure on the server without context:

When creating an event, we will see in the empty cell of the “BeforeRecording” events the procedure for processing the event assigned by the 1C 8.3 program: “Ext1_BeforeRecording”:

Go to the form module and paste the following code:

We update the changes and run the database in user mode for verification changes. We enter under the user Accountant Petrova and edit the document Sales of Goods and Services, press the book. burn:

For the administrator, editing the document will pass without problems.
The above program code can be put in the 1C 8.3 configuration extension for any document and directory, and this will allow you not to change the typical configuration, but at the same time solve the problem of access to database objects for different users.
How to provide access to a report option with individual settings for other users in 1C 8.3 ZUP, see our video:


