Installing mongodb on windows 32. Installing MongoDB on Ubuntu
MongoDB is an open source NoSQL database management system. source code, which is widely used in modern applications. In this article, we will describe the process of installing MongoDB on your server for use in a production environment.
At the time of this article's publication, MongoDB packages from the official Ubuntu repositories 16.04 has not yet been updated for use new system initialization systemd , . Using MongoDB installed with these packages on a new server running Ubuntu 16.04 requires an extra to set up MongoDB as a systemd service to start automatically on server startup.
Before installation
In order to follow the instructions in this article, you need an Ubuntu 16.04 server configured according to the instructions in our guide, including setting up a non-root user.
Step 1 — Adding the MongoDB Repository
MongoDB is available from the standard Ubuntu repositories, however, it is recommended that you use the official MongoDB repository to install the most recent versions. In this step, we will add this repository to our server.
Ubuntu authenticates packages by verifying GPG key signatures, so we first need to import the official MongoDB repository key.
- sudo apt-key adv --keyserver hkp://keyserver.ubuntu.com:80 --recv EA312927
After successfully importing the key, you will see the following output:
Gpg: Total number processed: 1 gpg: imported: 1 (RSA: 1)
To do this, run the following command:
- echo "deb http://repo.mongodb.org/apt/ubuntu xenial/mongodb-org/3.2 multiverse" | sudo tee /etc/apt/sources.list.d/mongodb-org-3.2.list
After adding the repository, we need to update the list of packages.
- sudo apt-get update
Step 2 — Installing MongoDB
Now we can install the MongoDB packages.
- sudo apt-get install -y mongodb-org
This command will install several packages containing the latest stable version of MongoDB, as well as some MongoDB server configuration tools.
In order to run MongoDB as an Ubuntu 16.04 service, we need to create a unit file that describes this service. Unit files tells systemd how to manage the appropriate resources. The most common type of unit file is service, which specifies how to start and stop a particular service. This file also indicates whether the corresponding service should be started at system startup, and also whether the service has dependencies on other software.
We will create a unit file to manage the MongoDB service. Create the configuration file mongodb.service in the /etc/systemd/system directory using nano or any other text editor.
- sudo nano /etc/systemd/system/mongodb.service
Paste the following text into this file, save and close it.
/etc/systemd/system/mongodb.service
Description=High-performance, schema-free document-oriented database After=network.target User=mongodb ExecStart=/usr/bin/mongod --quiet --config /etc/mongod.conf WantedBy=multi-user.target
This file has a simple structure:
Section unit a description of the MongoDB service, as well as its dependencies, which must be satisfied before the service can be started. In our case, MongoDB requires network connection to run, so we specified the network.target directive.
Section Service describes the parameters for starting the service. The User directive specifies that the service will be started as the mongodb user, and the ExecStart directive specifies the command to start the MongoDB server.
Last section Install tells systemd when to start the service automatically. The multi-user.target parameter sets the standard startup sequence, which means that the server will be automatically started during the boot process.
- sudo systemctl start mongodb
This command does not output anything to the console upon completion. We can use systemctl to check if the service started successfully.
- sudo systemctl status mongodb
The last thing we have to do is enable automatic start MongoDB at system startup.
- sudo systemctl enable mongodb
The MongoDB server is now set up and running, and you can control it with the systemctl command (e.g. sudo systemctl mongodb stop , sudo systemctl mongodb start).
Step 3 - Firewall Setup (Optional)
If you followed the instructions in ours and set up a firewall on your server, the MongoDB server will not be accessible from the Internet.
If you plan to use the MongoDB server only locally with applications running on the same server, then this is the safest and recommended setting. If you want to be able to access your MongoDB server over the Internet, then you need to set up incoming connections in ufw .
To allow access to MongoDB on the default port 27017 from anywhere, you can use the command sudo ufw allow 27017 . However, permission remote access over the Internet to the MongoDB server with default settings gives full access to the database server.
More often than not, MongoDB should only be accessed from certain applications that reside on other known servers. To do this, we can allow access to MongoDB's default port by specifying the IP addresses of the servers that are allowed to connect to MongoDB.
- sudo ufw allow from your_other_server_ip /32 to any port 27017
You can check the ufw firewall settings with the following command.
- sudo ufw status
You should see in the output that traffic is allowed on port 27017 . If you decide to allow traffic only from certain IP addresses, these IP addresses will be listed instead of the word Anywhere.
Status: active To Action From -- ------ ---- 27017 ALLOW Anywhere OpenSSH ALLOW Anywhere 27017 (v6) ALLOW Anywhere (v6) OpenSSH (v6) ALLOW Anywhere (v6)
A description of more advanced firewall settings can be found in the article.
Conclusion
You can check out more detailed instructions for installing and configuring MongoDB in .
MongoDB is a database management system that is quite different from MySQL. The main difference is that in MySQL queries are written in SQL language, and in MongoDB on BSON (binary JSON). This means that work with this system can be carried out mainly through JavaScript expressions.
MongoDB also includes its own utility for executing commands aimed at working with the database. In this series of articles, we will cover the following topics:
- Installing and running MongoDB on Windows
- Working with MongoDB through the console
- MongoDB integration and
Developers can easily get up to speed with Mongo if they are familiar with JSON. This format uses expressions that consist of "key": "value" pairs.
Why MongoDB
Between non-table DBMSs, many users opt for MongoDB. Firstly, this system can be installed on almost all operating systems (Windows, OSX, Linux). Secondly, the project is still actively developing and the development team publishes updates with an enviable frequency. I also think that MongoDB provides good documentation for beginners.
MongoDB is better suited when tables can be represented as objects. In my opinion, such systems are better used when developing applications for mobile devices. In this regard, Mongo provides separate libraries for both iOS and Adndroid.
Another weighty argument in favor of MongoDB: you can work with this system in many programming languages, such as C / C ++, Python, Rubym Perl, .NET and even Node.js.
MongoDB is the real deal if you want to step away from SQL and try something new.
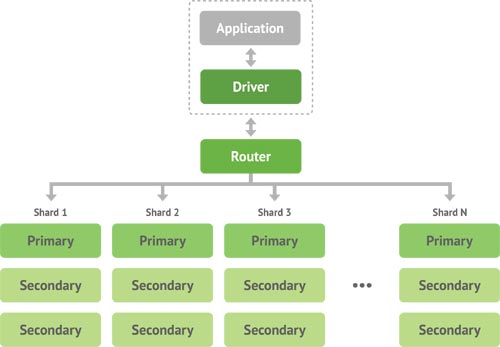
Key terminology
Before proceeding with the installation of MongoDB, let's understand the basic concepts.
Like MySQL, MongoDB can contain many databases, only instead of tables they contain "collections".
A collection is something like a table, only without columns. Instead, each row contains sets of records in the form key:value.
Example:
Inside the Users collection (users), there can be an entry with the keys firstname (first name) and lastname (surname). At the same time, the same collection may contain an entry with other keys: firstname, lastname, e-mail, birth (birthday). This is where the flexibility of MongoDB lies.
Each of these entries, or lines, is called a "document", but it's not a document like .txt or .. This entry stored in memory in JSON format.
Example:
Suppose our collection contains 500 documents. As mentioned earlier, each of them can contain different fields. The only field that every entry should have is a unique identifier (id), which is added automatically.
At first this terminology may be unusual. Everything will be much clearer when you see the work with the DBMS in practice.
Installing MongoDB on Windows
First, download the archive with MongoDB for win32 or win64 .
Unpack the downloaded archive and place it, for example, on drive C, in the mongodb directory. Moreover, make sure that the bin directory is available at C:\mongodb\bin .
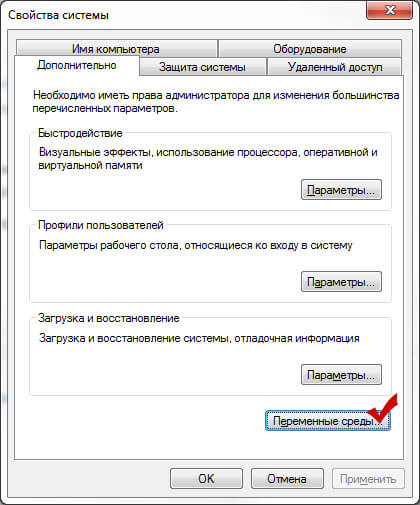
Next, write the path to bin folder in the settings of our OS, so that we can reach the .exe files of this folder from anywhere. So, do a right click on Computer - Properties. In the list on the left, select "Advanced system settings":

In the window that opens, look for the system variable Path. We click on it twice. In the “variable value” field, go to the very end, put the sign “;” and enter the path to the bin directory:
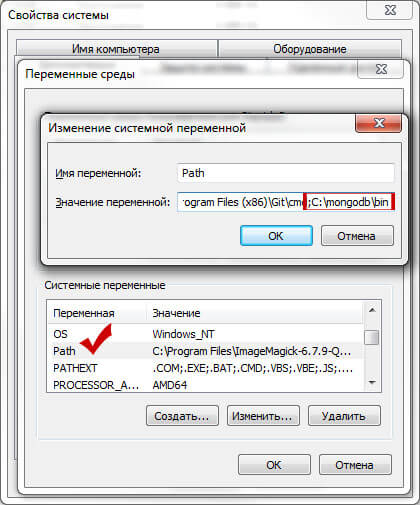
Excellent! Click OK... and move on to the next step.
First, we need to create a directory where our databases will be stored. For example, C:\databases . Let's create this folder.
echo logpath=C:\mongodb\log\mongo.log > C:\mongodb\mongod.cfg
This command will create a special log file and configuration settings for the service.
Mongod --config C:\mongodb\mongod.cfg --install
Before running it, let's edit the mongod.cfg file to include the dbpath setting, the path to our database folder. In my case, after editing the file, its content should look something like this:
logpath=C:\mongodb\log\mongo.log dbpath=C:\databases
We return to the command line and start the MongoDB service:
Net start MongoDB
In order to check if the service will start automatically, press the key combination “windows + r”, write “services.msc”, click OK.
We are looking for MongoDB in the list of services and, if its startup type is not automatic, then we set this item by first making a right click and selecting “properties”.
Now that we have created a service that will start MongoDB when the computer is turned on, we don't have to do it manually.
To test MongoDB, open a command prompt and write:
Show dbs
In the response, you should see the following line:
Local (empty)
Outcome
So, MongoDB is installed and configured. In the next part, we will consider the main commands for working with this DBMS.
Last update: 11/14/2018
To install MongoDB, download one redistributable package from the official site https://www.mongodb.com/download-center/community .
The official site provides distribution packages for various platforms: Windows, Linux, MacOS, Solaris. And there are several distributions available for each platform. And there are two types of servers - Community and Enterprise. In this case, you need to install the Community version. Although the Enterprise version has some more features, it is only available in trial mode or by subscription.
At the time of this writing, the latest version of the platform was version 4.0.4. Using a particular version may differ slightly from using other versions of the MongoDB platform.
To load nobhodiomgo functionality, select the desired operating system and the appropriate package type:
For Windows, you can select the "ZIP" package type, that is, download the server as an archive.
If an earlier version of MongoDB was already installed prior to installation, then it must be removed and any databases that were created should also be removed.
After downloading the archive package, unzip it to the C:\mongodb folder.
MongoDB Package Contents
If after installation we open the C:\mongodb\bin folder, we can find a bunch of applications there that perform a specific role. Let's briefly consider them.
bsondump : Reads the contents of BSON files and converts them into a readable format, such as JSON
mongo : provides a console interface for interacting with databases, a kind of console client
mongod : MongoDB database server. It processes requests, manages data format and performs various database management operations in the background.
mongodump : database backup utility
mongoexport : utility to export data to JSON, TSV or CSV formats
mongofiles : a utility to manage files on a GridFS system
mongoimport : A utility that imports JSON, TSV, or CSV data into a MongoDB database
mongorestore : allows you to write data from a dump created by mongodump to a new or existing database
mongos : a MongoDB routing service that helps process requests and locate data in a MongoDB cluster
mongorestat : represents counters of database operations
mongotop : provides a way to count the time spent in read-write operations in the database
Creating a Database Directory and Starting MongoDB
After installation, you need to create a directory on your hard drive that will contain the MongoDB databases.
On Windows, MongoDB stores databases at C:\data\db by default, so if you're using Windows, you'll need to create the appropriate directory. On Linux and MacOS, the default directory is /data/db .
If there is a need to use some other file path, then it can be passed when starting MongoDB in the --dbpath flag.
So, after creating a directory for storing the database, you can start the MongoDB server. The server represents the mongod application, which is located in the bin folder. To do this, launch the command line (in Windows) or the console in Linux and enter the appropriate commands there. For Windows it will look like this:
The command line will display a number of service information to us, for example, that the server is running on localhost on port 27017.
And after a successful start of the server, we will be able to perform operations with the database through the mongo shell. This shell represents the mongo.exe file, which is located in the above installation folder. Let's run this file:
This is a console shell for interacting with the server through which you can manage data. The second line of this shell tells you to connect to the mongod server.
Now let's do some simple things. Enter the following commands in mongo in sequence and after each command press Enter:
Use test db.users.save(( name: "Tom" )) db.users.find()
The first use test command sets the test database to be used. Even if there is no such database, it is created automatically. And then db will represent the current database - i.e. the test database. After db comes users which is a collection where we then add a new object. If in SQL we need to create tables in advance, then MongoDB creates collections on its own if they are absent.
The db.users.save() method adds an object ( name: "Tom" ) to the users collection in the test database. The description of the object to be added is defined in a format that you may be familiar with if you've dealt with JSON format. That is, in this case, the object has one key "name" defined, which is mapped to the value "Tom". That is, we add a user named Tom.
If the object was added successfully, the console will output the result as the expression WriteResult(( "nInserted" : 1 )) .
And the third command db.users.find() displays all objects from the test database.
From the output, you can see that initial values object was added some kind of incomprehensible field ObjectId . As you remember, MongoDB uses the _id field as unique document identifiers. And in this case, ObjectId just represents the value for the _id identifier.
Installing MongoDB Drivers
Of course, we can also work through the mongo console, adding and displaying objects in the database. But we would also like it if mongoDB would interact with our applications written in PHP, C++, C# and other programming languages. And for this purpose, we need special drivers.
On the offsite page https://docs.mongodb.com/ecosystem/drivers/ you can find drivers for such programming languages as PHP, C++, C#, Java, Python, Perl, Ruby, Scala, etc.
Jun 25 2013
Decided to get acquainted with NoSQL type databases. For acquaintance, I decided to choose MongoDB, because. I chose this particular DBMS because I often met it in articles on various blogs. If you have decided something, it is better not to put it off for a long time, which I actually did. Any acquaintance with the software begins with its installation, which will be described below. We will install as a Windows service.
1. First you need to download the distribution from the official website: http://www.mongodb.org/downloads
2. After the archive has been downloaded, unpack it into a directory, for example g:\webservwe\mongodb (this directory should contain the bin directory)
3. For the database files, create the data directory (g:\webservwe\mongodb\data)
4. In the directory g:\webservwe\mongodb create a file mongod.cfg with the following content:
logpath=g:\webserver\mongodb\log\mongo.log dbpath=G:\webserver\mongodb\data
5. In the command line, run as administrator, execute the following command:
G:\webserver\mongodb\bin\mongod.exe –config G:\webserver\mongodb\mongod.cfg –install
6. And finally check the work:
We start the mongo.exe client and write the following commands:
db.test.save(( a: 1 )) db.test.find()
The screen should display something like this:
( "_id" : ObjectId("51c89ca80db214128714caca"), "a" : 1 )
Mongo is an open source schemaless database system that is very different from the more popular MySQL. The most important difference is that MySQL is made up of sql queries while MongoDB is focused on BSON (Binary JSON).
This means that most of the functionality can be accessed directly via javascript values.
But Mongo comes with its own interface to run commands directly against your database. In this guide, we want to do the following:
* Reveal the steps for setting up your system (Windows and Mac) and running Mongo,
* Work commands in Mongo (soon)
* Tuning MongoDB when PHP help(in the near future)
Web developers will really like Mongo if they are familiar with . This javascript-based language focuses on objects that contain key-value pairs.
This is a little different from regular SQL tables, which are made up of data in rows and columns. But MongoDB is still an attractive database system that you should definitely learn and try out.
Besides Mongo, there are several others that you can try out. Personally, we have only heard positive reviews about this project and it is also supported by many operating systems (Windows, OSX, Linux), and the development team continues to delight us with new releases on a regular basis.
Installing Mongo on Mac OS X
Setting up MongoDB on Mac is much easier than on Windows. Through the command line (or terminal) we run a few commands to get the latest versions of MacPorts. The online documentation offers us where the same information is given to us.
First let's check and update latest version. Enter the following on the command line:
sudo port selfupdate
On the other hand, you can add the debug flag so that the result is output like this:
sudo port -d selfupdate
The process may take a few minutes as it downloads and installs.
Once this update is complete, we only need to run one line on the command line. This will bring us the latest MongoDB library files, and put it along with other system dependencies.
Port install mongodb
This process may take 10-15 minutes even if you have a fast internet connection. Installation will take a little time, but should be faster, but be sure to wait for the terminal to start.
You should then be able to start the server using the command:
Mongod
Everything should end with the phrase "waiting for connections on port 27017" (I'm waiting for a connection to port 27017).
This means our database is up and running correctly. You can test it by typing http://localhost:28017/ in your browser. MongoDB provides a small web interface that allows you to get information about your databases and installation.
And the last thing that is interesting here is the process of forcing MongoDB to be loaded when the computer is turned on. Hunter Ford published on his site, which is the main code presented here. By force loading, you don't have to keep the window command line open for development.
First you need to download, unzip and move this document (downloads: 52) in /Library/LaunchDaemons/ i.e. you should end up with /Library/LaunchDaemons/org.mongo.mongod.plist.
Then, in the terminal, create a small Log file, and a directory for new system data:
sudo touch /var/log/mongodb.log
sudo mkdir /var/lib/mongodb
Finally, run the following commands to configure the launcher. You can set the computer to restart after the process to check if Mongo will work properly after the reboot.
Sudo chown root:wheel /Library/LaunchDaemons/org.mongo.mongod.plist
sudo launchctl load /Library/LaunchDaemons/org.mongo.mongod.plist
sudo launchctl start org.mongo.mongod
Install Mongo on Windows
We ran into serious difficulties when trying to run MongoDB without an admin account. It's not that hard if you have the "Open as administrator" option available to you.
But if you have the opportunity, just type this command and restart your computer. After the reboot, you will notice that you can select an Administrator account for authorization.
Net user administrator /active:yes
If you run into problems, then MongoDB has a great one designed specifically for Windows users. To get your copy, open , where you will see the Windows version. At the time of this writing, the latest stable release is MongoDB 2.2.0: you can download the .
We need to place all these files directly in the C:\mongodb\ directory. That is, as soon as the download is completed, unpack the archive, and open folders until you reach /bin/ with several files. Select all these files, cut them and paste them into the new C:\mongodb\ directory.
Now, in this folder, besides \bin\, create a new "log" folder where we will store all the log files of our MongoDB system. We also need to create two external folders for data storage: C:\data\ and C:\data\db\.
And this is where using a non-admin account can cause problems. Open a command prompt and run cd C:\mongodb\bin.
Now we need to run mongod.exe, but after running you will notice that the operation will be frozen while listening for connections. Actually, it is not frozen, we started Mongo directly through the terminal.
This will bother you, so let's run a command that will set up Mongo to start automatically as Windows Service.
> echo logpath=C:\mongodb\log\mongo.log > C:\mongodb\mongod.cfg
The first command will create a log file and configuration for the service. This is not required, but it is desirable to be able to do it as a database administrator.
Now run the following 2 lines of code in a terminal to create the service and start it.
> C:\mongodb\bin\mongod.exe --config C:\mongodb\mongod.cfg --install
> net start MongoDB
If you didn't get any errors, then you're done right!
Check if the service is active. You can do this by opening the Start menu (Windows + R) and typing services.msc.
This command will bring up a list of active services in front of you, and if you scroll down, you will see Mongo DB in the status "active" and the startup type "automatic".
On a Mac, you can access the Mongo terminal directly from the command line. Change directories to C:\mongodb\bin\ and type in mongo and then press Enter.
You should now have direct access to the MongoDB server. You can now run Mongo commands to create databases, collections, post new data, or edit old data records.
Run the following line to list all current databases on the server:
> show dbs
Stay up to date!
That's all for today! We hope that now you have at least some understanding of the MongoDB system, and you can run it on your own computer! In the next article, we will cover the basic commands for MongoDB for you. Follow the news!


