In which folder are the css files? Folder and element structure
In this part of the tutorial, we will get acquainted with new terms that are used to describe folders and HTML elements.
Note: A folder is also often called a directory or directory.
Site structure
Don't keep all your files in one folder. Even small sites are much easier to manage if you put HTML documents, images and other resources into different folders, thereby creating a specific structure for the location of various files. By structuring files as you wish, you can choose a fairly flexible file organization system for yourself, given that the site can grow, while the file system will remain clear and understandable. The structure (hierarchy) of directories in which various files are located can usually be seen in the form of a tree. Consider the following image as an example.
As you can see, the structure is just a diagram that displays the nesting of some directories within others. In the example, we used only three directories, but this will be enough to describe all the necessary information. Directories are often described in terms of hereditary (family) connections. We have a folder called Bananas, located inside the Fruits folder. The Fruits folder is the parent of the Bananas directory, and the Bananas directory is the child (child directory) of the Fruits folder. We also have a “Kiwi” folder, which is also a child of the “Fruits” directory.
To help you remember better, we will describe the terms separately:
- Child directory is a folder that has a parent directory above it in the hierarchical tree.
- Parent directory is a folder containing another directory.
- There is also such a concept as "root directory"- this is the main (main) folder in which all other directories and files are located.
Element structure
The structure of elements can also be represented in the form of a diagram showing the nesting of some elements within others. Let's look at a simple example:
A diagram showing the nesting of elements can be represented as follows:

- Child element is an element that has a parent element above it in the hierarchical tree. A child element is also called child.
- Related element is another child element of the same parent element at the same branch level. Such elements are also called sisterly, in the example such elements are And ,
And <style> .</li> <li><span>Root element</span>- most <a href="https://zhumor.ru/en/computer/kakoi-element-ustanavlivaet-verhnii-indeks-delaem-v-css-verhnii-registr.html">top element</a> in the hierarchy ( <html>), all other elements are its descendants.</li> <li><span>Parent element</span> is an element that contains another element. Sometimes it is simply called the parent.</li> <li>A descendant can appear directly <a href="https://zhumor.ru/en/internet/css-vybrat-pervyi-dochernii-element-dochernie-selektory-css-ogranichenie-dlya.html">child element</a>, but is usually a general name for all elements that are nested within other elements, no matter how deeply they are nested, e.g. <head>, <title>, <body>, <p>And <style>are descendants of the element <html>.</li> </ul> <p>Which we will now consider in order.</p> <p>As I said earlier, css is designed to design html structures, that is, give them appearance, color, size, location, and so on, and therefore directly influence the html code.</p> <p>To ensure this effect, a css connection is made to the html document.</p> <p>The first way to include css is linked styles</span>. It is used when the style sheet is written in a separate file.</p> <p>In this case, the style.css file with the style sheet is connected to the html file in the head tag, using the link tag</p> <p><!DOCTYPE html><br> <html lang ="ru "><br> <head ><br> <meta charset ="utf-8 " /><br><<span>link href ="css/style.css " type ="text/css " rel ="stylesheet "></span><br> <title >Untitled document
link is a single tag;
href – a link attribute familiar to us, css/stile.css – a value indicating the path to the file, and the name of the file;
type – an attribute indicating the type of element to be connected, in our case it is text/css;
rel is an attribute that defines a relationship, and its value is usually written stylesheet;
In this code, usually only the value of style.css (the name of the connected table) changes. Tables are connected.
Now the browser will display the html file in the form that will be written for it in the style.css file.
By the way, for the future. You can connect as many style sheets as you like to one html file. All of them are included in the head tag.
And, what is used much more often, on the contrary, one table can be connected to many html files.
This is the most preferred way to include style sheets, since they are all in one file and therefore easier to define.
And also, if you have to change the style of several elements of the same type, it will be much easier to do this if they are collected in one group selector.
The fact is that one of the tasks of a webmaster is to reduce the amount of code, while maintaining the same final result, and separate file style.css most fully meets this requirement.
Just imagine, to write a title for an article, you need to set its size, color, font and, possibly, some other styles. And so for each post.
In the style.css file, you can set styles once, but for all post titles on the site.
Now do you understand the difference?
Nevertheless, other methods of connecting styles have a right to exist, so let's look at them and the situations in which they are used.
The second way to connect css is global styles allows you to connect (place) a style sheet directly in html file.
This is done using style tag, and it is written in the same way as in the first case in the head tag.
Untitled document
As you can see, the style sheet is located directly in the html file. All this works the same way as with the first connection method, but is used less often due to its cumbersomeness, and most importantly, due to the impossibility of styles affecting multiple files.
When to use it? For example, I use this method when creating a design in a file editor.
It is much easier to debug a document if both html and css are on the same page and you can quickly correct both.
The third way to connect css is internal styles allows you to write styles directly inside the html tag.
It is implemented using the style attribute, which should not be confused with the tag of the same name.
It is used when you need to design only one element of content.
For example, let’s take a piece of text and style it by enclosing it in a span tag
The link address can be either absolute or relative. Absolute addresses must begin with the protocol (usually http://) and contain the site name. Relative links are based on the root of the site or current document.
Example 8.2 shows how to create an absolute link to another site.
Example 8.2. Using absolute references
Absolute address Learning HTML
When you specify a site directory as a link (for example, http://site/css/), the index file is displayed. This is the file that is loaded by default when accessing a directory without explicitly specifying the file name. Typically the index file is a document named index.html.
Absolute links are usually used to point to a document on another network resource, however, it is also possible to make absolute links within the current site. However, this is not often practiced, since such links are quite long and cumbersome. Therefore, relative links are predominantly used within the site.
Links relative to the current document
When creating relative links, you need to understand what value you should specify for the href attribute, since it depends on the original location of the files. Let's look at a few typical options.
1. The files are located in one folder (Fig. 8.4).
This file name is taken only as a sample; on the site, Russian characters with spaces should not be used in file names, and even in different cases.
2. The files are placed in different folders (Fig. 8.5).

When the source document is stored in one folder, and the linked one is in the root of the site, then two dots and a slash (/) should be placed before the file name in the link address, as shown below.
Two dots in this case mean leaving the current folder to a higher level.
3. The files are placed in different folders (Fig. 8.6).

Now original file is located in two subfolders, and in order to link to the document in the root of the site, you need to repeat the previous example twice.
Link
The situation is similar with any number of subfolders.
4. The files are placed in different folders (Fig. 8.7).

Now the situation is changing, the source file is located in the root of the site, and the file to which you need to link is in the folder. In this case, the path to the file will be as follows.
Link
Note that there are no additional periods or slashes before the folder name. If the file is located inside not one, but two folders, then the path to it is written like this.
Link
Links relative to the site root
Sometimes you can find the path to the file relative to the root of the site, it looks like "/Folder/File name" with a slash at the beginning. Yes, record Courses means that the link leads to a folder named course, which is located at the root of the site, and in it you need to download the index file.
Please note that this form of entry does not work on local computer, but only under the control of a web server.
Publication date: 2018-03-27
From the author: Working on large projects comes with the complexity of working with large code in a large team. Too often I found myself not following the core principles of software development like DRY (don't repeat yourself), KISS (keep it stupidly simple), and YAGNI (you won't need it).
Given these problems, I started using the most common systems: OOCSS, SMACSS, ITCSS, ACSS and BEM - with their help, they create an acceptable CSS architecture.
In fact, I appreciate all CSS architectures for some reason and don't want to search for the perfect one. I've come to the conclusion that the best solution is the one that actually works for all the people working on it. A solution is far from human-friendly if it has weaknesses. Sometimes we easily get lost in the techniques and forget that there is a person behind every line of code. The way we write and organize code should be an important means of communicating useful information other developers, not just technical solution Problems.
From this I conclude that setting conventions is no longer enough. A user-centric agreement must also be adopted. All this means:
Avoid unnecessary complexity
Explain and make class syntax easy to read
Follow order and keep it clean
Try to create a flexible model that can change and evolve as people need it
All these thoughts led me to what I call UFOCSS. This means putting the user back in the spotlight by providing as much information as possible through a guiding CSS architecture.
What does UFOCSS stand for?
Despite the similarity in name, UFOCSS stands for User Friendly Oriented CSS. This is not an alien methodology or a new way of thinking about scalable and modular CSS architecture. This is an attempt to focus on the most “human” part of what we already value. Where does this lead? Let's find out!
It seems to me that here you need to work on a large web project where SCSS and PostCSS are used in development. This way, CSS code can be categorized and organized into small logical units, dividing the code into multiple folders and files that reference each other via the @import directive. Next, the build system will use the files and compile them into one style file for production and save it to the destination folder.
In general, a style directory could look like this:
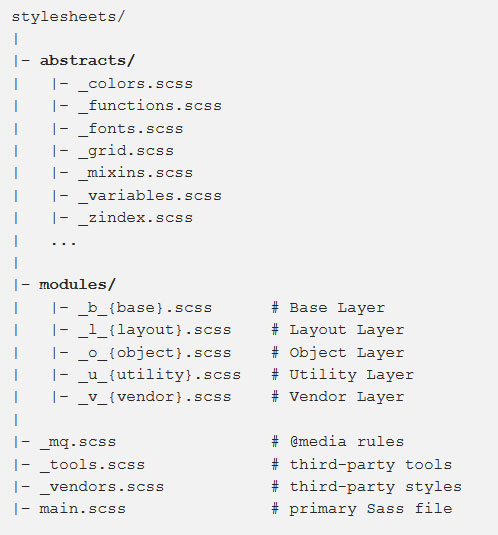
As you can see, the code is divided into 2 main folders: abstracts and modules. This helps keep your folder structure clean and organized without creating additional folders, which are not so necessary.
You can choose any folder names you like (i.e. tools for abstracts and patterns or layers for modules). I use the convention of sorting folders in alphabetical and numeric order. This convention is really useful when working with languages that rely on cascading and inheritance principles.
Organizing files and folders alphabetically and numerically gives users a clear visual indicator of what comes first in the code, which in turn is determined by the principles of specificity.
If you imagine the project as a layered sponge cake, then:
you can't make top layers if you don't have the first one
when all ingredients are used in equal quantities, the ingredients are best tasted on the top layer of the cake (cascading)
If you use a lot of chocolate chips in the bottom layer, then all the other layers will not be as noticeable, the chocolate will overwhelm the other flavors! (specificity)
Abstract folder: tools live here
The first information that needs to be given is what can be considered a tool. That is, what does not generate CSS rules and vice versa, which is the core of the project styles. For this reason, I believe it is important to separate abstract tools - this is a widespread practice.
Returning to the pie example, the first step is to understand what we will prepare, what design and taste the pie will have.
Abstracts are the ingredients and tools needed to start and speed up development, like variables, functions and mixins. They do not affect appearance and the taste of the pie, but determine the method of creation and maintenance. Nobody needs them except you and your team!
All abstracts files are self-explanatory. Just keep in mind that I'm taking everything that needs to be widely used from the _variables file - colors, fonts, grid and z-index. I think this makes it easier for everyone to understand what tools we need.
For example, the z-index file controls the vertical order of elements. A good practice for managing z-index in complex layouts is to set up several Sass lists that describe what order we want the elements to appear in, from lowest to highest.
Please note that a modal window is required to create a new stack context. You can simply create a new Sass list in the z-index file:
$modal-elements: fields, form-controls, alerts, autocomplete-dropdown;
$ modal - elements : fields , form - controls , alerts , autocomplete - dropdown ;
This Sass list is just a tool to help you safely manage the order of a stack of elements, it does not generate CSS rules.
You can use this tool, get the z-index value and assign it to all elements through the Sass index() function inside a valid module file, as shown below:
Modal-alerts ( z-index: index($modal-elements, alerts); .... )
Modal - alerts (
z - index : index ($ modal - elements , alerts ) ;
. . . .
This is just an example of how abstract tools can help when working on large projects. After defining the tools, you can finally move on to the real core of the project. Let's look at Modules in more detail!
Modules folder: layers live here
The principle of operating according to levels of increasing complexity and specificity allows us to add a second brick to the CSS wall - this is the definition CSS layers.
The abstracts layer discussed earlier can be considered null. After creating all the necessary tools and “ingredients”, we can begin to write the styles of our project through progressive layers of abstraction (more on them below).
Defining layers of abstraction will help us systematically create modular styles that will remain consistent, scalable, and maintainable as the project grows and changes over time. So I grouped them in the modules folder, just like in SMACSS. This gives the idea of a collection of templates, some Lego pieces with different uses that can be reused. Modules are a set of rules that can be reused throughout a project - repeatable and standardized units. They represent the real core of the project, since it is from them that the output of real CSS rules begins.
Using prefixes to easily define the scope of a class is a good practice and is adopted by major CSS architecture systems such as SMACSS and ITCSS. I'll talk about naming conventions in detail in a future article, but for now just keep in mind that I'll also be using prefixes in file names. This can be achieved:
Developers should think more about the actual function of the rule, this helps determine its place and order in the code
Everyone knows exactly what the file is used for
The prefixes used are sorted alphabetically. That is, they are shown in the order in which they were imported, which follows the principle of specificity (first comes the base, then layouts, objects, utilities and vendor layers)
The idea of dividing CSS code into separate layers came from ITCSS, whose main principle is to sort styles from general to explicit, from low-specific selectors to more specific ones. This approach has proven to be very useful when working with specificity, one of the most difficult principles of CSS.
I'm trying to simplify my folder structure by shrinking and renaming the layers represented by ITCSS: Settings, Tools, Generic, Elements, Objects, Components and Trumps.
I find it convenient to group variables, functions and mixins into one Abstracts layer rather than splitting them between Settings and Tools
Generic and Elements can be combined into the Base layer, since both include the most basic and low specific classes
I prefer to rename the Objects layer to Layout - the most understandable layer, since it is used for non-cosmetic classes
I will rename Components to Objects, since this layer can also be used for more atomic elements
Trumps is used for utilities, so I'll just name the layer Utility
If necessary, no one forbids you to add an additional layer like templates. This layer can be used for rules that are uniquely applied in some templates. In this case I would use the prefix _t_. Or you can use the following layers.
Layer bases
This is the first layer that generates the actual CSS rules. Here you can find reset or normalize styles, global rules like box-sizing and styles for HTML text tags. I also think that at this level it is possible to place some helper classes strictly related to HTML tags like .h1, .small, .mark - this is useful when there is no correspondence between style and semantics.
Font rules can be placed here as shown below:
h1, .h1-like ( font: ( family: $font-primary; weight: bold; size: 2rem; ) text-transform: uppercase; ...... )
h1 , . h1 - like (
font:(
family: $font-primary;
weight: bold;
size: 2rem;
text - transform : uppercase ;
. . . . . .
I would include these rules in the _b_typography.scss file. The prefix _b_ stands for base.
Layer layouts
This is where project layouts are created. This layer stores the main grid classes and other selector classes that define the skeleton of the site. At this stage we still don't care about the cosmetic side.
Let's look at an example of an article card that has an image and text underneath it. When cosmetically styling this object, we don't need to think about its layout. It should work well anywhere! That is, we must transfer responsibility for the layout to another class that is specifically created for this.
As a block, the card object will take up the entire width of its parent. If you want the card to take up only part of the available space, you need to write another class that is solely responsible for the object's layout.
The idea of separating structure and design is borrowed from OOCSS (SMACSS and ITCSS also adopt this principle). I think it should continue to be followed as it helps developers easily scope classes and reuse them anywhere.
One object can have different layouts, and one layout can be applied to different objects. So it makes sense to separate layout and cosmetic classes to make them easier reuse.
Imagine your client wants to fit up to 6 blocks per line. This does not apply to the design of all elements, so you can create a _l_columns.scss file that only works with the placement of certain block elements.
$min-cols: 2; $max-cols: 6; .l_columns-1 ( display: grid; grid-row-gap: 30px; grid-column-gap: 30px; ) @for $i from $min-cols through $max-cols ( .l_columns-#($i) ( @extend .l_columns-1; grid-template-columns: repeat($i, 1fr); ) )
$ min - cols : 2 ;
$max - cols : 6 ;
L_columns - 1 (
display:grid;
grid - row - gap : 30px ;
grid - column - gap : 30px ;
@for $i from $min - cols through $max - cols (
16.03.2021Internet


