WordPress Super Cache plugin, we use the browser cache. Caching a WordPress blog using the Hyper Cache plugin - installation and configuration Setting up WordPress caching
Caching is important for optimizing a website built on WordPress as it increases page loading speed. Site visitors will not like it long loading, as a result of which they may simply leave your site without waiting for information, thereby increasing the number of failures. Such behavioral parameters are poorly reflected in the ranking of the site search engines, which lower its position in search results. To prevent this from happening, connect the WordPress Super Cache plugin, which will automatically do the job of caching pages.

Description and capabilities of the plugin
A cache is a temporary storage for the content of a web page. Instead of downloading page data (such as images) from the server when you visit the site again, it will be loaded into the browser from the cache, which will significantly speed up the loading of the site. An effective caching tool for WordPress is the special WordPress Super Cache plugin.
The plugin generates static website pages and stores their cached versions on the server. Your hosting provider's server will then "serve" static files to visitors instead of having to access the database each time to retrieve page elements.
What else can the WordPress Super Cache plugin do:
- Allows you to use a content delivery network (CDN) together with caching, redistributing the most frequently requested materials from the server closest to the visitor.
- Supports caching of page versions for tablets and smartphones.
- Uses page compression to reduce site loading time.
- Supports several types of caching.
- Provides the ability to restore cache, so you can view cached pages even when a new cache is created.
Installing the WP Super Cache plugin
The plugin can be found in the WordPress repository. To do this, log into the admin panel using your username and password.
- Select the "Plugins" menu (1) and click "Add New" (2).
- In the search bar, type the name of the WP Super Cache plugin (3).
- Find the desired option in the list that appears and click the “Install” button (4).
- After installation, activate the plugin by clicking the corresponding button.

Even after activation, the WP Super Cache plugin is disabled by default, so you will see a warning at the top of the screen.
To enable it, follow the provided link to the plugin management page or select the “Settings” command, which is located immediately below the plugin name.
On the settings page you can see another notification about changing the wp-config.php file, after refreshing the page it will disappear.
To get the plugin to work:
- Select the "Caching Enabled" option
- Click the "Update" button.
- Then check that the plugin is connected correctly using the “Check” button.
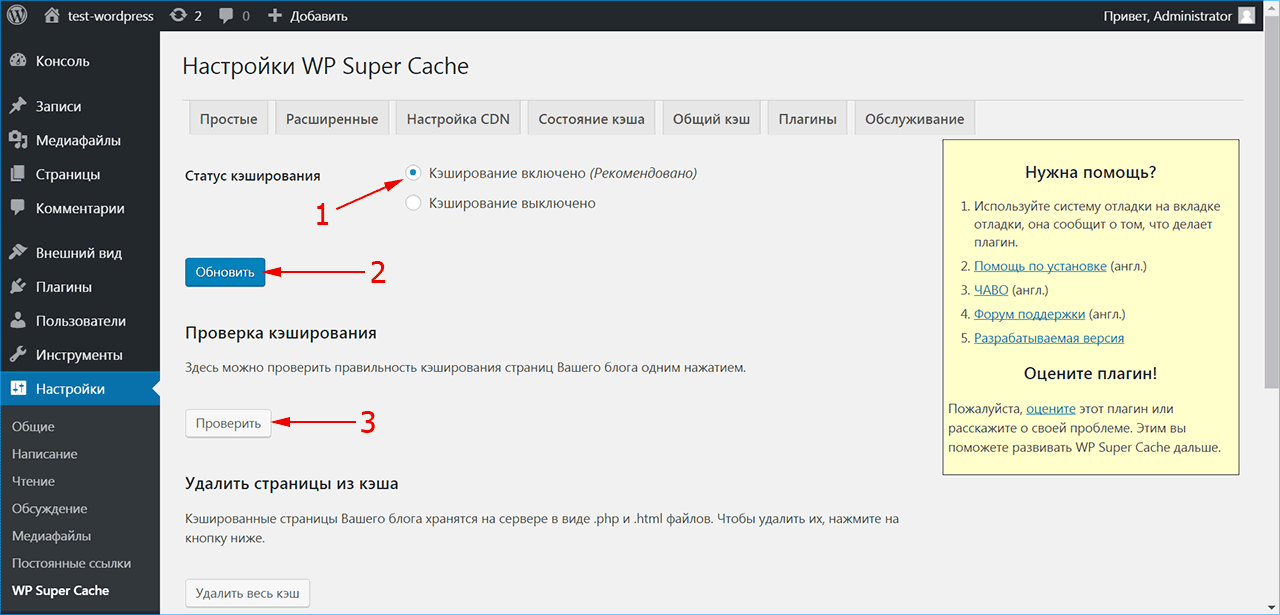
If the plugin is connected correctly, you will see an alert highlighted green. The plugin accesses the site twice and compares the timestamps of both copies. If they match, then caching is enabled for the site.
IN otherwise the message is displayed in red and you will need to look for the cause of the problem.

WordPress Super Cache plugin settings - how to enable and configure caching
WP Super Cache is a powerful plugin with big amount options, many of which can further improve site performance. The plugin's advanced settings panel provides flexible control over web page caching parameters.
Make sure caching is enabled and select one of three cache maintenance modes:
- mod_rewrite is the most quick option, which allows WordPress to serve static pages from the cache without accessing the PHP interpreter on the server;
- PHP mode is used by default and consumes more resources, which may be unprofitable if the server is heavily loaded;
- simplified caching is less productive than previous options, but also requires a minimum of resources.

The following settings require configuration in the Miscellaneous section.
- The "Compress cache files" option may conflict with other compression algorithms. If your site also has plugins that provide compression, do not check this box..
- Page caching is not required for logged in users or those leaving comments on the site. Enable this option to allow such visitors to view the page as it currently appears.
- Automatic cache rebuilding is not needed if the site has frequently updated information. Otherwise, visitors will see outdated pages.
- Error 304 occurs when the server tells the browser that the contents of the page have not changed since the last visit. In this case, loading occurs from the browser cache, which further speeds up the site.
- On the page with GET parameter There is a search based on certain criteria (dates, price) specific to each visit. Such pages do not need to be cached.
- If registered users are considered anonymous, cached pages will be served to everyone without exception.
- The last option in this section is advertising the plugin with a link to the author built into the footer.

The "Advanced" section contains settings for advanced users. Typically, for regular sites, you can leave them turned off.
- If your site contains dynamic elements, some of them may not work correctly when cached. In this case, you will need Lite or PHP caching mode and the dynamic caching option enabled.
- Sites designed specifically for mobile devices will need to enable support if the template is not responsive.
- The “Remove UTF-8 support” option is not required if all characters on the site are displayed normally.
- Clearing cache files on new posts can be enabled if the site is updated frequently.
- Additional reconciliation will be needed if there are problems with caching of any page.
- If a visitor left a comment on the page, the cache will be updated after moderation.
- You can view cached pages in the “Cache Status” tab, so the option is optional.
- The option slows down the work of files, preventing a possible problem on the server when caching pages.
- The developer option loads the cache only after WordPress has loaded.
Below the options is the cache location address and personal key in case you want to view the page without caching and without first clearing the cache.

If you choose to cache pages using the mod-rewrite method, the plugin will ask you to update the write permissions. To do this, scroll down to the "Update Mod-Rewrite Rules" button and click it.
Then set the time and period for which the cached data on the server will be valid. Start with 3600 seconds (1 hour). If your site has a large number of articles, you may need to set a longer time, up to several days, after which the cache will be considered out of date. There you can also schedule cache clearing by setting the timer and update interval. For non-changing sites, garbage collection can be canceled completely by setting the timeout value to zero.

You can prohibit caching of certain information on the site (for example, a section with constantly updated information) by checking the box in the desired section “Acceptable names and Prohibited addresses” or manually adding page addresses.

Clear the list of search bots if you want them to receive information from the cache and not load the server when crawling the site. For high-load sites with traffic of more than a thousand unique visits per day, it is recommended to enable private mode. In this case, the cache update will be canceled.

On the “CDN Settings” tab, connect paid service for efficient distribution of information when retrieving from the cache. The Cache Status tab will show you which pages are cached and can be manually removed from the list.
Go to the General Cache tab to configure the Preload mode settings. Why might you need to use completely static content?
- To save server resources.
- To improve site loading speed.
- To serve an old site whose content is no longer updated.
When selecting the “Create shared cache now” function, give the plugin time to create a cache in automatic mode. You can monitor the process by switching to the “Cache Status” tab.

The “Plugins” tab will only be needed if you are going to connect other plugins that do not affect file caching.
Keep in mind, some of them only work in PHP cache mode. For specialists, the “Maintenance” tab enables the debugging mode and the option to save logs.
Using the browser cache, how to clear the WordPress cache
After some time of running the WP Super Cache plugin, you will notice the formation of a cache for the site. Correct setting The plugin will significantly improve site loading time. Cached pages are stored as HTML or PHP files on your hosting server. Typically the server knows which pages have been updated and provides the user with the latest version. However, if you have problems displaying updated information, you can manually clear the cache. Remove cached pages from the server using the “Delete all cache” command on the control panel or by clicking on the same button in the plugin settings.

When a user visits a site for the first time, their browser contacts the remote server that hosts the site. The browser request and the server response take time, given that site elements (images, styles, scripts) are loaded sequentially one after another. If the page contains a large number of elements or they are large in size, they may take a long time to load.
However, the user's browser can cache duplicate elements. This makes the site load faster since files are accessed from hard drive always faster than retrieving data from remote server. Similarly, the cache clearing feature is present in every browser.
If you don't see changes to a site that needs to be updated, clear your cache using your browser's settings control panel, or view the page in private browsing mode (this mode does not use saved items such as passwords or cache).
Recently one of our readers asked us how to clear WordPress cache? Your web browser, server, and plugins installed on your site may use a caching process that is unlikely to allow you to see the updated status of your blog.
In this article, we will show you how to properly clear the cache of your WordPress blog.
Caching solutions store a static version of your website. This allows WordPress to skip the heaviest PHP scripts and improve your site's performance.

WordPress There are many types of caching solutions. The most popular are cache plugins like "I".
These plugins provide an easy-to-use interface for managing blog cache, cached content expiration, and on-demand caching.
WordPress hosting managed by providers like WPEngine uses native caching solutions, so you don't need to install this caching plugin.
If you use a CDN service such as "MaxCDN" or "CloudFlare" it will also serve cached copies of static content.
If you are using a web application firewall like "Or" To enhance the security of WordPress, they also have their own cache to speed up your site and reduce downtime.
Finally, your browser may also store cached versions of pages on your computer.
The purpose of caching is to speed up your site and improve the overall user experience. However, sometimes this prevents you from seeing the changes you make to your site, which can be frustrating. In this case, you will need to clear your cache to see your changes.
That said, let's see how to clear cache in WordPress.
Step 1: Clear your browser cache
First, you need to clear your cache. Most web browsers can store static content such as stylesheets, JavaScript, and images from a website to speed up subsequent visits.
However, sometimes web browsers may not realize that a web page has changed. Instead of getting a new copy, they can still reload the page from a cached version on your computer.
Here's how you clear your cache Google browser Chrome. First you have to click on the menu icon and then select« Additional Tools > Clear navigation data .

A window will open where you can select the content you want to delete. Make sure cached images and files are checked, and then click the " Clear browsing data P".

You have successfully cleared your browser cache and can now try accessing your website.
If you still don't see any changes, continue to the next steps.
If you want to choose between the two best WordPress cache management plugins, check out our article:
For other web browsers, please refer to their respective documentation on how to clear their caches.
Step 2: Clear WordPress Plugin Cache
If you are using a caching plugin on WordPress, you must clear your plugin's cache. Most caching plugins allow you to easily do this from the appropriate settings.
Clear cache from WP Super Cache
It allows users to instantly cache their site in one click. His robot automatically selects yours WordPress pages to create a cache, and then automatically enables recommended WordPress caching options such as GZIP compression, page caching, and cache preloading.
WP Rocket also includes additional features that you can enable to further improve your productivity. Including lazy loading of images, CDN support, DNS prefetching, minification, etc.
2.WP Fastest Cache
WP Fastest Cache is a WordPress cache plugin that offers almost everything a user might be looking for. The developers of this plugin claim that it is the simplest and most fast system WP Cache. And to be honest, it is! With over 300,000 active installations, this plugin offers visitors a fast browsing experience. 
WordPress is an excellent engine for convenient website management. This core contains many functions that you can constantly add to. But this is where the insidiousness of this CMS system lies - it is so functional that some webmasters, adding new modules, do not notice how the site begins to slow down.
To avoid becoming a victim slow work engine, some additional measures must be taken.
The best option to speed up the display of your resource within the user’s browser is to install special plugins.
Use the cache, and the problem of WordPress slowness will disappear on its own.
Why Cache Speeds Up WordPress - How It Happens
It is unclear to many how creating cached copies can improve the performance of an entire resource. But once you understand this a little, everything becomes extremely clear. The fact is that the browser can only understand language html. And the WordPress engine deals with PHP files - all its functions are hosted in this format on the server. You will not be able to receive a site image from your browser unless the data is first converted to another format.
When a user wants to open a page, a request is made to the server. This request “pulls” the desired part of the site and creates a copy of it in a format suitable for the browser. As a result, the user sees the same page, only it is no longer a PHP file. And to redo the format the server spends on this certain time. And the more configurations, material and functions there are on a page, the longer it takes to reformat the data. Thus, over time, as the number of plugins and modules on the engine accumulates, WordPress begins to work slower.
To prevent the server from rushing from one part of the site to another, creating copies of pages in the required format, use a cache. It works on the following principle: when someone makes a request for a page, a copy of it is created and placed in the cache. As a result, the hosting will not have to make copies every time someone makes a request - they are already available in a specially designated directory. As a result, for the browser this will bring increased page loading speed, and for the site - improved server response rates and trust from search engines. After all, the loading speed of a WordPress site is another important ranking factor.
To make a cache of pages and configurations for accelerated work user browser and improve the resource’s position in search results, use special WordPress plugins.
WP Hyper Cache
WP Hyper Cache is best plugin of a kind. It will allow you not only to create a cache in response to requests, but also to do it automatically without processing PHP files. The module is constantly updated and a cache has already appeared for mobile versions of WordPress sites. In addition, this module is distributed free of charge, so today, without spending a penny, you can speed up the work of your site.

Please note that the plugin requires special installation. By default, the caching feature in WordPress is disabled - you need to enable it. To do this, you should dig a little into the wp-config.php file. Find the following line in it:
define("WPLANG", "ru_RU");
(this is after installing the plugin on WordPress, but before activating it). After the specified line, insert the following tag:
define("WP_CACHE", true);
After installation is complete, you need to configure the work correctly WordPress plugin Hyper Cache. Here are the main settings you need to adjust:
- Caching timeout is the time that the page cache will be stored for the user's browser. A timeout is needed to ensure that pages do not lose their relevance. After all, you can make new settings on your blog, but they will not be displayed because users see the old version of the site.
- Cache invalidation mode is a condition under which the cache will be automatically deleted.
- Disabling comment cache is an important setting for active blogs. Users do not like to wait for their comment to appear on the page, so to avoid objections, it is better to disable caching for this element.
- RSS caching – you should not create a cache for feeds, since this is dynamic information that may lose its relevance due to delays.
If you have a responsive website, then you should enable the “Detect mobile devices" It will help to correctly display pages, the appearance of which changes when switching to the mobile version (some widgets disappear, and the sizes are also adjusted). If you don't have mobile version WordPress site, then you don’t have to check the box - the plugin will not create additional copies under a different name.
When creating a text cache, if you have a large amount of information on your site, the server may experience a problem with a lack of working space. To avoid such problems, it is recommended to activate the text compression function in the plugin.
Why is it necessary to clear the WordPress cache?
Sometimes the cache can be harmful. For example, when you entered some new feature or changed the page structure. In such cases, you should clear the cache. Otherwise, users simply will not see any changes on your site. It is recommended to immediately specify a ban on caching the main page if you have a dynamic one, or include in the filter the URLs that display the last notes– that is, category links.
The WP Hyper Cache plugin makes it very easy to clear the cache - just one click is enough for old copies of pages to be deleted from the server. In the module statistics you will see the number of cached pages. If there are too many of them, remove them. Or set a small caching timeout so that the cache is cleared without your participation and does not disturb you.

Other caching plugins
- WP Super Cache is the main competitor of the Hyper Cache plugin. It works by changing the .htaccess file on the hosting. When visiting the site, the user is automatically taken to a cached copy of the page. Although the plugin functions reliably, it is still inferior to its competitor - it provides an increase in loading speed that is 15% less than Hyper Cache.
- Widget Cache is a module that will allow you not to create caches of an entire page, but only copy widgets on the hosting. After all, it is the functional blocks in the sidebar that provide the greatest load on many sites.
- Total Cache is a plugin for professional webmasters. Its feature is a wide range of settings. If you are an experienced programmer, then you can change this module in your own way, adding many filters and caching conditions.
Are you trying to make changes to your WordPress blog but the changes aren't taking effect? For example, you just added an image, edited a theme, or corrected an error in the text of a blog post, but you can't see the changes on the site?
This is most likely due to caching of site pages by WordPress plugins.
These plugins reduce site loading time by generating a server-side cache for your WordPress blog. However, sometimes saving a copy of your site can be inconvenient, especially if you want changes to take effect immediately.
This guide covers clearing the WordPress cache for 3 of the most popular WordPress caching plugins.
What you will need
Before we begin, make sure you have the following:
Option 1 – Clear Cache in WP Super Cache
WordPress Super Cache is the most popular caching plugin, used by over 1 million WordPress users. Follow these steps to clear cache in WP Super Cache:

That's all, you have successfully deleted cached pages.
Option 2 – Clear cache in W3 Total Cache
W3 Total Cache is known for its convenience and variety of settings. Some popular blogs like Mashable use this caching plugin. To clear your WordPress site's cache in W3 Total Cache, follow these steps:

Great, you have just successfully cleared the cache created by the W3 Total Cache plugin.
Option 3 – Clear Cache in WP Fastest Cache
WP Fastest Cache is a simple and easy to use caching plugin. Follow the steps below to clear cache in WP Fastest Cache:

That's all, you have successfully deleted the cached files.
Summary
Caching plugins for WordPress are good way speed up the site. However, an outdated cache may cause some inconvenience for your visitors. After going through this tutorial, you will be familiar with clearing the cache for three popular WordPress caching plugins. If after clearing the cache you still do not see changes in your WordPress blog, try this too
Hello, dear readers of the blog site. In this article I will continue the topic WordPress optimization() in order to reduce its load on the hosting server. This question will become more relevant to you the more visitors come to your blog.
The previous article described some. But these, of course, are only half measures that must be carried out in combination with other methods.
There are a lot of optimization methods and I will talk about all of them in detail in this series of articles. Today we will look at one of the most effective of them, namely caching. First you need to decide what it is and why you need to use it. First, let's look at how a blog works on WordPress without a cache.
Caching in WordPress and how a blog works
The thing is that browsers only work with web pages in HTML format() and don’t understand at all PHP language, on which, in fact, this engine is written. Therefore, WordPress, after a user accesses one or another blog page, must have time to generate this page based on the algorithm written in its PHP code.
In a classic static website (there are very few of these left now), all web pages actually exist and are located on your hosting server. You can always access them by entering the appropriate address in the browser, or even physically, via FTP, download a page from the server to your computer and open it by double-clicking on it. As they say, you can feel it.
Based on these templates, a graphic design of the requested web page is created, and then, for example, the text of an article is loaded into the content area from the MySql database. Data from the database can also be loaded into the sidebar area MySQL data, if you use the output of any information in it using standard WordPress tools or using plugins.
As you have probably already noticed, this method of generating web pages for a browser hides a certain problem, which can become especially acute when large quantities visitors to the blog. The code of files written in PHP is interpreted into an HTML page on the fly.
If there are a lot of requests to the database to create pages (with high blog traffic), this can significantly load the hosting. Even if we assume that all visitors located in this moment on your site, they requested the same page, it will still be created anew in WordPress as many times as the number of visitors clicked on the corresponding link.
The way out of this situation is to cache usage. How does caching work in WordPress? Quite simple. Every time, at the request of a visitor, a page in HTML format is generated on the server, it is not only transmitted to the browser of the user who clicked on the link, but is also saved in the corresponding folder on your site.
And the next time you access this page, it will not be generated again, taking away the server’s resource (creating additional load on its processor and RAM), and will be transferred to the user’s browser that requested this page from the very folder on your site where cached web pages are stored.
This method, when the entire web page is cached, is the most effective, but not the only possible one. Additionally, some dynamic elements of your blog may not work.
Some WordPress plugins only cache database queries and therefore allow dynamic elements to work. But still, caching entire web pages is, in my opinion, the most effective way.
The hero of today's publication (the Hyper Cache plugin) caches entire pages and stores their HTML versions in its cache folder. What’s noteworthy is that caching only works for unregistered visitors to your blog. Because Most bloggers do not use registration, then the only registered user in this case will be only the administrator, i.e. You.
Caching will not work for you and this is very convenient. For example, when you make changes to the design, you will not need to reset the cache every time to see the results of the changes made. I would like to give an example of the effectiveness of using this extension in WordPress.
The hosting is good, and for free it’s absolutely excellent. But one day they flew HDD, where the databases of all users were located. And what’s remarkable is that my blog continued to work quietly, because its pages were opened from the cache and there were no calls to the database at all, because she was unavailable.
Which also had caching enabled, but did not work, complaining about the database being unavailable. The lifetime of HTML copies of web pages in my cache was 1440 minutes (one day), and this turned out to be longer than the time during which the database was inactive on the hosting (several hours).
Here is such a wonderful plugin for caching in WordPress. Well, I think that’s enough theory and it’s time to look at its installation and configuration.
Installing the Hyper Cache plugin on WordPress
Download Hyper Cache you can from the official page. Next, we carry out standard installation steps. Unzip the hyper-cache.zip archive using ftp manager (), connect to your site and upload the hyper-cache folder to the wp-content/plugins/ plugins folder on the remote host.
Next you will need to enable caching in the WordPress engine itself. To do this, we will need to open the wp-config.php configuration file for editing, which you can find in the root folder on your site’s server. You will only need to add one line of code to it:
Define("WP_CACHE", true);
You can insert it anywhere before the line:
/** Absolute path to the WordPress directory. */ if (!defined("ABSPATH")) define("ABSPATH", dirname(__FILE__) . "/");
For example, I inserted into the area where the parameters for the database are set:
/** Database name for WordPress */ define("WP_CACHE", true); define("DB_NAME", "wm1604_ox823");
Log in to the WordPress admin area, select the “Plugins” - “Inactive” tab, find the line with this plugin and activate it. Next, select Settings -> Hyper Cache from the left menu. If no warning messages appear in the settings window, then everything is ready to go.
If warnings appear, setting access rights to 777 on the folder (read about this in the article about Filezilla at the link just above) wp-content or the wp-content/plugins/hyper-cache folder will most likely help.
This is necessary so that this plugin can create a folder in WordPress for storing cached web pages called cache. After it creates it, you can return the permissions () on the wp-content folder and the wp-content/plugins/hyper-cache folder back to 755, and on the cache folder, which I have in wp-content/plugins /hyper-cache/cache , set permissions to 777 so that Hyper Cache can write to and erase cached HTML files.
Hyper Cache settings to reduce server load
In the first settings field (in the left menu, select Settings - Hyper Cache) called “Files in the cache” you can see how many web pages of your blog are currently stored in the cache.
In the same field there is a very important button "Clear cache", which allows you to reset the cache, i.e. delete all files there from the folder designated for this purpose. You may need this button if, for example, you have made changes to the design and want your visitors to see them as quickly as possible. Because otherwise, they will continue to only have access to cached versions of web pages.
In area "Configuration" the main settings are concentrated.

In the “Cached Pages Timeout” field, you can set the lifetime of the cache in WordPress. During this time, HTML copies of your blog's web pages will be stored in the cache folder and all users who request them will receive exactly these copies.
But as soon as the time specified in this field for a web page expires, the next time a visitor accesses it, it will no longer be opened from the cache, but in a standard way. In this case, it will be re-cached by the plugin and placed in the cache folder. If the lifetime is set too small, then Hyper Cache, instead of unloading the server, will place an increased load on it due to the constant recording of cached web pages.
The “Cache Invalidation Mode” field sets the method for clearing the cache when adding new materials to your blog or updating existing articles (including when adding comments). If you select “All cached pages” from the drop-down list, then when adding new entry or updating an existing one, the entire cache in WordPress will be updated (cleared). If you select "Nothing", the cache will remain unchanged.
When choosing "Only modified entries" Only the cache files of those web pages that have changed will be updated (removed from the cache). Checking the box “When canceling a post, also cancel the home page, archive and category pages” will add convenience to your work with the blog.
You can check the “Disable cache for commenters” box. In this case, users will be able to see the comments they added without waiting for the cache lifetime for a given web page to expire. This makes caching in WordPress less efficient, but the blog itself more convenient. A checkmark in the “RSS Caching” field will allow you to cache the RSS feed.
In the “Compression” area, by checking the boxes provided, you can download pages that are in the cache. This will allow speed up page loading a little your blog.

In the “Expert Settings” area, it would be advisable to check the box "URL with parameters". In my case, after installing it, the blog’s load on the hosting was halved.

I don’t know all the ins and outs, but despite the URLs with all sorts of question marks and other nonsense that WordPress can generate, someone accesses such pages (bots or someone else) and they should also be cached.
In the “Home Caching” field, you can check the box to disable caching home page. This may be necessary if it is updated intensively and enabling its caching may cause additional load due to constant overwriting of the file.
Don’t forget to save your changes in the Hyper Cache plugin settings window by clicking on the “Update” button. In order to check if caching is working, you will need to log into your blog not as a registered user, but as a regular visitor. To do this, you can simply open it in a browser other than the one in which you work as an administrator.
Open any blog page and look at its source code. To do this, right-click on the page in your browser and select context menu"Source Code" (), or "Page Source Code" (Firefox), or "View Page Code" ( Google Chrome), or "View HTML code" (IE).
If you see at the very bottom of the window with source code something like
then this will mean that Hyper Cache is working and the next time the request is made, this page will be opened from the cache.
Good luck to you! See you soon on the pages of the blog site
You might be interested
 Reducing memory consumption in WordPress when creating pages - WPLANG Lite plugin for replacing the localization file How to remove the transparent pixel http://yarpp.org/pixels in the Yet Another Related Posts plugin and change the inscription Similar materials
  Simple Counters and Category and Page Icons - beautiful RSS and Twitter counters, as well as icons for categories and pages in WordPress
  How to update WordPress manually and automatically, as well as the Database Backup plugin for Reserve copy
 Optimizing a WordPress theme (template) to reduce its load on the hosting server, the WP Tuner plugin and the number of requests to the database How to disable comments in WordPress for individual articles or the entire blog, as well as remove or vice versa enable them in a template
  Comment Toolbar - add to WordPress comments possibility of replying and quoting
  Installing and configuring plugins for WordPress, solution possible problems
 Installing WordPress in details and pictures, logging into the WP admin area and changing the password gone left menu in WordPress admin after update
  Code Highlighter and Comment Formatting Buttons in WordPress - SyntaxHighlighter and Comment Form


