Diskpart: Restore a memory card, USB flash drive or hard drive. Using Diskpart: Manage and Recover Your Hard Drive, Memory Card, or USB Flash Drive Partition Recovery on a USB Flash Drive
Today, flash drives and removable memory cards have a fairly large capacity and are used almost everywhere. Unfortunately, they are more prone to physical damage than internal drives and hard drives, but they can equally show software failures. So it turns out that when you try to connect the device to the computer, the system displays a message stating that the file system of the volume is damaged or not recognized. How to fix such failures will now be described.
Why is the USB flash drive not recognized? Possible reasons
The most likely reasons why the operating system cannot recognize the drive or its file system can be conditionally divided into two broad categories: physical damage and software failures.
Physical causes associated with malfunctions in the operation of microcontrollers, external and internal damage, overheating or hypothermia, and many other negative factors will not be considered. In this case, the USB flash drive will simply have to be thrown away. Even replacing the microcontroller will cost much more than a new flash drive or memory card. Sometimes there may be malfunctions in the USB ports, but here the solution is obvious: you just need to connect the flash drive to another port.
Therefore, we will focus on software failures. Among the most likely reasons that the volume's file system is not recognized when mounted, and if it is visible, then it is not possible to work with it), the following are distinguished:
- exposure to viruses;
- software failures in the microcontroller;
- incorrect or incomplete formatting;
- improper removal of the device from the port;
- power surges;
- unsupported file system;
- outdated device drivers;
- discrepancy between the standards of the USB flash drive and the port.
As for the last point, the problem is that the USB 3.0 standard stick is connected to the 2.0 port. This problem is solved by simply reconnecting to the desired port.
Signs of damage to a removable device
Determining that a removable device is in a non-working state is quite simple. When connected, the system starts to issue warnings that the location is not available, the volume's file system is not recognized, it is prompted to format the device, etc.

In passing, it is worth noting that the drive itself may or may not be visible. In the first case, fixing the problem is somewhat easier. In the second, you will have to use additional utilities.
When a warning about an inaccessible location is issued, the reason may also be that the flash drive or removable card has been assigned an incorrect volume label (drive letter), for example, X instead of F. In this situation, you just need to change it, after using the disk management section, where the right click on the device to select the appropriate command.
RAW format: what is it?
In the usual sense, such a structure is a modified format, which, with most of the known operating systems just incompatible. Therefore, a notification appears on the screen that the volume's file system is not recognized (although the RAW-format flash drive is visible, the files on it are not visible, even if you turn on the display of hidden objects).

Format change is most often associated with software failures due to incorrect formatting, improper shutdown of the device and exposure to viruses. However, it is quite easy to convert the format to readable, which will be discussed a little later.
Main directions in problem solving
If the volume file system cannot be recognized, there may be several solutions to correct the situation, depending on the cause of the failure:
- converting the format to any other compatible with the system;
- removal of viruses and threats;
- quick or full formatting;
- if you want to recover data, you need to use special utilities.
Just in case, you can make sure that the correct driver is installed for the device. This can be done in the standard "Device Manager", which can be accessed either from the "Control Panel", or called with the devmgmt.msc command from the "Run" console.

Generally, if a device is not working or not working properly, it will be flagged yellow. In this case, you should either update the driver (command from context menu) from the system's own database, or install it manually from removable media, or apply an automatic update using programs like Driver Booster (of course, with the flash drive turned on). Sometimes it may be necessary to update the driver directly for the USB controller itself.
The simplest testing and recovery
Now consider the situation when the file system of the volume is not recognized (the memory card is visible in the system) from the point of view of a regular disk. For removable drives, you can use standard commands for checking their status, which were originally intended for hard drives. This is about

To fulfill this operation, you need to call the command console (cmd) from the Run menu (Win + R), and then write the line chkdsk X / f in it, where X is the letter assigned to the flash drive (most often it is F). Even if the drive is in RAW format, this procedure works in terms of recovery file system or converting it to NTFS.
Virus check
Some viruses can change the structure of the file system of removable drives (and not only) purposefully. In this case, a message will also be displayed informing you that the volume's file system is not recognized. The SD flash drive, however, will be visible in the system. This simplifies the task.

by the most in a simple way solution to the situation that has arisen is its full check. You can use regular or portable utilities. But here, unfortunately, there is no full guarantee of "treatment" of the device. This is due to the presence on the carrier, it seems, standard file autorun autorun.inf, which in some cases may be hidden (to see it, you need to set the display of hidden objects in the view menu of the standard "Explorer").
If possible, it must be removed manually, but most often it is protected from such procedures. Here you should again use the command line.
Removing components from the command line
So, the system reports that the volume's file system is not recognized (the flash drive is detected in the system). For example, suppose that the volume label of the flash drive has the letter Z. To delete the desired file, we sequentially write the following commands, after each of them press the Enter key:
- cd F:/;
- attrib -a -s -h -r autorun.inf;
- delautorun.inf.
Only in this case is it guaranteed complete removal this object, because even the actions in the "Explorer" due to its tight integration with Windows viruses may set some restrictions, and the command line works using the principles of DOS systems.
Fixing the file system by formatting
Now another example, when an SD card is inserted into the card reader (the volume's file system is not recognized, but the system "sees" the device, even if it does not display formatting messages).
In principle, you can look at its format in the section, but why do this if the only problem is that information cannot be written to it? The easiest way is to format it.

Many users mistakenly believe that the most simple option is a quick cleaning of the table of contents. Absolutely false! Even if you set something from the drop-down list for the preferred system (FAT32 NTFS, etc.), there is no guarantee that it will be possible to work with it. Therefore, it is better to do a full format. It will take more time, but after that the user will receive a clean drive, as they say, from scratch. And there won't be any problems with it. But this method is applicable only if the device does not have important information which cannot be destroyed.
Is it possible to recover information on a damaged device?
For many, the issue of information recovery is an unambiguous criterion in favor of choosing special utilities that can not only restore boot sectors and records on devices of any type, but also to extract information that was previously present on them, which for some reason became inaccessible.
It is possible to recover data. But advertised programs like Recuva, when the same removable media not visible in the system, useless. This is where professional utilities come to the rescue. Two of them will be discussed next: the TestDisk application and the unique R.Saver program (both utilities are portable).
Recovery using the TestDisk utility
Now let's look at the situation when the volume's file system is not recognized (the flash drive is not visible even in Explorer, although we must say right away that the solution below can also be used for removable memory cards of any standard.
The program is free and does not require installation. True, many may be upset by the lack of a Russian-language interface and work in DOS mode. But the utility is very powerful, because it is able to restore the file system first, and then the necessary information.

We launch the utility, in the window that appears, select the item Create (“Create”). Next, a list of all available disks will appear, including a flash drive invisible to the system. As a rule, in the list it is designated as Disk /dev/sdc with an indication of the capacity (in addition, there may be a description like Generic-Multi-Card). If there is no description, you can determine that this is the flash drive you are looking for simply by the size or by the drive letter.
Next, we activate the analysis process (Proceed), after which we select Intel Partition in the partition table. Next, go to the extended file system (Advanced item), press the enter key, and then use the Undelete command at the bottom of the window. We are waiting for the end of the scanning process, and then red lines appear in the window corresponding to all deleted files. Do not be surprised that even those files that you do not remember at all can be found here (the program finds them with ease).
Now use the arrows to move through the list, select the desired object and press the C key to restore. Next, select the directory in which the files will be saved, press "Enter". After selecting the folder, press C again. Upon completion of the restoration, you will be informed that the copy is ready.
Universal program R.Saver
Finally, one more utility that can be used if the file system is not recognized (the flash drive is visible or not visible in the system - it does not matter). It is best suited for recovering sectors and data on SD cards.

After starting the application, select the flash drive and start the scanning process (we agree with sector-by-sector scanning). Next, the procedure for restoring sectors (reconstruction of the file system) and the information they contain starts (this may take quite a long time).
In the list of detected objects, select the necessary ones, specify the destination folder on the hard drive and confirm the selection with the appropriate button. When finished, you can work with the flash drive without problems.
Instead of an afterword
As you can see, in some cases, troubleshooting processes can be quite laborious (this applies to the simultaneous restoration of the drive's file system and data on it). However, if such procedures are not required, a flash drive or removable memory card can be quite simple. Which way to prefer? It is up to everyone to decide for themselves, based on the current situation.
Hello admin, the trouble happened to me, it seems that the user is experienced, but yesterday I wanted to format the USB flash drive, and I formatted all partitions on the portable hard drive USB drive, and there is EVERYTHING that has been accumulated by overwork for a couple of years: films, photographs, programs, music, images of operating systems, and so on. In short, there were two sections on a portable USB hard drive: under the letters (F:) and (H:), and now unallocated space instead. How would you advise recovering deleted partitions on a hard drive? So far, I have not made any attempts to recover the data, I'm waiting for advice.
How to Recover Deleted Partitions on a USB Portable Hard Drive
Hello friends! To recover deleted partitions on a portable USB hard drive or a simple hard drive (whatever), you can use the DMDE program. The program can recover deleted partitions and files on various storage media, and I'll show you how it all works.
The guinea pig will be my portable HDD(volume 1 TB), which also has two partitions with the most important data, if I fail to restore them, my partners at work will not talk to me until the new year, but I think it will do without it.
So, we look at what is happening and we ourselves do not repeat this trick unnecessarily, however, if you have an extra hard drive with junk files you can practice on it.
I connect my portable USB hard drive (1 TB capacity) to my computer and go to Disk Management, as we can see, there are two partitions with data on my portable hard drive: (G:) and (H:). I right-click on the disk (G:) and select Delete volume. "Deleting a volume destroys all data on that volume." I agree and click Yes. I do the same with the disk (H:).


That's it, both partitions along with the data have been deleted on my portable hard drive and now they need to be restored.

Download the DMDE program in the archive on its official website,
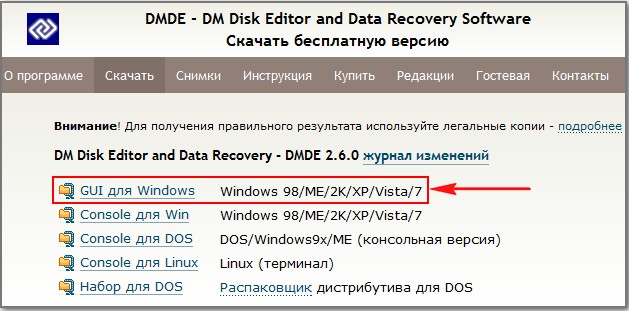
then unzip and run executable file programs.


We accept the license agreement

In this window, check the box " Physical devices", then select USB portable hard drive and OK.

It searches for deleted partitions on our portable USB hard drive. OK.


In this window, we see that the program found the first remote partition (G :) with a volume of 547 GB and marked it with favorable green xCF indicators.

T the program also found the second deleted partition(H :) 453 GB and also noted favorable BCF indicators.

We can immediately restore these partitions one at a time, or we can look at deleted files in this section to be sure whether we are restoring the partition. Sometimes DMDE program can find partitions that have long existed on the hard disk with completely unnecessary files. Let's take a look at the deleted files and make sure that we are restoring exactly the partition we need.
If you double-click with the left mouse on the first partition found,
a window will open in which you can select the button.

Virtual reconstruction of the file system. OK.

We see our deleted files and we can restore them one by one, but we will not do this, but we will restore the entire deleted partition with all the files. Exit this window and click on the "Disk Partitions" button.

We return to the first section and restore it, select it with the right mouse button and click on the Restore button

The program automatically detects the partition type, but I also remember that it was Primary.

Apply


Section restored

Go to Disk Management and select Action -> Recheck Disk

Our restored partition appears, but without a letter. Assign a letter to the section. Right click on it and select "Change Drive Letter or Drive Path"

Add

Select a drive letter and OK.

Our files are opened on the partition (G:) safe and sound.


Restoring the second deleted partition
We return to the second deleted partition found by the program(H:), 453 GB capacity marked with favorable BCF indicators. We also look at the deleted files, double-click on it with the left mouse

Click the button All found + reconstruction.


These are exactly the files we need. We return, click on the Disk Partitions button.

Insert

Basic

Apply


Deleted partition recovered

Go to Disk Management and select Action -> Recheck Disk
If a USB flash drive, memory card, or any other type of storage media is not working properly, wiping the drive and its partitions using the “Clean” command and the Diskpart tool is one way to solve problems. In this way, problems with a drive that cannot be formatted or whose capacity is displayed incorrectly can be solved.
This trick will also remove partitions that cannot be removed by the built-in ones like Disk Management. This process will completely delete the disk's partition table, allowing it to be rewritten.
Attention: This process will completely erase the entire drive, so be sure to keep your files safe. Also make sure the correct drive is selected, otherwise data may be accidentally deleted from the wrong drive.
Run Command Prompt as Administrator
To get started, run the command prompt as an administrator. In Windows 10 or 8.1, simply right-click on the Start menu and select "Command Prompt (Admin)".
In Windows 7, search for "Command Prompt" in the Start menu. By right-clicking on the mouse, select "Run as administrator".
diskpart
To clean up a disk, use the Diskpart command. Before proceeding, make sure that the appropriate USB drive, memory card, or other device you are about to clean is connected to the computer.
To run the diskpart tool, enter the appropriate command in the window command line and press Enter:
diskpart
Display a list of drives installed on the computer by typing the following command:
list disk
View the results of the command and determine the number of the disk that needs to be cleaned.
Be careful! If the wrong disk number is selected, it will be cleared and possibly important data will be lost.
In the screenshot below, you can see that Disk 0 has a capacity of 111 GB, and Disk 1 has 15 GB. We know that we need a 15 GB disk. So Disk 1 is the USB drive and Disk 0 is the computer's internal hard drive.

Once the disk number has been determined, enter the following command, replacing the # sign with the disk number.
Attention: Be very careful. If an incorrect disk number is specified, all data from the wrong disk will be deleted.
select disk#

The specified disk is selected with the diskpart command. Now all actions will be performed with him. To completely clear the partition table, type the following command and press Enter.
After installation, run the program and through the "Setup Wizard" select the device from which you want to recover data
Specify desired type files (anything is possible)
The program will scan, count the found files and display them in a list with a detailed description.
Those marked with a green circle can be saved. The red ones are irretrievably lost, and the yellow ones are lucky.
Select the necessary files and click on the "Restore" button
Specify a save location on your computer.
If the required files were not found, Recuva will offer to perform an in-depth analysis. It will take longer, but is able to detect a lot of data.
Flash drive is not detected when plugged in
The way to recover is the following: we find out serial number devices, then we go to the site containing recovery programs and look for a suitable number on it.The downside is that if the program was not found, then there is nothing to be done. And second: if the program is found, then it is best to run it in Windows XP. Many utilities were released a long time ago and have not been updated, so with new versions of Windows they may have conflicts that interfere with work.
How it works:
1. Connect the flash drive to the computer.
2. Go to Control Panel → System → Device Manager.
3. Click the USB Controllers tab.
4. Select Mass Storage

5. Right-click on it and click "Properties".
Here we are interested in the “Details” tab → Device Instance Code (Or “Hardware ID”).

6. You need to remember 2 four-digit numbers: one comes after the PID, the second after the VID.
If “0000” is displayed instead of the code, this indicates that the flash drive is damaged too seriously, and this method will not work.
7. Go to the site and enter the received codes.
8. See column "UTILS". If the name of the program is written somewhere, then copy it.
9. Go to the section " Files»The same site and through the search, find and download the desired application.
Decreased storage space
In this case, simply formatting the device will not help. You can fix the situation using DiskPart Windows.To launch it in...
Windows XP
Start → Run → diskpart → OK.Windows Vista / 7
Start → In the search bar "diskpart" → Run the found applicationIn all versions, including 8/8.1
Win+CTRL → diskpart → OK
In the window that opens, do the following:
After entering the command, always press Enter, everything is written without quotes.
1. First command: "list disk". It will display a list of all connected drives, including hard drives.
2. Select the number that matches your flash drive and write "select disk (number)".
3. We write "select partition 1".
4. “delete partition”.
5. "create partition primary"
6. Get a long message. Enter "clean".
 clean
clean
7. Done. Now we go to My Computer, right-click on the flash drive (now it does not show the size and there is no file system) and select "Format".

8. Now select the desired file system (if you don’t know what it is, then put NTFS) and in the “Volume Label” enter the name of the flash drive (whatever you want, in Latin letters).
9. Click Start. After formatting is completed, the flash drive will be restored.
If you get the error “Windows cannot complete formatting”, then go to “Run” (as with diskpart and cmd), enter “diskmgmt.msc” and click OK.
In the Disk Management window that opens, find your removable drive, right-click on the column with the volume and select "Format" or, as in my case, when formatting is not available, "Create a simple volume".

A window will open, leave the settings in it by default. After that, the formatting will be done.
The actual volume of the purchased flash drive is less than the declared
If the error is a few hundred megabytes, then this is normal, as it should be. When buying any storage medium, do not expect that 100% of the declared volume will be available to you: the drive needs part of it for its needs.If the difference reaches several gigabytes, then there is one of two things:
- The previous method may help.
- You bought a fake. This is especially true for flash drives and memory cards ordered from China, but we can sell this easily. So if you have a check, go back to the store.
All of the above refers to software defects, or to a simple marriage (fakes). Concerning mechanical damage, then it is definitely better to entrust such work to people with experience and experience in restoration. Besides software methods are the same for both memory cards, but mechanical “injuries” are treated differently for them.
I have long wanted to write a small article on data recovery - yes, somehow there was no chance, because writing "without nothing" is at least inconvenient - you can forget to write about some important point, and again - where to get print screens? But, as they say, who seeks - he will find. So am I. I wanted to write an article on a specific example - please, the case presented itself. And after all, it had to happen that I would write on my own example?
The situation is painfully familiar, if not to every third user USB storage data, then every fifth something - how to drink to give. You insert a flash drive (hard drive, memory card, ...) into a USB-shku with a calm soul, it will flash you a farewell light of indication - and that's it. And no activity, even in the "My Computer" window is not displayed. The first thought is impossibly banal - well, you need to plug the flash drive in a new way. No sooner said than done. We take out the flash drive, insert it into the USB connector, and we see the following picture:
001.
This is where the understanding usually comes in:
a) a furry animal came to the flash drive
b) there were such and such important data on the flash drive that was not saved anywhere else
c) there were still a lot of other files on the flash drive, and you don’t even remember approximately what was on it at all, why you start to think that it even had something that really never happened there, but now this is something irrevocable and irretrievably lost
And here, who cares more - data or a flash drive; I personally have always felt sorry for the data.
So, the situation gradually comes to a panic-stricken consciousness. And the first movement that occurs is to click on the "Format disk" button in the above window. If you do this, then in 99.9% of cases you will get a working flash drive. But completely without data - because it will be formatted.
Of course, you can then try to recover the necessary data using various FILE RECOVERY programs. But this is a long, complicated and, most importantly, unproductive way, because, according to statistics, mostly unimportant files are restored, moreover, most programs, when restoring, assign files not their original names, but names from the "00001~.doc" series, which goes without saying generates the need then to view all the recovered files manually, looking for the right ones. In addition, such programs usually pull out not only the latest version of the file, but sometimes a certain number of its previous copies, which creates a new problem - searching latest version the file we are interested in. Another important disadvantage of this method, in my opinion, is that such programs usually restore only files of a certain type, for example, only text files (.doc, .txt, .xls, etc.), or only pictures photos (.jpeg, .psd, etc.).
To summarize, the disadvantages of the method called FILE RECOVERY include the following (in order of criticality in my personal opinion):
- Often - the impossibility of restoring files by folders (as they were before), and with the same names. Hence - a huge amount of time needed for the subsequent sorting of the recovered files, searching for the necessary (last) copies of the files of interest to us among the many recovered ones, renaming and other "improvements" of the resulting files. About eight years ago I had a similar situation with an external hard drive 60 gigabytes (large volume for that time), on which the only version of the photo archive was stored. Until now, not all the photos restored then have been sorted into folders - they lie in one common heap of about 10 gigabytes of photos.
- The "sharpness" of such programs for the recovery of specific types of files (only test, only photos) - and in this regard, the impossibility of recovering, for example, startup files of programs and in general any other content that does not apply to those listed in the description of each specific program.
Therefore, I prefer the other way.
RECOVERY OF THE FILE SYSTEM OF THE INFORMATION CARRIER.
In the window prompting you to format the damaged storage medium, click "Cancel". After that, you need to make sure that this medium is physically alive (although the above window indirectly confirms this fact). This can be checked in Windows Service called "Disk Management". In Windows 7, you can do this as follows: right-click on the "Computer" icon and select "Manage" from the drop-down menu.
002.
In the window that opens, in the left panel, expand the "Storage devices" item (if it is not expanded) and select "Disk Management" in it.
003.
After the operating system has loaded all the physical media at its disposal ( hard disks, flash drives, card readers, etc.) we look for our failed drive in the list (you can find it, in particular, knowing its volume - so, in my case it was a 32 gigabyte flash drive). Found - look at the type of file system. Most likely it will be the so-called RAW.
004.
Do not confuse the RAW file system type with the RAW file type, which, in particular, is used by many professional cameras. These are two radically different things, although they are the same in name. Although in both cases this is the so-called "raw" type of data organization, just in one case - regarding the file system, and in the other - relative to the data format without any processing, that is, exactly in the form in which they were received from the device for taking these same data.
The RAW file system type occurs when, for some reason, the sector on the storage medium responsible for determining the file system type (NTFS, FAT32, etc.) is damaged. This can happen for a variety of reasons, but the most common are perhaps the following:
- power failure during media initialization
- action of viruses
- aging of the storage medium and the physical death of the sectors responsible for storing information about the type of file system
So, we made sure that the storage medium is alive (that is, the controller responsible for its operation is working, and the device’s memory is also alive, that is, in the case of flash drives and memory cards, the microcircuit on which the information is actually stored).
Now you can start actually restoring the file system.
Here it is worth noting the following:
- The first recommendation is to create a cluster-by-cluster copy from a damaged storage medium. In practice, this means that at least one more information carrier is needed, the volume of which is greater than that of the information carrier being restored. The recommendation is at least not without meaning, since in the event of an unsuccessful attempt to restore the file system, in this case it will be possible to repeat the operation again. In reality, this item is usually ignored by the restoring, which some then painfully worry about ...
- The principle of restoring the file system on different storage media is generally the same, but here is the preferred one software- miscellaneous. For example, the excellent program "PTDD Partition Table Doctor 3.5" can be used to restore the file system ONLY hard drives directly installed in the computer. USB devices are not supported by the program. To recover information by restoring the file system from flash drives and memory cards, it is very convenient to use the R.saver program, which is absolutely free for non-commercial use in the territory of the former USSR.
Since in my case it was the flash drive that was damaged, I used the R.saver program. After downloading the program from the official website of the R.Lab company (and it "weighs" less than one megabyte!), unzip it in a convenient place and run the "r.saver.exe" file.
005.
The initial window of the program opens, in the left part of which we select the drive of interest to us by clicking on it with the left mouse button.
006.
The right part of the window displays extended information about the selected media. Make sure it's selected desired device, and click the "Scan" button.
007.
To the program's request to perform a full (sector-by-sector) scan of the drive's file system, we answer in the affirmative ("Yes").
008.
After that, the process of reconstructing the file system and determining the files on the drive begins:
009.
010.
The time of this operation depends on the size and speed of the drive being restored, as well as on the power of the computer. In my case (Hi-speed "32 GB flash drive), data recovery took about 20-25 minutes.
Upon completion of this operation, we get the following window displaying the folders and files on the flash drive:
011.
We press the "Mass selection" button in order to copy the files and folders of interest to us from this drive to another, working one. No need to be afraid that the size of the folders is shown as "0 KB". All files that should be in folders are present in them. It's just that the weight of the folder itself (without the files contained in it) is equal to several bytes, that is, rounded to the nearest kilobyte, just displayed 0 kilobytes. So, we highlight required files and folders and click the "Save Selection" button.
012.
Select the destination folder (it must be created in advance), click "Select".
013.
And that's it - the process of copying data has begun, after which, after making sure that all the data was really successfully restored and copied, close the R.saver program, format the flash drive and transfer all the recovered data back to it, while not forgetting to do backup critical documents.
014.
This process, of course, is more related specifically to data recovery, but it is based on file system recovery. damaged drive, and therefore I consider it more advanced than the standard recovery of selective file types using "classic" programs.
Hi admin, the trouble happened to me, it seems like an experienced user, but yesterday I wanted to format a USB flash drive, and I formatted all partitions on a portable USB hard drive, and there is EVERYTHING that has been accumulated by overwork in a couple of years: movies, photos, programs, music, images operating systems and so on. In short, there were two partitions on a portable USB hard drive: under the letters (F:) and (H:), and now instead of them there is unallocated space. How would you advise recovering deleted partitions on a hard drive? So far, I have not made any attempts to recover the data, I'm waiting for advice.
How to Recover Deleted Partitions on a USB Portable Hard Drive
Hello friends! To recover deleted partitions on a portable USB hard drive or a simple hard drive (whatever), you can use the DMDE program. The program can recover deleted partitions and files on various storage media, and I'll show you how it all works.
The guinea pig will be my portable hard drive (1 TB capacity), which also has two partitions with the most important data, if I fail to restore them, my partners at work will not talk to me until the new year, but I think it will do without it .
So, we look at what is happening and we ourselves do not repeat this trick unnecessarily, however, if you have an extra hard drive with unnecessary files, you can practice on it.
I connect my portable USB hard drive (1 TB capacity) to my computer and go to Disk Management, as we can see, there are two partitions with data on my portable hard drive: (G:) and (H:). I right-click on the disk (G:) and select Delete volume. "Deleting a volume destroys all data on that volume." I agree and click Yes. I do the same with the disk (H:).
That's it, both partitions along with the data have been deleted on my portable hard drive and now they need to be restored.
Download the DMDE program in the archive on its official website,
then unzip and run the executable file of the program.
We accept the license agreement
In this window, check the item "Physical devices", then select USB portable hard drive and OK.
It searches for deleted partitions on our portable USB hard drive. OK.
In this window, we see that the program found the first remote partition (G :) with a volume of 547 GB and marked it with favorable green xCF indicators.
T the program also found the second deleted partition(H :) 453 GB and also noted favorable BCF indicators.
We can immediately restore these partitions one at a time, or we can also look at the deleted files in this partition to be sure whether we are restoring the partition. Sometimes the DMDE program can find partitions that have existed on the hard disk for a long time with completely unnecessary files. Let's take a look at the deleted files and make sure that we are restoring exactly the partition we need.
If you double-click with the left mouse on the first partition found,
a window will open in which you can select the button.
Virtual reconstruction of the file system. OK.
We see our deleted files and we can restore them one by one, but we will not do this, but we will restore the entire deleted partition with all the files. Exit this window and click on the "Disk Partitions" button.
We return to the first section and restore it, select it with the right mouse button and click on the Restore button
The program automatically detects the partition type, but I also remember that it was Primary.
Apply
Section restored
Go to Disk Management and select Action -> Recheck Disk
Our restored partition appears, but without a letter. Assign a letter to the section. Right click on it and select "Change Drive Letter or Drive Path"
Add
Select a drive letter and OK.
Our files are opened on the partition (G:) safe and sound.
Restoring the second deleted partition
We return to the second deleted partition found by the program(H:), 453 GB capacity marked with favorable BCF indicators. We also look at the deleted files, double-click on it with the left mouse
Click the button All found + reconstruction.
These are exactly the files we need. We return, click on the Disk Partitions button.
Insert
Basic
Apply
Deleted partition recovered
Go to Disk Management and select Action -> Recheck Disk


