How to recover photos deleted from computer. How to recover deleted photos
02:36PM 6/15/2017
Deleted photos from your desktop or laptop? Format the Partition hard drive of your PC such as C: D: E: drive by mistake and lost snapshots after formatting the hard drive? How to recover deleted/formatted photos from Windows computer? Photos can be removed from hard drives due to:
Deleting a photo file from the internal or external hard disk
The photo is deleted with "Shift + Delete" which wipes the photos bypass the trash
Third Party Applications, which cause a software violation that conflicts with your system software and photos
Power failure at preview photos from hard drive
Interruption during photo file transfer between external drive and system
Virus attacks on file photos are another major reason for losing photos from computer hard drives
Reformatting a hard drive by converting the file system from FAT to NTFS, resulting in photo loss
The other main reason for losing a photo is hard drive formatting. This usually happens when you connect external hard drive (containing your photos) to your computer and you receive an error message such as: "your HDD not formatted, you want to format it now." It forces you to format and data loss
An easy way to recover lost jpg pictures jpeg png gif bmp tif tiff and raw image data from computer HDD/SSD/SSHD/USB drive - use free computer photo recovery software. Download hard drive photo recovery software for free
Computer photo recovery software supports recovery image of hard drive in Windows 10, Windows 8, Windows 8.1, Windows 7 Home Premium, Professional, Ultimate, Enterprise, Windows Vista, Windows XP, 32 and 64 bit. You can recover photos from your computer's internal hard drive and external USB storage. Computer photo recovery software can recover deleted images from computer SATA, SAS and IDE hard drives, SSD, SSHD 40GB, 80GB, 100GB, 120GB, 160GB, 250GB, 500GB, 750GB, 1TB, 2TB, 3TB, 4TB, 8TB. Computer photo recovery pro works great on all desktop workstations and laptops, ultrabooks and netbooks including Dell Precision, Dell Optiplex, Gateway, Acer Aspire, Dell XPS, HP Specter One, Samsung ATIV, Vizio Touch PC, Lenovo ThinkCentre Edge, Dell Latitude, Razer Blade, Acer chromebook, Asus VivoBook, Microsoft Surface, Samsung Chromebook, Toshiba Satellite, Asus Transformer Book, Acer Aspire, Asus Ultrabook, Lenovo IdeaPad Yoga, HP AMD, HP Pavilion, Sony Vaio, HP Envy.
PC photo recovery software is a wonderful photo recovery tool for any photo loss situations. The software easily performs photo recovery from internal and external hard drives. In addition, it supports various hard drive brands such as Toshiba, Kingston, Seagate, SanDisk, Hitachi and many more. With this application, you can also recover RAW files from high resolution, filmed digital cameras. Apart from photo recovery, the software also recovers other media formats such as audio and video.
To increase the chance of recovering photos on your Windows PC hard drive, it is best to stop using your Windows computer before restoring deleted photos graphics. This is because continued use of the computer may cause the file to be overwritten, causing the erased images to not be recovered.
How to recover deleted formatted photos on computer hard drive
Step 1. Connect an external hard drive to your computer. Then, on the computer, check the drive letter (for example, drive E:) assigned to the hard drive. If you are recovering files from a Windows computer's internal hard drive, you can skip to step 2.
Step 2: Launch the computer photo recovery software, and then in the photo recovery software, select the drive letter of your hard drive, then click "Next" to start scanning deleted photos.
Step 3. You will see a list of recoverable photos. Select the ones you want to recover and click "Restore" to save them.

Download the computer recovery utility and recover lost photos from your computer hard drive.
![]()
Other Helpful Data Recovery Tutorials
You can recover deleted Worldwild files just like you can do it yourself on your computer. So you don't have to go to data recovery centers looking for data recovery services from professionals. You can Performa data recovery and photo recovery all over the world, including countries, Japan, USA, UK, Canada, Australia, New Zealand, India, Pakistan, Nigeria, Philippines, Germany, Bangladesh, Egypt, France, Italy, Thailand, Nepal, Netherlands, South Africa, Poland, Turkey, Iraq, Spain, Sweden, Kenya, Cameroon, Malaysia, Russia, Belgium, Israel, Austria, Long Island, Romania, Zimbabwe, Greece, Sierra Leone, Mexico, Denmark, Switzerland, Morocco , Norway, Ireland, Singapore, Ghana, Tanzania, Finland, Portugal, Liberia, Jordan, Algeria, Jamaica, Guinea, Uganda, Hong Kong, Czech Republic, Argentina, Yemen, Croatia, Chennai, Bangalore, Toronto, Mississauga, Delhi , Calcutta, Mumbai, Pune, Dubai, London, Nottingham, Hyderabad, Sheffield, Croydon, Barking, Bristol, Manchester, Watford, Luton, Dartford, Gatwick, Reading, Norwich, Chelmsford, Newhaven, Northampton, Southampton, Nottingham, Derby, Abingdon , Gloucester, Bury St Edmunds, Exeter, Los Angeles, Melbu ph, Chicago, Houston, Perth, Philadelphia, Phoenix, San Francisco, Detroit, San Jose, Dallas, Kenya, Birmingham, Finchley, Vancouver, Canada, Montreal, Ottawa, Calgary, Winnipeg, Australia, Sydney, Melboune, Brisbane, Auckland, Hamilton, Waikato, Atlanta, Boston, Riverside, Seattle, Minneapolis, Tampa, St. Louis, Baltimore, San Antonio, Delaware, Denver, Charlotte, Pittsburgh, Portland, West Midlands, Greater Bristol, Cardiff, Greater Glasgow , West Yorkshire, Bradford, Leeds, Liverpool, Greater Manchester, Nottingham Derby, Portsmouth Southampton, South Yorkshire (Sheffield), Newcastle Sunderland, Paris, Randstad, Istanbul, Moscow, St. Petersburg, Berlin, Madrid, Rome, Kyiv , Bucharest, Minsk, Vienna, Hamburg, Budapest, Warsaw, Barcelona, Kharkiv, Munich, Milan, and states Alabama, Alaska, Arizona, Arkansas, California, Colorado, Connecticut, San Diego, Miami, Florida, Georgia, Hawaii, Idaho, Illinois, Indiana, Iowa, Kansas, Kentucky, Louisiana, Maine, Maryland, Massachusetts, Michigan, Minnesota, Mi sissipee, Missouri, Montana, Nebraska, Nevada, New Hampshire, New Jersey, New Mexico, New York, North Carolina, North Dakota, Ohio, Oklahoma, Oregon, Pennsylvania, Rhode Island, South Carolina, South Dakota, Tennessee, Texas, Utah, Vermont, Virginia, Washington, West Virginia, Wisconsin, Wyoming.
Hello, Dear friends! Today we will talk about whether it is possible to recover deleted photos. I will say right away that this can be done, but I must warn you:Attention: after accidental deletion of a photo, IMMEDIATELY stop all work on this device!
I write on the device because it doesn’t matter what you work on: on a computer, laptop, tablet or smartphone.
The thing is that after deletion, the data remains in the same place, in the same memory cells. Only now, in the data markup table, the record is deleted that a photograph is stored in these memory cells. If you continue to work on the device, download some data, save something, new data may be written to the memory addresses where the photo is stored.
In case of overwriting, you can say goodbye to your photos, so be careful and after accidental deletion, stop all work immediately.
If the conditions are met, I hasten to please you: you can recover deleted photos. How to do this, I will show examples of various programs later in the article.
How to recover deleted photos
To facilitate the restoration of photos, many programs have long been written:
- PC Inspector File Recovery
- R.saver
- RS Photo Recovery
- Recuva Free
- Tenorshare iPhone Data Recovery
- PhotoRec
- DMDE
- GetDataBack
It is important to understand that the program cannot be installed on a disk on which you will have to recover deleted photos. You should install it on another hard drive or use the Portable version, launched, for example, from a USB flash drive.
I propose to dwell briefly on each of these programs.
PC Inspector File Recovery
Excellent program. Can work with different file systems (FAT 16, FAT 32, NTFS). Can recover various types of files, as well as deleted drives. Works even with network drives!
You can specify the time and date of the recovered files. It is very comfortable.
Choose the type of data to be recovered, the media, click restore and the program does everything by itself and even shows the probability of recovery.
R. Saver
The program recovers data even if the file system is damaged. It has a friendly interface, has the ability to restore photos even after formatting the disk.
Recuva Free
Highly popular program. I use it often at work, so I can safely recommend it. The program is free, recovers various data (photos, videos, music, texts, archives) from various types devices. Including from phones, and from music players.
DMDE
Too good program(actually, they are all good). The advantages of DMDE is that it is Portable (which means that the program can be uploaded to a USB flash drive and used without installing it on a computer). In the article we will consider how to use this program.
GetDataBack
Quite a powerful program. Therefore, it is somewhat more difficult to work with it: there is different versions for file systems (for FAT and for NTFS).
The program recovers deleted files even after reinstallation operating system(again in case they weren't overwritten with new files)
Recovery in practice
I propose to move from simple to complex. And for starters, the easiest option is to check the cart. If you applied the delete procedure with the Delete key or right-clicked -> Delete, your photos ended up in the trash (and this is very good).
To get photos from the basket, you need to right-click on the "Basket" label and select "Open"
We will see the basket contents window:
In the list of files we see deleted photos. It remains only to select the ones you need, right-click -> "Restore". The photo will be restored to the folder from which it was deleted.
How to recover photos deleted by the trash
In this case, you just have to use special programs. Let's look at the ones that I myself use.
Get back deleted photos with GetDataBack
Use the DMDE program
First of all, download the program. To do this, click on the button below:
We need to select a console for Windows:

After starting, select the Russian language, click "OK" 
Next, we accept the license agreement (put a cross and click the "Accept" button) 
The next step is to decide where we will look for deleted photos from. If everything is in order with the disk, we know where the folder was, then we select “Logical drives”, and in the right column the drive letter on which the folder was located.

Then select "Full Scan" 
Click "Scan" and wait for a while (not very long) 
As a result, we get a list with the number of files different type. Our task is to click "Save" 
In the next window, in the left column, select the "Graphics" item. These are all images from the disk, and in the right one - jpeg (I have photos saved in this extension) 
The list opens jpeg files. Somewhere among them are our photos. The problem is that the names are indicated by numbers. Therefore, you will have to save all the images found, and then select the necessary ones from them. 
To select files, press the insert (ins) key. You can hold and wait until all files are selected. Press Ctrl+U to save. Pay attention to the way our photos are saved. It is listed on the bottom line and is located in the program folder by default. 
This completes the work with DMDE, go to the folder and look at the saved images. Among them we find deleted photos and copy them to where we need.
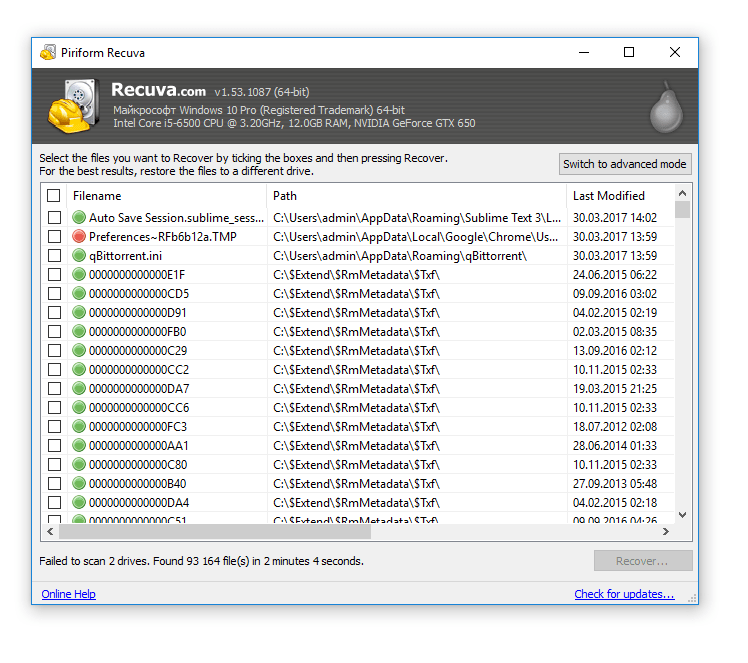
Recuva for recovery
Of course, first of all, we download the distribution kit of the program:Press the button " Download Free version"

Then we learn how to use the program: select the “picture” file type, click “Next”, and specify the folder in which to look for accidentally deleted photos:
Click "Start" and see that the search process is in progress:

For better work, we need to switch to advanced mode, then select the file type (graphics) and click the "Analyze" button. A table will appear with a list of pictures, from which we can only select the ones necessary for recovery.

The table is quite informative, if you drag the slider to the right, you can see the date of modification, size and other useful data that will allow you to correctly identify deleted photos.

On this work with Recuva program ends, the photos are restored (usually :)).
Photo recovery in Android
How to return a photo to the camera
Here you need to understand the meaning. A camera is just like a computer. It has a storage facility. Usually it's a flash drive.Our task is only to get access to the flash drive of the camera through a computer.
To do this, you can use a special device called a Card Reader.

It is also worth noting that modern laptops have a built-in Card Reader, through which you can access the camera's flash drive (sometimes an adapter is needed for this).

Accidentally deleted photos from your phone or tablet?
Again, there are no problems. The main thing is not to forget that you need to respond quickly and you should not save new data to your devices, as well as update them.
In this case, our task is to connect the phone or tablet to the computer via USB cable, which will allow you to see the device's memory in the My Computer window. Further we work by analogy with the camera.
Photos accidentally deleted from iPhone
Finally, we got to a special case: the photos were deleted from the iPhone. Here the algorithm of actions is slightly different:
- Try to retrieve photos from the trash;
- Use iPhone Recovery;
- Use sync.
Let's go in order. In operating version iOS systems 8, you can quickly and easily recover deleted photos.
To do this, go to the "Photos" application and find the "Deleted Photos" album. All removed from iPhone photo fall into this album and are stored in it for some time. This is very handy just in case of accidental deletions.
We just need to mark those photos that should be restored, then click the "Restore" button!
We will use point two in the case when the time was lost, the photos were deleted from the basket, but there is still a need to restore. Also, this item will help to restore photos from older devices (IOS 7 and earlier) or, for example, in case of problems with the device.

The task is this:
- We launch the program, connect the iPhone to the computer;
- Press the "Start Scan" button;
- Select "Camera Roll" in the left column;
- Select deleted photos, click "Recover".

Synchronization using iTunes
Of course, any self-respecting user of Apple technology should have in their arsenal iTunes. One of the useful features of this program is the ability to create backups. In case of accidental deletion of photos, you can get them from the backup (the main thing is that these copies are).

- connect iPhone to computer
- We find it in iTunes, right-click and select "Restore from backup"
- Choose a copy and agree to restore
Memory is the part of a computer that stores data. certain time. Like all computer elements that have a limited amount of content, memory must be cleared to make room for new information. In this regard, there is a need to restore data that was subject to deletion for any reason.
First, you should know that data does not disappear after deletion and this is not the end of their lives. Approximately, the actions take place according to this scheme, a value that corresponds to 0 is entered into the disk file table, that is, overwriting of this place is allowed. Thus, if you remember in time the need for photographs, and other data, you can return them to their places.

In order to reach the goal, you need to resort to using one of the methods. There are 3 main ways to help you recover your lost data: the easiest way is to use the recycle bin, the most effective method- is to restore data from backup storage, for the most difficult cases - to resort to the help of third-party programs.
Restoring data from the trash
For these purposes, there is such a tool as the recycle bin, it stores the data that you just deleted. In the event that you delete data by holding Shift key, happening permanent deletion, at least Windows tools recovery is not achieved, other methods will suit you.
The Recycle Bin has a limited capacity, like any storage, so if you delete large files, which in the future you may need to restore, then you should increase its volume to a reasonable size, in your opinion.
To restore the contents of the basket you should:
1.Open given repository, it is located on the desktop. If you do not have such an icon, you need to:
1.1.Right click on the desktop;
1.2.Select the "Personalization" option;


1.4.Check the corresponding item.

2. Find the files you want to restore in the trash and right-click;
3.Click on the "Restore" option.
After that, the files will be placed back in the place from which they were deleted.
To increase the size of this storage, you should right-click and select the "Properties" item. In the "Set size" field, specify the volume that you want to allocate for the basket in Mb.

Recovering data from a restore point
There are two ways to use this feature and, of course, you must have this service running. Thanks to the first option, you will restore the state of the system at the time the point was created, and this is not always convenient; by another method, you can roll back any folder to the state in which the necessary data existed. Let's consider the options in order.
1 way
1.Open the "Start" panel;
2.Right click on "My Computer";
3. Select the "Properties" element;

5. In the appropriate section, click on the "Recovery" button;

6.Select the desired point and roll back.
2 way
The following is a simpler and more accurate way:
1.Go to the section with the folder in which the data was deleted;
2.Right click on it;
3.Among the options, find "Restore previous version";

4.Select the appropriate point and follow the instructions.
"FotoDOKTOR" - a convenient program for restoring photos

If only photos were lost, then use the Russian-language program "PhotoDOCTOR" - https://foto-doctor.ru. The software recovers photos from hard drives, USB flash drives, memory cards, cameras, tablets, phones and other devices.
To restore a photo, you need to select the operating mode, specify graphic formats, file size and start scanning. Then view the report, mark the desired photos and save them to your PC, burn to disk or publish on the Internet via FTP.
Data Recovery with EaseUS Data Recovery Wizard
In general, the choice of the application with which you will recover data is yours, they fundamentally differ only in delivery methods and comfort. This program has a demo version, thanks to which you can perform the necessary actions.
The fact is that when you delete data, from that moment they are allowed to be overwritten and, accordingly, if this becomes necessary, due to the active use of disk space, the cells with this data may be occupied. From this we can conclude that the faster you get down to business, the more likely it is to completely restore all the data to its original form.
Principle of operation this application consists in analyzing the hard disk for "deleted" data, that is, having an appropriate value, usually 0, then all these elements are built into a list and shown to the user, who must decide whether they are necessary.
The program is quite convenient and fast in operation, fully justifies the expectations placed on it.
She also has additional advantage in the form of the possibility of creating a secure basket, from which you can recover data even if you have cleared the standard basket, it is also able to store data in itself for quite a long time, protecting it from being overwritten.
1.To become the owner of the utility, follow the link https://download.easeus.com/trial/drw_trial.exe ;
2. Run the program, you will be presented with a choice of data that the application will look for, we need an image or graphics;

3.Select the logical drive on which the data was previously stored;
4.Start the scan and wait for it to finish;
5. In the window that opens, you can view the files found by the application, and then check the box next to the file that interests you and restore it.
It can also be done in a different way. We will talk about it in the next article.
Regardless of the application that you use, the algorithm of actions will not differ significantly, and by performing such manipulations, you will be able to return precious photos.
If you still have questions on the topic “How to recover deleted photos on a computer?”, You can ask them in the comments
if(function_exists("the_ratings")) ( the_ratings(); ) ?>
A headache for PC users is the loss of files: photos, documents and other data. We will not touch on theory: this practical guide explains the basic principles of file recovery. We hope you can put them into practice.
Consider three main scenarios for recovering deleted files on a computer:
Programs used in recovery:
Is it always possible to recover deleted files on a computer?
Not always, but in many cases it is quite possible. Let's explain.
After deletion, the files remain on the hard drive. In the file table, they are assigned a label - “0”. This means that this space is not occupied and can be used to record other information.
Thus, the file is hidden from your eyes, it is only conditionally deleted and can be restored until it is overwritten with other data. (By the way, you can recover files after overwriting, but there is a risk that they are partially damaged and cannot be returned).
How to estimate the chances of recovery after deletion?
The probability of recovering files depends on many factors. The checklist looks something like this:
- How the deletion was done - through the Recycle Bin, bypassing it (Shift + Del), through the formatting command
- Time elapsed since deletion - the further, the higher the risk of overwriting files
- Type of deleted files- some files (images, videos) can be partially restored, others cannot be restored if even one byte of data is lost
- Storage device type - hard disk, RAID array, etc.
- File system type - NTFS/FAT/exFAT, etc.
With luck, the files can be restored completely or partially. It is impossible to determine the probability in numbers, but it is worth a try.
How to recover files from the Recycle Bin
Usually, after deletion (via the Del key), files are sent to the Recycle Bin. The Recycle Bin is a temporary storage, the data is there for 30 days, after which it is automatically deleted. If during this time you change your mind (for example, remember that among the deleted ones there are necessary files), check the contents of the Recycle Bin and restore the files. How to do it:
- Open the Recycle Bin via the desktop icon or via File Explorer
- Select files to restore and use Restore to context menu
- The files will be restored to their original location
How to recover files if the Trash is already empty
Even when you empty the Recycle Bin, the files are not permanently destroyed. However, you will need additional utilities and time to successfully recover deleted files. Recovery programs work according to the same principle: they scan the file system, look for sectors marked “file deleted” on the computer.
Note. By installing the program, you inevitably make changes to the file table, reducing the chances of recovery (depending on the amount of computer information written to the hard drive). We advise you to install the recovery program on a USB flash drive, another computer, or a disk partition that was not used to store deleted files.
Restoring files after formatting
Let's move on to more "heavy" cases. In particular, after formatting, not only individual files, but the entire hard disk partition is subject to change. The result is irretrievably deleted files.
Is there a chance to recover data on a PC in such a situation?
- After quick format - yes
- After a full format, the chances are minimal
What programs will help you recover files on your hard drive?
In fact, there are dozens of recovery programs. We do not recommend taking the first one that comes across: there is a risk that you will not only not recover your files after deletion, but also spend money on useless functions. We will list the top three programs that have been tested and respected by other users.
1. EaseUS Data Recovery Wizard: advanced file recovery after deletion (in difficult cases)
- Convenience. Data Recovery Wizard is perfectly integrated with file system and Windows OS. Thanks to the built-in recovery wizard, it is convenient to work with it.
- Protected Cart. Unlike the standard Recycle Bin, you can store deleted files in it and recover them even after cleaning.
- Solving complex cases. Recovery of files deleted without Recycle Bin (via Shift+Delete), after formatting or on HDD partitions with “raw file system”.
2. Recuva is an all-in-one file recovery solution
Recuva is a free and actively developing program for Windows platforms. It is very easy to restore files on your computer with it, plus it does not require money for basic functions or removing limits. By the way, on the pages of Softdroid "and we already talked about how to recover a deleted file in Recuva. Read our detailed guide.
We note three main features of this program.
- Simplicity. For beginners, Recuva offers a wizard to recover deleted files. Here you can specify certain types of files (for example, only photos), select a search location, and set other parameters for finding deleted information.
- Deep scan. By activating the option, you increase the chances of recovering a deleted file, even if nothing was found during a normal scan using other recovery utilities.
- visibility. All found files are marked. The color indicates the probability of recovery: high, medium, low. A quick preview is available for the found images.
3. DiskDrill - recover deleted files on PC and Mac OS X

DiskDrill is a young product in the computer recovery software market, but good technical support and community speaks for the maturity of the program.
The functionality of DiskDrill is suitable for recovering most files stored on a PC: images, music, videos, documents, archives. There is a version of the program not only for Windows, but also for Mac OS. Regardless of the OS, you can recover 100 MB of found files for free (and this is a generous limit).
DiskDrill Features:
- Selecting the type of data to recover. You can select only those file types that will be in the search results. Filtering by attributes and flexible search among recovered files are also available.
- Pause / resume scanning at any time. Convenient if you have a large HDD/SSD.
- Rewrite protection. By locking partitions while DiskDrill is running, you will insure your hard drive from overwriting deleted files.
Restoring files on a computer using Hetman Partition Recovery
 Hetman Partition Recovery: universal recovery toolkit
Question answer
The photos were deleted from the computer in an unknown way. I suspect that some kind of virus could have done this. I tried to recover a deleted file using Wise Data Recovery. All files that were found are in the "LOST" state. I take it they are non-refundable? Did the virus eat them up? Or is it possible to somehow cure these files and still restore them?
Answer. See if the program has Wise Data recovery mode deep scan. Probably not. Install other recovery programs. For example, Recuva has an in-depth scan feature that increases the chances of recovering deleted files. You can also use PhotoRec to recover photos on your computer. Both recovery utilities are free.
Photos and videos are an integral part of life modern man. We try to capture all the moments of our lives, both important and not so important. From time to time, some pictures have to be deleted, and, unfortunately, important photos are accidentally deleted along with the desired ones. Such inattention is very frustrating and causes a storm of emotions. But is there a way out? How to recover deleted photos from phone? Do I need special programs for this? How to do this with and without a computer? How to prevent this?
Deleted permanently?
Before you figure out how to recover deleted photos from your phone, you need to understand what happens after deletion. It is worth noting that no files disappear from the device completely. They are simply transferred as images to a separate system folder, which is regularly overwritten and updated. It includes not only photos, but also calls, messages and information about games and programs.
Obviously, the snapshot data will not be stored for so long, so it is necessary to start recovery as soon as possible, because the more the device is used, the more difficult it is to remove such precious information.
Can I restore photos myself?
In order to recover deleted photos from your phone ("Android"), you need to have some skills. If this is your first time doing this, be prepared that it will take a long time and may not be successful. Therefore, if you have friends or acquaintances who know how to install and use special software packages, it is better to contact them. Be prepared for the fact that some utilities for recovering deleted files will be paid.
Google: Photos and Drive
On devices with software Android has a synchronization function with several Google programs that automatically save photos not only in the device, but also on the server. One such application is Google Photos. If you have previously set up your smartphone for such backup cloud storage, then within two months you can restore pictures from the trash.

With "Google Drive" the same story: go to the trash and restore. The developers say that there is no time limit, like Google Photos, but it's still not worth the risk. This is the easiest way to explain how to recover deleted photos from phone.
DiskDigger
DiskDigger knows how to recover deleted photos from your phone. It helps to find the deleted file in hot pursuit. This program is installed separately from the "Market" and is great for beginners. But how to use it?
The program scans the device for PNG and JPG files. You can set your own search criteria, such as creation date, size, or location. By the way, as soon as you have deleted a photo, remember where exactly it was stored - on a memory card or in the device itself. It depends on whether it is possible to recover deleted photos from the phone by implementing the following option.
Hexamob Pro for memory card
This program is capable of processing any memory card up to 64 gigabytes. Another disadvantage is that it works exclusively with phones that have superuser rights, or rooted ones.

As for the work itself, it is worth downloading the program and unzipping it through a computer. After that, Hexamob must be transferred to a memory card and run like any other application. After complete installation choose one of the following options:
- Safe removal.
- Selective recovery.
- global recovery.
Depending on what you have chosen, you need to act in accordance with the prompts of the program.
Android Data Recovery
Perhaps this is the most common option by which you can recover photos deleted from your phone. This program works in tandem with a computer and is considered one of the most reliable. Android Data Recovery, like the applications described above, performs a full scan of your device.

To get started, download the program to your computer. Before connecting your smartphone to a PC, you need to do several operations in the settings:
- Go to "About phone".
- Press "Build number" until the smartphone tells you that you are in developer mode.
- Back in "Settings", select "Options for Developers".
- Check the box next to USB Debugging.
Now you can connect your smartphone to a computer that is already running the downloaded program. Click "Start" to scan and find deleted files. You just have to find the desired photo or video from the provided list and click the "Restore" button. If you can't, your phone may not have superuser rights. Only by rooting your smartphone, you can restore the frames so valuable to you.
CardRecovery
The name of the program itself speaks of the area in which it works. Its indisputable advantage is not only the ability to restore photos and videos, but also to fully preserve their quality. Unfortunately, not all utilities can boast of this.

This program works on the same principle as the previous one. Although she is on English language, its simple appearance and illustrations will help to understand everything without difficulty. In it, you can specify the approximate size of the desired file and its type (it was a photo or a video).
Conclusion
Of course, when there is information on how to recover accidentally deleted photos from your phone, the work becomes easier. But it is best not only to be more careful, but also to create several backups. Make it a rule to upload all the information from your phone to a computer or cloud storage. So it will be much easier to restore what you need.


