Programs for recording flash drives. WinToFlash - install Windows from a USB flash drive
In this article, we will tell you in detail how to quickly and easily write an ISO image to a USB flash drive (USB flash drive). This is usually necessary to create bootable USB flash drives with Windows XP, 7, 8, 10 or Ubuntu (Linux) operating systems, in order to then reinstall a computer or laptop using it. But the described method can be used to write any ISO image to a flash drive, as it is one of the most versatile and fastest.
What is necessary?
To create a bootable USB flash drive with Windows, Ubuntu or another image, you must have the following prepared:
- Flash drive (USB flash drive);
- Any ISO image;
- A cup of tea or coffee and 15 minutes of your time.
Write a disk image to a USB flash drive
1. Preparing the flash drive
Prepare a working flash drive on which there are no important files for you, since all files will be deleted during the image recording process. On average, flash drives 4 GB or 8GB should be enough for the average. ISO image with Windows, Linux or another image. But it is advisable to check and compare the size of the image and your flash drive, for this, right-click on the image and select "Properties".
2. ISO image
 Any ISO image will do. If you want to create a bootable flash drive for installing Windows or Linux operating systems, then it is advisable to download images from the official websites of the developers in order to avoid various errors during installation and operation.
2.1 Download ISO images
If you already have a downloaded image, you can skip this step.
- The original Windows images are Windows 7, Windows 8.1, Windows 10, and Windows XP is officially no longer available for download from the official site.
- The original Linux images are Ubuntu 16.04.1 / 14.04.5 , Mint 18.1 .
Or use your favorite torrent trackers. 🙂
For burning and editing images, we recommend the UltraISO program, which does not take up much space, is fast, convenient and easy to use, correctly writes images to a USB flash drive, thanks to which Windows or Linux OS images automatically become bootable, from which you can install Windows or Windows immediately after burning. linux. , install and proceed to capture the image. The program is completely free for 30 days.
4. Burning an image using UltraISO
Run the program and open the ISO image, to do this, go to the menu File > Open(CTRL+O), or simply double-click on the image file.

Insert a USB flash drive into a computer or laptop and go to the menu on "Boot" > "Burn Hard Disk Image..."

4.1. Proper formatting of a flash drive


Attention! Formatting will destroy ALL data on the flash drive. Press "OK" to start formatting, "Cancel" to cancel it.

4.2. Writing an image to a flash drive
To start burning an ISO image to a USB flash drive, follow the instructions in the following screenshot. Select your flash drive, write method "USB-HDD+" and click "Burn".

Do not stop writing the image to a USB flash drive, on average, it takes 4.5 GB to write an image 10-15 minutes, it all depends on the speed of the flash drive and your HDD / SSD drive.

Recording boot image completed! Now you can restart your computer and start installing the operating system if you wrote down Windows image or Linux.
If something is not clear, write in the comments below, we or one of our readers will definitely answer you!
In this article, I want to tell you how to burn Windows 7,8,10 to a USB drive. Two methods will be described. However, all versions of Windows operating systems are written almost the same way. To do this, I needed the following programs: Torrent UltraISO Image operating system USB stick
Three ways to burn Windows to a USB flash drive
To carry out this procedure, a USB drive with a capacity of at least four gigabytes was required. In my case, an 8 GB drive was used. So, for starters, it was necessary to format the media in NTFS format. This format I chose by going to "My Computer" first. Seeing the flash drive in the list of connected drives, right-click on it. AT context menu select "Format"
In the field "Type file system»Choose NTFS.

Burning Windows 7 to a USB flash drive using UltraISO
After formatting the flash drive, download the desired Windows version(7,8,10) and a program for recording UltraISO. For the convenience of downloading the operating system, it is better to use a torrent, you can download it in any search engine.
Download UltraISO— http://ultraiso.ru.softonic.com/
First of all, install and run the UltraISO program. After the program is fully opened, in the top menu bar, select the “File” command, then “Open”.

After opening the window with local drives, find the loaded Windows and double-click on it.

Before starting recording, make sure that the drive you want to record to is selected. To do this, look in the "Disk Drive" field. Also, in the "Write Method" field, I had the USB HDD value.

After the actions taken, the recording began, and, as a result, the creation bootable media. After the recording is completed, the USB flash drive can be used to install Windows on a PC.
This method is also quite simple and you will need the winToBootic program to execute it. When you open the program immediately displayed flash drive. Next, we find the downloaded image of Windows 8 and by dragging the mouse moved the shortcut to the window open program. After we put a tick on the inscription "Quick Format" and clicked "Do it!".
Download winToBootic- http://www.softportal.com/get-38790-wintobootic.html

This program formats the media on its own after a preliminary warning. However, in my opinion, winToBootic is very easy to use and suitable for Windows entries 7,8 and 10 versions.
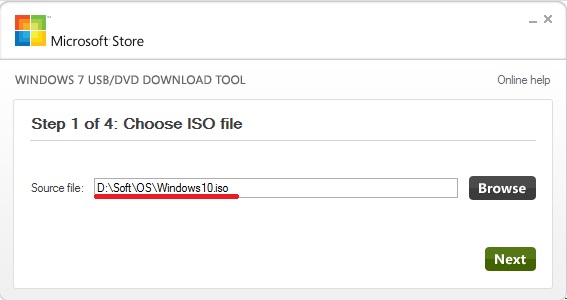
Burn Windows 10 to USB using Windows USB/DVD Download Tool
I will burn Windows 10 to USB using a utility from Microsoft - Windows USB / DVD Download Tool. You can download this utility from the official Microsoft website.
Download Windows USB/DVD Download Tool— http://wudt.codeplex.com/
After starting the program, we specify the location where the downloaded ISO image of Windows 10 is stored.
Then select the media type (USB).

The third stage is the selection of the desired flash drive.

Once selected, click "Copy". The program said that all data on the USB will be deleted.

And finally, the fourth stage is the beginning of the recording.

Writing Windows to a USB flash drive is quite simple, you need to have only the most minimal set of programs for this. The UltraISO method works for almost all versions of Windows except 10. But there won’t be many problems with this version either, because Microsoft utility very easy to use and does not require special skills!
This installation method is suitable if you own a netbook or your CD / DVD drive is out of order and you need to install Windows 7. This method is also good because the process of installing Windows 7 from a flash card is several times faster than from a CD or DVD disc a.
Before you start burning Windows 7 to a USB flash drive, copy all important data from the USB flash drive to other storage media ( HDD where Windows, another flash card, disk, etc. will not be installed), since during the process of formatting and writing the Windows 7 image to a USB flash drive, all data on it will be destroyed.
First way
If you are creating a bootable USB flash drive while in the Windows 7 operating system, then you will need a program Windows 7 USB/DVD Download Tool, which can be downloaded from Of. Microsoft website at the link.
If you are creating a bootable USB flash drive under the Windows XP operating system, you will need to install Microsoft .NET Framework 2.0 and Microsoft Image Mastering API 2.0. Of course, if you already have them installed (more often for the first program), then you do not need to reinstall them.
1) Insert the flash drive into the laptop.
2) Run the program. Click the button Browse.
3) Select the ISO image of Windows 7 and click the button Open.

4) After you have specified the ISO image of Windows 7, click the button Next.

5) Press the button USB device.

6) Your flash drive should appear in this window. Click the button Begin copying

7) Click on the button Erase USB Device

8) Click Yes.
9) The process of writing the Windows 7 image to a USB flash drive will begin

10) When the recording is completed, the status will change to Backup completed . close the program

Second way
For the second method, you will need a program UltraISO.
1) Insert the flash drive into the laptop.
2) Run the program. On Windows 7 and Windows Vista It is recommended to run the program as administrator.
The UltraISO program is paid, but you can use the trial period, consider this option. Click the "Trial period..." button

3) Select a menu item File ->Open...

4) Select the ISO image of Windows 7 and click the button Open.


6) In the field Write method: select USB-HDD. Click the button Format.

7) The formatting utility will start. Click the button To begin.

8) Click OK.

9) After formatting, a success window will appear. Click OK.

10) Close the program.

11) Press the button burn.

12) Click Yes.

13) The process of writing the Windows 7 image to the USB flash drive will begin.

14) At the end of the entry in the column event the message "Recording completed!" appears. Close the program.

Third way
For the third method, we need the WinSetupFromUSB 1.0 Beta 7 - program.
Note: the link is a newer version, but the principle remains the same.
1) Insert the flash drive into the laptop.
2) Run the program. In Windows 7 and Windows Vista, the program must be run as an administrator.

In field USB disk selection and format should be your flash drive.
Note: If the flash drive is not detected, then format it with the PeToUSB or HPUSBFW utility.
Also, the flash drive may not be detected if it is inserted into the laptop after the Winsetupfromusb 1.0 Beta7 program has been launched and in order for it to be determined, just press the button Refresh.
3) Press the button RMPrepUSB.

4) We mark such lines as: WinPEv2/WinPEv3/Vista/Win7 bootable (CC4), NTFS. Put a tick next to Boot as HDD (C:2PTNS). Click the button 6 Prepare Drive.

5) Press the button OK.

6) Press the button OK.

7) After that, this will appear Dos window.
Warning: Do not close this window. It should close automatically.

8) After Dos the window closes click the button exit.

9) Check the box next to Vista/7/Server 2008 - Setup/PE/RecoveryISO. Click on the square on the right.

10) A window will appear Folder overview where you need to choose virtual drive into which the ISO image of Windows 7 is mounted.
After you have done this, press the button OK.

11) Press the button GO. The process of writing Windows 7 to a USB flash drive will begin.

12) When the recording is finished, this small window will appear. Click OK.

13) Close the program.

Fourth way
The installation method is quite simple, so anyone can do it! For this we need:
1) Windows 7 image
2) A flash drive with a capacity of at least 4GB
3) A program for creating and editing ISO images, ultraISO from the above method or a free MagicDisk
You can take any media from a regular flash drive to an SD card, but not less than 4GB!
4) Run the command line (in Windows XP, these are standard-> command line. In Windows Vista / Windows 7, open start, at the very bottom there is a search, enter cmd and open as administrator).
5) Next, on the command line, enter diskpart, the disk management utility will open.

6) Next, in the diskpart utility itself, enter: list disk, this will display all the physical disks of the PC, namely disks and not partitions.
Among them we are looking for our flash drive.

7) Then we execute the command select disk#, where # this is the number of our flash drive.
In this case, the flash drive on the screen is number 1, therefore s elect disk 1. All further manipulations will be carried out only with this disk.
8) Execute the command clean, clear the drive, then the command create partition primary- create a new partition on the disk.
9) After creating a new section, write select partition 1, select this section for manipulation, enter active, thereby making the section active.
10) Now in order for the flash drive to be visible in bios, you need to format it in NTFS format, which we do with the command format fs=NTFS.
11) Next, you need to activate the process of connecting the device and assigning letters to it, we do this with the command assign.
Everything, the preparation process is completed.

Installing Windows 7
Distribution recording can be done with any file manager or free .
In this case, you need to somehow open the image installation disk with the OS, you can do this with any disk emulator, Alcohol or MagicDisk, create an image and copy everything from it with a file manager to our prepared flash drive.
Everything, the process of creating an installation flash drive is completed, now we are trying to install the OS by first setting it in bios.
Well, that's all, which of the four ways to create a bootable flash drive to use is up to you.
Inclusion in Boot BIOS from a flash drive
Before you start installing Windows 7 from a USB flash drive, you need to go into the BIOS and enable booting from a USB flash drive.
To enter the BIOS, you need to press a certain key when the computer boots. On the desktop computers this is the Del key. On laptops, the F2 key is most commonly used.
Usually, when you turn on the laptop, a screen appears on which at the very bottom there is a line that says which key you need to press in order to enter the BIOS.
If you do not have such a line, then you need to look at the information on how to enter the BIOS in User Manual walking with a laptop.
1) We insert the USB flash drive into the laptop, if it is not inserted.
2) Turn on the laptop, if it is on, then reboot.
3) We go into the BIOS.
For example, the whole process will look like below, if your BIOS is different, then the principle will remain the same. If you have any questions - write in the comments.

4) Go to the tab Boot. In it, in the boot order, you need to put our flash drive in first place, using the arrow keys and the keys F5 and F6. That is, with the arrow keys we select our flash drive, and with the key F6 take her to the top.
To find out which keys you need to use to set the boot order, see the hints on the right.
The name of the flash drive must appear in the line USB HDD.
Also, a flash drive can appear in the line USB key.
To save the changes and exit the BIOS, press the key F10. (Depending on the manufacturer of the BIOS, the key may be different. See the hints on the right or below).

5) A window will appear asking you in English to Save changes and Exit? You take Yes.

6) After that, a reboot will occur and the installation process of Windows 7 will start.
Installing Windows 7 from a flash drive
If a bootable USB flash drive with Windows 7 was created using WinSetupFromUSB 1.0 Beta 7, a green screen will appear first. Select Start Vista/Win7/Server 2008 Setup or PE/Recovery ISO from partition 0.

Next, the Windows 7 setup program will launch.
Write in the comments what is not clear and what questions you have.
Before installing the system, you need to understand that how to burn a windows 7 image to a flash drive, then set up your computer to install Windows 7, and begin the installation process. If you have visited this page, then you are having difficulty creating a bootable USB flash drive or disk. Here you will find answers to all questions.
To write a Windows 7 image to a USB flash drive, you will need specialized tools. There are quite a few of them, but we will describe them all. As an example, we will talk about UltraISO, USB / DVD Download Tool and many others.
Step 1: What You Need to Capture a Windows 7 Image
Any operating system image or programs is a common format that most utilities recognize. The most popular image format is ISO. It can be written to flash drives, hard drives, CD-DVD media. The format is somewhat similar to ZIP or RAR archives. In general, this is an optical disc image and is a single file or archive containing any other type of file. To work with the format, modern operating systems already have built-in tools. You can also use third party software: UltraISO, DAEMON Tools, Alcohol 120%, PowerISO, ImgBurn, ISO Master and many more.
Before choosing an OS image, you need to figure out in advance the bit depth and volume that it will occupy on the media. There are 32-bit systems (86x) and 64-bit systems (64x). Here you can find out about the differences in these bit depths. The volume of the systems is also different. Below is a table of all editions of Windows 7 with system requirements:
| Editorial | RAM | Processors | NucleiCPU | ||
| 32x | 64x | 32x | 64x | ||
| Windows 7 Ultimate |
4 GB |
192GB |
|||
| Windows 7 Professional | |||||
| Windows 7 Enterprise | |||||
| Windows 7 Home Premium |
16 GB |
1 | |||
| Windows 7 Home Basic |
8GB |
||||
| Windows 7 Starter |
2GB |
||||
Using these characteristics, you can choose the system for yourself. In this article, we will consider two programs, using which it is possible to burn a Windows 7 image to a USB flash drive: UltraISO, USB / DVD Download Tool.
You can download tools from virus-free resources from here:
- USB/DVD Download Tool .
- UltraISO.
- Command line.
Step 2: How to burn a Windows 7 image to a flash drive using UltraISO
Download the program from the link above or from your source and install. Using trial version UltraISO can perform the intended task, so it is not necessary to look for a version with a key. After downloading and installing, perform the following steps (I also advise you to read the article if you work with optical media:)
- We start the program. If it is not complete, then use the trial period.
- Insert a 4 or 8 GB flash drive into the USB port, preferably more.
- In the program, click with the mouse on the tab "File" — "Open" and select the image file Windows 7 Ultimate (Maximum) or any other version.
- The files will automatically be loaded into the program window, which are displayed in the right section. Now you need to click on the "Boot" tab and select the option "Burn Hard Disk Image".
- In the next step, select the flash drive (Disk Drive), the image file that is already registered, the recording method USB HDD+. It is worth noting that the files that are already on the flash drive will be destroyed.
- Click on the button "Record".

- A message will appear stating that the information on the disc will be erased. We agree with the "Yes" button.

- Preparation for recording begins, and then the process itself, which does not take much time.

- The end of the operation is accompanied by a message "Record completed!".
The finished flash drive can now be used for its intended purpose.
Step 3: How to Burn Windows 7 Image Using USB/DVD Download Tool
- We launch the program from the desktop. A window will open with four steps to complete. The first step is to select an ISO image of the operating system. Click the Next button.

- Next, select the media type, in our case USB Device.

- Select the media and click "Begin Copy".

- Next, formatting the flash drive and copying files will begin.

After copying, the flash drive is ready to install Windows 7. It is worth noting that using the USB / DVD Download Tool, you can burn the image to a DVD or Blu-Ray disc.
Step 4: How to burn a Windows 7 image to a flash drive using the command line
If at hand was operating system Windows, using its capabilities, you can create a bootable USB flash drive. We will use the command line. Run this tool as an administrator and follow these steps:
- In the command line (CMD), enter the command to work with disks: diskpart. Using it, we will format the media and write to it ISO files image.
- After entering the command above, the user will be in the disk utility, which characterizes the line "DISKPART>".
- The next step involves displaying all drives connected to the computer. For this there is a command list disk.
- You need to select the media that will be used as bootable. Here we focus on volume. For example, now a 30 Gb flash drive is connected here, in the "Size" column, this volume is just indicated. To choose this disk, must be written select disk N(your media number). When choosing, be very careful, because it is very easy to make a mistake here.
- Let's move on to copying files to a USB flash drive. We mount the system image (so that it is displayed in the My Computer directory) and at the command line go to the created image disk.
- With the help of commands, go to the boot directory and execute the command bootsect /nt60 N. Where N is the letter of the flash drive intended for installing Windows
- Copy the image files to a flash drive.
- Installing Windows 7.
For some users there will be several difficult to use command line, because you have to enter a lot of commands. The probability of making a mistake here increases many times over. Therefore, it is recommended to use UltraISO or USB/DVD Download Tool. Other utilities will be discussed in the following articles:
Using all these tools, the user will figure out in no time how to write a Windows 7 image to a USB flash drive. In this material, third-party and standard tools for creating such a media were analyzed. The following material will be about how to create a bootable Windows 7 DVD. This use case is losing popularity every year, as DVD drives are built into computer systems less and less, and flash media is replacing optical discs.
Previously, before writing windows to a USB flash drive, every time I searched new program. There are millions of them, but zero sense. Each time I managed to do it any, but every single one was inconvenient. In some there are too many settings, and the other records for a very long time. Just as often slipped paid programs, but if I wanted to pay, I would have a disk with the original operating system.
The other day, I again needed to burn Windows and randomly I stumbled upon the Rufus program. Probably, as you may have guessed, Rufus touched me and became my favorite program. Yes, that's what I've been looking for for years. Easier programs than Rufus doesn't exist. It has a minimum of functions, and, by comparison, there are no more of them than the menu for formatting a flash drive.
Everything you see in the screenshot is all, there is nothing else there. In addition, it is completely free, you can download it and use it without restrictions.
I was also surprised by one moment: when I started recording a bootable USB flash drive from the old OS image, the recording was completed indecently and not habitually quickly. Truth, it was the fastestwindows to a flash drive! Earlier, on the same flash drive, the same image was recorded for 30-50 minutes. and this time 10 minutes - Lightning fast.
What canRufus:
I already said about the fast recording of the system, now let's see all the features of the program.
What can be written with Rufus:
NT Password Registry Editor
Ubuntu, Ultimate Boot CD
Download Rufus
https://yadi.sk/d/DUW30yh93RLmZq - Version 2.18
Download torrent - Version 2.8
Installation is not required. Just run the program and use it.
Support for many languages. By default the program is in Russian. Become on any version of windows OS.
The program is completely free. You can also distribute it on your own behalf, subject to GPLv3.
How to burn windows to a flash drive
An amazing subtitle in which I have nothing to say to you due to the simplicity of this program. Simply insert your flash drive into USB, select all the options as above and click on the floppy disk icon to select the image to burn. Everything, it remains only to press the start.


