How to create an image of a multiboot flash drive. Creating a multiboot flash drive using WinSetupFromUSB
If you want to create external media that is capable of installing one of several operating systems, first of all, you need to read the instructions on how to create bootable USB flash drive in multiboot usb.
MultiBoot USB is a universal, popular utility for creating multiboot removable media. The application is distributed free of charge.
Interface: English.
Creating a flash drive in multiboot usb allows you to avoid some restrictions - the user can load two identical versions of the OS onto one external drive at once.
They should only have different assemblies. Also, the number of recorded images is unlimited.
It all depends on the memory capacity of your flash drive.
The initial stage is preparing devices and programs before installation
First of all, you need to think in advance how many images you want to install on one external storage medium.
Based on this information, calculate the approximate location and take a flash drive that will have enough memory.
Download and install the multiboot usb utility on your computer using the link provided at the beginning of the article.
Despite the fact that the program has only an English-language interface, there is detailed instructions on its use in Russian.
Familiarize yourself with the program's basic functions and toolbar elements before you begin. This will help you avoid common mistakes.
The multiboot usb utility image includes a number of programs that must be installed on bootable external media:
- FreeDOS command line boot utility;
- Program for working with NTFS partitions;
- You also need to confirm the installation of the password editor and operating system registry;
- Program to install earlier deleted files and applications;
- QuickTech Pro - a utility that allows you to quickly test the performance of hardware components personal computer or laptop;
- A number of programs for testing RAM and the quality of PC service;
- A program for checking the health of hard drives and working with their partitions.
Important! Do not delete the contents of the flash drive after the initial stage of its creation; all of the above utilities are necessary for further installation of the operating system on your PC. Removing or damaging at least one component may damage the multiboot flash drive. programmatic.
The main stage is creating bootable removable media
In the initial window of the utility, the user has access to a list of utilities that are necessary to create a bootable USB flash drive. Follow the instructions to prepare the external media:
- Enable the first utility in the list (Figure 1). It is designed to format removable media. Check the QuickFormat box to speed up the process. It is best to format for the NTFS file system.
Thanks to it, you will not have any problems installing images whose volume exceeds 4 Gigabytes;
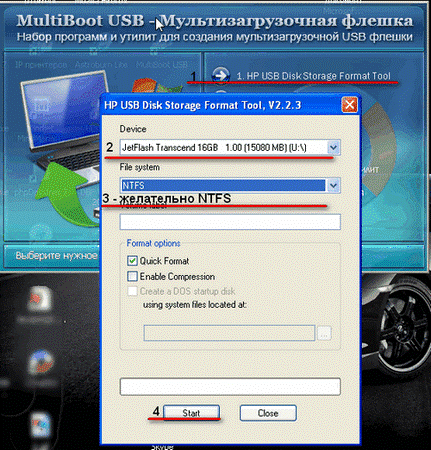
No. 2. Installing the HP Usb Disk Storage Format Tool
- Now return to the start menu (Figure 1) and run the grub4dos program. During installation, you must specify the disk name - select the path to it. The name will not be reflected, you will only see the volume free space on the selected hard drive.
Now click on the utility installation key;

No. 3. Grub4dos utility configuration
No. 4. Successful unpacking of the package
- After installation, a new program window will appear in which the user must specify the path to the flash drive and click on the Eject button. This way you will unpack all the necessary applications that are needed for the media to function properly.

№5. Appearance main application window
To begin the basic stage of creating a bootable USB flash drive, follow the instructions:
- Connect the flash drive to the computer and wait for it to be recognized by the system
- Now run the MultiBoot USB program;
- In the main program window, select the path to the connected flash drive in the Step 1 field;
- In the Step 2 field, select all components. They will also be installed on the bootable media;
- Click on the Create button to create a multiboot flash drive.
After completing all the steps above in the instructions, the flash drive will be created, however, it will not contain a single installation image of the operating system.
Adding new operating system images
To complete the process of creating a multiboot flash drive, you need to supplement it with images of the operating systems the user needs.
All images must be exclusively in ISO format.
To make it more convenient for you to navigate between files on a flash drive, create a special folder where you will move all OS images.
This way you won’t confuse them with previously unpacked utilities.
For OS Windows
To install an OS Windows image (of any version and build) on a created flash drive, first create a virtual drive using a program or any other similar utility.
Now go to the My Computer window and find the mounted disk image there. Open its contents. An example of the content is shown in the figure below:

No. 6. Example of the contents of the directory of a mounted operating system image
Now go to the utility window (Figure 1):

No. 7. Windows OS image recording window
In the above window, select the path to virtual drive image. Then check the box for the OS version that matches the mounted image. And now press the GO key.
Go to the folder with the image. Its contents will change, as, for example, in the figure below:

No. 8. Contents of the folder with the OS image after using the WinsetupFromUsb utility
To add another Windows OS to a flash drive, do the same steps, just don’t forget to check the box next to the OS version corresponding to the image (as in Figure 7).
For Linux OS
For Linux operating systems, follow these steps:
- find the file menu.lst on the flash drive and open it using a standard notepad or the Notepad utility;
- In the first line write down the name of the operating system, in the second line - the path to the image. Save the final file. The file system may freeze for 15-20 minutes. Wait until its operation returns to normal and the image is written to the flash drive.
An example notepad file content should look like this:

No. 9. Example of adding a new Linux OS image
Thus, you can add any number of images of different operating systems until the flash drive runs out of free space.
Try not to take up all the memory on the media, then the computer will recognize it faster and load image files.
Advice! You should not start installing the OS immediately after adding all the images. Make sure the device is working properly. To do this, run the WinSetupFromUSB utility and select the created multiboot flash drive as the device. Check the TestinQEMU box and click OK. The process of testing the performance of the flash drive will start.
Thematic videos:
How to create a multiboot flash drive
How to create a multiboot flash drive using MultiBoot USB
MultiBoot USB - Creating a multiboot flash drive
How to create a bootable USB flash drive. The process is shown without installing OS installation files onto a USB flash drive.
Installing different operating systems on the same computer can have different purposes: from purely educational to purely professional. Windows users who want to learn Linux do not want to leave their familiar Windows environment. It is important for them to organize their work on the computer in such a way as to alternately use one or the other “Axis”.
This can be done either by installing an emulator of one system in the system environment of another, or using multiboot, when the choice of the system to be launched is carried out on the computer’s stratum.
Until some time we all believed that the only carrier system files maybe a hard drive or, as a last resort, floppy drives that are now out of fashion. The advent of flash drives shattered these notions. Today you can install and run the OS directly from a flash drive. It wasn't always like this. USB flash drives have recently become those specifications that allow you to do this.
The first models of such media had too few read-write cycles before they failed. Therefore, installing them on a flash drive was almost pointless. The only area of application for such bootable flash drives was to install MS-DOS on them in order to gain access to the resources of a computer with a more powerful operating system.
Modern USB drives have become truly long-lived. Their great memory and high performance allow them to be used as an alternative to hard drives. In the BIOS of modern PCs, you can set to boot not only from a hard disk or floppy, but also from a flash drive.
Further, as we go along, we will look at all these possibilities and find out how to create a multiboot flash drive. That is, one that combines the two technologies discussed above. The subject of our note is not only the creation of a multiboot Windows 7 flash drive, but also some similar tasks.
Creating multiboot media: method one
First, let's answer the question: why might this be needed? Several answers can be given. Well, for example, if you want to have a universal installer on hand for several operating systems at once. On such media you can simultaneously place MS-DOS (several varieties), Windows installer, Linux installer and so on. Then you don’t have to dig around looking for the right distribution - everything is at hand at any time.
 Another reason: you want to have a portable OS with your favorite programs. This is very convenient: just plug the flash drive into any computer and install it in the BIOS correct order download, and now you are already in your usual working environment. The third reason: to create a recovery flash drive, that is, one that is used to restore a “crashed” machine.
In each of the described cases, the procedure for creating and configuring the media will be different. Therefore, we will begin our story with how to create a multiboot flash drive of the installation type. That is, one with which you can install or restore several systems at once Windows family. Let's say we want to include distributions of the following operating systems:
- ISO image of the "seven".
- WinXP ISO image.
- An image of a recovery disk, for example, an RBCD 8.0 disk, which can be easily found on torrent storage sites.
In theory, all this can be done manually using multi-booters like GRUB4DOS. But this will require studying its rather extensive specification. Immerse yourself in these wilds to the average user somehow out of hand.
Although an advanced user may find this interesting, most will want to achieve the result, so to speak, " little blood" Moreover, the result will be essentially the same. To solve our problem, we will use one useful utility: the WinSetupFromUSB program.
You can download the utility from here: http://www.winsetupfromusb.com/downloads/ - that is, from the website of the manufacturer of this program. Those who wish to familiarize themselves with the instructions in Russian can visit the following address: http://remontka.pro/winsetupfromusb/. We will create a multiboot flash drive like this:

This concludes the description of how the WinSetupFromUSB utility works.
We have succeeded in creating a multi-boot flash drive; we can begin to consider related issues.
Windows 7 on USB
LiveCD technology has long made its way into the hearts of users. Among Linux oids, this approach is common. It’s enough to carry a blank with your loved one everywhere Linux distribution, so as not to have problems with its absence on the computer. True, writing to a disc is excluded, but for many purposes the reading function is sufficient. The system boots from the CD into the PC's memory, and most of the functions of a full-fledged OS become available.
Until recently, Windows users practically did not do this. But with the advent of fast and bulky USB sticks, their turn has come. Live USB professes the same paradigm as LiveCD, only the information carrier is not a blank, but a flash drive. How to cook Windows flash drive 7 with a full-fledged “axis” on board, we will describe further.
 The first Windows that allowed installation on media other than a hard drive was a version of XP called WinPE (Windows Preinstallation Environment) - it was an extremely minimal, although quite fast, version of Windows.
This version was distributed by Microsoft itself, and therefore no claims were made against it as some kind of inferior product. Moreover, it was this “distro” that became the basis for a wide variety of portable homemade products. In order to expand WinPE to the limits specified by the developer - that is, include drivers in LiveCD that are not present in WinPE Windows components or external programs, it was proposed to use a special software, like the BartPE utility and others of the same kind.
BartPE, which has not been developed for a long time, is not suitable for illustrative purposes. Moreover, we intend to deal not with XP at all, but with the seventh version. A modern alternative to BartPE is the WinBuilder program, which we now turn to.
LiveUSB using WinBuilder
Win7PE will serve as the source material for building a mobile Windows 7 distribution, but for now we’ll tell you where to get WinBuilder itself. You can download it from the home page on the Internet: http://winbuilder.net/.
By delving into the depths of the site, you can find any information on practical use this program, but you won’t need it, because we will describe the process of working with it in sufficient detail. Before you start, here's what you need to do:

Next we need Windows package Automated Installation Kit (WAIK). This almost 2 GB image can be downloaded here: http://www.microsoft.com/download/en/details.aspx?displaylang=en&id=5753. Then run the package installer under the name StartCD.exe. We don't need all this product. We only need it separate files from the \Windows AIK\Tools\x86\ folder. Here is a list of these files:
- bcdboot.exe
- imagex.exe
- wimgapi.dll
- wimmount.inf
- wimmount.sys
- wimserv.exe
All these files need to be copied to the WinBuilder subdirectory (in our case, to the C:\WB\Projects\Tools\Win7PE_SE\x86\ folder). You should also copy the bcdedit.exe file from the \Windows\System32 folder there. Drivers for the future system need to be downloaded from this address: http://driverpacks.net/driverpacks/latest.
Additionally, we install VirtualBox - we will need this virtual machine to test the assembly. At this point, the preparatory procedures are completed, and you can begin generating the system.
Generation of a portable version of the "Seven"
Details of further actions:

As a result, we will get a “bare” axis with the most reduced functionality and the complete absence of “spillies” like “Aero”.
You can fill the assembly with content using the recommendations of the next paragraph of our story.
Assembly modification
The large number of nodes in the tree on the left allows for very flexible configuration of the resulting product. You can change almost everything, from the default screen resolution, bootloader theme, to including plugins in the future Windows Explorer.
To add documents and media content, you can use the interface of the “Additional files” node, however, you will not be able to include the user program in the distribution package this way. Aero, wallpaper and a panel with gadgets can be connected in a Tweeks connection.
Enabling applications is possible, but more labor intensive. To make this task easier, the developers have released many scripts for implementing a wide variety of programs into the assembly. You can download these scripts at the following address: http://reboot.pro/forum/65/. The finished script is placed in the C:\WB\Projects\Win7PE_SE\Apps folder or in any of its subdirectories.
If a ready-made script is not found on the site, you can make it yourself using the MakeScript tool located on the site http://reboot.pro/508/. You shouldn’t give this program installers; it’s better to let it eat the portable version of the software:
 IN otherwise An unimaginable amount of garbage will be generated in the registry. The MakeScript program has quite flexible settings. Check them out in the documentation or look for a description on the Internet.
In the simplest case, it all comes down to specifying the exe file of the portable version of the desired program, indicating its name and clicking on the large “Make It” button on the left of the screen.
Transfer everything to USB
So far, we haven't said anything about how to transfer all this to a flash drive. IN general case the program generates a ready-made ISO image of the system directly in the C:\WB folder.
We already know how to transfer such images to a USB drive. For this, we will need the knowledge gained in the first paragraphs of our story.
So, the circle is closed, and we essentially have nothing more to discuss.
A multiboot flash drive is a set of programs, operating systems or recovery utilities. Such a flash drive is an indispensable assistant for any system administrator and, if you have basic skills, a useful tool for the average user.
Thanks to the multiboot function, you can easily, using just one flash drive, check the performance of the RAM, HDD, install several operating systems to choose from, and so on. Accordingly, if you have problems with your computer, it is better to have such a tool for restoring and diagnosing the system and equipment.
For example, if you have enough memory on your device, you can:
- Record multiple OS Windows various versions and even together with Linux;
- Enter MemTest, Kaspersky Rescue Disk;
- A package of recovery utilities, for example: Hiren BootCD;
- Driver Pack Solution.
Having such a software package available, you can cover the needs of 90% of computer malfunctions. It will allow you to reinstall the OS and drivers for it or restore faulty system. Before we start creating a flash drive, you need to download images or installation files that are important to you.
Before you make a multiboot USB flash drive with Windows, you should decide on the program with which we will do this. There are quite a lot of them, but WinSetupFromUSB or Sardu can be a complete solution to all the tasks. It is possible to use other applications, but for example, let’s consider the ones mentioned.
Creating a multiboot flash drive via WinSetupFromUSB
First, let's look at creating a flash drive using the popular solution from WinSetupFromUSB, thanks to which many similar devices have already been created and a myriad of problems with the system have been solved.
You can simply download the utility from the website using free rights, link https://www.winsetupfromusb.com/files/download-info/winsetupfromusb-1-7-exe/. After this, start the unpacking process. After it is completed, you should follow the selected path and find the utility in the appropriate folder by launching the shortcut that corresponds to your x32 or x64 OS.
To decide how to make a multiboot flash drive with Windows 7 or other versions, you must first insert the media itself into the computer; its volume must be sufficient to perform recording. Typically, 16-32GB flash drives are used for this; in extreme cases, 8GB is possible.
So, to create a multiboot flash drive you need:
1.In the first line “USB disk selection...” select the desired media;
2. Check the box next to “Auto format it with FBinst” - this indicates the need USB formatting. This item is needed so that the flash drive auto-boots when the computer starts, but if you have already installed a Windows distribution or other Live CD software on it, then this item should be bypassed;
- Windows 2000/XP/2003 Setup – designed to record the corresponding system versions. To use it, you must specify the path to the I386 folder, which is located in the root of the OS distribution. Your ISO image you need to mount or unzip and specify the path to it;
- Windows Vista/7/8/10/Server 2008/2012 - an extremely simple method for modern versions of the system, the use of which boils down to specifying the path to the ISO image;
- UBCD4Win/WinBuilder/Windows FLPC/Bart PE – this item is not important for the average user, but it is intended for boot disks with the WinPE system. The installation is similar to the first option;
- LinuxISO/Other Grub4dos compatible ISO – in addition to being used for Linux entries system and its diversity, this section is used to record all diagnostic and/or recovery utilities of interest;
- SysLinux bootsector – alternative way Linux entries, used for those operating systems that include the syslinux bootloader.
After filling in the required fields (don’t forget to check the boxes next to the required items), click the “Go” button and wait for the installation to complete, this may take a long time 10-30 minutes (depending on the number of entries) and do not be alarmed if it seems that the program hung up - this is her normal way of working.
If you have a question about how to make a multiboot flash drive with several OSes, especially similar in architecture, then you can simply run the program for the second time and set the path to the file, just uncheck the box next to “Auto format”. The WinSetupFromUSB program will automatically add the image you need to the USB.
Creating a Multiboot USB Flash Drive Using Sardu
Sardu is a similar program, only with a slightly lighter control option. Includes the ability to download the necessary software distributions directly from the application window.
To use the Sardu utility, you should:
- Download it https://www.sarducd.it/downloads;
- Now, without installation, launch the application. In the same way, as in the previous version, there is a breakdown into specific tabs (located on the left), where you can find their corresponding application. Sections have an intuitive image and name. It is worth noting that the last Extra item is intended for other images that do not fall under other options;
By using one of the options for creating a multiboot flash drive, you can be fully armed against various system problems and give them a worthy rebuff. Thanks to such actions, you will not necessarily have to replace the OS, but you will be able to restore it, check the functionality of the equipment, and more.
If you still have questions on the topic “How to make a multiboot flash drive?”, you can ask them in the comments
if(function_exists("the_ratings")) ( the_ratings(); ) ?>
Bootable USB Flash or HDD drive convenient in that you can avoid using CD/DVD to install the OS and use diagnostic programs such as Memtest, MHDD, Acronis TI.
A “multi-boot” flash drive or HDD is good because you don’t have to format the entire disk for each program, but install everything there once necessary programs and when loading from it, select the one you need through beautiful menu. In the case of an HDD, it is convenient to create a separate small partition for this.
There are many solutions for flash drives (for example, http://eee-pc.ru/wiki/soft:usb_multiboot), but, as a rule, they do not work with USB HDD. On Habré I only found information about installing Win7 from a USB HDD, but a year ago attempts to reproduce this were unsuccessful. To install Windows 7 from a flash drive, there is MS Win7 DVD Tool, but again it does not work with HDD. So let's create our own multiboot USB HDD using GRUB4DOS.
We will need:
- USB HDD (everything described should also work for flash drives).
- Windows OS (of course, you can do this in the same way from a Linux-based OS, but I don’t currently have the opportunity to check the performance and the presence of pitfalls).
- Motherboard (BIOS) with support for booting from USB drives. If booting from USB is not supported, you can use Plop, more on that below.
Let's get started
- Download HP USBFW and format our drive. Usually everyone, including me, skips this step. It may work without it, but personally, I tried all the standard formatting options from Windows 7, but booting from my 320GB Toshiba did not work (it froze immediately after selecting it in the Boot menu) before using this utility.
- If you used HP USBFW from the previous point, you can delete the partition it created for the entire disk and create your own, smaller one (preferably FAT32, otherwise problems may arise with some programs and the OS), and leave the remaining space for “file dumping”.
- Install the GRUB4DOS bootloader in the MBR. It is recommended to use the first option so as not to make a mistake when choosing a disk or partition.
- You can use the GUI: to do this, download grubinst-1.1-bin-w32-2008-01-01, run grubinst_gui.exe, select the disk, click Refresh V Part list and select the desired section. The rest of the settings can be left untouched.
- Or in the console with the command: grubinst.exe hd(disk number, partition number) The disk number can be found in Disk Management (diskmgmt.msc).
- Copying files grldr And Menu.lst from the archive grub4dos-0.4.4.zip to the root of the section.
To check the functionality of many programs, it is not necessary to reboot the computer every time. Can be used virtual machines: MobaLiveCD or VirtualBox. For VB, execute in the console: "C:\Program Files\Oracle\VirtualBox\VBoxManage" internalcommands createrawvmdk -filename "C:\USBHDD.VDI" -rawdisk \\.\PhysicalDrive1 where the number in PhysicalDrive is our number boot disk, and specify the resulting file (C:\USBHDD.VDI) as the hard drive when creating the machine. However, some operating systems (such as Windows 7) may not work this way.
Examples of installing some OS and programs
Memmers86+
Download the ISO image from off. site memtest.org/download/4.20/memtest86+-4.20.iso.zip and throw it on our boot HDD (do not forget to unpack the .zip archive).Open Menu.lst text editor, add the following there:
title Memtest find --set-root /mt420.iso map /mt420.iso (hd32) map --hook root (hd32) chainloader ()
And let's try to figure out what these commands mean.
title Memtest - the name of the item (Memtest) that will be displayed in the menu.
map/mt420.iso (hd32) - loading an ISO image located in the root of the boot disk (CD-ROM emulation).
root(hd32) - makes the virtual CD-ROM root.
chainloader() - transfers control to another bootloader (if nothing is specified in brackets, then the root one is used, in this case hd32).
Ubuntu 10.4
We also drop the ISO image from ubuntu.com onto the HDD and write it in Menu.lst (the image is renamed ubuntu1.iso):
Title Ubuntu map /ubuntu1.iso (hd32) map --hook root (hd32) kernel /casper/vmlinuz iso-scan/filename=/ubuntu1.iso boot=casper quiet splash -- locale=ru_RU initrd /casper/initrd.lz
Windows 7
But with Win 7 it’s a little more complicated.
Method 1:
Copy all files from the Windows 7 disk (image) and add them to Menu.lst:
title Install Windows 7 find --set-root /bootmgr chainloader /bootmgr
In some cases it works, but various errors may occur during installation. In addition, this method will only work if there is only one Windows 7 on the hdd, otherwise (for example, if we want to put x86 and x64 there), the installation of the first one found will start.
Method 2:
UPD: automation of this method: rghost.ru/20467691 or greenflash.su/_fr/7/7487664.7z. The files from the archive (except for menu.lst and seven.iso) must be copied to the root of the section (or the paths in Menu.lst must be changed accordingly).
Possible problems and errors
Error 60: File for drive emulation must be in one contiguous disk area
Solution: You need to defragment the image. For example, using the Contig program from Mark Russinovich. Usage: contig.exe g:\ubuntu1.iso in the console.
BIOS does not support booting from USB, freezes, takes a long time to load and other problems associated with booting from a USB HDD
In my previous article, I talked about how to burn various types of information onto CD/DVD discs, for example: music in MP3 format, any boot program (for example, installation disk Windows or antivirus), a movie in DVD format and, of course, just a set of any files and folders.
Fortunately, CD and DVDs today they are receding further and further into the background. Many laptops no longer have disk drives, and for stationary home computers there is often simply no point in buying a disk drive (if only for reading and writing Blu-ray discs).
And fortunately, because disks are being replaced by ordinary flash drives, i.e. flash drives. Progress does not stand still and now the majority music players, video players and TVs support the ability to play information directly from a flash drive! Moreover, you can make a flash drive bootable, and, for example, install Windows from it or run any computer maintenance program (antiviruses, partition managers, LiveCD and much more)!
In this article I will share with you in a simple way creating a bootable one using one simple program.
But how convenient is it now to use flash drives and not carry these discs with you in special boxes? :) I put a lot of any movies and music on one flash drive, after which you can listen to music in the car by inserting a flash drive, watch movies by simply connecting it to the TV or DVD. Also, at the same time, the flash drive can be bootable and simply store numerous of your documents and various kinds of files. In general, everything in one bottle :)
In the article about burning discs, I talked separately about recording music, movies, boot program images and mixed data. And for flash drives, such a manual is not required, because to record movies, music, or just a set of files, you just need to copy it all to a flash drive and that’s it! For convenience, you can also sort into different folders. That is, it is clear that a separate program for writing data to a flash drive is not required :)
For example, I copy music:
It's simple!
And now not only flash drives, but USB external ones are very relevant hard disks, which can contain a huge amount of information, for example 2 TB (2000 GB). And they are used in exactly the same way as flash drives: connect to USB, copy everything you need and you’re done! And no CDs needed.
But how can you make sure that a USB storage device (be it a flash drive or external hard disk) could be written, for example, Windows Installer, in order to then insert the USB flash drive into the right computer and install Windows on it directly from a flash drive? Or we want to write a bootable antivirus onto a flash drive to scan the computer before the system starts. And someone may need a boot program to reset Windows passwords. I wrote about this program in the article:
Or maybe someone would like to have several different boot programs on a flash drive with the ability to select through a special menu? It is very comfortable! But in this case, unfortunately, simply copying images of the necessary programs to a flash drive is not enough... You will need separate program in order to make the flash drive bootable and fill it with the necessary boot programs. I've come across several programs that perform the same function. They are all free! I personally settled on one and haven’t even had to resort to the help of other programs yet.
The program is called "WinSetupFromUSB". She, like many others, is on English language, but don’t let this scare you, because you have this article at hand :)
Let's look at how to make a bootable USB flash drive using it.
Download and unpack the WinSetupFromUSB program.
First we need to download the program. As I have already mentioned in many of my articles, you need to download programs from official sites, and not from anywhere! Otherwise, you might end up downloading viruses for yourself in addition to the program :)
winsetupfromusb.com
This is the official website of the program. At the top of the window you will see links to download the latest Beta versions programs, but I do not recommend downloading them, since such versions of programs are at the testing stage and may have various glitches. It is better to always download the latest stable versions released so that there is no “beta” or “b” prefix.
As we can see in the example from the image above, the latest stable version today is 1.5. Here I am downloading it as an example in the form of an unpacked .exe archive. There is another option in the 7z archive, but there is no difference.
In the next window, simply click “Download” and the program will immediately begin downloading to your computer:
After downloading the program, run the downloaded file to unpack:
A window will appear in which you need to specify a folder on your computer to unpack the archive:
I unpack directly to my desktop. In this case, the program will still be unpacked into a separate folder “WinSetupFromUSB”, which will be created independently. To start unpacking you need to click “Extract”.
After unpacking we see a folder with the name of the program:
This is where the program itself will be located.
Now let's start creating a bootable USB flash drive...
We create a flash drive with any boot programs using WinSetupFromUSB!
So, we unpacked the program and now in the folder we see 2 files to choose from to run:
One is designed to run on 32-bit Windows systems, and the other (which is labeled “x64”) is designed to run on 64-bit systems. Run the appropriate file depending on the bitness of your Windows. At the same time, there will be no difference in the program itself and the speed of its operation! I recommend running the program as Administrator. To do this, right-click on the file and select “Run as administrator” (see image above).
The program will start and we will see this window:
The program is very easy to use!
First, you should know that the first time you write, the program will format the flash drive, which means deleting all existing data on it. Therefore, either use any empty flash drive for these purposes, or copy everything that is stored on the flash drive somewhere to your computer so as not to lose data!
After we have launched the program, connect USB flash drive(or USB hard disk) that you want to make bootable to your computer. This can be done before starting the program.
In the topmost section “USBdiskselectionandformattools”, the first thing you need to do is select the USB drive to which you will record. I have on this moment There is only one flash drive connected to the computer, so the program automatically indicated it:
If you have several devices connected, be sure to select the one you need in the top selection list (see image above). And, make no mistake, because the program, as mentioned above, will destroy all data! It will be best if you have only one connected to your computer USB drive, on which you are just going to record programs.
Below, check the “AutoformatitwithFBinst” checkbox to format the flash drive and make it bootable. Next, you need to select the file system into which the flash drive will be formatted (point 3 in the image above): FAT32 or NTFS. NTFS will be supported in most cases today, so it's best to choose it. However, FAT32 does not support recording files larger than 4GB, which may hinder you in the future.
Now go to the “AddtoUSBdisk” section:
In this section we will just add boot programs that will be written to the flash drive. We see the following options:
Windows 2000/XP/2003 Setup.
You should choose this if you are going to burn the installer of one of the listed Windows systems onto a USB disk. All of them have long been outdated and I think few people will need this item today.
Windows Vista / 7 / 8 / Server 2008 / 2012 / Based ISO.
This choice will allow you to write the installer to a USB disk for more than modern systems Windows, for example 7 or 8. This is already relevant today and I think it will be useful to many!
UBCD4Win / WinBuilder / Windows FLPC setup / Bart PE.
This item is needed if you want to burn a boot program created based on WinPE to a USB disk. But most boot software is based on Linux, so many will never need this feature, or very rarely.
Linux ISO / Other Grub4dos compatible ISO.
Current feature! Allows you to burn a Linux-based boot program to your USB drive. Nowadays, most programs are created this way. For example, bootable versions of antivirus products, a bootable version of the famous program for creating backup copies and recovery – Acronis, a program for resetting Windows user passwords.
SysLinuxbootsector / Linux Distribution using SysLinux / ISO Linux.
This item is likely to be of little use to anyone. The option allows you to write programs with the Syslinux bootloader to a USB drive. If the program image has a Syslinux folder, then most likely you will need to use this option to write it to USB.
So, now that you at least roughly know the purpose of each item in the program, you can start adding programs.
Let's say we want to put the Windows 8.1 installer, a program for creating backups and restoring them - Acronis, and a program for resetting the password onto a flash drive. Let this be an example.
So, check the “WindowsVista / 7 / 8 / Server 2008 / 2012 / BasedISO” item and click the “…” button to the right, intended for selecting an image with the desired Windows:
Click “OK” in the next window:
The standard one will open Windows Explorer, where you need to select ISO file(image) of the system you need and click “Open”. In my example, I select Windows 8.1:
Now I add Acronis program. I select the item “LinuxISO / OtherGrub4doscompatibleISO” and in the same way, by clicking “…”, I select the image of the bootable version of Acronis in the form of an ISO file:
After selecting the program image, you will be asked to specify the name of the menu item, by clicking on which you will open the added program:
You can mentally ask the question: “how did I know that the bootable version of Acronis is based on Linux, on the basis of which I chose the “LinuxISO / OtherGrub4doscompatibleISO” item?” In fact, in no way, purely intuitively and based on the fact that now most boot programs are built on similar to Linux systems. However, you can try to find out this on the official websites of the programs themselves. But it’s even easier to take and write the program directly through the “LinuxISO / OtherGrub4doscompatibleISO” item and if it suddenly doesn’t work, then rewrite the flash drive again, choosing a different option :) Fortunately, all this doesn’t take long.
So, I prepared 2 programs for writing to a flash drive: Windows 8.1 and Acronis installer:
And here, since there is only one option for selecting each type of program to be recorded, another question arises: “How then can you add 2-3 or more boot programs of the same type (for example, Linux-based) or 2-3 Windows installation programs?”
The question is correct! The program allows you to record as many programs as you like onto a flash drive. Everything is limited only by its volume :) But this needs to be done in several approaches.
At the moment, I have already indicated 1 Acronis program based on Linux, and I need to write down another one - password reset, which is also built on Linux. So, you will have to add the password reset program to the flash drive on the second run.
But first, let's write down the 2 programs that I added. To do this, just click the “Go” button at the very bottom of the window:
The program will give 2 warnings that the data will be 100% deleted, the disk will be repartitioned and recovery will probably be impossible. I already warned you about deleting data before starting to work with the program, so I hope you understood all this and made a copy of the files located on your USB storage device, if necessary :)
Click “Yes” in each warning window:
The process of writing the specified programs to the flash drive will begin. The recording duration depends on the amount of data and the speed of the flash drive. The recording process is shown at the bottom of the window:
For example, for this example I recorded Windows 8.1 3.85 GB in size and Acronis 355 MB in size onto an 8 GB USB 2.0 flash drive and it took me about 15 minutes. If the flash drive were USB 3.0, the process would most likely be reduced to 5 minutes or even less. Now flash drives and external USB Hard drives are mostly in USB 3.0 format, which gives very high information transfer speeds.
The end of recording will be indicated by a window with the inscription “Jobdone”, where you just need to click “OK”:
After the first 2 programs are written, we can run WinSetupFromUSB again and add more programs to the flash drive, and we no longer have to format it!
When you run WinSetupFromUSB a second time to add new programs, do not check the “AutoformatitwithFBinst” checkbox! All that remains is to select new programs and press the “Go” button again to record:
As a result, new programs will be added to the flash drive. If you need to add more, then do the 3rd launch of the program and again add what you need :)
That's actually the whole recording process. Now our USB drive is ready and all we have to do is boot from it!
To configure the computer to boot from a USB drive (it doesn’t matter whether it’s a flash drive or an external HDD USB), most often you have to go into the BIOS and make some settings there. Explain important BIOS features, including boot order from various devices, I'm going to in a separate article:
Now I will briefly show how to do this using the example of one of BIOS versions– AmiBios:

There are many versions of BIOS and each of them has a slightly different interface and capabilities, but the principle is still the same and each has a device priority menu similar to that described above.
After saving the settings, the computer will reboot and boot from the flash drive will begin, since it was set as the first boot device.
You will need to wait a few seconds and the boot menu will appear, where all the programs we recorded via “WinSetupFromUSB” will be listed:
Selecting with the arrow keys on the keyboard (because the mouse will not work in such boot programs) the desired program and pressing the “Enter” key, it will start running.
That's all!
I think that the article will be useful for those who want to have installation files on a flash drive Windows versions and various utilities for recovery, partitioning hard drive to partitions, password resets and various other purposes.
As you can see, such multiboot flash drives are very easy to write!
Have a nice day and good luck! Bye;)


