How to screenshot on android. Taking a screenshot on an Android smartphone
For those who are not yet aware or simply forgot what a screenshot is, we remind you that this is an instant screenshot. It may be needed so that, for example, you can capture some moment happening on the screen of your phone (smartphone).
On a computer or laptop, taking a screenshot is not difficult at all - just click on the button Print Screen on keyboard. And how to make it on a device where there is only virtual keyboard? There is a way and you don't need any keyboard.
Those users who prefer iPhone or iPad are well aware that a screenshot on Apple devices is done by simultaneously pressing the "Power" and "Home" buttons. In the case of Android, the situation is different. Since there are a lot of Android firmware versions, and all devices are different, manufacturers use different key combinations. However, for most devices, including those based on the standard android firmware, the screen can be made as follows: you need to simultaneously press the "Power" key and the volume down button. After about a second, a characteristic click will be heard, and you will see a corresponding notification at the top of the screen. For example, you want to save a picture on the screen. As soon as you make a click, a notification will appear at the top of it:

And if you pull out the curtain, it will say that the screenshot has been saved:

Of course, on your device, you may need to hold down other keys to take a screenshot. Here are all the possible options:
- Power key and volume down button (this option is the most common).
- Power key and volume up button.
- Power key and Home button.
- Home key and volume down button.
- Home key and volume up button.
An example of the layout of the buttons on the Nexus 5:

Other Android devices
- On Samsung devices, a combination of the Home and Back buttons can be used. For some devices, for example, samsung galaxy, the combination of the "Power" and "Home" keys works.
- On HTC devices, hold down the "Power" and "Home" keys, after which the screenshot will be saved.
- If you use devices from ASUS or Acer, you can use the standard combination - hold down the "Power" key and the volume down button.
- At Sony everything is also standard - here the combination of the "Power" key and the volume down button is used.
- In case of by Huawei everything is the same as the Sony.
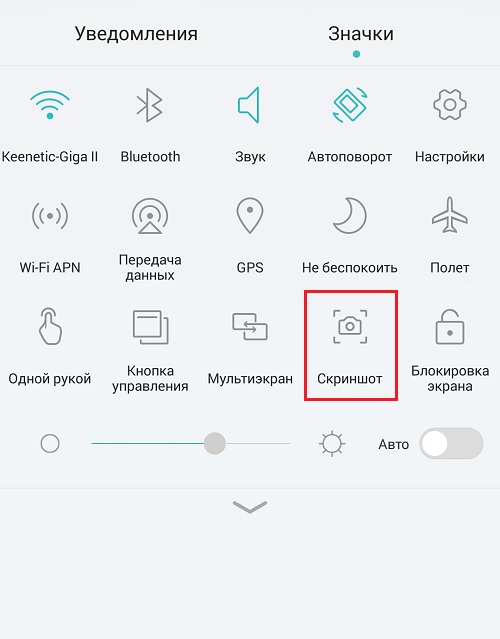
By the way, many companies have begun to add a button to create a screenshot in the drop-down menu (curtain). She looks like this.
On some Samsung devices Galaxy Note You can use an electronic pen to take a screenshot.

Screenshot apps
Screenshots can also be taken with third party applications. True, there is one big BUT here - for this you need to root the device. If you are rooted then you can download from Google Play almost any application that allows you to take screenshots. In this case, a screenshot can be taken, for example, if you just shake the device. But if there is no root, then such applications may not download at all, since the maximum they can do is tell you which buttons you can try to press in order to get a screenshot on your device.
All smartphone users sooner or later need screenshots. They are needed in order to visually consider problems and try to solve them. Screenshots allow you to share music and movies by capturing their title.
There are two main methods on how to take a screenshot on android. The first is the use of separate software, which is located on Play market, the second is to create a screenshot using a key combination on a smartphone, tablet.
How to take a screenshot on android with a keyboard shortcut?
Versions operating system starting with 4.0, a screenshot is taken using the power and volume key combinations. To do this, you need to press:
- power button;
- lower volume key.
Both buttons are on the right side of the phone. For the function to work, you need to simultaneously press these two buttons and wait a couple of seconds. After that, you will hear a characteristic soundtrack - it will be similar to the sound of a camera shutter. This will mean that the screenshot is ready.
You can view the screenshot taken from the path of the operating system - pictures / screenshots, or - pictures / screen capture. We will immediately answer your question - screenshots will not be stored on the memory card, but in the internal storage.
It is worth noting that the keyboard shortcut functions smoothly on absolutely all smartphones and tablets. The only condition is that the version of the Android operating system is at least 4.0.
But some manufacturers have found it necessary to develop their own ways to take screenshots. For example, in HTC devices you need:
- hold down the power and volume down keys;
- press the power and home buttons.
If the second method does not work for some reason, then use the first method.
Samsung has the ability to take a picture with a gesture. By default, the option is disabled, to enable it you need to go to "Settings" - "Management", "Palm control", "Screenshot".
How to take a screenshot on android with third-party software?

If for some reason the keyboard shortcut does not work for you, or you just don’t feel comfortable taking pictures in this way, download the software from Google Play. Let's look at the two most common:
- "Screen Capture"
- OK Screenshot
The first utility allows you to take screenshots as in a standard way, using the buttons, or by shaking the device. This program provides a simple yet effective screenshot editor. Another feature is that, unlike most other software, the use of the mentioned tool does not require you to getting root- rights. However, if you have them, then the utility will provide a little more functionality.
The phone has recently become an integral part of our lives and sometimes it displays moments that need to be captured for the future. To save information, you can take a screenshot, but many do not know how it is done. For example, in order to take a picture of what is happening on your PC monitor, just press the button on the keyboard "Print Screen", but on Android smartphones, you can do this in several ways.
Method 1: Screenshot touch
Simple, convenient and free app to take a screenshot.
Launch Screenshottouch. A settings window will appear on the smartphone display, where you can select the options that suit you to manage the screenshot. Specify how you want to take a picture - by clicking on the translucent icon or by shaking your phone. Select the quality and format in which photos of what is happening on the display will be saved. Also check the capture area (full screen, no notification bar or no navigation bar). After setting, click on "Launch Screenshot" and accept the permission request for the application to work correctly.

If you select a screenshot by clicking on the icon, the camera icon will immediately appear on the screen. To capture what is happening on the smartphone display, click on the transparent application icon, after which a picture will be taken.

A notification will inform you that the screenshot has been successfully saved.

If you need to stop the application and remove the icon from the screen, lower the notification shade and in the information line about the operation of Screenshot touch, click "Stop".

At this step, work with the application ends. There are many different applications in the Play Market that perform similar functions. Then the choice is yours.
Method 2: Single button combination
Since there is only one Android system, there is a universal key combination for smartphones of almost all brands except Samsung. To take a screenshot, hold down the buttons for 2-3 seconds. "Locks/shutdowns" and a rocker "Volume Down".

After a characteristic click of the camera shutter, an icon of the screenshot taken will appear in the notification panel. You can find the finished screenshot in the gallery of your smartphone in a folder with the name "Screenshots".

If you are the owner of a smartphone from Samsung, then for all models there is a combination of buttons Home and "Locks/shutdowns" phone.

This completes the button combinations for taking a screenshot.
Method 3: Screenshot in various branded Android skins
Based on the Android OS, each brand builds its own branded shells, so let's take a look at additional screen capture features from the most common smartphone companies.
- Samsung
- Huawei
- ASUS
- Xiaomi
On the original shell from Samsung, in addition to holding down the buttons, there is also the ability to create a screenshot with a gesture. This gesture works for Smartphones Note and S series. To enable this feature, go to the menu "Settings" and go to "Additional functions", "Traffic", "Palm control" or "Gesture control". What exactly the name of this menu item will be depends on the version of the Android OS on your device.

Find an item "Screenshot with the palm of your hand" and turn it on.

Then swipe the edge of your hand across the display from the left edge of the screen to the right or in the opposite direction. At this moment, what is happening on the screen will be captured and the photo will be saved in the gallery in the folder "Screenshots".
Owners of devices from this company also have additional ways how to take a screenshot. On models with Android 6.0 with EMUI 4.1 and above, there is a function to take a screenshot with the knuckles. To activate it go to "Settings" and then to the tab "Control".

Then go to the tab "Movements".

Then go to point "Smart Screenshot".

In the next window at the top there will be information on how to use this function, which you need to familiarize yourself with. Click the slider below to turn it on.

Some Huawei models (Y5II, 5A, Honor 8) have smart button, which can be set to three actions (one, two, or long press). To set it to take a screenshot, go to the settings in "Control" and then go to "Smart Button".

The next step is to select the button that is convenient for you to take a screenshot.

Now use the press you specified at the required moment.
Asus also has one option for conveniently creating a screenshot. In order not to bother pressing two keys at the same time, it has become possible in smartphones to take a screenshot with a touch button. latest apps. To launch this feature, in your phone's settings, find "Individual asus settings» and go to point "Recent apps button".

In the window that appears, select the line "Press and hold to take a screenshot".

Now you can take a screenshot by holding the custom touch button.
In the MIUI 8 shell, they added a screenshot with gestures. Of course, it does not work on all devices, but to check this possibility on your smartphone, go to "Settings", "Additionally", followed by "Screenshots" and turn on gesture screenshot.

To take a screenshot, swipe down on the display with three fingers.

On these shells, work with screenshots ends. Also, do not forget about the quick access panel, in which today almost every smartphone has an icon with scissors, indicating the function of creating a screenshot.

Find your brand or choose a convenient way and use it any time you need to take a screenshot.
Thus, screenshots on Android smartphones can be done in several ways, it all depends on the manufacturer and the specific model/shell.
Having acquired a new device or changed the version of the operating system, it is not always clear to the user how to take a picture of the screen on Android. The reason for this is that Google has made the screenshot feature not as obvious as it is in iOS. In this article, we will analyze how to take a picture of the screen of a phone or tablet, i.e. take a screenshot.
Which button to take a picture of the screen
In most versions of Android, you can take a screenshot by holding certain buttons on the device:
- Press the "ON / OFF" + "Volume Down" button at the same time (НTC, LG, Lenovo, Motorola, Nexus, Xiaomi, Sony, rarely Samsung) as in the picture below.
Example with HTC: how to take a picture of the screen (take a screen)
- Hold down the "Home" + "ON / OFF" button at the same time (Samsung). Photo instruction below.

Taking a picture of the screen on Samsung
- Hold down the Home button + the Back button (Samsung) at the same time, as in the diagram below.

You will find ready-made screenshots in the gallery or in file manager, in folders Pictures/Screenshots or Pictures/ScreenCapture.
In custom and other firmware
In many custom or other firmware from manufacturers, you can take a picture of the screen by calling an additional menu. To do this, hold down the "ON / OFF" button and click the "Screenshot" button.

How to take a picture of the screen with the palm of your hand on Samsung
In new models of smartphones and Samsung tablets You can take a picture of the screen by swiping your palm from one edge of the device to the other.

Activate this function You can go to Settings ➠ Controls ➠ Palm Controls ➠ Screenshot.
A universal way to take a picture of the screen using a PC
The the way is fine for users of smartphones and tablets on which Android OS version 4.0 and higher is installed.
For this you will need:
- Computer with Windows OS;
- Install Android drivers;
- Enable "USB Debugging";
- Download the ADB RUN program;
- MicroUSB cable.
How to take a screenshot of your phone using a PC
There are two ways to take a picture of the device screen - automated and with manual command entry. Let's consider each in more detail.
With command input:
- We launch adb program Run and go to Manual Command ➠ ADB
- We enter into command line:
adb shell screencap -p /sdcard/screenshot.png - The screenshot has been created, now we will copy it to the PC. To do this, enter the command:
adb pull /sdcard/screenshot.png %USERPROFILE%Desktop - Now the screenshot is on the "Desktop" of the computer.
- Connect your smartphone or android tablet to PC
- Run the Adb Run program and go to the ScreenshotRecord menu
- Select "Take a Screenshot" - the screenshot is created
The screenshot will be automatically moved to the Adb_Run_Screenshot folder on your computer's Desktop.
Screenshot using apps
AT Android versions 2.2 and 2.3, it was possible to take a screenshot only if there was Root rights and downloading a special application from Google Play, also this way Suitable for new versions of Android.
How to take a screenshot - video
The video below demonstrates how to take a screenshot on an android - learn.
All popular and available ways taking a screenshot on Android.
The rapid development of the Internet opens up new benefits every day for doing business, finding a job, entertainment and communication. One of the popular areas is the creation of blogs, websites, online stores. Many users are able to realize their potential by creating instructional videos and step by step guides. To do this, you need to capture a video or screenshot. Carrying out such a procedure on a desktop computer is quite simple, but how to take a screenshot on a smartphone or tablet?
There are many options for solving such a problem, each has its own characteristics. Let's consider in detail all the solutions.
Standard Tools
Android gadget manufacturers have provided for the need to create screenshots using the function buttons:
- In most cases, just press and hold the Volume Down and Power buttons for a couple of seconds.
- AT Sony smartphones Xperia needs to use "Volume Down + Power On". However, the function is not available for all devices, but only for certain models.
- Samsung Galaxy S gadgets require a simultaneous press of "Home + Lock". By default, in Samsung smartphones screenshots are saved to the ScreenCapture folder. After pressing the combination, a menu with options for actions appears.
- Many models of the HTC brand also perform the function of creating a screenshot. This feature is implemented by a combination of buttons "Power + Home".
- Starting with Android 3.2, a screenshot can be taken using the Recent Programs button. You just need to hold it for a few seconds. In some cases, the option of using "Volume Down + Power On" at the same time is possible.
The result of the performed action can be found out by characteristic sound alerts or on the smartphone screen.
On the one hand, such methods allow you to quickly take a snapshot of the entire screen. On the other hand, the user has no control over the characteristics of the resulting screenshot. If, for example, it is necessary to display only a certain part of the screen, then standard tools will not cope.
Screenshot programs
If the gadget works on Android latest versions(4.0 and up), the most practical way to take a screenshot would be to use additional programs. Here you need to know the main rule - you need to install such programs. Simply put, the user must have administrator rights to get additional features operating system usage.
After completing all the settings, you can proceed with the installation required software. The choice is very large, many developers have worked on creating effective programs for taking screenshots. The most high-quality developments: Screenshot UX, Screenshot ER PRO and MyPhoneExplorer.
There are a lot of programs, you can find them on Google Play.
Let's take a closer look at how to take a screenshot on Android using Screenshot UX. After installing and launching the program, a special service icon appears on the screen, making it easier to configure and take screenshots. The program has some additional features and functions:
- Installation reverse timer until the screenshot is taken.
- Taking a screenshot after shaking the gadget.
- Select the image format in which the picture will be saved.
- Adjust the size of the service icon on the screen.


It is worth noting that Screenshot UX allows you to edit a screenshot: you can make text comments, cut out the desired fragment, work with a brush with a transparency setting and color selection. The program provides a choice of further options for action with a ready-made screenshot.
Screenshot using computer
This method can hardly be called optimal, but it is definitely effective. Standard Tools may not work in many models of Chinese gadgets. If the smartphone runs on older versions of Android, then the screenshot function will also not be available, since it is simply not provided there. This is where it comes to the rescue home computer which will allow you to take a screenshot special program SDK. The method is universal, it works in all versions of Android. You need to follow the following procedure:
- Connect device to PC. It is better to do this through a standard usb cable, which is included in the kit.
- Now you need to install software and gadget drivers. If such a procedure was performed before, then the action can be skipped.
- Download the SDK, unpack the archive. In the root folder of the disk (for example, D or C), create a folder (it is better to choose a short name, for example, SCR) and copy the contents from the unpacked archive into it. This is done for the convenience of further use and command entry. As a result, the SCR folder should contain the following items: eclipse folders, sdk and SDK Manager app.
- Next, in the sdk folder, we find the platform-tools directory. Now we copy the adb.exe, AdbWinApi.dll, and fastboot.exe files from it to the System32 system folder, which is located in the Windows directory.
- Next, you need to launch the command console. You can do this through the Start menu. The command console is located in the Accessories section. More fast way is to press the key combination Win + R. In the window that appears, enter cmd command and press Enter. A black window should open with a blinking cursor to enter commands.
- The next step is to move to desired folder. For this, dos commands are used in turn: cd D: \ (go to the root folder), cd SCR (go to the SCR folder), cd sdk (go to a subdirectory), cd platform-tools. Each command must end with the Enter key.
- The last entry on the screen will be D:\SCR\sdk\platform-tools> and a blinking cursor at the end. Now you need to run executable file. To do this, enter the adb shell command, press Enter. Upon successful completion of the command, a message will appear on the screen. [email protected]:/$. The work in the console is over, but you can’t close it yet, just turn it off.
- Through the explorer, go to the folder D:\SCR\sdk\tools\. There should be a ddms.bat file that needs to be run. The Davlik Debug Monitor shell should load.


