Cannot connect to the network. What to do if Windows is unable to connect to your Wi-Fi network
In this article we will look at a situation that many users face. You click on the wireless networks icon in the lower right corner of the desktop, select the desired network from the list, click Connect, but instead of accessing the Internet, an error appears: “Windows could not connect to...”.
There may be several reasons why this window may appear. We will look at some of them in this article, and we will figure out why Wi-Fi may not connect to a laptop.
Network diagnostics
Let's start with the settings in the operating system.
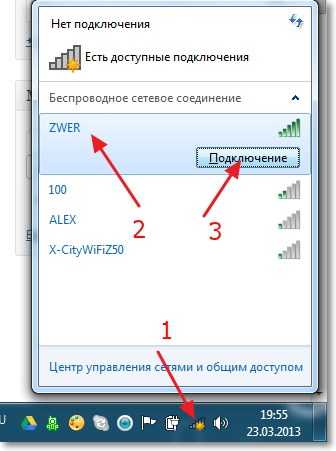
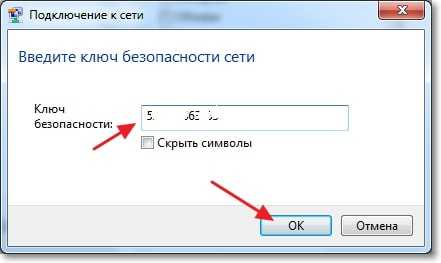
We will perform network diagnostics. Click on the icon wireless network in the tray, select the one you need and click “Connect”. Enter the password if it is protected.

When an error window appears, click on the button in it "Troubleshooting". Windows will search for problems and offer solutions. Just follow the recommendations. In some cases, this helps, and the laptop successfully connects to Wi-Fi.

New network connection
If the laptop still does not connect to Wi-Fi, then we will delete the network we want to connect to and connect again. This may help if you or someone else has recently changed their network password. The laptop has other settings saved that do not match the current ones, which is why it does not connect to Wi-Fi.
Right-click on the network icon and select "Network and Sharing Center".


In the list, select the network to which the laptop cannot connect, right-click on it and select “Delete network”.

After this, click on the network icon in the tray again and connect to the desired Wi-Fi networks. You may need to find out and enter your current password. After this, Internet access should appear.

Changing router settings
Let's move on to the router settings. They could have gone astray for some reason, or someone replaced them. Since you do not have access to the network on your laptop, open your favorite browser on a computer that is connected to the same router via cable and enter the IP address in the address bar: 192.168.1.1 or 192.168.0.1.
Data cleaning
route -f
ipconfig /flushdns
netsh int ip reset
netsh int ipv4 reset
netsh int tcp reset
netsh winsock reset
After each, press "Enter". This will help clear data in DNS and Winsock, reset routes and network adapter parameters.
That's all. I hope at least one of the described methods helped you. And now you will know what to do if the laptop sees the Wi-Fi network, but cannot connect to it, as a result of which an error window appears.
Rate this article: (2
ratings, average: 5,00
out of 5)
Webmaster. Higher education with a degree in Information Security. Author of most articles and computer literacy lessons
Hello everyone, in this topic we will talk about the problem with connecting to the network. Let's say you have a router with a wireless network function. Via Wi-Fi you can connect to this network and access the Internet. There are times when you cannot connect to the network, in other words, you see this error: . It's quite sad, but it's worth dealing with it.
By the way, one could use the most simple method– forget the network you are trying to connect to. You need to go to the network settings, then to manage Wi-Fi network settings, click on the “Manage known networks” button and find the problematic network in the list and click on the “Forget” button, then restart the computer and try to connect again. Unfortunately, this method does not always help, so we will use more effective ones.
I can't connect to the WiFi network, what should I do?
The network connection error looks like this: And she can appear at any moment.
There are several reasons why this problem appears:
- In the parameters of the router itself, you changed the specification from WPA-PSK to WPA2-PSK, or vice versa.
- Changed the security key in the router settings.
Then you will be asked to enter a new security key as usual, and a message may also pop up indicating that some data has been changed. Try re-entering your Wi-Fi network key and connecting, the new data should be automatically applied.

But here is the case when, instead of requiring you to enter a key, an error appears about the impossibility of connecting to the network.
The first method is “Forget this network”
Yes, at the beginning I said that this method does not always help, but I did not say that it does not help at all.
Click on the Wi-Fi icon on the taskbar, and then go to "Network Settings"

Go to the tab "Wi-Fi", if not already on it and scroll to the very bottom, select the item "Manage Wi-Fi network settings", or point "Managing Known Networks".

A window appears where you can see a list of all the networks to which you have ever connected. Find yours there, click on it and press the button "Forget".

Close all windows and click on the network icon on the taskbar again.We are trying to reconnect to the network by entering the key.
Using this method does not always lead to a positive result.
The second method is “Network reset”
As far as I remember, this method only available in the Anniversary Update. You click on the network icon and go to Network Settings. Go to the tab "State" and scroll to the bottom of the window. There will be a button "Network reset". Let's press it.

A window will appear in which they tell us what will happen during the reset. The computer, by the way, will restart. After that, try connecting to the network again.

Method three - removing the network driver and reinstalling it
The method is somewhat similar to the previous one, but you should not bypass it either. Let's go to device Manager, to do this, right-click on the Start menu and select this item.

Expanding the tab « Network adapters» and device, does not remove only the driver.

After this, restart your computer, the device will be restored, and you will be able to connect to the network.If it doesn’t help, maybe the problem is with the router and you need to reset it, but that’s a topic for another article.
This is how it would seem that a laptop (netbook, etc.) works with a Wi-Fi network and no questions asked. And one day you turn it on and an error appears: “Windows was unable to connect to Wi-Fi...”. What to do?
This is exactly what happened with my home laptop. In this article I want to tell you how you can eliminate this error (besides, as practice shows, this error quite common).
The most common reasons:
1. Lack of drivers.
2. The router settings are lost (or changed).
3. Antivirus programs and firewalls.
4. Conflict between programs and drivers.
And now about how to eliminate them.
Resolving the error “Windows could not connect to the Wi-Fi network”
1) Setting up Windows OS (using Windows 7 as an example, similar in Windows 8).

If you still receive an error stating that it is not possible to connect to the network (as in the picture below), click on the “ troubleshooting"(I know that many are very skeptical about it (I was the same way until it helped restore the network a couple of times)).

If the diagnostics did not help, go to “ Network and Sharing Center"(to enter this section, just right-click on the network icon next to the clock).


Now we simply delete our wireless network, which Windows cannot connect to (by the way, you will have your own network name, in my case it is “Autoto”).

We try again to connect to the Wi-Fi network that we deleted in the previous step.

In my case, Windows was able to connect to the network, and without any questions. The reason turned out to be trivial: one “comrade” changed the password in the router settings, and in Windows, in the network connection settings, the old password was saved...
![]()
2) Setting up a Wi-Fi network in the router
After checking your wireless connection settings in Windows, the second thing you need to do is check your router settings. In 50% of cases, they are to blame: either they went wrong (which could happen, for example, during a power outage), or someone changed them...
Because you were unable to access the Wi-Fi network from your laptop, then configure WiFi connection you need from a computer that is connected to the router using a cable (twisted pair).
In order not to repeat myself, here is a good article about. If you can’t log in, I recommend checking out this:
In the router settings We are interested in the “Wireless” section (if in Russian, then setting up Wi-Fi parameters).
For example, in TP-link routers this section looks something like this:
Setting up a TP-link router.
By the way, in some cases you may need to reset your router(s). There is a special button on its body for this. Press it and hold it for 10-15 seconds.
Task: change the password and try to set up a wireless connection in Windows (see point 1 of this article).
3) Update drivers
The lack of drivers (as well as the installation of drivers that are not suitable for the equipment) can cause much more serious errors and failures. Therefore, after checking the router settings and network connection in Windows, you need to check the drivers for the network adapter.
How to do it?

4) Setting up startup and disabling antiviruses
Antiviruses and firewalls (with certain settings) can block everything network connections, supposedly protecting you from dangerous threats. Therefore, the easiest option is to simply disable them or delete them during setup.
About autoloading: During setup, it is also advisable to remove all programs that automatically load with Windows. To do this, press the “Win + R” button combination (valid in Windows 7/8).
Then enter the command in the “open” line: msconfig


5) If all else fails...
If Windows still cannot connect to the Wi-Fi network, you can try opening command line and enter the following commands sequentially (enter the first command - press Enter, then the second and Enter again, etc.):
route -f
ipconfig /flushdns
netsh int ip reset
netsh int ipv4 reset
netsh int tcp reset
netsh winsock reset
Thus, we will reset the network adapter, routes, clear DNS and Winsock. After this, you need to restart your computer and reconfigure your network connection settings.
If you have anything to add, I would be very grateful. Best wishes!
Error "Could not connect to Windows service"can occur for various reasons. The System Event Notification Service, Client, may stop working group policy. You can also very often see this message on the weather gadget in Windows 7. The consequences of such unsuccessful connections are different, but almost always lead to system inoperability.
Many users have a problem when the message “Windows cannot connect to the System Event Notification Service” starts appearing in the tray. This prevents regular users from logging in."
At the same time, the computer begins to load slowly or does not load at all, freezes, a black screen appears when logging in, programs start and open very slowly, while the CPU shows 100% load, but does not load anything specific. May also not work Windows recovery. In general, it becomes completely impossible to work on a computer.
In most cases, such problems occur due to damage to the registry keys with Winsock settings for various reasons. It can be damaged due to incorrectly installed software, viruses, incorrect settings and incorrect installed updates. There may be other reasons.
How to fix System Event Notification Service error
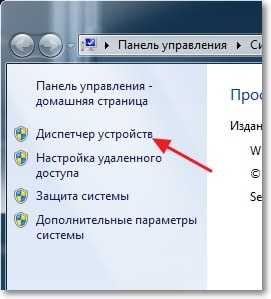
The first thing you can do is try to roll back the system to its previous state. To do this, go to Start, open Control Panel, select System and Security - System Restore.
Select a restore point that appeared before the error about connecting to a Windows service started appearing, and start the process. But in some cases, this may not work due to system problems or missing restore points. Be sure to check the system with an antivirus and a garbage cleaner. This can help.
If the problem persists, then open the command line and write: “route -f”, press Enter, on the next line write “netsh winsock reset”. Close and restart the computer.
If it doesn’t help, open the command line again and enter the commands sequentially:
- ipconfig /flushdns
- nbtstat -R
- nbtstat -RR
- netsh int reset all
- netsh int ip reset
- netsh winsock reset
- netsh interface tcp set global autotuninglevel=disabled
And we reboot again.
You can also try opening Network and Sharing Center and click on “Change adapter settings.” Next, right-click on “Connect via local network» and select Properties. Opposite “Client for Microsoft networks” there should be a checkmark; if it is not there, check it and reboot again.
If this problem still persists, you will have to reinstall the system.
The service on gadgets does not connect
Everyone's favorite gadgets appeared in Windows 7, but Microsoft stopped supporting them and one day, instead of the usual gadget, for example, the weather, a message will be displayed that it was not possible to connect to the service.
 In some cases, simply restarting the application helps, but over time it may stop working completely. To do this, click on the cross in the corner, then right-click on any free space desktop and select Gadgets, then drag “Weather to desktop”. Also, to solve problems, you can change the city to another and then return to the current location again.
You can try to revive the weather gadget. First you need to close the application (click on the cross in the corner of the gadget). Next, go to My Computer, open drive C, select the “Users” folder, in it click on the folder with the user name and sequentially open: AppData-Local-Microsoft-Windows Live-Services-Cache.
The AppData folder may not appear. To make it visible in Windows 7, press Ctrl+C and select “Tools” in the top menu that appears. Next, select the tab "Folder properties" and choose "Show hidden files and folders". In Windows 8, this can be done in the top menu by selecting the View tab. This should resolve the error issue.
Windows can't connect to the Group Policy Client service
When loading, a Group Policy Client connection error may appear. This may prevent users other than the administrator from logging in. And if there are several computers connected to one network, then this problem can be very annoying. There may be other consequences.
First, you can try to enable the service manually. To do this, go to the control panel, select System and Security, then Administration and Services. Find the Group Policy Client, right-click and select enable. But this method does not always work.

You can try to roll back the system to an earlier state. Also check if all updates are installed.
The problem may disappear when you reboot, but this will not go away.
To fix the problem, you can try the following:
- log into Windows account Administrator and call the line “execute Win+R” – in it we write regedit.exe;
- The registry editor will appear in it, open the folders sequentially HKEY_LOCAL_MACHINE-SOFTWARE-Microsoft-Windows NT-CurrentVersion-Svchost;
- create a GPSvcGroup section in it (right mouse button);
- in the GPSvcGroup section we create two more parameters:
- DWORD (32 bits) name AuthenticationCapabilities value 0x00003020 (12320) DWORD (32 bits) name CoInitializeSecurityParam value 0x00000001 (1)
- Let's reboot.
The most extreme method to correct the error is to reinstall the system.
Hello, Dear friends. As you probably already understood from the title, today I decided to touch upon a very serious and painful topic, and try to figure out what to do when Wi-Fi on a laptop or netbook does not work and how to still connect the laptop to Wi-Fi router. By the way, this can be not only a laptop or netbook, it can also be an ordinary desktop computer with a Wi-Fi receiver. A lot of similar questions have been popping up lately, mostly related to the article.
Now we will try to figure out step by step what and why problems may arise when connecting a laptop to wireless wifi networks. We will also try to find a solution to this very popular and unpleasant problem with connecting to Wi-Fi, or rather, an unsuccessful connection.
Most often, problems arise when it is not possible to turn on the Wi-Fi module itself on the laptop. And when Wi-Fi turns on, the laptop finds all available networks, but when trying to connect it writes . You need to check if the drivers are installed on Wi-Fi adapter, is Wi-Fi turned on on the laptop, etc. Now we will do this.
I noticed that most often problems with connecting to Wi-Fi occur in Windows 7. It is on this OS that the network without Internet access error very often appears; I wrote how to solve this problem in the article linked above. In fact, as practice shows, there can be many reasons for this problem. And if there are many reasons, then there are many ways in which you can force a laptop to connect to a Wi-Fi router.
But it’s not always the laptop, netbook, etc. that is to blame. There may also be a problem with the access point, that is, with the Wi-Fi router. And the first thing we need to do when a problem arises with connecting to Wi-Fi is to determine what the reason is, in the laptop, or in the Wi-Fi router. Now I will consider the problem with connecting to my own router. Because if you can’t establish a connection with someone else’s Wi-Fi, then all the complaints are against your neighbor, it’s most likely his problem :).
Who is to blame, the laptop or the Wi-Fi router?
As I wrote above, you first need to find the culprit. Before you make any settings on your laptop or Wi-Fi router, you need to understand what the problem is, which is why you can’t connect your laptop to Wi-Fi. You can just set it up in such a way that then you have to do it and set everything up again. Most The best way To determine which device the problem is hiding in, try connecting another device to the router, for example another laptop, tablet, or phone. If you have a laptop that has problems connecting to Wi-Fi, you should try connecting it to a different wireless network.
I think that you understood my point. If there are other devices connected to your router (best with a similar operating system) will connect without problems, then the problem is in the laptop. Read this article further, now let’s try to solve it.
Well, if problems connecting to your network also occur on other devices, and the “problematic” laptop connects to other networks without problems, then the problem is in setting up the Wi-Fi router. See the article on, it might come in handy.
I will show the example of a laptop that runs on Windows 7. This is currently the most popular operating system.
I advise you to immediately pay attention to the icon that displays the status of your Internet connection. It's located in the notification panel.
If the Internet connection status looks like this:
![]()
First you need to check whether the drivers for Wi-Fi are installed and whether the Wi-Fi adapter is turned on.
Right click on "My computer" and select “Properties”. On the left select "Device Manager".
Open a tab in a new window "Network adapters" and see if there is a device like Wireless Network Adapter (You may have a different name for it). If you have such a device, then right-click on it and select “Properties”. Another window will open, make sure it says “The device is working normally.”
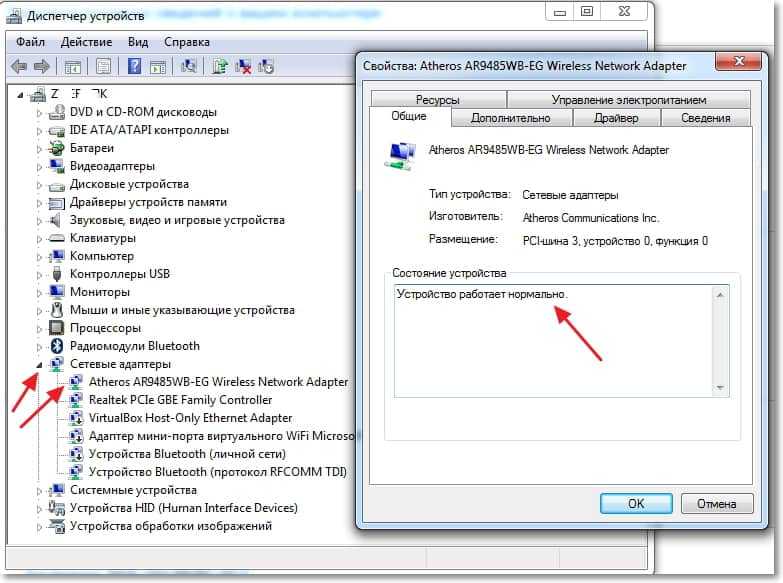
If everything is approximately the same as mine above in the screenshot, then everything is fine, the driver is installed. And if there is no Wireless Network Adapter device and you have unidentified devices, go to the website of your laptop manufacturer, download and install the Wireless Network Adapter driver for your model.
Learn more about installing and updating the driver for wireless adapter – .
We sorted out the drivers.
Checking whether Wi-Fi is turned on on the laptop
If the driver is installed, but Wi-Fi module is disabled, the connection status will be the same:
Usually the wireless adapter on your laptop is turned on, but it doesn't hurt to check. Wi-Fi on laptops (netbooks) is usually turned on and off using a keyboard shortcut. On my ASUS K56cm, these are the keys FN+F2. But although when I press these keys I get a message that the wireless adapters are enabled/disabled, nothing happens. Look for the key on your laptop FN and a key with a picture of a wireless network. Press them at the same time.

Some laptops may have a special switch on the case that can be used to enable or disable Wi-Fi. For example on Toshiba Satellite L300 it looks like this:
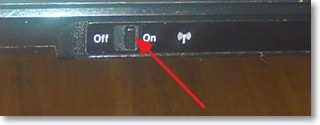
Enable or disable the Wi-Fi wireless adapter in Windows 7
But the best way to check whether the wireless network adapter is working or not is to go to the network control center and take a look.
So, on the notification panel, right-click on the Internet connection status icon and select “Network and Sharing Center”.
Then select on the left.

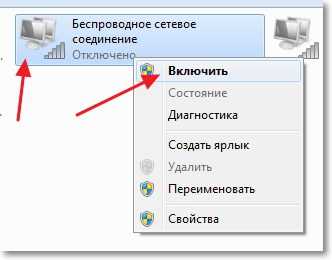
Among the connections we are looking for “Wireless network connection”. If everything is fine and the Wi-Fi adapter is turned on, then it should look like this:

If the adapter is disabled, it will look like the screenshot below. Right-click on it and select “Enable”.
Using the methods described above, we must make sure that the status of the Internet connection in the notification panel is like this:

This status means “No connection – There are connections available”- this means that the Wi-Fi adapter is turned on and there are available wireless networks to connect to.
If the connection status is like this:

This means that Wi-Fi is turned on, but the laptop simply does not see the networks available for connection.
Error “Windows could not connect to...”
We have sorted out the problem when the wireless network module is disabled or does not work at all. Now consider the case when the laptop finds available Wi-Fi networks, but when trying to connect to Wi-Fi it writes: “Windows was unable to connect to...”, where instead of dots is the name of the network you want to connect to.
If your network connection status is the same as in the screenshot above (via one, network with yellow icon), then click on it and you will see a list of networks available for connection.
Select the desired network, click on it, then click the “Connect” button.
If the set is password protected, Windows will ask you to provide the password. Enter your network password and click “Ok”.
And if everything is fine, then your laptop should connect to the Internet via a wireless connection. And the Internet connection status should look like this:

But it is at the moment of connection that the error “Windows could not connect to...” very often appears. She looks like this:

Unfortunately, friends, there is no definite solution to this problem. But I can download that very often the problem with such an error appears due to the settings of the Wi-Fi router. It may be through the type of security and encryption that is installed on the Wi-Fi router, read more about this in the article. There may also be a problem with the distribution of IP addresses.
If you notice that in the window with the error “Windows was unable to connect to...” you can run “Troubleshooting”, it would be a sin not to take advantage. Try running it, I heard somewhere that there are cases in which it helps :). But seriously, sometimes it really helps. Windows will check the readiness of the wireless adapter, check the settings, etc. And if it can, it will fix the problem that is preventing you from connecting to Wi-Fi.
Just reboot your router and then your laptop. Very often this helps.
Update
I noticed that in Windows this error appears when the settings that are saved on the computer for your network do not match the current network settings. I'll explain now.
For example, your laptop was connected to Wi-Fi, it automatically connected to the network. But you went and changed the password, or the type of network encryption. Now the laptop is trying to connect to the network, but the parameters no longer match, and that’s the error.
All you need to do is simply delete the network on your computer and re-establish the connection. I wrote about this in an article
Conclusion
It’s a great article, and I hope it’s useful. I wrote it for half a day, with interruptions of course, there were still problems with adding screenshots to the site, but I seemed to have solved it.
I tried to collect all the necessary information that should help you solve the problem that arises when connecting a laptop or netbook to Wi-Fi. If I forgot to write something, I will definitely add to the article in the future, and I will also be very grateful if you share in the comments the information that helped you solve the problem with connecting to a wireless network.
If you have any questions, ask them in the comments, we will try to figure it out. Best wishes!
Also on the site:
Why doesn't Wi-Fi work on a laptop (netbook)? How to connect a laptop to a Wi-Fi router? Error “Windows could not connect to...” updated: February 7, 2018 by: admin


