Show in Folder. How to see hidden files and folders in Windows XP
On each computer Windows control there are so-called "hidden folders". They are not visible on the user's screen for various reasons, however correct settings help you display them so you can make the appropriate changes. Next, we will describe in detail all the nuances of working with hidden folders.
How to enable hidden folders on Windows?
It should be borne in mind the fact that some files on the computer are hidden from the user for a reason. As a rule, such folders are stored critically. important information necessary for the operation of specific programs or the operating system as a whole. In no case can you delete them, which is why the developers “hid” the files in such a tricky way.
Making them visible (we will use Windows 7 as an example, but on other versions everything is done by analogy) is quite simple:
- Open “Computer” through “Start” or a shortcut, in the left upper corner, on the taskbar we find the button “Organize” (in Russian localization “Organize”), click on the item “Folder and search”, a new window “Folders option” will open.
- Go to the “View” tab and in the “Advanced settings” window, among various settings, in the “Hidden files” subsection, check the checkbox with the inscription “Show hidden files”.
- Click "Ok", look at desired folder and check the result - the files should be displayed as translucent labels.
- If it becomes necessary to undo the changes, just move the checkbox one line up and save the changes again, the system folders and files will disappear from the screen.
How to see hidden folders in Windows 10?
Since the “ten” has changed its interface by default (it can be returned to the classic one, but we will talk about displaying in a “tablet”, tiled appearance), it is worth mentioning the settings for hidden files separately.
- To show them, click on the “Start” button, find the item “Explorer”, a new window opens.
- At the top, in the taskbar, we find the “View” menu, a little lower and to the right, next to “Current View”, check the box next to “Hidden Items”.
- Alternatively, press the key combination Win + Q, the search opens. In it, enter “Explorer Options”, open the corresponding window. Then everything happens in the same way as described in the first paragraph - on the “View” tab we find the corresponding item for displaying files and folders.


Show Hidden Folders in Windows Vista
If you still can't part with this version of the operating system, let's say a few words about the differences in the settings here. In the classical form, they repeat point 1, in the form “ home page” From the Control Panel, you will need to go to “Appearance and Personalization”, click on the link “Show hidden Files and Folders”. If necessary, the user can make a file or folder invisible on their own, in any modern Windows. Just right-click on the icon, go to its properties and check the "Hide" box.
Seeing hidden folders can be useful for more than just changing settings. Sometimes they hide viruses that intentionally hide information from the user. If you find one of these suspicious folders, do not rush to delete it, first carefully analyze the contents.
Novice users sooner or later have to look for ways to ensure the security of personal data on the computer. In one case, the files can be encrypted or packed into a password-protected archive, while in others you have to hide directories with personal photos and other data in the jungle file system or make invisible in Explorer windows.
When it comes time to turn to the contents of the hidden directory, the question arises: how to show hidden folders in Windows 7. We hide something, but we don’t know how to display it back. This short but detailed article will answer the question.
Hidden folders and files are physically no different from normal ones. The only difference is that the former have the Hidden attribute active. It can be assigned to any file system object to which the user has access. Many system directories, for example, are invisible to the user by default in order to protect system files from inexperienced users.
Conductor
The meaning of any of the methods (except for using third-party software) is to change the value of the key system registry, responsible for the visualization of hidden folders in Windows 7.
- The solution to the problem begins with the launch of Explorer, for example, using the Win + E key combination (the contents of the My Computer directory will open).
- Click on the "Organize" button located under the window header.
- In the "Tools" drop-down menu, click on the "Folder Options" item.
The same window opens through the main menu of the explorer.
- Press the Alt key to bring up the main menu.
- In it, click on the "Service" item.
- From the drop-down list, select "Folder Options ...".
- Switch to the "View" tab.
- Scroll through the list of options in the Advanced Options frame.
- To return the hidden directories, move the switch next to the "Hidden folders and files" option to the second position - "Display hidden files…».
- Click "OK" to save the new settings for the Windows graphical shell.
Now Explorer will display all file system objects with the Hidden attribute, and this does not require a computer restart, re-authorization in the system, or even a window refresh.
Icons with low brightness and color saturation indicate that the files/folders have been assigned the "Hidden" attribute.
You can also get to the settings window, familiar from the previous section, through the control panel.
We launch it in any convenient way.
If its elements are shown as categories, go to the "Appearance and personalization" section.
Here, click on "Folder Options".
In the case when the control panel items are displayed as small or large icons, the Folder Options applet is already in the main window.
By the way, the “control folders” command will help you open the window with the settings of the directory parameters the fastest. It should be executed through the search bar or the "Run" window. The key combination Win + R will help to do this.
Registry Editor
You can also change the value of the key that allows you to manage hidden objects manually using the registry editor built into Windows 7. To do this, run it.
- Open the "Run" window through the start or the key combination Win + R.
- Enter and execute the "regedit" command.
Administrator privileges are required to perform the operation.
- Expand the HKEY_CURREN_USER hive, where all settings related to the current account are stored.
- We go along the path: "Software\Microsoft\Windows\CurrentVersion\Explorer\Advanced".
- We call the context menu of the key with the name "Hidden" and click "Change ...".
- Enter "1" as the new key value and press Enter or click "OK".
- It remains to re-enter the directory where the hidden objects were. You can also refresh its contents with the F5 key or the button located to the right of the address bar.
Total Commander
Many Windows users prefer File Explorer file manager Total Commander due to the huge advantages of the program in terms of convenience and functionality. To enable the function of displaying hidden directories and files, we perform the following chain of operations.
- From the main menu, call the "Configuration" command.
- In the drop-down menu, click on the item “Settings: Panel Contents”.
- To display hidden directories, the activation of the option "Show hidden folders" will help. Mark it with a flag and apply the settings.
After saving the settings and closing the configuration window Total Commander will start showing hidden folders.
How to hide information
You can hide a folder or file by assigning an appropriate attribute to it/him. This is done in the following way.
- First you need to open the "Properties" of the object through context menu or via the keyboard shortcut Alt + Enter .
- Check the box next to the "Hidden" option in the "Attributes" frame.
If this checkbox is unchecked, the hidden file/directory will be displayed in the Explorer window.
- Save the new settings by selecting the appropriate options in the warning window.
Regarding removable drives
After removing viruses of the Win32 family, which hid all files on the flash drive and replaced them with themselves, you have to change the attributes of all the affected objects. A little trick will help you to view their list and make them visible for the current media without activating the option to visualize directories and files hidden in Explorer.
- Open the contents of the flash drive in Explorer or a file manager, right-click the context menu of the free area and create a new text file with any name and permission "bat" (when renaming it, replace "txt" with "bat").
- Through its context menu of a text file, we call the "Change" command.
As a result, the "Hidden" attribute will be removed for all objects on the flash drive, and they will become visible without changing any settings.
Search for hidden files
Find and display directories and files that have the "Hidden" attribute, called the Hidden program File Finder from the SecurityXploded team. She doesn't change at all. system settings. The program will only scan the specified directory or drive, filter all found files and folders by the "Hidden" attribute and display a list of found objects to which it is assigned. If you want to find data (photos, movies and even directories) hidden by someone without changing Windows 7 settings, install and run Hidden File Finder.
- In the main window, click on the directory icon with a green arrow and select the scanning source.
- We are waiting for the completion of the procedure. It will be marked by the appearance of an information window, which we close.
The window displays only those file system objects that have the "Hidden" attribute assigned. Moreover, the names of directories are highlighted in blue.
Through the context menu of any object or their group, you can go to the selected directory, open the file, make it visible or delete it.
Choose the most suitable method for your case, because none of them is universal.
Video instruction
Sometimes there is a need to make available hidden files or folders, display them, make them visible. Let's look at how to do this in Windows XP and Windows 7 operating systems (in Windows Vista and 8 similarly). The "Folder Options" window itself in all Windows versions the same, only the way of opening this window differs.
How to show hidden folders and files in Windows 7, Vista
We go to Control Panel (via menu Start). Choose an item Folders settings . If not found, then in the upper right corner of the Control Panel there is a word "View:" and next to it you can choose the display option: "Category", « Large icons» , "Small Icons". Choose one of the last two options. Now you will definitely find the right item Folders settings .
After that, in all operating systems, a window will open in front of you where you can configure show hidden folders and files. Further, the procedure will be the same, despite the slight differences in the appearance of the windows.
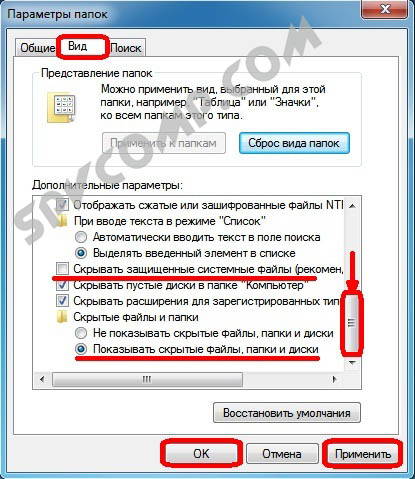
Go to tab View. Under the inscription Extra options there is a list of parameters that can be checked. Scroll this list down to the end. Putting a dot opposite "Show hidden files, folders and drives" , uncheck "Hide protected system files» (here the system will issue a warning, we answer Yes). Click "Apply" and "OK" .
All is ready. That's it hidden and system folders and files are shown like normal. When the need for this disappears, you can go back to Folders settings and on the tab View press "Restore Defaults" .
How to show hidden folders and files in Windows XP
Method 1. We open Conductor(or My computer ). In the upper left corner we are looking for the standard menu bar (File, Edit, View ...). Click Service - Folder properties... .

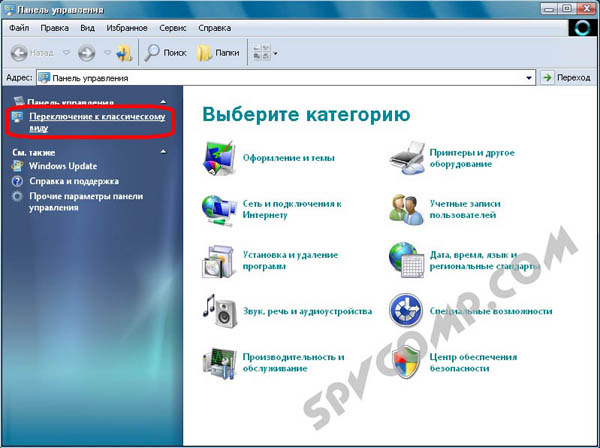
Method 2. We open Control Panel (via menu Start), choose Folder properties . If you did not find this item, then on the left you need to click "Switch to Classic View".

In order to ensure the security of the operating system, its correct operation, important Windows system folders and files are hidden by default. Also, for various reasons, users often hide other, regular folders and files.
An outside user, not finding them in the explorer, will not be able to get acquainted with your personal information.
Sometimes you need to access hidden folders, see, open and view properties. There is nothing difficult in this. There are many ways.
The first one. Go to Windows 10 Explorer.
Open the View tab.
Select "Options", click on this item.

In the window that appears, click on "View", go to the tab.

In the advanced options (green rectangle), uncheck hide protected system files (top red arrow in the picture).
The field in the square next to this item should be empty, as in the screenshot above. In the circle next to the item ("Show hidden files, folders and drives"), check the box (bottom arrow). Be sure to click "Apply" and "Ok" confirming changes made. These actions turned on the display of system and ordinary hidden folders.
If necessary, in this way, you can separately enable the display of user folders without opening access to system files. And vice versa.
Another very simple way to do visible files and folders in Windows 10. System folders remain hidden when using this method.
Enter the "View" tab of the explorer.

Check the "Hidden Items" box as shown in the picture. Now all folders are visible (except system folders).
When using the third method, it is possible to show hidden folders selectively, choosing only the necessary one folder.
To do this, hover over the selected folder and right-click to open the folder properties.
From the hiding attribute, in the lower part of the window, uncheck the box, the field of the “Hidden” square should be empty, it should look like this in the picture above. The folder in this case becomes visible. Apply the action by clicking on "Apply" and click "Ok".
Mission completed.
How to open hidden files on Windows 7?
Press Win+R, type control folders and press Enter.
Open the "View" tab, scroll the slider down and check the box "Show ...".
Click Apply to save your changes.
If you need to disable their display, then in the same window check the box "Do not show ...".
Second way:
Go to Start, open the "Control Panel" and click on the "Folder Options" shortcut.
Select the "View" section, scroll the slider down and activate the "Show ..." item.
Save changes by clicking "Apply".
And the third way:
Open any folder.
Click the Alt button and a menu will appear.
Click Tools - Folder Options.
A familiar window will open: to enable the display of hidden files, go to the "View" tab and check the box "Show ...".
As you can see, there is nothing complicated here. Choose whichever method suits you best and use it at the right time.
When you turn on viewing hidden files in Windows 7 using any of the above methods, they will be visible everywhere. Including on a flash drive. You just need to connect it to a PC or laptop - and you will see the hidden folders (provided that they are there). The same goes for an external HDD.
We figured out the "seven", now let's move on to the "eight".
How to enable hidden files in Windows 8?
There are also 3 options to choose from. The first two are described above in the instructions for Windows 7. That is, you can enable hidden files in Windows 8 by typing the control folders command. Or by selecting the Folder Options shortcut in the Control Panel.
But there is another way to show hidden files in Windows 8:
Open any folder.
Select the "View" section.
Click on Show or Hide, and then check the box next to Hidden Items.
Ready. And not only in the current folder, but also in the rest. The same methods will help display hidden files on a flash drive or external HDD drive- you just need to connect them to a computer or laptop.
The last method, which works on Windows 8, is also suitable for "tens"
To enable hidden files in Windows 10:
Open any folder.
Select the "View" section.
Put a checkmark in the "Hidden Items" section.
After that, you will be able to see hidden folders and documents in any section hard drive or on a flash drive (it must be connected to a PC).
If you want to hide the folders again, uncheck this box.
There is also another way to enable the display of hidden files in Windows 10:
Click Win+Q and type "Explorer Options" in the search box.
Press Enter - a familiar window will open.
Go to the "View" section and check the box "Show ...".
Ready. Now you can open any hidden files on Windows 10. As you can see, the methods on different versions of the OS are quite similar, but differ in small nuances.
How to view hidden files in XP
Go to Start - Control Panel and select the "Folder Options" shortcut.
The same window will appear: go to the "View" section and check the box "Show ...".
Don't forget to click "Apply" to save your changes.
All - now you can open or delete hidden folders and documents.
If there is no desire to understand the differences between different Windows versions, you can use the generic method
In this case, you just need to install the Total Commander file manager (download link). The program sees hidden documents and works on all Windows.
How to see hidden files in Total Commander? To do this, do the following:
Open the program and select Configuration - Settings from the menu.
Click the Panel Contents tab.
Put the birds in the 2 upper points.
Click "Apply" and exit the settings.
Now all folders and documents in Total Commander will be visible. And you don't even have to go to windows settings and change folder display options.
Need to see hidden documents? Launch Total Commander and navigate to the desired hard drive partition. Or plug in a flash drive and then open it with this file manager.
In order for hidden folders to become visible, you need to start the explorer. In the upper left corner of the explorer, click organize and in the drop-down menu, click folder and search options. In the options menu that opens, click the "View" button and scroll all the way down to "advanced options" and turn on the item - show hidden files and folders. Finally, click the "Apply" button.
In order to force the Windows 7 operating system to show hidden folders, we need to open any folder and press the ALT button on the keyboard.
After clicking on ALT key, a series of drop-down menus will appear below the address bar: File, Edit, View, Tools, and Help. Here we need to open the "Tools" drop-down menu and select the "Folder Options" item.
After that, a small window called "Folder Options" will open in front of you. In this window, you can configure all the basic settings that relate to the display of folders, files and drives in Windows 7 Explorer.
It should be noted that if you are unable to open the "Folder Options" window through the drop-down menu, then you can use the search in the Start menu. To do this, open the start menu and type "Folder Options". After that, the operating Windows system 7 will find desired program and offer to open it.
So, you have opened the "Folder Options" window, in order to show hidden folders in Windows 7, you need to go to the "View" tab and find the options that are responsible for showing hidden folders.
You need two parameters:
"Hide protected system files" - it must be disabled;
"Show hidden files, folders and drives" - you need to enable it.
After making changes, close the window by clicking on the “OK” button in order to save the changes. After that, you will be able to see hidden folders and files. Now, if there is such a need, you can remove the "Hidden" attribute and the folder will become normal. To do this, right-click on the folder and select "Properties". After that, turn off the "Hidden" feature and close the window.
After you have removed the Hidden attribute, the display of hidden folders can be disabled. Farther given folder will be displayed anyway.
The simplest method that I always use is with programs Total commander. Open the program, select desired disk and just click the Hidden Items button and you will see everything that has been hidden (marked with a red exclamation point).
If you do not have the program installed, also use quite simple ways described below.
Show hidden files and folders in Windows 8.x or 10
Use the View tab and click the Options button.
On the View tab, check the "Show hidden files, folders and drives" option at the very bottom. If you want to get to the hidden system Windows files, uncheck the "Hide protected operating system files" option
Hidden files will appear semi-transparent. If you want to completely remove the "hidden" attribute from a file or folder, right-click on it and select properties. On the General tab, clear the Hidden option.
Folder or file attribute "Hidden"
In most cases, this helps, but sometimes it happens that the checkbox cannot be removed from the option, because. the hidden attribute is inactive. If so, scroll down a bit and follow the instructions.
Windows 7 or Vista
Open any folder and select "Folder and Search Options" from the Organize menu.
As in the previous example, check or uncheck the required options and click OK.
What to do if the hidden attribute of a folder is inactive
In case you are unable to remove the attribute hidden from a folder with the above method, the code below can help you in this situation. Just copy it, paste it into notepad and save it as folder with extension .vbs instead of txt to make it folder.vbs. Then copy and paste the file to the drive you want ( USB flash drive, SD card or HDD) where you want to display hidden files and launch it with a standard double-click.
Don't forget to change "d:" to your drive letter.
‘ Reset file attributes for all folders within a specific drive
‘Change d: to the drive letter where the script will be applied
cDrive="d:"
Set FSO = CreateObject("Scripting.FileSystemObject")
ShowSubfolders FSO.GetFolder(cDrive)
WScript.Echo "Done with fix."
Sub ShowSubFolders(Folder)
str = ""
For Each Subfolder in Folder.SubFolders
str = str & » » & Subfolder.Path
subFolder.Attributes = 0
ShowSubFolders Subfolder
Next
end sub
After running the file, you should see all hidden folders but not files (note) because this method only applies to folders. And for files, use the following method:
Open the Run dialog box, type cmd and press Enter.
Enter your drive letter, for example d: and press Enter.
Then enter the following command:
attrib d:*.* /d /s -h -r -s
Now, all hidden files should show up.
How to hide the folder with personal files
And now we will consider with you how to hide the folder with personal files. First, let's create a folder, put some files in it and open Folder Options.
Check the Hidden box and click Apply.
Apply changes to this folder only
This folder and all subfolders and files.
We select the hiding option of our choice, you can select the second one and click OK.
How to show hidden folders in Windows 10 through File Explorer
The shortest way to get to what you want is to use a little tweak in the default and everyone's favorite Windows Explorer. Find the "View" tab and make sure you have "Hidden Items" checked. That's all - the system will show you hidden files and folders.
There is also a useful parameter "File name extensions" if you suddenly want to see the document type (exe, jpg, bak and others)
Hidden files and folders in Windows 10 via "Folder and Search Options"
If the method above appeared only with Windows 8 ... then the second option lives for sure from the very first versions (at least it was in Windows 98, and earlier I didn’t even have a computer).
Click on the "File" tab and select "Change folder and search options" from the drop-down menu.
In the window that opens, go to the "View" tab and check the box "Show hidden files, folders and drives", click "Apply"
By doing this, we have enabled the display of hidden folders in Windows 10 - as you can see, everything is simple to disgrace.
How to open hidden folders on Windows 10? - Control Panel
If the two previous methods seemed too simple to you, then meet the longest and most inconvenient option with the display of hidden files in Windows 10 (for those who like to complicate things).
You can enable showing hidden files through the Control Panel. In fact, we use the second method with setting up the explorer, but we do it not from the program interface, but from the global system settings.
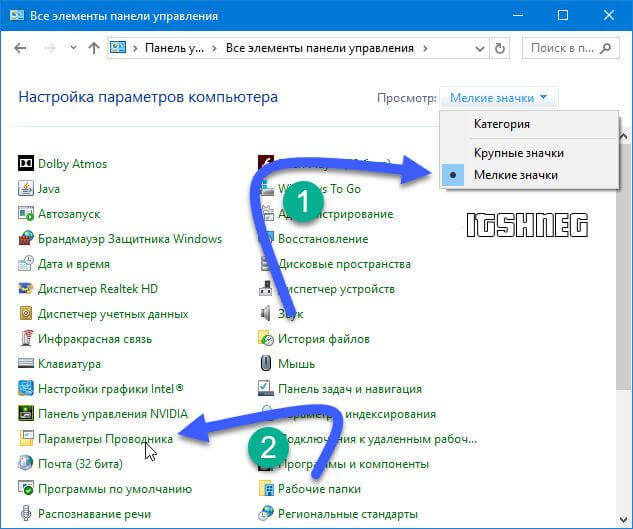
Go to the Control Panel and for the convenience of the search, change the view to "Small Icons" and find the item "Explorer Options".
On the "View" tab, check the "Show hidden files, folders and drives" box and click the "Apply" button. From now on, you will be able to see hidden files.
You will most likely be warned that showing hidden files is not entirely safe - edit them wisely and with knowledge of what you are doing ... (if you want to show system files, then uncheck "Hide protected system files")
Now, having familiarized yourself with the existing basic methods, you can use the most suitable option for you to enable the display of hidden folders in Windows.
Hi all! Today we will look at the basic knowledge of Windows, without which you can’t do anything at all. All modern Windows operating systems by default hide system files and folders from our eyes so that you do not accidentally harm yourself and delete them. However, there are many reasons when access to these files becomes necessary - here the question is how to show hidden folders in Windows 10.
When can it be useful? For example, the hidden folder AppData/Roaming contains a huge amount of user data (same save toys). Or maybe you just don't like that the system is trying to restrict you - you can and even need to view hidden folders!
Many users use hiding various files and folders to protect information. It is clear that the method is so-so, but I know people who have hidden the folder ... and do not know how to get into it (hidden from themselves)
I decided to tell you about three ways to open hidden folders and files in Windows 10 (although it will work fine for any other OS from Microsoft). In this regard, Ten has gone far ahead and it is possible to show the necessary files in a couple of clicks without wandering through the system settings.
How to show hidden folders in Windows 10 through File Explorer
The shortest way to get to what you want is to use a little tweak in the standard and beloved Windows Explorer. Find the "View" tab and make sure you have "Hidden Items" checked. That's all - the system will show you hidden files and folders.

Hidden files and folders in Windows 10 via "Folder and Search Options"
If the method above appeared only with Windows 8 ... then the second option lives for sure from the very first versions (at least in Windows 98 it was, and earlier I didn’t even have a computer).
Click on the "File" tab and select "Change folder and search options" from the drop-down menu.

In the window that opens, go to the "View" tab and check the box "Show hidden files, folders and drives", click "Apply"

By doing this, we enabled the display of hidden folders in Windows 10 - as you can see, everything is simple to disgrace.
How to open hidden folders on Windows 10? - Control Panel
If the two previous methods seemed too simple to you, then meet the longest and most inconvenient option with the display of hidden files in Windows 10 (for those who like to complicate things).
You can enable showing hidden files through the Control Panel. In fact, we use the second method with setting up the explorer, but we do it not from the program interface, but from the global system settings.
Go to the Control Panel and for the convenience of the search, change the view to "Small Icons" and find the item "Explorer Options".
On the "View" tab, check the "Show hidden files, folders and drives" box and click the "Apply" button. From now on, you will be able to see hidden files.

You will most likely be warned that showing hidden files is not entirely safe - edit them wisely and with knowledge of what you are doing ... (if you want to show system files, then uncheck "Hide protected system files")
Outcome
We have discussed with you 3 different ways to show hidden folders in Windows 10. Please note that system files are also hidden and just checking the box “Show hidden files” is not enough ... you need to make settings according to the third method in the control panel - then you will see everything in general !


