The program to partition a disk windows 7. How to partition a hard disk or SSD into partitions
Partitioning a Windows 7 disk is best done during Windows Setup. All disk operations will be performed using Windows Installer 7.
And so you new computer or a new hard drive on which you want to install Windows 7. Perhaps the computer is not new, the disk is also not the first freshness, but you want to kill EVERYTHING old on the disk and install Windows 7 cleanly, from scratch. By the way, it is always better to install Windows cleanly, that is, after formatting the disk. To do this, go to the BIOS, make the installation "", insert the installation into the drive and restart the PC. If you want to install Windows from a USB flash drive, then first connect the USB flash drive, then turn on the computer, go into the BIOS, make the installation Boot PC from a USB flash drive or USB drive.
Select the installation type "Full installation"
The installation of Windows 7 begins. When it comes to the screen shown in the picture above with the inscription "Select installation type", select the second item with the inscription " Full installation". It is circled in red rectangle.
Next, a screen will appear that says "Select a partition for installing Windows." If you have new disk or a computer with which no one has done anything yet, then you will not have a single created partition and only the inscription "Unallocated space" and the full disk space.
Disk setup

To go to work with the disk, click the "Disk Settings" button. You will have several new buttons: "Delete", "Extend", "Format", "Create". See below.

Create a system partition
We press the "Create" button. And we have a line on the screen, consisting of the "Size" window and two buttons "Apply" and "Cancel". 
Set the size of the system partition
If you do not change anything, but simply click the "Apply" button, then only one partition will be created, occupying the entire volume of the disk. You can't do that!
In order to secure data and speed up the operation of the OS, we will leave only a small piece to Windows. This will be the system partition. And the rest of the space will be used to store our data. And so in In the "Size" window, delete the numbers and write, for example, 50,000, as in the picture below, and click the "Apply" button. (Why exactly 50 GB is described in the article " ). Or other numbers if you want to create a disk partition of a different size. 
Create/Uncreate System Reserved Partition
A window appears with a suggestion and a warning: "To ensure that all of its features work correctly, Windows may create an additional partition for system files." If you want your Windows to work correctly, press the "OK" button, as shown below on the screen. This is what most people do and rightly so. (If someone suddenly wants their Windows to work less correctly, then you can click "Cancel". Then the partition for system needs will not be created and you will save only 100 MB of space on your huge hard drive. Well, I think there are none. Although anything happens in life. 
If you clicked the "OK" button, then two partitions will appear on the screen at once: 1 - Reserved by the system exclusively for 100 MB system files and 2 - Main (this will be our system disk). And also there will be a significant piece of unoccupied space.

Create a partition for storing data.
Select the ruler with the unallocated area with the mouse and click the "Create" button.

You will again have a ruler with a "Size" window and "Apply" and "Cancel" buttons.

If you are not going to create additional partitions (and I do not advise you to create anything else without special need), then just without changing anything, click the "Apply" button. 
Another section will appear on the screen and it will be highlighted. The partitions we have created are just allocated disk space. Now it needs to be formatted.
Formatting partitions
Press the "Format" button and the formatting of the highlighted partition will begin. And before that, the installer will display a message: "When formatting the disk, all information on it will be lost." This is a warning in case you want to format an already working data drive. And now we just need to format the prepared partition. Otherwise, we will not be able to write anything to it. Therefore, we press the "OK" button 

The warning window will reappear. Click "OK".

This completes partitioning. You got three sections, but the first one is not yours, but reserved by the system. The second partition is the system partition, which is 50 GB - this one is for Windows. The third, with the remaining volume, is for your data. Your drives are formatted and ready to go. You can continue installing Windows 7. To do this, select the "second" partition, since the first one is reserved by the system. It is important not to make a mistake here. Otherwise, you can install Windows to another partition, and then dividing the disk will be completely pointless. Click the "Next" button. Windows installation will continue.
Deleting partitions
If the computer is not new and the disk is already partitioned, but not in the way you need, the picture will be somewhat different. In the second picture, you will have a picture that resembles the penultimate picture of this article. Then you will need to do so. Select the lower section and click the "Delete" button (When you delete a partition, all information on it is lost). You will have a ruler with the name "Unoccupied space". Mark the section above it and also delete it, and so on until you have only one ruler with an unoccupied space. And then we do everything as described starting from the second figure.
Partition resizing
If you are reinstalling Windows 7 - 10 and want to change the size of drive C, but you have on drive D important information, which you are not going to delete, then you can execute the expand function.
All necessary sections must be created at once . Otherwise, unallocated space will not be available to the system. And you won't even know what else you have free place on disk.
Well, if Windows works well, there is no need to reinstall it, but there is a problem with partition sizes and they need to be changed. How to be then? To solve this problem, there is an excellent program "". It will help you change partition volumes without reinstalling Windows.
The hard drive of a computer is a means of storing system and user data in particular. Sometimes, it is necessary to divide information into some larger sections to avoid confusion. It is recommended to install the system on one partition, and user files, programs, etc. save to others. When buying a new PC, most often, the hard disk is not divided into local disks (partitions), so you need to carry out this operation yourself. Consider how to break HDD into sections. For example, let's use Windows 7, which is the most stable among current versions(Windows 8, 10).
Before you begin the process of partitioning a disk, we recommend that you familiarize yourself with the following tips:
- For the OS, allocate at least 50-60 GB of free space, otherwise you will not see the normal operation of the system. Of course, if you have a hard drive already 100-200 GB, then allocating so much space is too troublesome, but for systems starting with the "seven", you need enough memory.
- It is also better to take care of the file saving path for the browser and the torrent client, it is better to set the file upload paths for them not on the system disk (by default), but on another more capacious partition. You should also be aware that desktop content will take up space on your system drive.
- If you have a hard drive up to 1 TB - divide into 3 sections, if from 1 TB to 2 TB - divide into 4 sections, more than 4 TB - into 5 sections. This is explained by the fact that large files to a hard disk, optimal partitioning will allow it to be written correctly.
- Do not use all available hard disk space. It is necessary to leave some space "in reserve" to restore damaged clusters.
If you follow these tips, you can set up hard disk partitioning once and not worry about it again until you decide to expand the memory on your computer.
How to Partition a Hard Drive in Windows 7?
To partition a hard disk, we will use the standard tool of the Windows operating system. It's called Disk Management. To open this utility, you need to do the following operation:
Now let's move on to how to partition a hard drive in Windows 7. The instruction is as follows:

How to Partition a Hard Drive in Windows 8, 10
Using Windows 7 as an example, we looked at the partitioning process. There will be nothing fundamentally new in the G8 and G10, so you can use this procedure for this system as well. The only exception, we will slightly correct the tips for the correct execution of the task:
- For system disk leave (add) at least 70-80 GB of information. Starting with the "seven", the system writes information about the current state to the local disk so that you can use system restore if necessary. In addition, after many updates (including up to 8.1, 10), large files are generated that are protected by the system;
- Divide the disk into several partitions, do not leave 2 partitions. So it will be more convenient for you to handle the files that are written to the hard drive, logically structuring them into sections.
How to partition a hard drive in Windows 7, 8, 10 using third-party programs
What to do if you do not trust the standard local disk tool? We suggest using third party application Partition Wizard. This application is free, does not require a lot of space and works stably. Of course, its functionality is far from Acronis Disk Director, but it will be just right for partitioning a hard drive.
So, first download it, and then install it in a convenient location on your computer. Once the program is installed, launch it and wait for it to load necessary information about your system and hard drive.
An unallocated partition will be labeled "Unallocated". Right click on it and click "Create".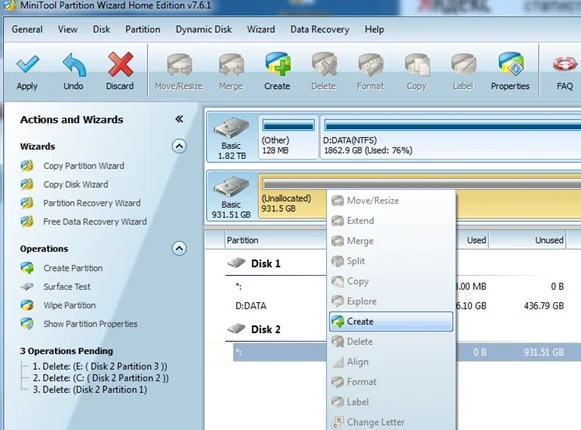
When you run this command, you will need to provide the following information in the next window:
- Section title;
- Partition type (for example, logical);
- drive letter;
- File system type;
- Volume.
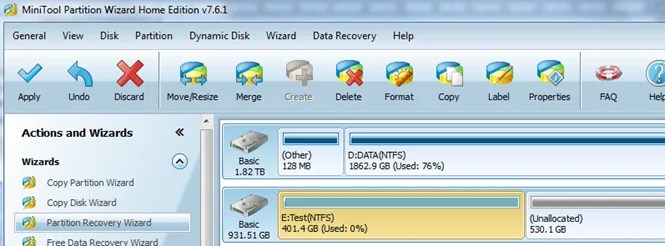
Please note that in the case of the program that is built into the system - "Disk Management", these operations are performed in different windows, but here, for convenience, everything happens in one window. We, for example, created a new section "Test" with 400 GB on board. Once created, the file system looks like this:
This process can be repeated as many times as you like until you run out of free unallocated space. Please note that it is very important to leave quite a bit of free space so as not to harm the hard drive. To create another new partition, simply repeat the instructions. Don't forget to save your progress with the Apply button.

As you can see, the process of dividing a disk into partitions is not complicated, but very simple, if you approach the issue with instructions from our site.
When buying a computer or Windows installation or another OS, many users want to split the hard disk into two or, more precisely, several partitions (for example, drive C into two disks). This procedure makes it possible to store separately system files and personal data, i.e. allows you to save your files in case of a sudden "rally" of the system and improve the performance of the OS by reducing the fragmentation of the system partition.
Update 2016: Added new ways to partition a disk (hard or SSD) into two or more, also added a video on how to partition a disk in Windows without software and AOMEI Partition Assistant. Corrections have been made to the manual. Separate instructions: .
You can split a hard drive or SSD into several partitions not only in Disk Management, but also using the command Windows strings 10, 8 and Windows 7.
Be careful: the example shown below will work without problems only in cases where you have a single system partition (and possibly a couple of hidden ones) that needs to be divided into two partitions - under the system and data. In some other situations ( MBR disk and there are already 4 partitions, when shrinking a disk "after which" there is another disk) this may work unexpectedly if you are a novice user.
The following steps show how to split the C drive in two on the command line.

Done, now you can close command line: in Windows Explorer you will see a newly created drive, or rather a drive partition with the letter you specified.
How to Partition a Disk in Minitool Partition Wizard Free
Minitool Partition Wizard Free is an excellent free program that allows you to manage disk partitions, including dividing one partition into two or more. One of the advantages of the program is that the official website is available boot image ISO with it, which can be used to create bootable flash drive(developers recommend doing this with Rufus) or to burn a disc.
This makes it easy to perform disk partitioning in cases where running system it fails.
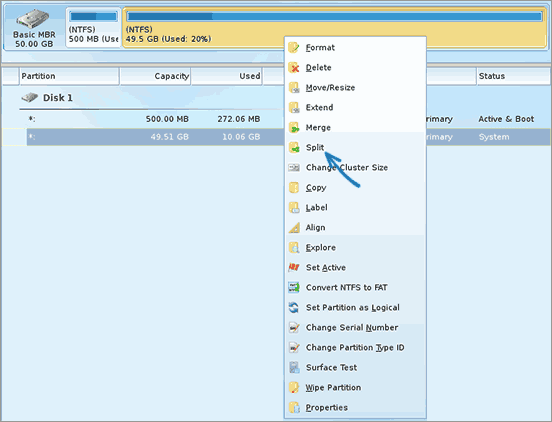
After booting into the Partition Wizard, you just need to right-click on the disk you want to partition and select "Split" (split).
The next steps are simple: adjust the partition sizes, click OK, and then click the "Apply" button (apply) at the top left to apply the changes.

Free download bootable iso image Minitool Partition Wizard Free is available from the official website https://www.partitionwizard.com/partition-wizard-bootable-cd.html
Video instruction
I also recorded a video on how to partition a disk in Windows. It shows the process of creating partitions with the regular means of the system, as described above and with the help of a simple, free and convenient program for these tasks.
How to partition a drive during Windows 10, 8 and Windows 7 installation
The advantages of this method include its simplicity and convenience. Partitioning will also take relatively little time, and the process itself is very clear. The main disadvantage is that the method can only be applied when installing or reinstalling the operating system, which in itself is not very convenient, moreover, there is no possibility of editing partitions and their sizes without formatting the HDD (for example, in the case when the system partition has run out of space and the user wants to add some space from another partition hard drive). For more details on creating partitions on a disk when installing Windows 10, see the article.
If these shortcomings are not critical, consider the process of partitioning the disk during OS installation. This instruction fully applicable when installing Windows 10, 8 and Windows 7.

Attention! When deleting disk partitions, all data that is on them will be deleted.

Partitioning a Hard Drive When Installing Windows XP
During the development of Windows XP, there was no intuitive GUI. But although it is controlled through the console, partitioning the hard drive when installing Windows XP is as simple as when installing any other operating system.
Step 1. Delete existing partitions.
You can repartition a disk while defining the system partition. It is required to divide the section into two. Unfortunately, Windows XP does not allow you to perform this operation without formatting the hard drive. Therefore, the sequence of actions is as follows:

Step 2. Create new sections.
Now you need to create the necessary hard disk partitions from the unallocated area. This is done quite simply:

Step 3. Determine the format of the file system.
After the partitions are created, select the partition that should be the system partition and press Enter. You will be prompted to select a file system format. FAT format is more outdated. You won't have any compatibility issues with it, for example, Windows 9.x, but because systems older than XP are rare today, this advantage does not play a special role. If we also take into account that NTFS is faster and more reliable, it allows you to work with files of any size (FAT - up to 4GB), the choice is obvious. Select the desired format and press Enter.
Next, the installation will go to standard mode- after formatting the partition, the installation of the system will begin on it. You will only be required to enter user parameters at the end of the installation (computer name, date and time, time zone, etc.). As a rule, this is done in a convenient graphical mode, so it is not difficult.
Free AOMEI Partition Assistant
AOMEI Partition Assistant is one of the best free programs to change the structure of partitions on a disk, transfer the system from HDD to SSD, and, among other things, with its help, you can split a disk into two or more. At the same time, the program interface is in Russian, unlike another good similar product - MiniTool Partition Wizard.
Note: despite the fact that the program claims Windows support 10, in my system it did not perform partitioning for some reason, but there were no failures either (I think they should be fixed by July 29, 2015). In Windows 8.1 and Windows 7 it works without problems.
After launching AOMEI Partition Assistant, in the main window of the program you will see the connected hard disks and SSD, as well as partitions on them.

To partition a disk, right-click on it (in my case, C), and select the "Partition Partition" menu item.
At the next step, you will need to specify the size of the partition to be created - this can be done by entering a number, or by moving the separator between two disks.

After you click OK, the program will show that the disk has already been partitioned. In fact, this is not yet the case - in order to apply all the changes made, you must click the "Apply" button. You may then be warned that the computer will restart to complete the operation.

And after the reboot in your explorer you will be able to observe the result of disk partitioning.
Other hard drive partitioning software
To partition a hard drive, there is a huge amount of different software. These are both commercial products, for example, from Acronis or Paragon, and distributed via free license– Partition Magic, MiniTool Partition Wizard. Consider dividing a hard drive using one of them − Acronis software Disk Director.

How to partition a hard drive in MacOS X using standard tools
You can partition your hard drive without reinstalling the operating system or installing additional software on your computer. AT Windows Vista and above, the disk utility is built into the system, and this is also the case on Linux systems and MacOS.
To partition a disk in Mac OS, do the following:

After that, after a short (at least for SSD) process of creating a partition, it will be created and available in the Finder.
I hope the information will be useful, and if something does not work as expected or if you have questions, you will leave a comment.
As a rule, on most computers and laptops, the hard drive is divided into several sections, called "Local drives". Several local drives allow the owner to properly separate system files from games, programs, and so on. Thus, when restoring the system, only one local disk will be involved, without the intervention of others, which greatly simplifies the work.
But, unfortunately, for some owners, the hard drive has only one partition, in which absolutely all files are located. This should not be allowed, and therefore you will have to divide the hard disk into partitions yourself. In this article, we will tell you how to partition a hard drive into partitions in windows 7 without losing data.
With the help of this manual, you can, without using third party programs split the local disk for example into two equal parts and at the same time save all the data. To do this, do the following:
We go into computer management by right-clicking on the "Computer" icon on the desktop or in the "Start" menu and selecting "Manage" from the menu that opens.

Disk management in windows 7
The window below will display all drives connected to the computer. You need to right-click on the local disk that you want to partition and click on "Compress volume ...".

The choice of the disk from which the "chipping" of the new one will be made
After turning on the “launcher” for volume compression, a notification will appear that the system is searching for free space. You won't have to wait for a long time and in a minute a window will appear where the free space on the selected local disk will be indicated and maximum size for compression. In other words, you specify the size of the new local disk, which will be "bitten off" from the selected one.
Choosing a size for the new local drive
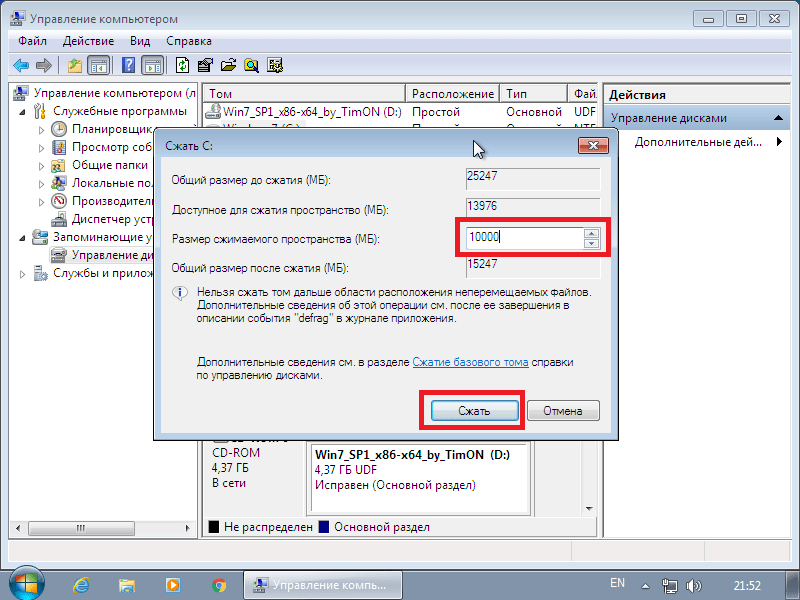
Specify the size of the future disk in megabytes and after entering, click on the "Compress" button.
After the compression has completed, you will see that a new unallocated space has appeared. This is the space we "cut off" in the previous step. Now we will create a new partition in its place.

Unallocated area for new partition
To do this, click on the unallocated area and select "Create a simple volume ...".

Creating a new partition on an unallocated area
The "Volume Creation Wizard" is activated, where you must specify the maximum size, drive letter (for example, D), and check the boxes next to the NTFS lines, "Format this volume ...". Don't forget to put "Default" next to Cluster Size. (In fact, we click “Next” everywhere).
After the creation of a simple volume is completed, you will have a new local disk.

The result of splitting one partition into 2 in windows 7 without data loss
Now you know how to partition a hard drive into sections in windows 7 without losing data with standard Windows tools 7 without the use of third-party programs.
With a 99% probability, a very sad picture will appear in the existing computer: the new disk will contain only one partition. Perhaps for people using as an operating room Linux systems, it is not so important, but using Windows 7, it is more convenient to store your files on several partitions. Moreover, in case of reinstalling or restoring the system, it is easier to save your data if there is a separate partition available - in this situation, you will appreciate your former foresight.
The required minimum in terms of the number of partitions, dictated by more than one year of using the Windows 7 operating system, is two. The first section should be allocated exclusively for the operating system and work programs (including games), while the second section should be used to store documents, movies, music and other things. You must decide on your own the number of partitions that you will be comfortable working with later, therefore, given that disk partitioning usually does not change for years, approach this issue with all responsibility.
To partition a hard drive into several separate partitions, hardened "computers" are accustomed to using third-party software like the well-known Partition Magic or Acronis Disk Director, but in Windows 7 there is no need for this - programs for performing these manipulations are included in the operating system itself. For this reason, you do not have to look for and install any third-party software. The only thing you have to take care of is to equip your account system administrator rights, since ordinary users do not have the necessary authority to change parameters that are so important for the system.
So, let's start the task of dividing the hard drive into several partitions, for which you should go to the Control Panel by clicking the "Start" button and selecting the appropriate item in the system menu. Next, follow the following path: "System and Security" -> "Administration" -> submenu "Create and format hard disk partitions".


The "Disk Management" tab will allow you to familiarize yourself with the existing partitions. When buying a computer with operating system Windows 7, in addition to the main partition (drive C:) on the hard drive can be located hidden section, which serves to restore the OS in case of loss of its performance. It is up to you to decide whether to leave this partition or delete it, but in the latter case, you can free up an additional few gigabytes (the size of this partition can vary greatly) and lose the ability to quick recovery systems.
To partition a disk, right-click on the symbolic image of the partition designated as (С:) and select in context menu item "Compress volume ...". Wait a little while the system performs the necessary preparatory steps, after which in the window that appears you will be asked to select the size of the space allocated for the new partition (in general, the translation of some terms, as well as their original name in Russian Windows versions 7 is not always logical, therefore this value is indicated in the “Size of compressible space” item, and the size of the C: drive after the manipulations is indicated in the “Total size after compression” item). If you make a mistake or decide to resize the partition, you can perform the reverse of compression - expanding the volume.

After making sure that the specified data is correct, you can click the "Compress" button and after a while you will receive a new section, which will be marked as "Unallocated". To fully use the newly created partition in the system, you need to format it, for which right-click on the partition and select "Create a simple volume ...". After clicking the "Next" button twice, the New Simple Volume Wizard will prompt you to determine the drive letter for the new partition. You can choose any that you like, but only from those not previously occupied by the system. Confirm your choice and in the next window you will be asked to specify the file system type. For "Format this volume like this:" select file system NTFS, after which, if using a new disk, click the "Next" button, otherwise, you must, among other things, check the box next to the "Quick Format" item and only then click "Next".
In the next window, make sure that all options have been set correctly and click the "Finish" button. If you specified the quick format option in the previous step, the whole process will be completed in a matter of seconds, in otherwise you will have to wait about an hour (the time depends on the amount of disk space given to the new partition).
After all the manipulations performed, you will receive a hard drive with two partitions. Large quantity sections can be obtained by performing the same steps as many times as necessary.