How to remove usb ports. How to delete data about USB flash drives in the Windows registry
Almost every user connects a phone, tablet, reader, flash drives and external HDD. When working with these devices, Windows installs their drivers. At the end of operation, they are not deleted from the computer (that is, they gradually accumulate) and, just like temporary files, unnecessary entries in the registry clutter up the system.
In addition, if devices are disconnected from USB port incorrectly (pulled out without software shutdown by the "Extract" function), then the installed drivers not only remain in the system, but also continue to function. Because of this, they often become the cause of a software conflict in the process of connecting another USB device (the system “does not see” the device, gives errors, hangs).
This article will help you avoid all these troubles: it will tell you how to remove the driver of an unused USB drive or gadget from operating system completely how to automatically uninstall all USB drivers.
Removal by regular means
Surface cleaning
1. Open the Start menu.
2. Right-click on the "Computer" panel that appears. Select "Properties" from the list of commands.
3. In the column on the left, click "Device Manager".

4. In the dispatcher window, in horizontal menu, open the View section, and click Show hidden devices».

5. Open the "USB Controllers" directory.
6. Remove the old or unused driver: right-click on its name → click "Delete".

Deep cleaning
1. Hold down the Win key and press the Pause/Break key. Or open: Start → right-click "Computer" → Properties.
2. In the window that opens, in the left panel, click "Advanced system settings".
3. On the Advanced tab, click the Environment Variables button.

4. In the upper block, click "Create".

5. In the "New User Variable" window:
- in the line "Variable name" enter - devmgr_show_nonpresent_devices;
- in "Variable value" - 1.
6. Click OK in the variable panel and in the Environment Variables window.
7. Return to the system properties window (Win + Break) and click "Device Manager".
8. In the manager, open: View → Show hidden…
9. Click the "Update configuration ..." button (the last one in the panel).

10. The icons of unused drivers in the manager are grayed out (that is, you can delete this driver). Open the following directories one by one and remove unnecessary elements (right-click on the name → Delete):
Non Plug and Play Device Drivers

Advice! In this directory you can also remove old drivers, installed by programs that are already uninstalled from Windows (for example, the Comodo firewall package).


This section of devices displays installed drivers for flash drives, readers, hard drives. Transparent object icons indicate that they are not used (not connected). So, you can safely get rid of them.
11. When cleaning is complete, restart your PC.
Automatic removal by USBDeview utility
1. Copy this link into the address bar of your browser - http://www.nirsoft.net/utils/usb_devices_view.html#DownloadLinks (official website of the utility). And then press "ENTER".
2. On the opened page:

- if you have a 32-bit system, click the first link "Download USBDeview";
- if 64-x, the second is "... for x64 systems".
3. Unpack the downloaded archive: right-click on it → select "Extract all ..." → in the "Unpacking ..." window, click "Extract".

4. Open the unzipped folder. Run with administrator rights executable file usbdeview.
5. The utility window displays a list of all drivers installed in the system. Disabled elements are marked with red "chips".

To remove a driver from Windows, select it with a mouse click, and then click the Trash icon in the USBDeview panel. Or right click on it and select context menu"Uninstall Selected Devices".

Note. In addition to the removal function, USBDeview provides the user with the ability to disable / enable the driver, view its properties.
Removing all USB device drivers
Global cleaning of drivers can be done with the DriveCleanup utility (download link - http://uwe-sieber.de/files/drivecleanup.zip).
1. Unzip the archive downloaded to your computer.
2. If you have 32-bit Windows, open the "Win32" folder, if 64, respectively, "x64".
3. Run the "DriveCleanup" file as an administrator.

Once launched, the utility will automatically clean up. At the end of the procedure (when the message “Press any key” appears in the console window), press any key.
Good luck with your system setup!
Sometimes it becomes necessary to disable USB ports on a computer or laptop in order to restrict access to connecting flash drives, hard drives and other USB devices. Disabling the USB ports will help prevent the connection of any drives that could be used for theft important information or cause a computer to become infected with a virus and spread malicious software through local network.
Restricting access to USB ports
Consider 7 ways, with which you can block USB ports:
- Disabling USB through BIOS settings
- Changing registry settings for USB devices
- Disabling USB ports in device manager
- Uninstalling USB Controller Drivers
- Usage Microsoft Fix It 50061
- Usage additional programs
- Physical disabling usb ports
1. Disabling USB ports through BIOS settings
- Sign in BIOS settings.
- Disable all items related to the USB controller (for example, USB Controller or Legacy USB Support).
- After you have made these changes, you need to save the settings and exit the BIOS. This is usually done with the key F10.
- Restart your computer and make sure the USB ports are disabled.
2. Enable and disable USB drives using the registry editor
If disabling via BIOS does not suit you, you can block access directly in Windows itself using the registry.
The instructions below allow you to block access to various USB drives (for example, flash drives), but other devices such as keyboards, mice, printers, scanners will still work.
- Open the Start menu -> Run, type " regedit and click OK to open the Registry Editor.
- Proceed to the next section
HKEY_LOCAL_MACHINE\SYSTEM\CurrentControlSet\Services\USBSTOR
- On the right side of the window, find the item " start” and double click on it to edit it. Enter value " 4 » to block access to USB storage devices. Accordingly, if you enter again the value " 3 ”, access will be re-opened.

Click OK, close Registry Editor, and restart your computer.
The above method only works when installed driver USB controller. If for security reasons the driver has not been installed, the value of the "Start" parameter can be automatically reset to "3" when the user connects USB stick and Windows will install the driver.
3. Disabling USB ports in Device Manager
- Right click on the icon " A computer” and select the “Properties” item in the context menu. A window will open on the left side of which you need to click on the link " Device Manager».
- In the device manager tree, find the item " USB controllers' and open it.
- Disable the controllers by clicking the right mouse button and selecting the Disable menu item.

This method doesn't always work. In the example shown in the figure above, disabling the controllers (the first 2 points) did not lead to the desired result. Disabling the 3rd item (USB mass storage device) worked, but it only allows you to disable a single instance of the USB drive.
4. Remove the USB controller drivers
As an option to disable ports, you can simply uninstall USB driver controller. But the disadvantage of this method is that when the user connects a USB drive, Windows will check for drivers and, if they are not available, will offer to install the driver. This in turn will open access to the USB device.
5. Prevent users from connecting USB storage devices using the application from Microsoft
Another way to disable access to USB drives is to use Microsoft Fix It 50061(http://support.microsoft.com/kb/823732/ru - the link may open in a few minutes). The essence of this method lies in the fact that 2 conditions for solving the problem are considered:
- The USB stick has not yet been installed on the computer
- The USB device is already connected to the computer
Within the framework of this article, we will not consider this method in detail, especially since you can study it in detail on the Microsoft website using the link above.
It should also be taken into account that this way Not suitable for all versions of Windows OS.
6. Using programs to disable / enable access to USB storage devices
There are many programs for setting the prohibition of access to USB ports. Consider one of them - the program USB drive Disabler.

The program has a simple set of settings that allow you to deny / allow access to certain drives. Also, USB Drive Disabler allows you to configure alerts and access levels.
7. Disconnecting USB from the motherboard
Although physically disabling the USB ports on motherboard is an almost impossible task, you can disable the ports located on the front or top of the computer case by disconnecting the cable that goes to the motherboard. This method will not completely block access to USB ports, but it will reduce the likelihood of using drives by inexperienced users and those who are simply too lazy to connect devices to the back of the system unit.
! Addition
Deny access to removable media through the Group Policy Editor
In modern versions of Windows, it is possible to restrict access to removable storage devices (including USB drives) using the local editor. group policy.
- Run gpedit.msc through the Run window (Win + R).
- Go to the next branch " Computer Configuration -> Administrative Templates -> System -> Removable Storage Access»
- On the right side of the screen, find " Removable drives: Prohibit reading.
- Activate this option ("Enable" position).

This section of Local Group Policy allows you to configure read, write, and execute access for different classes of removable media.
The program can reset the channel using the channel reset register. The channel configuration and data marker remain unchanged. Only banks and status bits are returned to their original state.
For full reset channel, the program should prohibit, and then allow the channel.
23.11. Channel data access
To write to or read from a channel FIFO, the CPU must select the channel number using the UPNUM register and write or read data from the UPDATX register.
23.12. Organization of the control channel
The control transfer consists of three phases:
- setup,
- data (IN or OUT),
- status (OUT or IN).
The software must change the marker after each phase. Data markers are initially set as follows (only for control channels):
- SETUP: data0,
- OUT: Data1,
- IN: Data1 (waiting for data token change).
23.13. OUT channel control
Initially, the channel must be configured and not stopped. Note: if software switches to suspend mode (SOFEN reset) even if the bank is ready to send, the USB controller will automatically exit the suspended state and the bank will be sent.
The TXOUT bit is set by hardware when the current bank is freed. This results in an interrupt if the TXOUTE bit is set. The FIFOCON bit is set at the same time. The CPU writes data to the FIFO and clears the FIFOCON bit to allow the USB controller to send data. If the OUT channel consists of several banks, then it also switches to the next data bank. The TXOUT and FIFOCON bits change according to the state of the new bank.

23.14. IN channel management
The channel must first be configured. Before the host requests data from the device, the program must set the IN transfer mode using the INMODE bit:
- INMODE = 0. The INRQX register is taken into account. The host controller requests data (INRQX+1) times through the selected channel before stopping the channel. This mode allows you to avoid unnecessary requests for data through the channel.
- INMODE = 1. The USB controller constantly sends an IN request for data until the program stops the channel.
The data request starts after the PFREEZE bit is cleared. Each time the current bank fills up, the RXIN and FIFOCON bits are set. The program can acknowledge receipt of the interrupt by clearing the RXIN bit. The program reads the data and resets the FIFOCON bit to free the current bank. If an IN channel consists of multiple channels, resetting FIFOCON will switch to the next bank. The RXIN and FIFOCON bits change according to the state of the new bank.

23.14.1. CRC error (only for isochronous channels)
A CRC error may occur when receiving data if the USB controller receives a corrupted packet. In this situation, the STALLEDI/CRCERRI interrupt occurs. This does not prevent the RXINI interrupt from occurring.
Due to numerous requests from readers, I decided to write a detailed and simple instructions, how to reset password account user in any version of Windows: 10, 8.1, 8, 7, XP.
So, you turned on the computer, and the system asks you to enter a password to enter. You enter the user password, but it does not match: an “invalid password” error occurs. What to do if no password is suitable, but you need to log in? There is a solution - the password can be reset using special program recorded on bootable flash drive. Now I will tell you how to create such a flash drive. 
You will need to briefly use any others computer. To do this, you can contact a relative, friend, neighbor, maybe there is a computer at work - I think this is not a problem now.
So, we sit down at another computer or laptop. We insert any flash drive into it:

Downloading free program to reset Windows passwords - . You can download it from the official site (or from my Yandex.Disk): 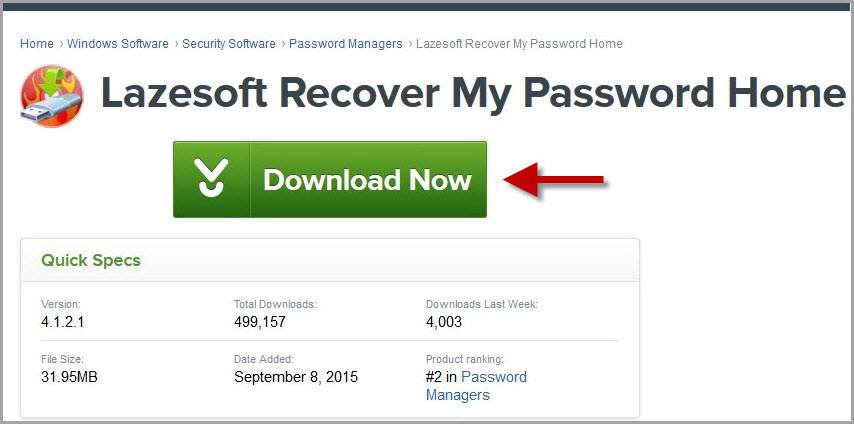
Run downloaded file lsrmphdsetup.exe: Install the program as usual: i.e. we agree with everything and in all windows we press the button “ Next". In the last installation window, click the “ Finish” – the program will start automatically and its shortcut will be created on the desktop: 
In the start window, click the button Burn Bootable CD/USB Disk Now!(“Burn bootable CD/ USB disk right now"): 
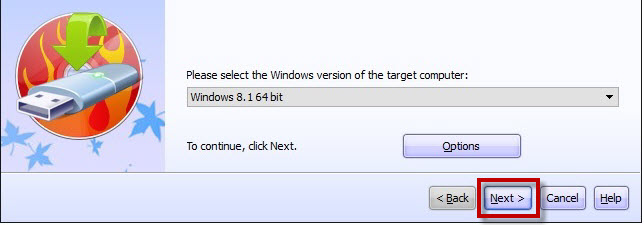
In the next window select Windows version, which is installed on the computer where we will then reset the password. Not in the list Windows 10, but it's not scary: if you have a "ten", then choose here Windows 8.1 with your grade.
By the way, on one of the forums I saw a message that you can create a bootable USB flash drive with Windows 8.1 64-bit, and it is suitable for resetting the password on any version of Windows (I checked on Windows 10 64-bit and on Windows 7 64-bit - so and is): 
After being chosen desired version Windows - click the button Next”:
In the next window, put a marker on the item USB Flash and select the letter of our flash drive (it is already inserted into the computer). In my case, the letter of the flash drive: F.
Then press the button " start”: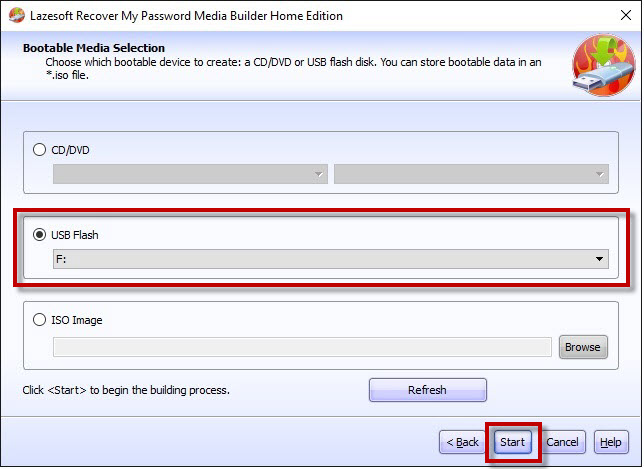
The program will download the necessary components from the Microsoft website for some time:

After that, the program will ask: “ Format USB drive now?” All files, if they are on the flash drive, will be deleted. We press the button " Yes”:
Now we are waiting for the bootable USB flash drive to be created:


At the end of the process - click the " Finish”:
 Everything! A bootable USB flash drive with a password reset program is ready. We take it out and carry it to our computer.
Insert a bootable USB flash drive into your computer. And now comes the most important, and at the same time the most difficult moment for those who will do it for the first time. We need set up computer boot from our flash drive .
Those who know how to boot a computer from a USB flash drive can immediately skip to the end of this article. For those who do not know how to boot from a USB flash drive, I will try to explain as clearly as possible:
============================================================================================
In order to “force” the computer to boot up not as usual (i.e. with hard drive), and from the device we need (in our case, from a flash drive) - you need to enable a certain setting in Bios computer.
To get into this very Bios, we must immediately after turning on the computer press a certain key on the keyboard (and press not once, but many, many times until we see Bios on the screen).
On the different computers and laptops this key is different:
- The most commonly used key Delete(or Del ).
- Also, often Bios can be called up with the key F2(and on some laptops Fn+F2 ).
- Less commonly used keys Esc, F1, F6 and others.
In general, immediately after you have pressed the Power button on your computer or laptop, do not wait until the Windows boot, and immediately start pressing many times on the key Delete on keyboard. After a few seconds (5-10) the screen should appear Bios.
If nothing of the sort appeared, but the loading of your Windows started as usual, then we don’t expect anything else: we restart our computer again (you can directly with the Reset button) and try to press another key many times already - F2.
If you didn’t get into the BIOS again, restart the computer again and try to press the next key - Esc. Then F6 etc. But I hope you don't have to experiment so much: in the vast majority of cases, either the Delete key or F2 works.
By the way, a hint about which key to load BIOS usually flashes at the bottom of the screen immediately after turning on the computer. But for some reason, no one looks at her, or does not have time to consider.
On different computers Bios different, and it looks different for everyone.
On my computer it looks like this: 
On another computer it will look like this: 
On the third computer:  That is, I say this to the fact that it is almost impossible to write a separate instruction for each Bios.
The main thing that anyone who needs to set up booting from a USB flash drive should know is that in Bios (no matter how it looks to you) you need to find a section where the word Boot(from English “Loading”). Using the arrows on the keyboard to go to this section, we put it in first place in the list of boot devices flash drive.
In BIOS, a flash drive can be displayed with its own name (for example, Transcend), or how USB-HDD; there are other options. One thing is important: it must be selected as the first device from which the computer will boot.
Usually, the flash drive is “raised” to the first place using the arrows on the keyboard, or with the keys +/- , or F5/F6.
Having set the setting we need in BIOS, we must leave it, not forgetting to save changes made. To do this, go to the section exit(it is usually the last one) - and there select the item “ Save and Exit” (“Save and Exit”). And then once again confirm that we are exiting by pressing “ Yes”.
That's all: if you did everything right, the computer will reboot and the boot will start from the USB flash drive (press the Delete key again, or F2, or something else - no need!).
Many do not even want to mess with creating a bootable USB flash drive with any software, because. they are afraid that they still will not be able to configure the computer to boot from it. I tried to describe this whole process of booting from a USB flash drive in as much detail as possible. If you have mastered this text, I hope it has become at least a little clearer and now it remains only to practice.
===============================================================================================================
So, I created a bootable USB flash drive with a password reset program on another computer. I insert this flash drive into my computer and turn it on.
I immediately press the key many, many times Delete on keyboard. A few seconds later I'm in Bios.
Navigate using the arrows on the keyboard to the section Boot(although in my Bios you can also work with a mouse - in older versions of Bios this will not work).
Here I have the first device now HDD
(ACHIPO: WDC WD50…): 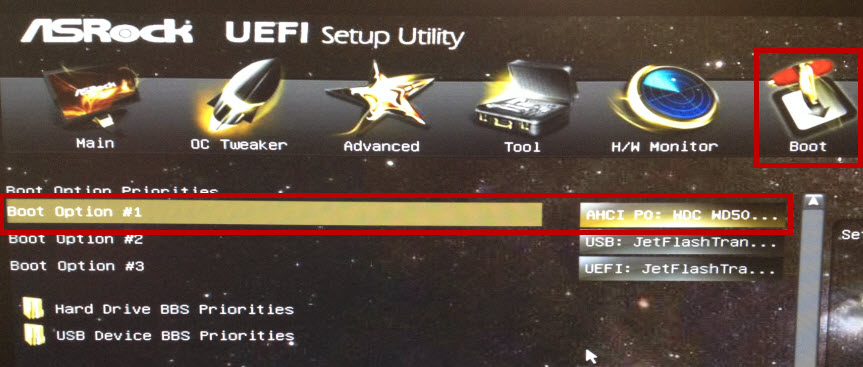 I select this line with the arrow on the keyboard and press the key Enter. A list of devices from which you can boot opens. In my case, this is a hard drive and my flash drive (it is listed here already twice). Raising to the top of the list - flash drive(if there is a choice: USB or UEFI, then select UEFI). We do this using the arrows on the keyboard, or with the keys +/-
, or F5/F6:
I select this line with the arrow on the keyboard and press the key Enter. A list of devices from which you can boot opens. In my case, this is a hard drive and my flash drive (it is listed here already twice). Raising to the top of the list - flash drive(if there is a choice: USB or UEFI, then select UEFI). We do this using the arrows on the keyboard, or with the keys +/-
, or F5/F6: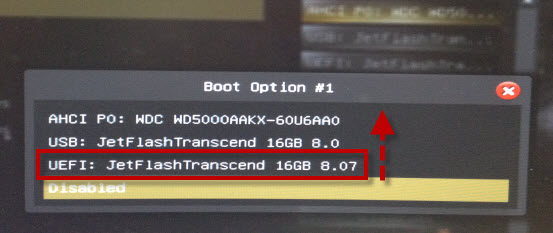
Now the flash drive is in first place in the list of bootable devices: 
Now we exit from here, saving the changes. To do this, move the arrow on the keyboard to the last section exit. Highlight a line Save Changes and Exit- press key Enter:
Then choose Yes:
After a while, a menu opens, in which the key Enter we choose the point Lazesoft Live CD:
Waiting for the download: 
In the next window, check that the item is selected Reset Windows Password(“Reset Windows password”) and press the button Next:
A window pops up with a message about the non-commercial use of the program - click Yes:
Click again Next:
In the next window highlight the username, the password of which will be reset and click Next:
Click on the button RESET/UNLOCK:
Password reset successfully - click OK. Then Finish:
We go to " Start” and press Reboot Computer("To restart a computer"): 
Click OK:
After the computer has restarted, we can login to windows without password!

Device (modem) that really went. Sometimes it works fine, but other times it refuses to connect. The only solution I've found to fix it when it gets into a bad state is to physically unplug the device and plug it back in. However, I don't always have physical access to the computer it's connected to, M is looking for a way to do this via the command line.
This article assumes running:
$ sudo modprobe -w -r usb_storage; sudo modprobe usb_storageHowever, I get "unknown variant -w". This slightly modified command:
$ sudo modprobe -r usb_storage
Error with message FATAL: usb_storage module is in use. If I try to kill -9 processes marked before starting, they refuse to die (because they are heavily tied to the kernel, I think).
Does anyone know how to do this?
NOTE. I cross-hosted this on the server as I didn't know which would be more appropriate. I will delete and/or contact whoever gets answered first.
5 Solutions collect form web for “USB Hard Reset in Ubuntu 10.04”
I have Ubuntu 14.04.4. I have no idea if this works in 10.04. I tested it on a Cyborg Rumble Pad (and a generic USB drive).
Immediately after connecting the device:
Dmesg | grep usb | tail -n 20
I get (probably by the way):
[ 2875.790610] usb 2-1.2: new full-speed USB device number 7 using ehci-pci [ 2875.887485] usb 2-1.2: New USB device found, idVendor=0738, idProduct=cb02 [ 2875.887489] usb 2-1.2: New USB device strings: Mfr=1, Product=2, SerialNumber=3 [ 2875.887490] usb 2-1.2: Product: Cyborg Rumble Pad - PC/Xbox 360 [ 2875.887492] usb 2-1.2: Manufacturer: Saitek [ 2875.887493] usb 2-1.2 : SerialNumber: 0CFE6B97
2-1.2 part - line 2-1.2. It defines the USB port. The good news is that it shouldn't change unless I plug the device into a different port, so I only need to get the string once.
Then I go to the right place:
cd /sys/bus/usb/drivers/usb
And call as root(e.g. sudo bash):
echo 2-1.2 > unbind ; sleep 3 ; echo 2-1.2 > bind
As a result, my Rumble Pad reinitializes itself as if it had been turned on and off again. I also tested my USB stick. It (its LED) behaves like nothing happened, but my KDE reacts and asks if I want to mount.
All the time powering the device. This method will not work if your modem is reset due to a lack of power.
You just search for the device you want to reset (lsusb):
# lsusb Bus 005 Device 004: ID 0951:1642 Kingston Technology DT101 G2
And then:
# usbreset /dev/bus/usb/005/004
Why are you trying to unload the usb_storage module when your device is a USB modem?
Sudo lshw and find the entry for your USB modem. There should be a configuration: line like this (your driver will be different, obviously):
Configuration: ... driver=iwlagn ...
Make sure the module is loaded (substituting the correct driver name):
ls mod | grep iwlagn
Then just do:
sudo modprobe -r iwlagn && sleep 2 && sudo modprobe iwlagn
I like sleep there just in case the device needs some time to power down.
This is a "way out" solution, but it might work.
- Get a second, old, not very powerful PC. Install Debian on it. Install usbip on it.
- Then install usbip on your server.
- Connect the modem to the second PC. Set up usbip on both machines so that the modem connected to the second PC is accessible via VHCI from the server.
- Set up ssh on the second PC or other means that you can drop into it and issue commands.
- When the device crashes, log in and reboot the second computer with the reboot command, then when it comes back, reconnect to whatever means usbip provides usbip (I've never used usbip). This should reset the device. Probably you could write it.
The easiest way to disable arbitrary USB devices from command line(i.e. with a real USB power cycle):
- Buy DELOCK 87445 4-Port USB Hub (google for
) - This hardware is compatible with hub-ctrl.c (google for
). Therefore, arbitrary ports can be enabled/disabled. Additional information see also at: .


