MacBook doesn't see keyboard. How to properly install Kali Linux on MacBook Air (dual boot with El Capitan) The machine parameters are as follows
Yesterday I updated to El Capitan (on MacBook Air 2014). Then I decided to install Kali Linux 2.0 and boy it was one problem after another, still nothing worked as expected. Without going into details, some of which include (rEFInd boot problems, burning iso image to flash drive, etc.). I think I managed to do it.
So now I'm trying to restart my Mac, after the rEFInd loading screen appears, I plug in the USB drive and I only get one volume (legacy OS) and the Linux installation guide says try installing rEFInd and try again, but I already have rEFInd (you need to have 3 volumes as it shows).
If I try to download a legacy folder it says:
Starting the Legacy Loader
Using Load Options USBMake sure you have the latest firmware update installed
Hit any key to continue
Any help is appreciated :) I'm really getting frustrated trying to install Kali for the first time.
Postscript There is a very high chance that I messed up somewhere, because like I said, I've run into almost every problem there, with searching the internet and trying to work around it, most of the time not even sure what I'm doing, so that... I may have messed something up along the way.
More details:
rEFIdn used - 0.9.2 How I set it up: I enabled it, I had to disable security settings in recovery mode and I think it worked for me after I started it as it should be running as stated in link. It's a long process, I don't remember all of it.

6 answers
I set up a MacBook Air 2013 from scratch and tried to install Kali Linux 2.0. The installation was successful, but the big problem was with the Broadcom wireless card. But this is probably the second question.
Here's what I did:
- First I made a fresh install of El Capitan 10.11.1 after repartitioning the internal drive to 1 partition with a GUID partition table.
- After configuring El Capitan I downloaded Kali Linux and
- Choose EFI Boot at the Mac boot screen and then Kali Linux at rEFInd boot screen.
- Set up Kali Linux
Then I dd"ed the kali iso image to a thumb drive:
First get the disk identifier of the thumb drive and unmount it:
Diskutil list
My thumb drive had the disk identifier disk2.
Diskutil unmountDisk /dev/disk2
then dd the iso to the thumb drive:
Sudo dd if=/Users/your_user_name/Downloads/kali-linux-2.0-amd64.iso of=/dev/rdisk2 bs=1m
The thumb drive will be bootable without installing rEFInd.
Then I booted to Recovery HD by holding cmd R while booting. Disable System Integrity Protection in Terminal with
Csrutil disable
Reboot to Internet Recovery Mode by holding alt cmd R .You will see a spinning globe animation while booting.
Since you probably have a CoreStorage partition after installing El Capitan you have to resize it. I doubt that the disk partition tool in the Kali Live USB drive succeeds with that. Open Terminal and enter:
Diskutil cs list diskutil cs resizeStack lvUUID size
lvUUID is the UUID of the Logical Volume. It"s the last one listed in the output of diskutil cs list. The size has to be in t, g, m or k. Example: If your main disk has 250 GB and you need 40 GB free space to install Kali Linux to, enter 210g.
If you don"t have a CoreStorage stack on your Mac you may choose Disk Utility to resize the main volume. The Recovery HD should be moved automatically in both cases.
Reboot while holding the alt key. Boot to the Windows partition of the thumb drive. Choose Graphical Install and configure the locale settings. The network interface install will probably fail. Choose none. Use the defaults of the disk partitioning tool. It will choose the empty space on your main disk to create a small boot partition for grub, a main partition and a swap partition. Then Kali Linux will be installed. Install grub to the mbr of your main disk.
After a reboot the Mac will boot to OS X. Eject the Kali Linux installer thumb drive.
Cd /Users/your_user_name/Downloads/refind-bin-0.9.2 ./install.sh
Rename the refind folder and the efi file:
Cd /Volumes/ESP/EFI mv refind boot mv boot/refind_x64.efi boot/bootx64.efi
Immediately after installing rEFInd the EFI volume is mounted at /Volumes/ESP and the install script fails to unmount it. If you mount disk0s1 later manually (e.g. after a reboot) with diskutil mount /dev/disk0s1 it will be mounted to /Volumes/EFI! Then you have to use cd /Volumes/EFI/EFI instead.
Quit Terminal and reboot while holding alt
Everything except the WLAN interface (and AFAIK the webcam) works now.
To further configure Kali Linux, check out the following resources:
To get the Broadcom chip, check:
So far I haven't been able to get the WLAN to work, but I'm looking into it and I'll update with an answer as soon as I succeed.
Once configured, everything will successfully boot into Recovery HD again and re-enable System Integrity Protection in the terminal using
Csrutil enable
First you must receive your order.
2) Reboot by holding Option key while loading
3) Go to Recovery HD and create a partition for Kali
I built a MacBook Air 2013 from scratch and tried to install Kali Linux 2.0. The installation was successful, but the big problem was with the Broadcom wireless card. But this is probably the second question.
Here's what I did:
- First, I did a fresh installation of El Capitan 10.11.1 after repartitioning the internal drive into 1 partition with a GUID partition table.
- After setting up El Capitan I downloaded Kali Linux and
- Select EFI Boot from the Mac boot screen and then Kali Linux from the rEFInd boot screen.
- Setting up Kali Linux
Then I dd"ed to the potash ISO image on the flash drive:
first get the disk ID of the flash drive and unmount it:
Diskutil list
My flash drive had a disk ID of disk2.
Diskutil unmountDisk /dev/disk2
then D.D. iso to flash drive:
Sudo dd if=/Users/your_user_name/Downloads/kali-linux-2.0-amd64.iso of=/dev/rdisk2 bs=1m
The thumb drive will be bootable without installing rEFInd.
I then booted into Recovery HD, holding CMD R while booting. Disabling system integrity protection in a terminal with
Csrutil disable
Reboot into Internet recovery mode by holding alt CMD R. You will see a spinning globe animation while booting.
Since you probably have a CoreStorage partition after installing El Capitan, you should resize it. I doubt Kali Live's USB drive partition tool handles this successfully. Open a terminal and enter:
Diskutil cs list diskutil cs resizeStack lvUUID size
lvUUID is a UUID logical volume. This is the last one listed in the diskutil cs list output. Size must be in t, g, m or k. Example. If your main drive is 250 GB and you need 40 GB free space to install Kali Linux, enter 210g.
If you don't have a CoreStorage stack on your Mac you can choose Disk Utility to change the size of the main volume. In both cases, Recovery HD should move automatically.
Reboot when holding alt key. Download Windows flash drive partition. Select Graphical installation and configure locale settings. Installation network interface probably won't succeed. Choose none. Use the default disk partition settings. It will select empty space on your main drive to create a small boot partition for grub, main partition and swap partition. Kali Linux will then be installed. Install grub on the mbr of your main drive.
Once the Mac restarts, it will boot into OS X. Remove the Kali Linux installation drive finger.
Installing rEFInd:
Cd /Users/your_user_name/Downloads/refind-bin-0.9.2 ./install.sh
Rename the refind folder and EFI file:
Cd /Volumes/ESP/EFI mv refind boot mv boot/refind_x64.efi boot/bootx64.efi
Immediately after installing rEFInd, the EFI volume is installed in /Volumes/ESP and install the script to unmount it. If you later install disk0s1 manually (after a reboot, for example) with diskutil mount /dev/disk0s1 , it will be installed to /Volumes/EFI! Then you should use cd /Volumes/EFI/EFI .
Exit terminal and reboot while holding alt
Everything except the WLAN interface (and AFAIK the webcam) works currently.
To further configure Kali Linux, check out the following resources:
To get the Broadcom chip working check.
Mac in the service of a hacker. Part 8 – Installing Kali Linux on a virtual machine
Alexander Antipov
We're almost done Mac setup for hacker needs. If you have not yet read the previous parts of this series, I recommend that you do so.
Even though macOS is POSIX compliant, some Linux utilities will not work on this operating system. Sometimes it takes small movements to make everything work, sometimes it takes serious effort. In addition, there are utilities that will not work on macOS under any circumstances. For example, those that use the proc file system, or many hacking utilities designed to work with wireless networks.
As one solution to this problem, you can try to port the necessary tools, but this is a lengthy process. When we have a task, the necessary applications are required “here and now”.
Since in most cases you will have deadlines with no option to pause your current project, I recommend setting up Kali Linux as a virtual machine as one of the tools in your arsenal. Kali comes with a huge number of pre-installed utilities that will come in handy during pentests. In addition, this distribution is easy to install.
In this article we will look at installing and running a virtual machine on macOS. If, for some reason, you do not want to deal with virtual machines, you can either buy a separate inexpensive computer or use a USB flash drive. Alternatively, you can install Kali in a separate partition hard drive.
Step 1: Install VirtualBox
Before starting Kali we need software, on the basis of which the virtual machine will operate. There are many similar software on the market, such as VMware, but I prefer the free VirtualBox application from Oracle. It is VirtualBox that we will consider in this article.
After downloading, connect disk image, and then double-click on the VirtualBox.pkg icon: 
Figure 1: Installation Image Start Screen
Installing VirtualBox is not difficult. Just follow the instructions that will appear on the screen. You may be asked to enter your password once or twice during the installation process.

Figure 2: Installation stepsVirtualBox
Once the installation is complete, launch VirtualBox from the Applications folder.
You can download the image that best suits your needs. In addition, pre-installed images are available on the Offensive Security website, including for VirtualBox. All you need to do is download the desired image, double-click on the file and follow the instructions to import the image into the system.
While the pre-installed images are easy to install (you may want to install a set of extensions to make USB devices work correctly), the ISO image has more options. I prefer XFCE images because I like lightweight graphical environments, and the procedure for installing such a system from scratch will be shown below. The standard image uses the Gnome environment, which, although it has a lot of capabilities, requires a lot of resources. 
Figure 3: List of available images
Step 3: Create a new virtual machine
In the left top corner interface of the VirtualBox application, click on the New button.
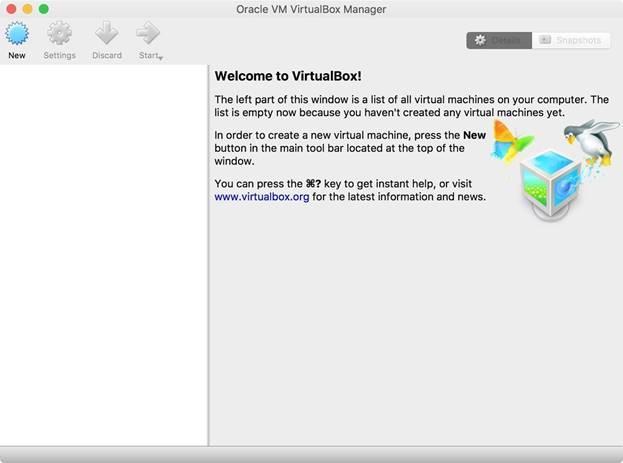
Figure 4: Creating a new virtual machine

Figure 5: Selecting parameters for a new machine
Then you need to set the memory size. It all depends on the memory size of your main system. Too much RAM in a virtual machine can cause slowdowns operating system hosta I set the size to 2GB, which is more than enough for Kali Linux. After setting the memory size, click "Continue".

Figure 6: Setting the amount of memory used by the virtual machine
Now you need to choose hard type disk that will be used by the virtual machine:
- Donotaddavirtualharddisk(don't add virtual hard): Kali Linux will run interactively without a hard drive. This mode is equivalent to booting from USB flash drives. Changes made will not be saved.
- Createavirtualharddisknow(create a new virtual HDD): A new hard drive will be created on which Kali Linux will be installed. I prefer to use a virtual hard disk because in this case updates and all collected information (for example, about target systems) are stored in the virtual machine. For example, Metastploit uses a database to track accounts.
- Useanexistingvirtualharddiskfile(use existing file virtual hard disk): This option is used if you want to boot an already created hard drive. For example, if we have a ready image of a tough disk, we can connect this file using this parameter.
The specific option you choose depends on your needs. Working interactively is fine, but there will be times when you'll be working on files and want your changes to be saved. So I create a virtual hard disk. After selecting the desired option, click “Create”. 
Figure 7: Creating a virtual hard disk
Since I decided to create a new hard drive, I need to configure additional settings. I chose VDI as the file type because compatibility with other virtualization applications is not critical to me. If you require compatibility, you must select the appropriate file type. After selecting the desired option, click “Continue”.

Figure 8: Selecting a file type for the hard drive
The next step is to select the type of hard drive placement. There are two options here:
- Fixedsize(fixed size): A fixed hard drive will be created of the size we set.
- Dynamicallyallocated(dynamic placement): The hard disk file will grow and shrink depending on the needs of the guest operating system.
Dynamic placement helps to use host disk space more efficiently. The fixed size gives a small gain in speed. I set it to a fixed size because I have a lot of space on my machine. After selecting the desired option, click “Continue”.

Figure 9: Selecting the virtual hard disk placement type
Next you need to set the hard drive size. Kali Linux requires at least 10 GB and I think 15 GB will be enough. In addition, you need to specify the location of the hard drive by clicking on the folder icon next to the field where the name is indicated. I usually store such files in the Documents directory, although the choice of folder does not really affect anything. Next, click on the “Create” button. 
Figure 10: Selecting the virtual hard disk size
On my system with modern hardware, a new virtual machine was created in 12 seconds. Older systems may take longer.
Step 4: Install and Run Kali Linux
If everything went according to plan, you should have a new virtual machine listed in VirtualBox Manager: 
Figure 11: List of virtual machines
Select virtual machine Kali Linux and click on the “Start” button. A window will appear to select the installation image. Click on the small folder icon and enter the path to the ISO image that you downloaded in Step 2. Then click “Start”.

Figure 12: Selecting the installation image
Then you need to select the installation mode in the GRUB bootloader menu and install the distribution.

Figure 13: Boot menu of the installation image
Conclusion
Now, with a configured macOS and a virtual machine running Kali Linux in your arsenal, you can solve almost any problem related to pentesting. In future articles we will look at other utilities for macOS.
Stay in touch.
Fair, not overpriced and not underestimated. There should be prices on the Service website. Necessarily! without asterisks, clear and detailed, where technically possible - as accurate and concise as possible.
If spare parts are available, up to 85% of complex repairs can be completed in 1-2 days. Modular repairs require much less time. The website shows the approximate duration of any repair.
Warranty and responsibility
A guarantee must be given for any repairs. Everything is described on the website and in the documents. The guarantee is self-confidence and respect for you. A 3-6 month warranty is good and sufficient. It is needed to check quality and hidden defects that cannot be detected immediately. You see honest and realistic terms (not 3 years), you can be sure that they will help you.
Half the battle is Apple repair- this is the quality and reliability of spare parts, so a good service works with suppliers directly, there are always several reliable channels and your own warehouse with proven spare parts for current models, so that you do not have to waste extra time.
Free diagnostics
This is very important and has already become a rule of good manners for service center. Diagnostics is the most difficult and important part of the repair, but you don't have to pay a penny for it, even if you don't repair the device based on its results.
Service repairs and delivery
Good service We value your time, which is why we offer free shipping. And for the same reason, repairs are carried out only in the workshop of a service center: they can be done correctly and according to technology only in a prepared place.
Convenient schedule
If the Service works for you, and not for itself, then it is always open! absolutely. The schedule should be convenient to fit in before and after work. Good service works on weekends and holidays. We are waiting for you and working on your devices every day: 9:00 - 21:00
The reputation of professionals consists of several points
Company age and experience
Reliable and experienced service has been known for a long time.
If a company has been on the market for many years and has managed to establish itself as an expert, people turn to it, write about it, and recommend it. We know what we are talking about, since 98% of incoming devices in the service center are restored.
Other service centers trust us and refer complex cases to us.
How many masters in areas
If there are always several engineers waiting for you for each type of equipment, you can be sure:
1. there will be no queue (or it will be minimal) - your device will be taken care of right away.
2. you give to Macbook repair an expert in the field of Mac repairs. He knows all the secrets of these devices
Technical literacy
If you ask a question, a specialist should answer it as accurately as possible.
So that you can imagine what exactly you need.
They will try to solve the problem. In most cases, from the description you can understand what happened and how to fix the problem.
), we recommend doing this before starting to study today's material.
Although macOS– fully functional, POSIX-compatible operating system, not all Linux tools work on it out of the box. To run some programs you have to put in some effort, sometimes quite significant. Other applications do not work at all macOS. These include, for example, all programs associated with the file system procfs, as well as many hacking tools designed for wireless networks.
Of course, having certain knowledge, you can port the desired program, but this is a separate project that takes a lot of time. We need all our tools to launch quickly.
In order not to be distracted from our current project, we will use a virtual machine with the operating system Kali Linux. This one is easy to install OS includes many tools for pentesting, and is therefore well known to hackers.
In this article we will take a step-by-step look at how to install and run a virtual machine on macOS. If, for some reason, you do not want to use a virtual machine, Kali can be run on many computers, and even on a regular flash drive. You can also install Kali to a separate hard drive partition Mac.
Step 1: Install the virtual machine
In order to run Kali, we need a virtualization program. There are many similar programs - they are produced, for example, by the company VMware. We prefer to use the application VirtualBox from Oracle. You can download it for free from the program website. In our example we will also use VirtualBox.
Once the file has downloaded, mount the disk image and then double-click the VirtualBox.pkg icon inside it.
In general, install VirtualBox- as easy as pie. To do this, you just need to follow the instructions on the screen and enter the password a couple of times. 
Once the installation is complete, run VirtualBox from the "Programs" folder.
Step 2: Download Kali
Images Kali posted on the operating system website. Download the one that best suits your needs. On the site OSCP you can also download pre-installed images of virtual machines, including for VirtualBox. After downloading the image, double-click on the file to open it in VirtualBox, and import all content following the onscreen instructions.
Although pre-installed images are very easy to install, and launching them does not take any time at all (except for installation Extension Pack, if you are using USB), ISO image will give you more configuration options. Since we prefer a more lightweight desktop environment, we are more impressed by the image XFCE. In this case, we will install the virtual machine from scratch. (We'll show how next.) The default image is Gnome, and it's a great environment, but a bit heavy on our system's resources. 
Step 3: Create a new virtual machine
Click on the "New" button in the upper left corner of the application VirtualBox.
Here you will need to select the name of the virtual machine and the type of operating system to install on it. We named our car " Kali Linux", selected the type " Linux", and version " Debian 64-bit" Click “Continue”. 
Now you need to select the memory size. This setting depends on your machine configuration. If too much is involved random access memory, the system will begin to “slow down”. We allocated 2 GB to our guest machine - this should be more than enough for Kali Linux. Once you have decided on the memory size, click “Continue”. 
Now let's select one of the options regarding the hard drive of our guest machine.
Do not mount the virtual hard disk: In this case we will be able to run Kali Linux in live mode, essentially emulating a computer without a hard drive. It's like loading Kali from a flash drive. Changes made to file system, will not be saved.
Create a new virtual hard disk: This option allows you to create a new hard disk and install on it Kali Linux. In this case, all changes will be saved in the system. You will be able, for example, to store collected personal information about users in databases, tracking this data using Metasploit. We prefer this option.
Use a virtual hard disk: This option is suitable if you want to boot an existing hard disk. For example, if you already had a hard disk image Kali Linux, you could download it to a virtual machine.
Situations are different. In some cases, you can work in live mode, but in others, you need to save files. This is why we prefer to create a virtual hard disk. So, click “Create”. 
Since we decided to create a virtual hard disk, we need to set some settings. Let's determine the file type for the disk. It doesn't matter to us whether our disk will be compatible with other virtualization programs, so we choose the file type VDI. IN otherwise You should select the disk type that matches the software being combined. Click Continue. 
Next, we need to decide what we will do with the space for the hard drive. There may be two options here:
Fixed size: In this case, the file with hard drive will be the size we specify.
Dynamic size: The size of the file on the hard drive will be able to grow or shrink depending on the needs of the guest operating system.
A dynamic virtual hard disk saves space on your computer, but a fixed one works faster. Let's say you have enough space on your machine to allow you to choose a fixed size. Having indicated your choice, click “Continue”. 
Now you need to decide what size the disk will be. Because the Kali Linux takes up at least 10 GB, we will allocate 15 GB for the disk so that there is room for maneuvers. You also need to decide where the virtual hard disk will be saved. To save, click on the icon next to the “Name” field. You can place the disc in your Documents folder or somewhere else. Once you have decided, click on the “Create” button. 
Creating a disk on a new computer takes about 12 seconds. On older machines this process may take longer.
Step 4: Launch Kali Linux
If everything went according to plan, the manager VirtualBox will show the new virtual machine. 
Select Kali Linux VM and click "Start". Next, you will need to select the installation image with Kali. Click on the small folder icon and navigate to the ISO disk image Kali, which you downloaded according to Step 2. Select the image and click “Start”. 
The machine will start. Select installation mode from menu GRUB and install as usual. 
So, on your Mac now it is Kali!
Having at your disposal a prepared macOS and a virtual machine with Kali Linux, you are ready to solve almost any security problem. Next time we'll look at other tools for macOS. Do not miss!


