Ntldr is missing what to do windows 7. Fixing the error NTLDR Is Missing
Hello, friends! Working for a long time at the computer, users periodically have to deal with various system errors. Moreover, these errors are usually different, as well as the reasons for their appearance, starting from which minor problems appear when working with files, and ending with, after which the system does not boot at all.
Of course, ordinary users cannot know how to fix absolutely, for this there are such as ours, on which you can find step by step guide to get rid of any problem. So, join us by mail or RSS subscription, and also, you can use group in VK.
And in order to keep my word that you can really find absolutely any solution on the sites, I have prepared another article on how you can get rid of another problem called: "NTLDR is missing error". Most often this problem appears on the good old Windows XP, but since many people still use it, my advice will be very relevant today.
Causes of the NTLDR is missing error
Let's take a look at what causes the NTLDR is missing error to appear on system boot.
In general, the fact is that during turning on the computer, a file called NTLDR is required for a full download. But, at the moment when, at a certain stage, the OS tries to access this file, a message appears with the phrase, which translated into Russian means that given file missing from the hard drive. As a result, Windows XP (7) cannot boot to full operation.

I think everything is clear with the reason, let's move on, directly, to how you can deal with the NTLDR is missing error. As I said before, users who use Windows XP most often encounter this, so all examples and screenshots (pictures) will be given specifically for this operating system.
Eliminate NTLDR is missing by replacing the file
I’ll start with perhaps the most reliable method, which is one hundred percent working and a win-win option, which, by the way, has already been tested by me more than once when eliminating the “NTLDR is missing” error.
In general, we need to copy the NTLDR file from any similar system and put it on our C:\ drive. Based on my personal experience, I can say that after placing the "NTLDR" file in system drive, Windows started to load, as always, and it worked in 99% of cases.
If you already have a finished disk, then we find any computer or laptop with a similar system and insert the CD there and boot from it,.

In the booted system, immediately go to " My computer» –> « Local drive C:", and here we copy the file " ntldr» to your flash drive and go to our computer.

With our PC, the procedure is the same, we inserted the disk, set the boot priority and boot from the LiveCD.

In the booted system, go to local disk with our Windows and put there the file that you saved on the USB flash drive.

After rebooting the PC, the system should boot into its normal state, and the “NTLDR is missing” error will disappear forever.
Fixing an error using the Windows XP installation disc
So, the second option is that we will copy the files we need directly from the installation Windows disk XP, using the recovery string for this. I consider this option to be more difficult because not all users like to get into any console settings, and some are generally afraid to do something wrong. But, anyway, I think that this method is one of the “must have” category, which will definitely come in handy as an alternative.
Okay, less words, let's get straight to the point. We insert the disk with Windows XP into the drive and boot from it. the same window will appear as in the standard installation of Windows XP. But, however, this time we will not choose the installation, but the second item by pressing the "R" key, which will launch the recovery line.

A black screen and several lines will appear on the screen. First, the console will determine how many OSes are installed on our computer and will offer to choose the one with which we will work. Usually, only one is displayed for everyone, as shown in the screenshot below.

All we need to do to select is to press the key on the keyboard with number one and confirm selection Enter ».

Further, we simply prescribe all the commands that I will indicate below. I think you noticed that at the beginning of each line is displayed " C:\Windows", which means that we are on drive C: in the system folder" Windows". We need to go one directory above, namely, directly to the disk " C:\". To do this, we write the command " cd ... ”, where cd means changing directory, and two dots mean moving one directory up. That is, we switched from C:\Windows" in " FROM:\". I hope you understand what the point is.


You may have noticed that the beginning of the line has changed from " FROM:\" on the " D:\”, indicating that we are now in the right place for us. So, now we write three letters " dir ", which will allow us to see the contents of the disk from which we are interested in the folder " i386”, It is in it that the file lies, which will help us get rid of the error “NTLDR is missing”, so go to this folder with the command “ cd i386 ».


If you enter again " dir " you can find the "ntldr" file from a huge list, which we will copy. But, this procedure is not required, so you can go directly to the next step if you wish.

The final command that we will need to write looks like this:
copy ntldr c:
A message should appear that " 1 file copied", namely the one that we indicated above (ntldr). Now, close the recovery prompt and restart the PC. At the next boot, instead of the “NTLDR is missing” error, the desktop and its usual state should appear.

I think this is enough, although I assure you everything has always worked for me with the first option, with which I dealt with the “NTLDR is missing” error in a jiffy, while spending only a few minutes. Therefore, we try, if something does not work out, ask questions in the comments and, as always, I will answer you and try to help! Good luck!!!
NTLDR is missing, what should I do?
Quite often in my practice, I met the inscription NTLDR is missing when the computer boots. Perhaps enough often to write a separate article about this :)
Here is what this situation looks like on the monitor screen:
After the inscription NTLDR is missing (NTLDR does not work, “missing” is damaged), we are offered to reboot, and then the situation repeats itself cyclically. Overloaded - the same picture. In general - the operating system does not boot.
I propose, as always, to analyze the situation in detail. What is NTLDR? This is the bootloader for Windows XP and Windows 2000. The abbreviation NTLDR means - " nt load r" (load - loading, and in full - the loader of systems based on NT technology).
Note: "NT" from English. new technology- new technology. I don't know why exactly? Although, in comparison with Windows 98, it is certainly new and even revolutionary! :)
Now we know that our operating system bootloader is damaged. Sounds unpleasant. But there is good news: it is quite fixable and you don't need to reinstall Windows at all!
But before we start fixing the problem, let's take a look at the process itself in basic terms. Windows startup xp. How does it happen? Do we need to understand what we are dealing with? Let's skip everything related to the "iron" part of the system start process (we analyzed these points in previous articles of the site), and let's touch on the software component.
At the initial stage, the computer reads from the first sector of the zero cylinder hard drive so-called " Home boot record " or - MBR (Master Boot Record). MBR data occupies one (first) sector of hard disk space (512 bytes). A negligible volume, in fact, but it contains code that is copied to RAM and prepares the computer to start.
Without going into details (in order not to complicate the description) - the master boot record scans all physical and logical drives and finds a partition marked as " active” (the OS starts from such a partition) and transfers further control to the boot sector located on it.
This sector active partition(it's called the boot sector - boot sector) is located in the first sector of the logical disk, from which the operating system (OS) will be launched. The boot sector contains all the necessary information about the type and size of the file system and logical parameters.
In turn, the Boot Sector already finds the bootloader of the operating system itself (in this case, NTLDR) and transfers control to it.
Note: in Windows Vista and Windows 7 uses file instead of "NTLDR" winload.exe. This is the file located at C:\Windows\System32\winload.exe.
Once in control, NTLDR does the following things:
- switches to 32-bit mode
- organizes access to file system
- reads file " boot.ini» and in the case of multiple systems installed - displays a menu for selecting them
- starts the program ntdetect.com”, which collects data on the composition of the hardware of the computer (ntdetect.com builds a list, which is then used in the key system registry: HARDWARE branch HKEY_LOCAL_MACHINE)
- initializes the file " ntoskrnl.exe”(kernel of the operating system. “Kernel” is the kernel) and transfers to it the collected information about the found equipment. In addition to the kernel, another very important file is loaded - “ hal.dll» (Hardware Abstraction Layer - the level of hardware abstractions). It separates (abstracts) the system core from the hardware (this mechanism allows the OS to function on various hardware platforms).
Note: The files "ntoskrnl.exe" and "hal.dll" are located in the System32 directory.
After that, the operating system starts itself. This is if - in short :) There is still a lot of "interesting" things going on, but we are not interested in this now, but the inscription NTLDR is missing and how to fix it?
NTLDR is missing how to fix and what to do?
Now, understanding what role and at what stage of the system start the operating system loader performs, we can begin to solve the problems associated with it.
Let's remember the following: for the successful start of Windows 2000/XP/2003 operating systems, the following files are required:
- Ntldr
- ntdetect.com
- Boot.ini
They are located at the root of the disk C:". Yes, the bootloader is a file on our hard drive, as well as the accompanying modules involved in the download. Let's take a closer look at it.
To do this, we will need to display in the explorer windows hidden default system files and folders. To do this, click on the "Tools" menu and from the drop-down menu - "Folder Options".

Go to the "View" tab and uncheck (as shown below) the checkbox "Hide protected operating system files" and put the switch on "Show hidden files and folders". I also recommend removing the "bird" from the item: "Hide extensions for known file types".

Click "Apply" and go to our "C" drive. Here's what we see there:

All of our three files responsible for loading the system are present. Excellent!
I propose to simulate an accident and delete all of them! :) This is the easiest way to visually show what would happen if any of these files were corrupted (or missing).
Delete them all and reboot. After the reboot, we see the inscription NTLDR is missing Press Ctrl+Alt+Del to restart. Exactly what we need! :) Let's get down to recovery.
To begin with, our plan of action: since the files are missing (damaged), it would be very logical to assume that we will need to take exactly the same files somewhere and substitute them for the missing (damaged) ones. Iron logic! :) And where can I get them? Here are several options:
- download from internet
- write to a friend
- use the Windows installation disk (copy them from there)
Since we are our own admins and are used to solving issues without outside help, we will choose the third option! :)
To do this, we need a disc with the original Windows XP (in the case of Windows 2000, the process looks almost the same), it is highly desirable from the one that we installed on the computer. Upload it to , expose it to BIOS boot from the CD and wait for the window we need to appear.
At first, it's like installing Windows from scratch, with one (very important) exception. At some stage, we should have a window that looks something like this:

Pay attention to the line: "To restore Windows XP using the Recovery Console, click" R". Let's take advantage of this opportunity: press the button " R" on keyboard.
Note: what does the recovery console do? It allows you to get limited access to the system (in text mode) if it does not boot. In "text" it means that we will not be able to use the mouse (since there will be no graphical shell itself) and we will need to enter all commands from the keyboard.
Already scared? When I saw it for the first time, I was scared, then it passed :) In general, anyone familiar with DOS will feel absolutely comfortable.
So, after launching, the program will scan the disks for the presence of operating systems from Microsoft on them and display the result in a column with numbers, starting from the first one.
Since we have one system, then (in the photo below) we see that there was one OS under the number " 1 ' in the folder 'C:\WINDOWS'.

Next, we are asked: "In what a copy of Windows should you sign in?" Naturally - in the first (and, in our case, the only one). Press the number " 1 ", then - the key" Enter". We are then asked to enter the administrator password. If you have it - enter it, if not, then just press "Enter" again.
Here we are logged in! This is evidenced by the inscription at the very bottom "C: \ WINDOWS" and a blinking cursor for entering text commands.
What commands do we need to know? First of all, those that respond to our navigation (movement) on the disk. After all, we will need to go into the folders.
The task is to go to the "C" drive and view its contents! Just having a mouse at hand :)
Take a close look at the screenshot below:

Let's wrinkle our brains and we'll figure it out! First of all, what does the entry "C:\WINDOWS>" mean? This is the ID of our current position. We are located on the "C:" drive in the "WINDOWS" directory. Icon " > » is a separator that simply visually separates the result of the execution of the previous commands (to the left of it) from the ones we enter (to the right of it).
Since we need to display the contents of the system disk, first we need to "get out" of the "WINDOWS" directory. To do this, enter, as shown in the photo above: " cd..". The abbreviation "CD" stands for " Change Directory” (change directory, folder, directory), then a space and two dots in a row. This command is similar to the back arrow in Windows Explorer.
Just remember that things like space, indent, slash left or right have a very importance. There is only one correct spelling and that must be given!
I dwell on this in such detail due to the fact that this is the basis (roots and origins), which, unfortunately, not everyone knows and remembers. And then the inscription appears on the monitor NTLDR is missing, but how to fix it, what to do and immediately - to the master! :) And the master - refers to the "origins", loads into the recovery console, enters simple commands from the keyboard and - gets a positive result :)
We move on. After that, press "Enter" (this ends the input of any command) and see the symbol "C:" We left the "WINDOWS" directory one level up and got to the root of drive C. And in it we enter the following abbreviation: " dir» (directory), which will show us the contents of the current directory.

We see all our files and directories that are on it.
Now let's go to our CD or DVD drive. We have in it installation disk Windows, remember? To do this, enter the command " D:" (without quotes). The main thing here is to "guess" under what letter of the alphabet you have it. I have - one logical partition (it is also a system partition), therefore - the letter "D" is - optical drive. If you have multiple partitions (or hard drives), then the letter may be completely different. Let's say - "F", "G" or - even further down the alphabet. Well, I think you will choose the brute-force method :)
In the folder with our installation disk, we give the already familiar command "dir" (content overview). We get this result:

Here we will be interested in the folder " I386". It contains the bootloader files we need. NTLDR and ntdetect.com, which we are going to copy instead of the damaged ones (which we deleted on purpose).

To do this, we need to go to this folder and see if this is the case? We enter the command "cd" (change directory) and - the exact name of the target directory is "i386". We press enter. We see the result: D:\i386> We have moved to the directory we need. In it, we will execute the content browsing command - "dir".
Among a large number files contained in it, we can see the one that we need!

Now - we write the copy command, indicate which file we copy and where: " copy ntldr c:» It is necessary to write in this way, observing all spaces, colons and putting a slash at the end.

The system tells us that one file has been successfully copied to the root of drive C. Let's check this fact. Let's go to the system drive (you should already know how to do this), enter "dir" and see this picture:

There was a file Windows bootloader- ntldr.
Super! We just solved the problem with the NTLDR is missing message when booting the computer from the command line! Let's reboot and taste the fruits of our labors :)
To do this, we just need to type in the console the command " exit» (exit) and press enter. The computer will start to restart. But... so far we won't see anything joyful, except that the inscription NTLDR is missing will no longer appear, and the system will reboot cyclically without displaying any more messages. Remember, in a fit of experiment, we deleted two more files "Ntdetect.com" and "boot.ini"?
The first file can be copied from the same "i386" folder of the installation disk. Let's do it. Let's enter the recovery console, then - to the directory with this file and execute the copy command.

Note that the "Ntdetect.com" file has an extension (everything after the dot in the name), so the extension must also be specified in the command itself. We see confirmation of successful copying.
Let's make sure of this. We go to drive C and look around there:

We see - both files we copied are in place. We try to reboot - "exit". When loading, we, again, do not see NTLDR is missing, but we observe this picture:

The “boot.ini” file is not only wrong, we don’t have it at all! But Windows is smart and "tells" us that it's ready to start booting without it. And - indeed, in a few seconds we can observe the successful start of our OS.

The problem is that such an entry will not go anywhere and will appear every time you turn on the computer (and if the configuration file is really wrong, the system will not boot at all).
Therefore, let's learn how to fix this problem too! First of all, what is this file and what function does it perform? This is a small text configuration file, which can be opened with Notepad. Let's do it. Here's what's inside it:

Let's quickly analyze its contents.
- boot loader - boot section (just a notation)
- timeout=30 - countdown timer until OS boot starts (in seconds)
- default - the operating system that will be loaded by default (relevant for systems with several operating systems installed at the same time)
- operating system - system(s) boot parameters. Each subsequent one adds a new line here.
Now consider the values of the parameters themselves. The "multi" and "disk" parameters will almost always be set to "0" and we do not touch them. We will be interested in rdisk» - serial number of the disk (starting from zero) from which the operating system is loaded. For example: if we physically (at the hardware level) have one hard drive, then “0” should be here, but if we have two hard drives and the OS is installed on the second, then in this case the value of "rdisk" will be equal to "1".
Parameter " partition" means almost the same thing, but for logical disks into which our HDD. Here the numbering starts from one. For example: if my Windows is loaded from the “C” drive, then “partition” will be equal to “1”, if - from the “D” drive, then - “2”, “E” - “3”, etc.
It remains to parse what comes after the slash: Windows="Microsoft Windows XP Professional RU". Instead of what is indicated in quotes, you can write anything. This is textual information (the download ID) and has no effect on anything. Parameter " /fastdetect” tells the bootloader that (if there is one installed system) it should ignore the “timeout” timer value and immediately load the operating system without displaying a boot selection window.
Knowing these simple things, you can directly in text editor(notepad) arrange desired values and save the file. Upon reboot, the new values entered by us will be read from it. But I want to show you one more method specially provided for such cases by developers from Redmond.
We boot into our (I hope, already familiar console) and enter the command “ bootcfg", from English. "boot config" (boot management). Since we entered the command without parameters (did not indicate what it should do), the system will show us all the possible options for its use:

Red marks the "keys" (additional options) of this command, which we can type directly after it. Look, read, everything is in Russian.
Let's start with the "key" list” to display a list of systems already in the boot list. Before the "key" put a space and a slash.
We are "telling" that there are no items in the load list available to display. It is not surprising, because we do not have the boot list itself (boot.ini), we successfully deleted it.
We use another "key" of this command - " add" (add), you can and - " rebuild' (rebuild). The result will be the same.

We "forced" the program to scan all disks for the presence of installed systems Windows families. The result is one OS on the C drive in the Windows folder. Next, we are asked to select the system to be added. Where to add? Namely, in the "boot.ini" file, which was created at the same time :) We put the number "1" - the serial number of the found OS. Next - a suggestion to enter the download ID. You can write anything. For example - "My Windows XP". In the line "Enter boot parameters" I advise you to enter "/fastdetect" (so as not to display the timer in vain).
Let's make sure that the "boot.ini" file is really created in the root of the disk. Let's go to it and execute the "dir" command.

And there is! We reboot and make sure that the download goes smoothly, the inscription NTLDR is missing does not appear, no other windows either. Q.E.D!
Let's go into the loaded system (already with the mouse) into the bootloader configuration file and see what it contains?

Pay attention to what is highlighted in red. This is exactly the data that we entered from the console, and they were written at that moment to this file.
In conclusion, I would like to note the following, if you see the inscription when loading NTLDR is missing, then the problem can be solved in another way. Remove the hard drive, connect it to another computer with the same system and overwrite necessary files from there. It's up to you to decide, but I think the skills of working in the console will definitely come in handy in the future!
What to do with the NTLDR is missing error? It's pretty frequently asked question, since it happens quite often among users of Windows XP and Windows 10/7 operating systems?
It may occur while working with a computer.
After the reboot, it says: NTLDR is missing and the operating system does not turn on. It is also impossible to boot into a safe environment or bypass an error during the OS power-up process.
The line after the error field prompts the user to reboot the device using the Ctrl->Alt->Delete key combination. However, this does not help.
After trying to reboot, the error appears again and again.
Consider the causes of the problem and effective ways its elimination.
Causes of an error in the OS
Before describing all sorts of reasons for the failure of the OS, it is necessary to decipher the information that the error code carries.
In our case, NTLDR is a regular operating system loader. Literally, the abbreviation can be deciphered as New Technology Loader.
Once the problem area has been identified, you can proceed to more detailed work with the error.
Among the reasons for the appearance of NTLDR is missing are the following:
- Fatal error (fatal error) in the operation of the hardware components of the system. The hard drive may not be connected to the system or the controller motherboard broken;
- Another hard drive was connected to the motherboard;
- You may have more than one operating system installed on your computer. In this case, a conflict may occur between them and, as a result, the computer will not boot;
- In the process of incorrect installation of programs, the files of the NTLDR installer could be damaged;
- The system's active disk has been replaced.
Troubleshooting without reinstalling the system
Reason 1. If you are using old computer, then the hardware components are most likely damaged. Disconnect the hard drive from the motherboard and check it for any faults.
The easiest way is to connect it to another PC and check if it works.
If the device is still defective, the only way out is to replace it.
In the case when the computer does not respond to other hardware components, it is also necessary to replace the device's motherboard.
Reason number 2. According to this reason, this error appears due to a conflict between two hard drives.
Most users, after connecting another disk, do not prioritize use.
The bootloader of a new hard drive cannot access NTLDR system files during the OS boot process.
Follow the instructions to resolve this issue:
- After the error appears, restart your computer;
- In the first five seconds after starting a new boot, go to the BIOS menu;
- In the BIOS window that appears, find the tab in which the order of using the system's hard drives is set - Hard Disk Boot Priority;
- Using the up and down keys, put the first hard disk in first place;
- Press the F10 key to save your changes.
After the done actions, exit the BIOS menu, restart the computer and wait for the operating system to load.

Reason 3. This cause is resolved as follows:
- Find the drive you used to install the operating system. It can also be a flash drive, you need to write the OS installation image to it;
- Boot from a connected drive;
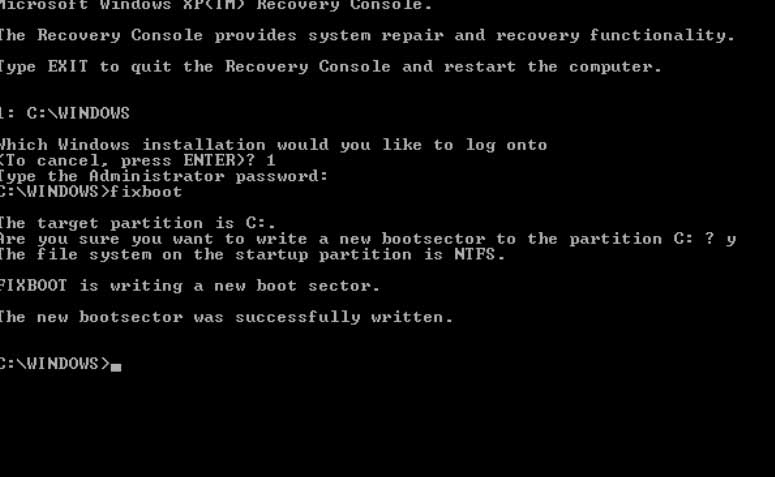
- If you are using Windows XP, press the R button immediately after the inscription appears: " Installing Windows". The following window will appear;

- This window is the standard recovery console. Click on the number that means the boot partition and enter the fixboot and fixmbr commands in turn (via Enter);
- Users of the seventh and newer versions of the Windows OS, after the Install button appears, must click on the OS recovery field, as shown in the figure below;

- In the window that appears, select the command line utility;
- AT command line write the bootrec.exe /FixMBR command and the bootrec.exe /FixBoot command through Enter. After all commands are successfully executed, close the utility.

Advice! Another way to solve the problem is to disable one hard drive after copying the installer system files. Then they need to be copied to a second hard drive. Connect both drives to the motherboard again and reboot the system. Now boot mode will be able to find the necessary system files.
Reason 4 are corrupted installer files. In most cases, they are damaged due to the functioning of malware or other types of viruses.
Also, the files could be deleted by the user himself.
To get the system up and running, you need to recover previously lost files. This can be done using the solution to reason 3.
Notice! If the cause of the problem is a virus, after issuing the fixmbr command, there is a possibility that the main partition table of the hard disk will be damaged. First you need to scan the disk for viruses. You can do this by connecting it to another computer.
Reason 5. The solution is that the user must change the system's active disk. Enable the Recovery Console as described in the previous instructions in this article.
You will also need the DiskPart program. It is preinstalled in Windows OS.
At the command prompt, type diskpart and press Enter. The utility will start.
Hello everyone, dear friends! Today I tried to turn on my computer, but it didn’t work, some incomprehensible inscription appeared something like this: “NTLDR is missing”, I don’t even have a clue what it is and why my computer stopped booting. I have a lot on my computer. important information Have I lost everything now? Help me please!
It is precisely such letters that have recently begun to come to me on my email from many users, with a plea for help. Well, let's figure out what actually causes the appearance of such an inscription when the operating system tries to boot successfully.
An error - NTLDR is missing of this kind occurs extremely rarely, but not every user can cope with it. The first thing that comes to the mind of the user after several attempts to reboot is reinstalling the operating system (OS). This is long, and sometimes unprofitable, because the system disk may contain important files. In today's article, I will tell you how to deal with the error without reinstalling the system. Methods are suitable for everyone current versions Windows (XP, Vista, 7, 8, 8.1, 10).
And there are several reasons for the appearance of "NTLDR is missing":
- corrupted boot files of the system;
- conflict due to the installation of another OS;
- installation additional hard disk;
NTLDR is missing What to do?
Hardware failure.
Reasons #1 and #2 - Damage boot files
So instead of Windows boot the error "NTLDR is missing" appeared. In the event that an error appears due to damage to boot files or a conflict between two systems, these methods will help you. Check if you have a Windows installation disc or flash drive that is in this moment is on the computer.
If there is no disk, then check out the following article, from which you will learn how to create such a disk or flash drive:
If the cherished flash drive or CD / DVD is present, then the sequence of actions for Windows Vista, 7, 8, 8.1.10 is as follows:
1. We restart the computer and insert the disk or USB flash drive.
2. Now we need to set the boot priority from the media, and not from the hard drive. To do this, you need to go into the BIOS and set the "boot priority" on CD-ROM or USB. Almost all modern computers you can get to the "Boot Menu" without going into the BIOS. Try pressing F8/F9/F10 during boot. Then if it didn’t work with “F8”, then reboot and press “F9”. You can read more details
3. If the priority is set, then the download will already be from the disk. We are waiting for the installer to perform automatic operations. The installer will offer you two options: install new system Or restore the current one. Select "Restore current" and wait for completion. Done, problem solved.

Note for Windows XP users.
We carry out the first two points of the instruction located above. As soon as the installer starts, we immediately start pressing the "R" button - do not be afraid to overdo it. You will be given a list of OSes that need to be restored. Choose desired system(for this, the installer may ask you to press a number and Enter) and confirm your actions with the "Y" and "Enter" keys. Last action is a set of commands FIXBOOT and FIXMBR- the procedure is shown in the screenshots below.

What if the above actions did not lead to a positive result?
If the commands did not return the files, then you need to go the other way - using the same recovery console. Our task is to copy two files from your boot disk Windows. Using the "copy" command, transfer the files "NTDETECT.COM" and "NTLDR".
To do this, you need to register this in the recovery console: copy
where
Actions on the command line will look like this:
copy f:\i386\ntldr e:\
copy f:\i386\ntdetect.com c:\
In commands, "f:\" means the letter of your Windows boot drive;
"c:\" is the address of the drive where the operating system is located.
Perhaps you have it on drive "d", and not on "C" - fix it. Also the name of the CD/DVD may be different. Check this data and write two simple commands - the problem will definitely be solved.
Reason #3 – Active Disk Change
After installing an additional hard drive, the error most often occurs due to incorrect user actions. The already familiar recovery console will help fix the situation and standard utility"DiskPart", which is launched using the command diskpart on the command line.

When the utility starts, proceed as follows:
Enter the list disk command - you will see a list of hard drives that are connected to the computer.
If only one disk is present, the program will display disk0.
We need to enter the command "select disk 0" to select the disk with the operating system to boot.
After selecting the disk, we drive in the “list partition” command to display a list of partitions on the disk.
We select the partition with the operating system, it is most often signed "select partition 1".
To complete the procedure, enter the command "active". Done, the partition with the operating system is again the main one - reboot and use it.
Reason #4 - hardware failure
If the instructions above did not help, then there was a hardware failure. personal computer. The hard drive or the motherboard controller, which is responsible for the operation and recognition of hard drives, can fail. Most often this problem occurs on older hardware. But still, if a breakdown occurs, then there is usually only one way out - replacing the faulty equipment. In some cases, craftsmen repair or replace only the failed item.
Concluding the article, I would like to add that if the problem still turned out to be damaged files boot, and the disk with Windows is not found, then you have to go for another. The main thing is that the version of the operating system on the disk matches the Windows installed on your computer.
That's all for today, how do you like the article? If you have any questions wishes, then ask them in the comments!


