How to start the hp power supply. How to turn on a computer power supply without a motherboard
If there is a need to check the functionality of the power supply, and you don’t have a PC at hand, there is an easy way to carry out this manipulation. You only need a piece of wire. How to turn on the power supply without a computer? Let's answer this question.
Turn on the PSU without third-party components
Now all power supplies are ATX standard. They are not designed to be turned on without other components, as they are waiting for a start signal from the motherboard, but this operation can also be performed.
For this you need:
- First, take a small piece of wire and clean the ends.
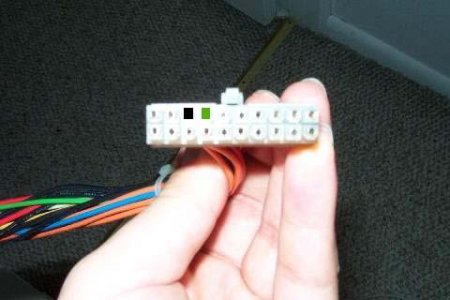
- Then we pay attention to the power supply connector. The essence of our manipulation is to close the PS-ON and GND pins. These are the green and black wires, the first being number 14 on the twenty-pin connector, and the second is always adjacent. You can also pay attention to the color coding, but the Chinese sometimes confuse the wires, so it’s better to clarify the pinout.
- Now we close these contacts with a pre-prepared wire, connect the power supply to the network and turn it on. The PSU will start, the cooler will start working. There are systems with load control, then the fan will not spin without connected devices. In this case, attach optical drive, this will help make sure that the device is in working order.

Useful information
If you need longer runs, take two pieces of wire, strip them, and solder them to a pre-purchased or removed power switch from your PSU. Connect the remaining free ends of the wires to the connector pins already indicated earlier. Now the PSU can be turned on by pressing a key.

What if it doesn't turn on?
If the computer refuses to work, you need to check the presence of power at the PSU input. In the event that it is, even when the computer is turned off, there will be a voltage of + 5V. This is easy to check by arming yourself with a multimeter and checking the ninth pin (purple wire). If it is not there, then there are technical problems. There are many of them - from a cable break to a short circuit at the output, with such a problem it is better to go to a service center.
Many computer enthusiasts have a question: “How to turn on the power supply without a computer?” This need is due to various reasons, most often we are talking about checking the performance of cathode lamps or new coolers.
Why such difficulties?
Turning on the power supply without a computer is simply necessary in case of repair, because if you constantly turn off and on the computer, this will negatively affect the PC components, due to premature battery failure. In addition, any experiments with a computer can lead to unstable operation of the operating system.
First start
As computer wisdom says, if you can find a PC power supply, how to turn it on is even easier to understand. All modern computer blocks comply with ATX (special international standard). Thus, the 20-pin connector has a contact that is responsible for the active state of any such unit. We are talking about the fourth contact from the left (you need to count from the fastening latch). Most often, the contact we need is green. This wire must be tried to close with the ground (i.e., any black one). It is most convenient to use the adjacent, 3rd contact. If everything is done correctly, the power supply will instantly come to life and the cooler will make noise.
How to turn on the power supply without a computer: details
ATX standard devices can output the following voltages: 3.3, 12 and 5 V. In addition, they have good power (from 250 to 350 W). But here's the question: "How to enable computer block nutrition?" Above, we have already, so to speak, outlined the procedure in a nutshell, and now we will try to figure it out in more detail.
It was easier in the past

It is curious that the old blocks, which belong to the AT standard, could be launched directly. With the ATX standard, things are much more complicated. However, the solution to a huge problem comes down to a little wiring that needs to be connected in a certain way. We have already described how to turn on the power supply without a computer, but we ask you to disconnect all the wires going to the motherboard, hard drives, drives and other accessories. Better yet, remove the element we need from system block and work away from it.
Another important point that should not be overlooked: do not force the power supply to idle. This way you can shorten his life. You need to put on a load. For this purpose, you can connect an old hard drive or fan. As already noted, you will need black and green contacts to start. However, remember that some manufacturers, for unknown reasons, refuse to follow the established color coding. In this case, it is advisable to first carefully study the pinout. If your knowledge allows, you can make a special button to turn on the power supply.
Strange computer power problems: PC stopped turning on

First, let's check the presence of a primary power supply ~ 220V at the PSU input. Among the reasons for the absence can be called a malfunction of the surge protector, sockets, plugs, cable breakage. Also, the problem may lie at the source. On the back of many units there is a power switch - it can also be faulty or turned off.
In the case of primary power supply, even if the computer is turned off, there is a voltage of + 5V at the PSU output (if everything is in order). This can be checked by testing the pins of the PSU connector with a tester. We are interested in pin 9, which has a purple wire (+ 5VSB).
Often motherboard has an LED indication of standby voltage. If it is active, both standby and primary power are present.
If the computer still does not turn on, we are looking for other sources of the problem. The most common reasons are discussed below.
1. Open circuit in the power button. To check this, close the contacts responsible for turning on the power on your motherboard with tweezers, or run the PSU outside the system unit (we described in detail above how to turn on the power supply without a computer).

2. A short circuit that occurs at the output of the PSU. Try turning off the power to all devices, and remove all adapters from the slots for a while. In addition, all USB devices should be disabled. You can also deactivate the 4-8-pin power connector for the Power Connector + 12V processor.
3. Malfunction of the motherboard or PSU. If only the motherboard is connected to the power supply, but it does not turn on, it is probably the unit itself that is faulty. As for the malfunction of the "motherboard", which leads to the impossibility of turning on the power supply of the computer, we note that theoretically this is possible, but in practice it is extremely rare. To check this, turn it on without connecting the connector to your motherboard. If the PSU turns on, it is the motherboard that is faulty.
The ability to start a power supply without a computer and motherboard can be useful not only for system managers, but also for ordinary users. When there are problems with the PC, the main thing is to check the performance of its individual parts. Any person can cope with this task. How to turn on BP?
How to turn on the power supply without a computer (without a motherboard)
Previously, there were power supplies (abbreviated as PSU) of the AT standard, which were launched directly. FROM modern devices ATX such a focus will not work. This will require a small wire or an ordinary paper clip in order to close the contacts on the plug.

AT modern computers ATX standard is used. There are two types of connectors for it. 1st, older, has 20 pins on the plug, 2nd - 24. In order to start the power supply, you need to know which contacts to close. Most often, this is the green PS_ON pin and the black ground pin.
Note! In some "Chinese" versions of the PSU, the colors of the wires are mixed up, therefore it is better to familiarize yourself with the pinout (pinout) before starting work.
Step-by-step instruction
So, when you are familiar with the wiring diagram, you are allowed to start launching.
1. If the power supply is in the system unit, disconnect all wires and pull it out.
2. Old 20-pin power supplies are very sensitive, and in no case can they be started without load. To do this, you need to connect an obscene (but working) hard drive, cooler or a primitive garland. The main thing is that the PSU does not idle, otherwise its service life will be greatly reduced.

Connect something to the power supply to create a load, say, a cooler
3. Take a close look at the pinout and compare it with your plug. It is necessary to close PS_ON and COM. Since there are several, choose the most comfortable for you.
Observantly compare the location of the contacts on your plug and on the diagram
4. Make a jumper. It can be a short wire with bare ends or a paper clip.
5. Close the selected contacts.

Close PS_ON and COM pins
6.Turn on the power supply.
The fan is noisy - the power supply is working.
Checking the performance of the power supply is a simple task that an ordinary PC user can handle. Just follow the instructions carefully.
All modern computers use ATX power supplies. Previously, AT standard power supplies were used, they did not have the ability to remotely start a computer and some circuitry solutions. The introduction of the new standard was also associated with the release of new motherboards. Computer technology rapidly developed and is developing, so there was a need to improve and expand motherboards. This standard has been introduced since 2001.
Let's look at how a computer unit works ATX power supply.

Location of elements on the board
To begin with, take a look at the picture, all the nodes of the power supply are signed on it, then we will briefly consider their purpose.


And here is the electrical circuit diagram, divided into blocks.

At the input of the power supply there is an electromagnetic interference filter from the inductor and capacitance (1 block). In cheap power supplies, it may not be. The filter is needed to suppress interference in the power supply network resulting from operation.
All switching power supplies can degrade the parameters of the power supply network, unwanted interference and harmonics appear in it, which interfere with the operation of radio transmitting devices and other things. Therefore, the presence of an input filter is highly desirable, but comrades from China do not think so, so they save on everything. Below you see a power supply without an input choke.

Further, the mains voltage is supplied to, through a fuse and a thermistor (NTC), the latter is needed to charge the filter capacitors. After diode bridge another filter is installed, usually a pair of large ones, be careful, there is a lot of voltage on their terminals. Even if the power supply is turned off from the network, you must first discharge them with a resistor or incandescent lamp before touching the board with your hands.
After the smoothing filter, the voltage is supplied to the circuit impulse block nutrition, it is complex at first glance, but there is nothing superfluous in it. First of all, the standby voltage source (block 2) is powered, it can be performed according to a self-generator circuit, or maybe on a PWM controller. Usually - a circuit of a pulse converter on one transistor (single-cycle converter), at the output, after the transformer, a linear voltage converter (KRENK) is installed.

A typical circuit with a PWM controller looks something like this:

Here is an enlarged version of the cascade circuit from the example above. The transistor is in a self-oscillating circuit, the frequency of which depends on the transformer and capacitors in its piping, the output voltage from the nominal value of the zener diode (in our case 9V) which plays a role feedback or a threshold element that shunts the base of the transistor when a certain voltage is reached. It is additionally stabilized to a level of 5V by a series-type linear integrated regulator L7805.

The standby voltage is needed not only to generate the enable signal (PS_ON), but also to power the PWM controller (block 3). ATX computer power supplies are most often built on the TL494 chip or its analogues. This block is responsible for controlling power transistors (block 4), voltage stabilization (using feedback), short circuit protection. In general, 494 is used very often in impulse technology, it can also be found in powerful blocks power supply for LED strips. Here is her pinout.

If you plan to use a computer power supply, for example, to power led strip, it will be better if you load the 5V and 3.3V lines a little.
Conclusion
ATX power supplies are great for powering ham radio designs and as a power source for the home lab. They are quite powerful (from 250, and modern ones from 350W), while they can be found on the secondary market for a penny, old AT models are also suitable, to start them you just need to close two wires that used to go to the system unit button, the PS_On signal to they are not.
If you are going to repair or restore such equipment, do not forget about the rules safe work with electricity, that there is mains voltage on the board and the capacitors can remain charged for a long time.
Turn on unknown power supplies through a light bulb so as not to damage the wiring and tracks printed circuit board. With a basic knowledge of electronics, they can be converted into a powerful charger for car batteries or . To do this, the feedback circuits are changed, the standby voltage source and the block start circuits are being finalized.
If you want to check the performance of the power supply, but you do not have a computer, then there is one way to do this. All you need is a couple of wires and a single pole switch that stays on or off when you change position. We'll show you how to do it below.
Standard ATX power supplies are not designed to idle unless they are properly connected to the motherboard. This ensures that they cannot damage computer components if the connector is not fully connected or connected incorrectly.
Note: in no case do not turn on the power supply without load! This can lead to its complete failure. The load can be either a resistor, or a connected drive, floppy drive, hard drives.
Another problem is that if you connect the power supply to the mains, it simply does not initialize. It will wait for a start signal from the motherboard to turn on (usually the signal is controlled by a button on the front of the computer). The article describes the direct initialization of the power supply, by closing the corresponding connectors.
Prepare two long pieces of wire to connect them to the switch and the power connector (20- or 24-pin connector).
Remove the insulation from both ends of each wire, leaving enough wire to wrap around the power button (or solder). At the other end, expose a strip large enough to make sure it makes good contact with your 20- or 24-pin connector on your power supply.
Wrap the long end of the bare wire around the switch and repeat this process with the other wire. Set the switch to the "OFF" position.
Power off the computer and remove the power supply connector.
Hold the 20-pin or 24-pin power supply plug in one hand. Locate the green wire (the ATX motherboard signals the command to start the power supply via "PS_ON #", which is indicated by the green wire). This is pin number 16 on a 24 pin connector and pin number 14 on a 20 pin connector. On the 20/24 pin connector, you need to find a black wire (GND). It is usually found next to green.

Note: there is one green wire in each row, it doesn't matter which one you use, they both perform the same function.
Insert one end of the prepared wire from the switch into contact with the green wire. Insert the other wire into contact with the black wire.
Connect the power supply to the mains, and then turn the switch to the "ON" position. The power supply will turn on and you can now use it to power your devices or for testing purposes.
To make sure the power supply is working properly, you can measure the output voltage with a multimeter. The drawing above shows the output voltage of each pin (+12V, +3.3V, +5V, COM). Pin 13 can either be a +3.3V supply or can be used as a probe from the power supply to measure cable losses.
In this simple way, you can easily, and most importantly, safely turn on your power supply without a computer.


