Open server installation and work with the server. Open Server is a professional web developer tool for Windows
First, let's figure out what OpenServer is and why it is needed at all. OpenServer is a program, or rather a local server, with which you can create or edit websites on your computer and then upload ready-made or modified ones to the hosting. That is, if you are going to create your first website, then for a start it is not necessary to buy a domain and hosting, in this program you can create websites as much as you like and do various experiments for free!
With it, it is very convenient to make changes on your site without affecting the working version, because the files will be located on your PC, and not on the hosting, because if you start to change something on your working version on the hosting, then you can simply alienate your audience, because at the moment when you make changes, they will not be able to understand what is happening with your site and most likely will leave it, because it often happens that when you make changes, the site sometimes stops work. The first time I did it myself until I found out about this method.
So, first you need to download this program on the official website, on the download page, select the maximum version of "Ultimate" as it has more features, free download in this moment goes at a low speed, at maximum speed it will be available to you if you make a donation, I contributed 100 rubles to the author (as a token of gratitude) and downloaded at the maximum speed available to me.
After you download and install the program, I want to show you one important detail, go to the "OpenServer" folder
it will contain 4 folders, we are interested in the “domains” folder, it is in it that our sites are stored

like in my example

that is, first you need to create a folder with the name of the site, for example test.local
 ending after the name of the site local - required! Otherwise, there may be problems with the operation of the site on the local server, then we drop the installation files of the engine (wordpress, joomla, drupal, etc.) into this folder, I will show you on css example wordpress engine.
In our case, you need to go to the official website and download the engine itself

as soon as we downloaded the archive, we need to unzip it, after unzipping we will have a folder with files, we need to transfer these files to the test.local folder, or you can transfer the folder itself and rename it to test.local.
Now we need to install this engine, we need to run this program by clicking on the green label of the corresponding bit depth of your OS, I have 64-bit, so I'm running "Open Server x64"

I advise you to immediately take out the “OpenServer” folder itself so that it is immediately in front of your nose)). A red flag will appear at the bottom, this indicates that the program has started, but in order for it to function, you need to select the green flag and click start, after launch we will have a list of sites in the “my sites” section that are in the “domains” folder. Before installing the site, we definitely need to create a database, for this we go to the “OpenServer” profile and select “Advanced> PhpMyAdmin” in the menu that opens, then we will open a separate browser window (which you have set by default in the system, in my case it is Google Chrome) an authorization window will open in it
 it is not necessary to enter a password here, the most important thing is that it be root in the “user” column (sometimes there are cases when login is not performed without a password, then we also write root in the password column).
Once you are logged into the PhpMyAdmin control panel, we need to click "Users" at the top

at the bottom you need to find the word "add user"

here we will be creating a new database for our site. Here we write the name of the database, it is desirable that it matches the name of the site without a domain, come up with a password and check the box below “Create a database with the same name and grant all privileges to it.”

Once we have created a database, we can start installing our engine, you can read about how to install wordpress in this article.
That's all, in this article I tried to tell as much as possible from my personal experience about the work of OpenServer. If you still have questions, write in the comments, I will help everyone.
Program description
Open Server is portable software package, created to help webmasters develop, debug and test sites directly on a computer (even if there is no Internet on it) running Windows. You can read in more detail about what Open Server is, what is the difference in its assemblies (maximum, extended and basic) and what components they include, you can read at the office. project website: ospanel.io.
Personally, I use the extended edition (premium)
Where to download open server?
- On the developer's site www.ospanel.io/download/- without donation, the download speed is very small (3 hours to download)
- From my Yandex disk, here: https://yadi.sk/d/qDuNKrWUhkHvo- I usually throw all the updates there
Installing OpenServer
Before installation, I recommend to disable antivirus program. In my case, this is Kaspersky Anti-Virus, it is disabled as follows: we find the anti-virus icon in the tray, click on it with the mouse (right-click) and select: pause protection, then select for how long to pause and confirm the action in the window that opens.
We launch the downloaded distribution of Open Server (preferably on behalf of the administrator). 
Specify the path to install the distribution. 
We are waiting for unpacking, after which we follow the path that you specified during unpacking and see the OpenServer folder there, inside which the installed Open Server is located

This completes the installation!
Open Server - first launch
To do this, go to the folder with the installed Open Server distribution (in my case, it is located on local disk D). We right-click on the Open Server icon (x64 or x86, depending on the bitness of your OS) and select "Run as administrator" in the window that opens.

In the window that opens, select the server interface language (in my case it is Russian):


They will be installed for quite a long time, you will have time to drink coffee freely at that time. or something else to do)
After installing all the necessary libraries in the tray (lower right corner, where the clock is), the Open Server icon will appear in the form of a red flag, click on it and select run.
If a window appears: System notification Windows Security, put both checkboxes against the items Private and Public networks and click on the "Allow access" button.

After that, the server should start successfully and the red flag in the tray should turn green, click on it and select "My Sites" - "localhost".
A page will open in the browser, in which a greeting will be written.

Congratulations on the successful launch of Open Server.
Configuring OpenServer
To do this, launch it, then right-click on its icon in the lower tray and select the settings tab.

A settings window will open in front of you, we are primarily interested in the Modules tab, here I recommend setting the modules you need (based on the hosting software, in my case hosting will run, it supports latest versions Apache , Ngins , PHP etc. Accordingly, I choose the latest versions).
In doctor web, it is disabled in the settings parental control if I am not mistaken.
You can also try opening a command prompt as an administrator and running the following command:
attrib.exe -s -r -h -a C:\Windows\system32\drivers\etc\hosts
Common Error 2: Failed to start Apache
Or some other component or just writes the port (port number) is busy. This usually indicates that you given port busy with some other program.
Solution:
If you have Skype running, make sure that it does not occupy ports 80 and 443, to do this, in Skype, go to the Tools -> Settings -> Connection tab and uncheck Use ports 80 and 443.
If it doesn't help or something else is blocking the ports. Then download, install and run the Port Explorer program (or similar), then go to the ALL tab, sort the list of processes in the Local Port tab, find the processes occupying the port indicated in the logs and end them. PS this action After each reboot of the system, you will most likely have to repeat.
After that, restart Open Server and work!
If this does not help, then turn off the firewall (firewall) and antivirus!
Well, if all of the above does not help, then go to the office. forum open-server.ru/forum/ look for your problem, or write to the developers through the same forum what kind of problem you have and they will help you solve it. Well, or you can write about it in the comments, I will try to help you!
Hi all! In today's article, I will tell you about installing and configuring a local Open Server on your computer.
With the help of Open server you can test on the local machine (i.e. on your computer) any changes related to the creation of sites in and Php (self-written sites).
If you are a Denver fan, then I have an article.
Beginning of work
The very first thing we need to visit is the official website of the local server developer, which is located at this address - http://open-server.ru

In principle, we do not need to download the maximum edition package (504 MB). The second, more compact version with the necessary settings for creating a local server on a computer is quite suitable for us. That's why I choose it.
Enter in the "Code from the image" field and click on the "Download" button


I want to warn you to be patient, because choosing the second option will make your files download very slowly. It took me about 2 hours with dedicated internet. In principle, you can be even more cunning and upload all files through Rutreker. A tricky marketing ploy by the developers 🙂 Well, okay, let's move on.
Installing Open Server to Disk
Go to downloads and double click on our downloaded file. Next, you will be prompted to select the path where the local server will be installed. I will leave it unchanged, because I have only one disk - the disk c:\

Then unpacking will follow. We go to our directory where we installed Open Server and click on the appropriate icon (I use a 64-bit OS). We choose "great and mighty" as the language.

Next, a dialog box will appear telling us that this is the first time it is running on the computer, which will offer to install Microsoft Visual C ++ Runtime & Patches. We agree and continue to work. This process may take some time.

After installing the local Open Server, you will see a red flag in the system tray.

Right-click and select "Run"

After starting, you may get an error that the port to which the server is accessing (80 and 443) is already occupied by another program, in most cases it is Skype. The solution is the following. Go to Skype - Tools - Settings.

In the "Settings" section, you will need to go to the "Connection" sub-item and uncheck the checkbox "For additional incoming connections, use ports 80 and 443". Save your changes.

After these manipulations, let's try to open and launch the Open Server window again. And voila! Everything is working.

Creating a new site on a local Open Server
Great, the program has been launched, now we need to create a new site and see how it works on our local hosting. To do this, go to the Open Server itself and its domains folder (domains or folders of our future sites).

Go inside and just click "Create a new folder".

There is already a site in the Domains directory called localhost. You can go to the browser and type this name into the address bar.
We will see a welcome message telling us that the server is running.

Now let's create our own folder with a new site and call it - test.loc. LOC will tell us that the site is on the local machine.

Inside it, through any text editor, we will create a simple php file– index.php

The index.php file itself can be created through a text editor or is also called a code editor - Sublime Text.

Now we go down to the very bottom of the window to the system tray area (where the Windows clock is located) and start our server.

After a successful launch, we again go to the Open Server in the tab my sites and select our local one - test.loc

Now let's go to the browser and see the result of the output php code On the page.

Important! There is one very important nuance: you can have an icon on that everything is working, a message appears, shown in the screenshot above. Here lies the error. If your site has php or scripts, they WILL NOT work! This is because many antiviruses, such as Kaspersky and others, regard the launch of Open Server as a virus and block the operation of all scripts. Before a session, just disable your antivirus and then everything will work fine for you. This is so, for information.
That's all I have Dear friends! I think that you will be able to set up your local Open Server and test your future sites without any problems. Thank you for your attention, see you soon.
In this tutorial, we will figure out how to install Open Server on your computer. But first, let's find out with you what is Open Server and what is it for?
open server- it is portable server platform and a software environment created specifically for web developers, taking into account their recommendations and wishes.
The software package has a rich set of server software, convenient, multifunctional well thought-out interface, has powerful capabilities for administration and configuration of components. The platform is widely used to develop, debug and test web projects, as well as to provide web services in local networks.
In other words, Open Server will allow you to create websites right on your local computer. Also, you will be able to work with the current site, having previously uploaded it to Open Server, and not experiment with the existing site directly on the hosting. This can come in handy when you want to check out new engine updates, try out new module on the site, change the design, etc. Open Server will help you with all this.
You can read more complete information about Open Server on the official website.
On my own behalf, I’ll add that I used to use it to develop sites, but since it hasn’t been updated for a long time, and there’s no way to make the necessary settings on the local server on my own, I paid attention to the alternative - Open Server, and never regretted my choice.
Well, let's start installing Open Server.
First of all, we need to download the distribution itself. To do this, go to the official website in the "Download" section, select desired version distribution (1). It is worth noting that the product comes in three versions: Ultimate, Premium, Basic, how they differ from each other can be clearly seen in the comparison table on the site. I always use "ULTIMATE" (with maximum performance). Next, enter the code from the image (2) and click the "Download" button (3).

Once the distribution is downloaded, we begin the installation.
The distribution kit is presented as a self-extracting archive. We launch it and we are immediately offered to choose a disk where Open Server will be unpacked. I leave the default drive "C", if you want to install on another drive (or on a flash drive or portable drive), then specify the appropriate path for unpacking. After the disk is selected, we begin unpacking, press the "Ok" button.

We are waiting for the distribution to be unpacked.

Now we can run the program. Since the program is portable, no shortcuts are created on the desktop or in the Start menu. Therefore, go to the disk where Open Server was unpacked (I have it C:\OpenServer\) and you will see two executable files for running Open Server: for 32 (Open Server x86.exe) and 64 (Open Server x64.exe) bit Windows systems. according to your operating system Windows, you can display one of the shortcuts on the desktop so that you always have quick access to start Open Server.

On first launch, you will be prompted to select a language.

Also, when you first start Open Server, you will be prompted to install patches for Microsoft Visual C ++. We press "Ok".

We are waiting for the installation of the necessary libraries to finish.
And the last thing we have to do is restart the computer for all the changes to take effect. Click "Ok".
As soon as the computer restarts, you can start working with the local server.
Starting and Verifying Open Server
Start Open Server and you will see that a red flag icon has appeared in the tray. This means that the program is activated, but the server itself has not yet started.

To start the server, click on the icon with any mouse button and in the opened context menu select the item - "Start". As soon as the local server starts, the checkbox will turn green.

Now Open Server is up and running.
To check if it works, go to your browser and type in the address bar: http://localhost/. If you see the message: "Welcome to Open Server!", then you did everything right and the local server is ready to go.

On this Open installation Server is over! Congratulations, you have successfully completed your task :)
In one of the following tutorials, I will talk about setting up Open Server, so don't miss it.
Greetings, friends! 🙂
Today we have on the agenda again the WAMP assembly of OpenServer and MySQL, which is included in its kit, beloved by many (including me).
With this software, as well as its features, I first introduced the readers of this blog in one of my first articles on .
The idea of creating today's article came to me while writing publications about working with MySQL in the console, when working with which OpenServer has its own subtleties.
In addition, in practice, situations often arise when you need to change the MySQL server settings and debug operations with the database using logs. In such cases, when working with OpenServer, novice users usually have a lot of questions (as I had in my time).
Therefore, today you will be waiting for answers to them 🙂
And also I will briefly go through the tools for working with the MySQL database in OpenServer, which provide a convenient GUI for manipulating data, and by the way, I will touch on working with MySQL in the OpenServer console.
In a word, today you will find an overview of the full cycle of working with MySQL when using OpenServer.
Let's go 🙂
Selecting MySQL version in OpenServer
A feature of OpenServer is that it includes not only many different server components, but also various versions of them.
This, I must say, is very convenient, because. in some cases, you need to use outdated software for local deployment of legacy projects (very, very old) that need to be supported.
And at the same time, to start new projects, you will need to use everything fresh 🙂
That's when switching MySQL versions will come in handy, so that we can work with different projects when using one OpenServer distribution, and not install it for each separate one.
So, to select the required version of MySQL in OpenServer, after starting the program, click on the tray icon and select the main menu item Settings:

After that, the following window will appear on the screen, in which you will need to go to the tab Modules:

And here, in the drop-down list with the values of the MySQL / MariaDB field, select the required version of MySQL or MariaDB, which, as you know, is a fork (from the English fork - a branch) of MySQL, working with which is no different from its parent.
Even the tools are the same :)
After selecting the version, a window will appear on the screen about restarting OpenServer, which is necessary for the changes to take effect.
We restart and you can work with the new version.
AT this menu, in addition to choosing the required version of MySQL, you can, by the way, completely disable the use of this DBMS when working with OpenServer. How it is done, for example, with PostreSQL in OpenServer by default.
An important point when using multiple versions of MySQL and other server components that are part of OpenServer at the same time is the need to configure each version separately.
This is because for each version of MySQL there are individual files configurations and logs, which will be demonstrated next.
Also, a database created using MySQL 5.7, for example, will not be available when working with MySQL 5.5.
Therefore, I ask you to take this fact into account and not be surprised at the reset of your settings and the loss of the database. However, don't worry, your data hasn't disappeared without a trace.
If you select as the current version of MySQL the one that you carefully configured and for which you created your databases, everything will return back 🙂
MySQL logging settings in OpenServer
Quite often, when searching for various bugs, and just to track operations with the database, you need access to the MySQL server log files.
There are two ways to view the MySQL logs running as part of OpenServer: through the OpenServer interface and by opening log files stored on the hard drive.
For the first method, you need to open the familiar OpenServer management menu by clicking any mouse button on the OpenServer tray icon and select the item View logs, then the following dialog box will appear on the screen:

By default, OpenServer only logs errors and events on the MySQL server itself, as you can see in the screenshot above.
However, what to do if you need a list SQL queries to databases located on the server?
Fortunately, OpenServer provides the possibility of advanced logging, upon activation of which queries to the database will be written to a separate log.
To enable logging of requests to the MySQL server in OpenServer, you need to perform the steps familiar to us today: OpenServer Control Menu -> Settings -> Modules.
And next to the drop-down list with the values of the MySQL / MariaDB field, check the box keep a request log:


On my own behalf, I want to add that the decision of the developers to separate logging MySQL Data way very wise and convenient.
Firstly, it allows you to unload the server from writing logs that are unnecessary in most cases (therefore, in fact, request logs are not written by default). And, secondly, writing logs to separate files allows you to sort the information stored in them according to their purpose.
I showed you how to view MySQL logs through the OpenServer interface. However, personally, from time to time I come across in practice such cases when the log is very large, and it is necessary to find a specific entry in it.
Then the OpenServer log viewer becomes useless, because it does not provide any search tools, and you need to look through all the records in searches - the occupation is very long and unpromising.
Therefore, in this case, I prefer to open the log files with a regular text editor and perform all the necessary operations there.
OpenServer log files, including MySQL, are located in the directory openserver_install_dir/userdata/logs which in my case looks like this:

In the screenshot, I marked the log files of my current version of MySQL: the state of the server and requests to it. All other logs maintained by OpenServer are also available here.
As you can see, log files are written separately for each version of MySQL and other server components used, as I discussed in the previous section on changing the current version of MySQL.
Setting up MySQL in OpenServer
We talked about choosing the required MySQL version for working and logging in OpenServer. Another point that is quite common in practice is the need to configure MySQL in OpenServer for correct operation and the functions it performs on certain projects.
MySQL customization consists of adding/removing and modifying existing configuration options contained in special files- configs.
To get access to MySQL configs, just launch the familiar OpenServer management menu, select the item Additionally and select from the dropdown list Configuration.
After that, another menu will appear, which will contain shortcuts to access the configuration files of the current OpenServer modules selected on the tab Setting where we changed MySQL version:

Selecting the MySQL config shortcut will open the corresponding file in text editor installed on your PC as the main one.
If you need access to the MySQL configuration file itself, you can find it in the directory install_directory_openserver/userdata/config, in which the configs of all OpenServer modules are located, moreover, for each version of the component, the config is separate.
When working with configs of server components, it should be borne in mind that in order to shorten their text and make it easier to use, special OpenServer variables are found in their text, with complete list and the values of which you can find here - https://ospanel.io/docs/#rabota-s-path
And also keep in mind that after any changes in the files MySQL settings in OpenServer, you will need to restart the server after saving the file for them to take effect.
Tools for working with MySQL in OpenServer
We talked about the choice of MySQL versions in OpenServer and their configuration. Now is the time to move on to working with databases, users, and other objects created on the MySQL server.
And for this, OpenServer has a whole set of tools with a graphical interface. Therefore, if you are not a hard coder, but nevertheless need to create a MySQL database in OpenServer or change the user password, then using graphic editors- this is the easiest and easiest way to do what you have planned.
Well, nobody canceled the OpenServer console to work with command line MySQL.
The visual tools are represented by various utilities that can be accessed from the OpenServer menu by selecting the Additional:

In the screenshot above, I highlighted the utilities for working with MySQL, which are included in OpenServer by default.
The first two are exclusively for use with MySQL databases data, and the latter is universal (through it you can work in various DBMS).
Therefore, when you disable the use of the MySQL module in OpenServer, phpMyAdmin and MySQL Manager will disappear from this list altogether, and the SQLite Manager will remain, but it will be impossible to work with the MySQL server through it.
Let's take a brief look at each tool and the features of working with it in OpenServer.
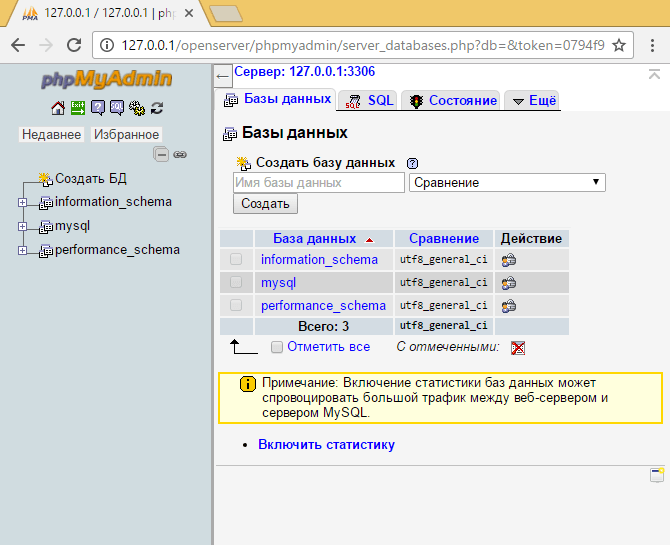
phpMyAdmin
A well-known utility written in PHP language for administering exclusively MySQL servers, which is preferred by both beginners and professionals. Provides a visual interface for working with MySQL server, through which it is very easy to manage databases, users and their rights.
After starting from the OpenServer menu, phpMyAdmin will start either in open window your browser or in a separate window.
To be honest, I find it difficult to answer what it depends on. On one PC, phpMyAdmin from the OpenServer kit runs in an open window, and on the other, in a separate one.
After a successful launch, phpMyAdmin will look like this:

This is the start screen where you need to enter your MySQL username and password to connect to the server. By default (if someone is not in the know) admin account root/blank_password.
Enter, enter, work 🙂
I will not give a complete list of phpMyAdmin features now, because. for this there are specialized publications and video tutorials, which are already full on the Internet. If you are completely new, you can use the following video as a starting point:
Regarding the peculiarities of working with phpMyAdmin in OpenServer, I can note the possible occurrence of the following error, which I encountered when switching MySQL versions:
SQL query error: SET lc_messages = "ru_RU"; MySQL response: #1193 - Unknown system variable "lc_messages"
The reason for its occurrence was the choice of MySQL version 5.1, in which, as it turned out after studying articles on the Internet, there is no system variable lc_messages, which phpMyAdmin is trying to install.
It appeared in MySQL 5.5, upon installation of which, in theory, the problem should have disappeared ... However, nothing of the kind, to my great surprise, did not happen 🙂
After changing the MySQL version and restarting the server, the error continued to irritate with its presence.
The reason turned out to be in the banal browser cache, when cleared, phpMyAdmin started working normally.
phpMyAdmin is a handy thing for working with a local MySQL server.
However, sometimes there are situations when you need to connect to different MySQL servers, it is either difficult or impossible to install specialized software (for example, in companies with high requirements for network and information security).
Fortunately, for such cases, the OpenServer package has other tools for working with various MySQL servers.
MySQL manager
When selecting the menu item OpenServer MySQL manager the HeidiSQL program is launched, with a detailed description of which you can see here - https://www.heidisql.com/
I don’t know why it was renamed, apparently, for a simplified understanding of users what awaits them after launch 🙂
I myself actively use this utility at my main job, so as not to install various additional software. You can run it from the same OpenServer menu item as phpMyAdmin.
Running HeidiSQL is slightly different from phpMyAdmin in that it is a desktop program and not a web application, so it will always open in a separate window.
After starting, you will see a form for connecting to the MySQL server on the screen, which looks like this:

To demonstrate the possibilities, I made a test connection to a local MySQL server, after selecting which this window will open:

It is already, in fact, an admin panel for working with the MySQL server, in which you can manage databases, their tables, indexes, triggers and other entities.
For example, in the screenshot above, I created a test database and opened the menu for managing it, where I chose to create a table.
In principle, it is quite convenient. Many people may like it even more than the usual phpMyAdmin - this is already a matter of taste 🙂
But personally, I use MySQL manager OpenServer only for remote connections. With a local server, I still prefer the first option.
SQLite manager
Another graphical client for working with MySQL in OpenServer. Under this name, as in the previous case, there is a utility with a completely different name - Adminer, a detailed description of which can be found here - https://www.adminer.org.
Perhaps, to the old-timers of the Internet, this utility will be familiar by the name phpMinAdmin 🙂
The creators of OpenServer decided to rename it to the SQLite manager, most likely from the considerations that this utility is the only one from the entire OpenServer suite that allows you to work with the SQLite DBMS, which is still in some demand in narrow circles.
The launch of this utility is very similar to phpMyAdmin and just as unpredictable: it can open either in an open browser window or be in a separate one.
On the screen, you will first see a connection form that looks like this:

This form immediately shows the great advantage of Adminer over phpMyAdmin, because It allows you to connect not only to local server MySQL, but also to remote ones, and it also supports work not only with MySQL, but also with other DBMS, including:
- PostgreSQL
- SQLite
- MS SQL
- Oracle
- firebird
- SimpleDB
- elasticsearch
- MongoDB
The list is very solid, I must say 🙂 In addition to these advantages, this program also has the ability to easily and easily change skins that are decorated with ordinary CSS files, therefore, anyone who has at least a little knowledge of this language can edit them.
This is what the MySQL server control panel looks like in Adminer after connecting to it using the default skin:
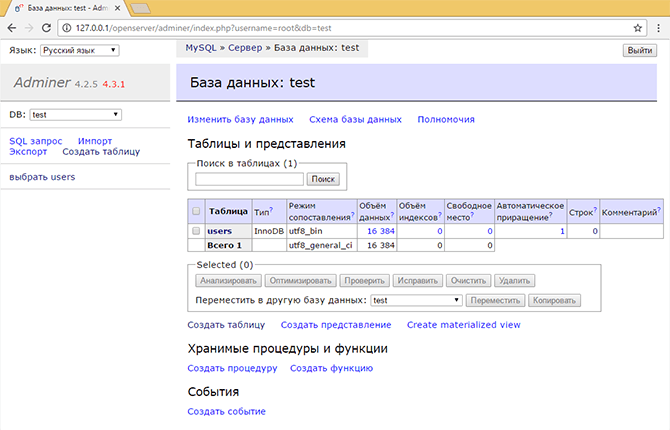
Yes, I agree, it looks rustic, but it also works faster than phpMyAdmin, with which the creators of the ex-phpMinAdmin are very fond of comparing their work. But again, this is at the default settings.
As I already said, all this is solved by changing skins.
Working with MySQL in the OpenServer Console
We have reviewed the tools that provide a graphical interface for working with MySQL, and which are included in the OpenServer package.
However, there are times when their use is not entirely convenient.


