Centos 7 on vds with kvm virtualization. Installing a KVM virtualization system on CentOS
Server preparation
Check for processor support:
cat /proc/cpuinfo | egrep "(vmx|svm)"
If the command does not return anything, the server does not support virtualization or it is disabled in the BIOS settings. You can put KVM itself on such a server, but when you try to enter the hypervisor control command, we will get the error "WARNING KVM acceleration not available, using "qemu"". In this case, you need to restart the server, enter the BIOS, find support for virtualization technology (Intel VT or AMD-V) and enable it.
Let's create directories in which we will store everything related to virtualization (the ones offered by default are not convenient):
mkdir -p /kvm/(images,iso)
* directory /kvm/images for virtual disks; /kvm/iso- for iso images.
Installation and launch
Installation is performed from the repository with the following command:
yum install qemu-kvm libvirt virt-install
* where qemu-kvm- the hypervisor itself; libvirt— virtualization management library; virt-install- management utility virtual machines.
Allow autostart:
systemctl enable libvirtd
Start KVM:
systemctl start libvirtd
Network configuration
In this manual, we will consider the use of a network bridge.
When configuring a network bridge over a remote connection, carefully check the entered data. In case of an error, the connection will be terminated.
Install the package to work with the bridge:
yum install bridge-utils
We look at the list of network interfaces and their settings:
My example had the following data:
1:lo:
link/loopback 00:00:00:00:00:00 brd 00:00:00:00:00:00
inet 127.0.0.1/8 scope host lo
inet6::1/128 scope host
valid_lft forever preferred_lft forever
2:enp4s0f0:
inet 192.168.1.24/24 brd 192.168.1.255 scope global enp4s0f0
valid_lft forever preferred_lft forever
valid_lft forever preferred_lft forever
3:enp5s5:
4:virbr0:
valid_lft forever preferred_lft forever
5: virbr0-nic:
link/ether 52:54:00:cd:86:98 brd ff:ff:ff:ff:ff:ff
* of which are important to us enp4s0f0- real network interface with configured IP address 192.168.1.24 , through which the server is connected to the local network (we will make a bridge out of it); 00:16:76:04:26:c6- mac-address of the real ethernet adapter; virbr0- virtual network adapter.
Editing the real adapter settings:
vi /etc/sysconfig/network-scripts/ifcfg-enp4s0f0
Let's bring it to mind:
ONBOOT=yes
BRIDGE=br0
TYPE=Ethernet
DEVICE=enp4s0f0
BOOTPROTO=none
Create an interface for the network bridge:
vi /etc/sysconfig/network-scripts/ifcfg-br0
DEVICE=br0
TYPE=Bridge
ONBOOT=yes
BOOTPROTO=static
IPADDR=192.168.1.24
NETMASK=255.255.255.0
GATEWAY=192.168.1.1
DNS1=8.8.8.8
DNS2=77.88.8.8
Restart the network service:
systemctl restart network
Network settings should change - in my case:
2:enp4s0f0:
link/ether 00:16:76:04:26:c6 brd ff:ff:ff:ff:ff:ff
3:enp5s5:
link/ether 00:16:76:04:26:c7 brd ff:ff:ff:ff:ff:ff
4:virbr0:
link/ether 52:54:00:cd:86:98 brd ff:ff:ff:ff:ff:ff
inet 192.168.122.1/24 brd 192.168.122.255 scope global virbr0
valid_lft forever preferred_lft forever
5: virbr0-nic:
link/ether 52:54:00:cd:86:98 brd ff:ff:ff:ff:ff:ff
6:br0:
link/ether 00:16:76:04:26:c6 brd ff:ff:ff:ff:ff:ff
inet 192.168.1.24/24 brd 192.168.1.255 scope global br0
valid_lft forever preferred_lft forever
inet6 fe80::216:76ff:fe04:26c6/64 scope link
valid_lft forever preferred_lft forever
We insist on redirecting network traffic:
vi /etc/sysctl.d/99-sysctl.conf
net.ipv4.ip_forward=1
Apply settings:
sysctl -p /etc/sysctl.d/99-sysctl.conf
Restart libvirtd:
systemctl restart libvirtd
Create a virtual machine
We are watching available options guest operating systems:
To create the first virtual machine, enter the following command:
virt-install -n FirstTest \
--noautoconsole \
--network=bridge:br0 \
--ram 1024 --arch=x86_64 \
--vcpus=1 --cpu host --check-cpu \
--disk path=/kvm/images/FirstTest-disk1.img,size=16 \
--cdrom /kvm/iso/CentOS-7-x86_64-Minimal-1611.iso \
--graphics vnc,listen=0.0.0.0,password=my_password \
--os-type linux --os-variant=rhel7 --boot cdrom,hd,menu=on
- firsttest- name of the created machine;
- noautoconsole- after creation, it is not automatically connected to the console of the virtual machine;
- network- network type (in our example, a network bridge);
- ram- the amount of RAM to be allocated;
- vcpus- number of virtual processors;
- disk- virtual disk: path - path to the disk; size - its volume;
- cdrom- virtual drive with the image of the system;
- graphics- connection settings to the virtual machine using the graphical console (in this example use vnc); listen - on which address it receives vnc requests (in our example, for all); password - password for connecting using vnc;
- os-variant- guest operating system (we received the entire list with the command osinfo-query os, in this example we install Re in Hat 7 / CentOS 7).
We allow autostart for the created VM:
virsh autostart FirstTest
Connecting to a virtual machine
For further installation of the operating system, download the VNC client on the administrator's computer, for example, TightVNC and install it.
On the server, we look at which port the VNC of the created machine is listening on:
virsh vncdisplay FirstTest
in my case it was:
This means that you need to add 0 to 5900. If the result of the command is: 1 - 5900 + 1 = 5901 and so on.
Open the port on the firewall:
firewall-cmd --permanent --add-port=5900-5905/tcp
firewall-cmd --reload
* in this example, 6 tcp ports from 5900 before 5905 .
We launch the installed TightVNC Viewer, in the window that opens, enter the IP address of the KVM server and the port on which our VM is listening (in this example, 5900):
Click Connect. The program will ask for a password - enter the one that was specified when creating the VM (in this example, my_password). We will connect to the virtual machine as if it had a monitor or remote KVM console connected to it.
Admin and the password that was created when running the command engine setup. After a successful login, you can manage virtual machines through the web interface.
Solaris, Haiku, REACTOS and much more.
KVM can be managed using a command line or available graphical tools. Virt-Manager (Virtual Machine Manager) is the most widely used application for managing KVM based virtual machines. It supports creating, editing, starting, and stopping KVM-based virtual machines, as well as the live or cold migration of guest machines between hosts.
Prerequisites
Install KVM on CentOS 7
Issue the following command to install latest qemu package and also virt-manager which provides a graphical interface to manage virtual machines.
Yum install -y qemu-kvm qemu-img virt-manager libvirt libvirt-python libvirt-client virt-install virt-viewer
- qemu-kvm= QEMU emulator
- qemu-img= QEMU disk image manager
- virt-install= Command line tool to create virtual machines.
- libvirt= Provides libvirtd daemon that manages virtual machines and controls hypervisor.
- libvirt-client= provides client-side API for accessing servers and also provides the virsh utility which provides command line tool to manage virtual machines.
- virt-viewer– Graphical console
Create Virtual Machine
Once you have installed KVM and other tools, it is all set to start creating virtual machines. We will look to be looking at creating virtual machines both in command-line and graphical mode.
Command Line Mode
virt-install is used to create virtual machines using the command line mode, and this command needs multiple inputs from us to create a virtual machine such as CPU, Memory, disk, network, installation media location, OS variant and more.
Virt-install --name=itzgeekguest --ram=1024 --vcpus=1 --cdrom=/tmp/CentOS-6.5-x86_64-minimal.iso --os-type=linux --os-variant=rhel6 -- network bridge=br0 --graphics=spice --disk path=/var/lib/libvirt/images/itzgeekguest.dsk,size=4
Note: The above command uses bridged networking “br0” for allowing virtual machines to communicate with outside network, you can find a tutorial on creating bridged networking with Virt Manager.
-name– Name of the Virtual machine
-ram– Memory size in MB
–vcpus– Virtual CPU's in numbers
-cdrom– Location of the ISO image
--os-type– OS types like Linux, Windows, etc.
--os-variant– OS variant like RHEL 6, Solaris
–network– networking
–graphics– Guest display settings
--disk path– Location of the disk with size of 4 GB
Once you've issued the above command, virt-install will create a virtual machine and starts virt viewer console for OS installation.
 Install KVM (QEMU) on CentOS 7 – Guest Installation command Line Virt Viewer
 Graphic Mode
Type the following command in the terminal in GUI mode.
virt-manager
Application>> System Tools>> Virtual Machine Manager.
You may be asked to enter a password if you don't have root access.
Once it is opened, right-click on localhost(QEMU) and Click on New. Virtual Machine Manager will start a new wizard for creating a virtual machine. You will find no difficulty in using this graphical mode.
Step 1: You would require naming your virtual machine, in the same window, you would be asked to choose how would you like to install the operating system. Here I chose to install it from ISO image or CD-ROM.
 Install KVM (QEMU) on CentOS 7 - Virt Manager - Create VM
 Step 2: Enter the location of ISO image as the physical CD-ROM pass through is not supported by the hypervisor, do not forget to choose operating system type and version.
 Install KVM (QEMU) on CentOS 7 – Virt Manager – Installation Media
 Step 3: Configure CPU and memory for the virtual machine.
 Install KVM (QEMU) on CentOS 7 – Virt Manager – Memory and CPU
 Step 4: You have to mention the amount of storage that you want to assign to a virtual machine, Uncheck on “ Allocate entire disk now“, this will prevent from allocating full disk at the VM creation.
Disk size will be allocated dynamically depending on the virtual machine usage.
 Install KVM (QEMU) on CentOS 7 – Virt Manager – Allocating Storage
 step 5: Summary of all the settings, click on advanced settings to select bridged networking to allow the virtual machine to communicate outside the network.
Click on Finish.
 Install KVM (QEMU) on CentOS 7 – Virt Manager – Summary
 Step 6: KVM will start to create a virtual machine depends on our input, once VM is created. Virt manager will start a console for OS installation.
The following screen shows the installation screen of .
 Install KVM (QEMU) on CentOS 7 – Virt Manager – VM Console
 Manage Virtual Machine
With the Virtual Machine Manager, you can perform VM's life cycle actions such as start, power off, reset, clone and migration by right-clicking on the selected virtual machine.
 Install KVM (QEMU) on CentOS 7 – Virt Manager
 Managing a virtual machine using virt manager is very simple, you can just click on the “bulb” icon in the VM console. Here you can add, modify and remove devices.
 Install KVM (QEMU) on CentOS 7 – Virt Manager – Managing VM
 In continuation of the games with the organization of virtual Windows on a dedicated server, I decided to try the taste of KVM, because until that moment, VMware and VirtualBox products were always enough for my eyes. And then on one of the forums I read an angry tirade of some comrade about the fact that only idiots put VirtualBox where you can put KVM.
Well, I decided to take a look. I must say that in my understanding, VIrtualBox is a little more dreary than KVM, but it is easier to manage and there are no hemorrhoids with grid settings, although it may be inferior in functionality. What can not be said about ESXi. But first things first.
I set it as standard on CentOS 6.7, including the gestures we start with updating the system:
# yum -y update
We look to see if hardware virtualization is supported by the processor, because KVM requires support for Intel VT or AMD-V to work
# egrep -i "vmx|svm" --color=always /proc/cpuinfo
the output should contain either vmx or svm
Check SELinux Access Control Status
# sestatus
SELinux status: enabled
SELinuxfs mount: /selinux
Current mode: enforcing
Mode from config file: enforcing
policy version: 24
Policy from config file: targeted
theoretically, it can interfere with access to disks, so it must either be correctly configured to work with the images folder, or cut off, which is naturally easier for me - in the /etc/selinux/config file, change the value of the SELINUX parameter to disabled and reboot the machine
SELINUX=disabled
Importing GPG Keys for Packages
# rpm --import /etc/pki/rpm-gpg/RPM-GPG-KEY*
We put all the stuffing: kvm itself, the libvirt virtual machine management API, virtinst for creating virtual machines and the qemu-kvm hypervisor
# yum -y install kvm libvirt python-virtinst qemu-kvm
We start libvirt and prescribe the autoload module
# /etc/init.d/libvirtd start
# chkconfig libvirtd on
Check how KVM installed and started (there should be 0 errors in the output)
# virsh -c qemu:///system list
Id Name State
—————————————————-
We install a network bridge to connect guest machines to an external grid and a terrible, terrible entornet
# yum install bridge-utils
Create a network bridge config similar to the network interface settings, but with a slight difference:
# cp /etc/sysconfig/network-scripts/ifcfg-eth0 /etc/sysconfig/network-scripts/ifcfg-br0
###### /etc/sysconfig/network-scripts/ifcfg-br0
DEVICE=br0
TYPE=bridge
ONBOOT=yes
BOOTPROTO=none
NM_CONTROLLED=yes
IPADDR=SERVER_IP
PREFIX=24
GATEWAY=GW_IP
DNS1=8.8.8.8
DEFROUTE=yes
IPV4_FAILURE_FATAL=yes
IPV6INIT=no
NAME="System br0"
##################
then we edit the settings of the main interface, commenting on the BOOTPROTO, IPADDR, PREFIX, GATEWAY, DNS1 parameters and setting the network bridge
###### /etc/sysconfig/network-scripts/ifcfg-eth0
DEVICE=eth0
TYPE=Ethernet
ONBOOT=yes
#BOOTPROTO=none
HWADDR=01:2e:32:ab:9f:1e
#IPADDR=SERVER_IP
#PREFIX=24
#GATEWAY=GW_IP
#DNS1=8.8.8.8
DEFROUTE=yes
IPV4_FAILURE_FATAL=yes
IPV6INIT=no
NAME="System eth0"
BRIDGE=br0
##################
Now we restart the grid and see what happened - we should show 4 interfaces:
br0 with main IP
eth0 no IP
lo 127.0.0.1
virbr0 with virtual router's internal IP
check the status of our network bridge:
# brctl show
bridge name bridge id STP enabled interfaces
br0 8000.002215ab999d no eth0
virbr0 8000.52540052c0e1 yes virbr0-nic
theoretically, you can speed up the network bridge by adding the following parameters to the /etc/sysctl.conf file:
net.bridge.bridge-nf-call-ip6tables=0
net.bridge.bridge-nf-call-iptables=0
net.bridge.bridge-nf-call-arptables=0
Now let's move on to creating a directory for storing virtual machine images and iso dist images.
# mkdir /usr/vm/iso
# mkdir /usr/vm/vm-images
by default, all machine images, disk images, etc. are stored in /var/lib/libvirt/ but I decided to show off and cut the disk in the best old-school partitioning traditions, so take this into account when installing the server, or you will have to delete the original storages and link as me, on /usr
# rm -Rf /var/lib/libvirt/images
# ln -s usr/vm/iso /var/lib/libvirt/images
After all this preparation, we are trying to create a virtual machine under Windows 7 with 2 virtual processors, 4Gb RAM, 30Gb HDD, storing the image in the /usr/vm/vm-images folder and the windows7.iso image that we downloaded earlier to the /usr/vm folder /iso
# virt-install --connect=qemu:///system -n win7 -r 4096 --vcpus=2 --disk path=/usr/vm/vm-images/win7.img,size=30 -c /usr /vm/iso/windows7.iso --vnc --noautoconsole --os-type windows --os-variant win7 --accelerate --network=bridge:br0 --hvm
If everything is fine, then we will see the process of creating a disk. On this solemn note, you can proceed to setting up the machine, and here lies the real ambush, because if you work from under Windows, then from the options there is either control via ming through putty-ssh, but this requires X Windows on the server side, or a completely incomprehensible virtual viewer tool, which I could not get to work. Therefore, all I could find was either this external service that allows you to hook up your KVM to their admin panel; or install your own web admin panel based on Webmin Cloudmin GPL.
It should be noted here that the grid initialization line –network=bridge:br0 will allow you to use a public IP on a virtual machine, while if you want to sit in a virtual local area and exit it to the Internet, then you need to put another statement –network=bridge:virbr0 what I missed during installation, including then I had to change it manually in the virtual machine settings file /etc/libvirt/qemu/win7.xml.
Machine control in the CLI is carried out through virsh (virtual shell) which we get from command line shell:
# virsh --connect qemu:///system
Welcome to virsh, the virtualization interactive terminal.
Type: 'help' for help with commands
‘quit’ to quit
virsh#list -all
Id Name State
—————————————————-
2 win7 running
virsh #shutdown win7
Domain win7 is being shutdown
virsh #start win7
Domain win7 started
KVM is a virtualization infrastructure for Linux for which a processor with a virtualization hardware extension can host guest systems.
KVM is a convenient solution for testing various operating systems if you do not have the opportunity to purchase expensive and energy-intensive physical devices.
The guide below introduces the installation and configuration of KVM (QEMU) along with Linux configuration Bridge on CentOS7 / RedHat7 operating system.
1. Check CPU hardware virtualization support
Our processor must support hardware virtualization (VT-x) to become a Hypervisor KVM and host virtual machines (guest Operating Systems):
# lscpu Architecture: x86_64 CPU op-mode(s): 32-bit, 64-bit Byte Order: Little Endian CPU(s): 4 On-line CPU(s) list: 0-3 Thread(s) per core: 2 Core(s) per socket: 2 Socket(s): 1 NUMA node(s): 1 Vendor ID: GenuineIntel CPU family: 6 Model: 42 Model name: Intel(R) Core(TM) i5-2520M CPU @ 2.50 GHz Stepping: 7 CPU MHz: 800.000 BogoMIPS: 4988.58 Virtualization: VT-x L1d cache: 32K L1i cache: 32K L2 cache: 256K L3 cache: 3072K NUMA node0 CPU(s): 0-3
2. Disable and stop NetworkManager
NetworkManager is known to cause problems when working with Linux Bridge, so it's best for us to disable it:
# systemctl stop NetworkManager # systemctl disable NetworkManager Removed symlink /etc/systemd/system/multi-user.target.wants/NetworkManager.service. Removed symlink /etc/systemd/system/dbus-org.freedesktop.NetworkManager.service. Removed symlink /etc/systemd/system/dbus-org.freedesktop.nm-dispatcher.service.
3. Install KVM related packages
# yum install qemu-kvm qemu-img libvirt libvirt-python libvirt-client virt-install virt-viewer virt-manager4. Start and enable the libvirtd daemon
# systemctl enable libvirtd # systemctl start libvirtd5. Set system-wide privileges for KVM
We need to add our regular user tuxfixer to the kvm group so it can run virt-manager
# usermod -a -G kvm tuxfixer
We also need to install polkit (policy kit) rules for KVM.
Editing the 49-polkit-pkla-compat.rules file:
# vim /etc/polkit-1/rules.d/49-polkit-pkla-compat.rules
and add the following:
Polkit.addRule(function(action, subject) ( if (action.id == "org.libvirt.unix.manage" && subject.isInGroup("kvm")) ( return polkit.Result.YES; ) ));
6. Create a KVM Linux Bridge (KVM hypervisor modem network interface with VM network interfaces)
In this tutorial, we want the VMs to get their IP addresses from the same network where the KVM Hypervisor host is connected, so we will connect its main network interface (em1) to the VM's network interfaces.
To do this, we need to create a Linux Bridge from the em1 interface on the KVM Hypervisor host.
Current Hypervisor network configuration (immediately after installing KVM):
# ip a 1: lo: mtu 65536 qdisc noqueue state UNKNOWN link/loopback 00:00:00:00:00:00 brd 00:00:00:00:00:00 inet 127.0.0.1/8 scope host lo valid_lft forever preferred_lft forever inet6::1/128 scope host valid_lft forever preferred_lft forever 2: em1: mtu 1500 qdisc pfifo_fast state UP qlen 1000 link/ether d0:67:e5:33:15:3f brd ff:ff:ff:ff:ff :ff inet 192.168.2.3/24 brd 192.168.2.255 scope global dynamic em1 valid_lft 73193sec preferred_lft 73193sec inet6 fe80::d267:e5ff:fe33:153f/64 scope link valid_lft forever preferred_lft forever 3: wlp3s0: mtu 1500 DN qdiscop state 1000 link/ether 00:24:d7:f4:dc:e8 brd ff:ff:ff:ff:ff:ff 4: virbr0: mtu 1500 qdisc noqueue state DOWN link/ether 52:54:00:b7:22: b3 brd ff:ff:ff:ff:ff inet 192.168.122.1/24 brd 192.168.122.255 scope global virbr0 valid_lft forever preferred_lft forever 5: virbr0-nic: mtu 1500 qdisc pfifo_fast master virbr0 state DOWN qlen 500 link/ether 52 :54:00:b7:22:b3 brd ff:ff:ff:ff:ff:ff
ifcfg-em1 configuration file (before creating the KVM Linux Bridge):
# cat /etc/sysconfig/network-scripts/ifcfg-em1 DEVICE="em1" TYPE="Ethernet" BOOTPROTO="none" NAME="em1" ONBOOT="yes" HWADDR="D0:67:E5:33: 15:3F" IPADDR=192.168.2.3 PREFIX=24 GATEWAY=192.168.2.1 PEERDNS="no" NM_CONTROLLED="no"
To configure the KVM network, we will use the virt-manager application, which is a user-friendly GUI for the KVM command line interface.
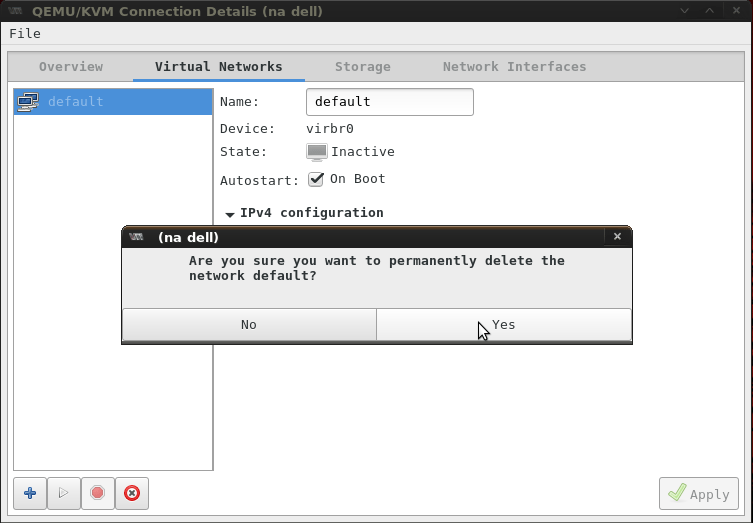
Note. The virbr0 interface was created automatically with the KVM installation and represents a virtual network that exists "inside" a KVM environment with NAT (network address translation).
Since we don't need NAT in the KVM environment (we want to hide the Hypervisor interface), we can remove the existing KVM virtual network based on the virbr0 interface.
Run virt-manager as root user:
# virt-manager
... the virt-manager window should appear:

Right click on QEMU/KVM -> Details -> Virtual Networks -> Disable network: “default” -> Delete network: “default” based on virbr0
Now we can connect the Hypervisor KVM (em1) interface:
Right click: QEMU/KVM -> Details -> Network Interfaces -> Add Interface:
- Interface type: Bridge
- Interface name: br-em1
- Start mode: on boot
- Activate now: enabled
- IP settings: copy configuration from 'em1'
- Bridge settings: STP on, delay 0.00 sec

… click Finish to override the existing configuration and create the KVM Linux Bridge.
We can now test the newly created Linux Bridge (br-em1):

Check the current IP configuration (the IP is now assigned to br-em1 and em1 is now only acting as an interface):
# ip a 1: lo: mtu 65536 qdisc noqueue state UNKNOWN link/loopback 00:00:00:00:00:00 brd 00:00:00:00:00:00 inet 127.0.0.1/8 scope host lo valid_lft forever preferred_lft forever inet6::1/128 scope host valid_lft forever preferred_lft forever 2: em1: mtu 1500 qdisc pfifo_fast master br-em1 state UP qlen 1000 link/ether d0:67:e5:33:15:3f brd ff:ff:ff :ff:ff:ff 3: wlp3s0: mtu 1500 qdisc noop state DOWN qlen 1000 link/ether 00:24:d7:f4:dc:e8 brd ff:ff:ff:ff:ff:ff 6: br-em1: mtu 1500 qdisc noqueue state UP link/ether d0:67:e5:33:15:3f brd ff:ff:ff:ff:ff:ff inet 192.168.2.3/24 brd 192.168.2.255 scope global br-em1 valid_lft forever preferred_lft forever inet6 fe80::d267:e5ff:fe33:153f/64 scope link valid_lft forever preferred_lft forever
Check your bridge setup:
# brctl show bridge name bridge id STP enabled interfaces br-em1 8000.d067e533153f yes em1
Now the KVM Linux bridge is configured, and we can continue installing the virtual machine.
A task: install CentOS 7 to the virtual machine Hyper-V second generation(Generation 2). First go to the official CentOS website and download the iso image desired version systems.
1. Create a virtual machine
Let's create a new virtual machine in Hyper-V. Let's give it a name, for example VM-CentOS.
In the next step, we indicate that it will be second generation virtual machine(Generation 2).


Then "Configure Networking" - select Connection - LAN.

Now "Connect Virtual Hard Disk" - select the creation of a new disk (Create a virtual hard disk) and set its size, name and location. For example, VM-CentOS.vhdx.

Next, "Installation Options" - select the installation of the system from the image (Install an OS from a bootable image file), which must be downloaded as an iso file from the official CentOS website, and point to it (Image file iso).

The virtual machine has been created.
Right-click to go to the machine settings (Settings). In the Hardware block, select Firmware and uncheck " enable secure boot ".
If this is not done, then the following error will appear on startup: " Boot failed. EFI SCSI Device. Failed Secure Boot Verification."

2. Installing CentOS 7 on the created virtual machine
Now we start the car (Start). The welcome window of the CentOS system installer will be displayed. If necessary, add the Russian language.

Now you can pre-configure.

Let's go to the "Keyboard" button. Here we can change the layout parameters, if necessary (for example English language lift up, change the layout keys, for example, to the combination "Ctrl + Shift").

By clicking the "Select programs" button, we go to the software selection, where you can specify which packages will be preinstalled in advance. These parameters are highly dependent on what you plan to use in the future. this system. If performance is important, then you can select "Minimal installation", and then "reinstall" all the necessary components.
When planning to use a CentOS machine for hosting sites, you can set the "Standard Web Server" option, add, for example, "PHP Support", "MariaDB Client" and others.
If you need a graphical interface, then you can select "GNOME Environment" or "KDE Plasma Workspaces", add " office suite" etc.


Now let's set the network parameters. Go to "Network and host name", set the host name and turn on the network using the top right radio button.

Now click "Start Installation".

While the installation is in the background, we will set the necessary passwords for access.
Press " root password and set the administrator account password.

Create a user if necessary.

Now we are waiting for the installation of CentOS 7.

Click "Finish Setup" and wait for the installation process to complete. After that, you will be prompted to reboot.

3. Checking the generation of the virtual machine
After the reboot, enter the previously created login-password.
Note for installers Linux system for the first time: the password is not displayed on the screen when you enter it.
Next, we check whether the created virtual machine is indeed a second generation machine (Generation 2). To do this, run on the hypervisor Windows PowerShell and run the following command (instead of "VM-CentOS" enter the name of your machine):
Get-vm VM-CentOS | fl name,generation

We make sure that Generation 2 is indicated. Installation is complete.
|
Monitoring IIS Web Server HTTP Requests with Fiddler |
Kooboo. Lesson 1: Introduction |


