How laptop cases are made. The coolest system block for PC (do it yourself)
Introduction
It all started with the fact that we needed to go to another city to record sound for the film, and the money ... well, you know. The only ADC of suitable quality that we were able to purchase at a reasonable cost was an external (USB) sound card. Creative sound BlasterSurround 5.1 . But she needed a computer. Of course, there was no laptop either. And drag with you desktop computer Well, I really didn't want to. I had to make my own laptop.
All that is at hand
To begin with, I dragged some kind of plastic case from the garbage heap, it seems from under a typewriter. It was decided to place the details of the computer in it. The main problem turned out to be a monitor. CRT fell away immediately - you had to carry everything on yourself. Then a 15 "TFT monitor without a case was purchased. Taking into account the "second-hand" it cost only $ 50. A hole was cut in the cover of the suitcase in the size of the screen. Around it, in the places where the monitor was attached to the case, holes were drilled for the screws. Through them, the monitor is inside However, since the suitcase had to travel on a train and it is still unknown where, we had to insert a suitable size plexiglass between the monitor and the lid.

A Micro motherboard was attached to the bottom of the case on stands. ATX with Atlon-XP processor at 1000 MHz and a Seagate hard drive Barracuda 20 GB (on photoj 3 in the lower left corner under CD -drive). The rest of the parts are simply inserted into the body. The power supply is located so that its fan blows over the hard drive, protecting it from overheating. The lid of the suitcase with the monitor in the working position is placed vertically and held in this position on one side by the weight of the monitor, and on the other side by diagonal braces.

The monitor is powered from the output socket of the power supply. It is signaled from VGA - connector on the mother. The button on a separate cord (in the foreground of photo 4) is designed to start the computer. CD - the drive in the working position is placed on the corner of the suitcase and connected together with the hard drive to one IDE channel, and in the stowed position detached and placed in the case. The mouse, keyboard and all laces, including the network one, also add up there. Now it is enough to close (neatly) the lid and we get a suitcase with which we can travel, no one will think that there is a computer.


And if you break it down...

Dmitry Weisburd
vaysburd (at) narod.ru
21/12.2008
Good afternoon, Khabrovites. Thank you very much for the invite! And although starting with the translation of other people's posts is not the best a good idea, perhaps this homemade project will seem mega-cool to someone else.
This is a translation of a post from the Overclock.net forum. Show4Pro user decided to take out all the insides of his super computer and hang everything on the wall. Great idea beautifully implemented. Who cares how it was going and how it works - wellcome under cat.
The last time I upgraded my home machine was 1.5 years ago. Well, I thought about upgrading the car to i7 (before that there was Bloomfield), although in fact, I didn’t need a more powerful processor. I wanted to buy a new case - Corsair 900D, to change the 8 year old Super Armor. But I wanted something special, unique. In Battlestations on Reddit, I came across a very simple yet elegant solution - a wall mount computer. And that's where the whole project started.
Accessories:
CPU: Intel Core i7 950
Motherboard: Asus Rampage III Extreme
Video cards: 2 x AMD HD7970
RAM: 6 x 2GB Corsair Dominator
SSD drives: 4 x 120GB Corsair Force GT SSD
HDD drives: 2 x 1TB WD Caviar Black
2TB WD Caviar Green
1.5TB WD Caviar Green
Power supply: Corsair AX1200i
Sound: creative sound blaster Zx
Cooling:
Cooling for CPU:
Water Cooled CPU Heatsink EK Supreme HF Full Copper
Pump Swiftech MCP655 /w Speed Control
Cooler FrozenQ Liquid Fusion V Series 400 ml Reservoir - Blood Red
XSPC RX360 Performance Triple 120mm Radiator
GPU cooling
Heatsink for video card EK FC7970 - Acetal+EN
The pump and cooler are the same as for the processor.
Swiftech MCP655 /w Speed Control
FrozenQ Liquid Fusion V Series 400 ml Reservoir - Blood Red
Watercool MO-RA3 9x120 LT Radiator
Other:
Branch pipes for the cooling system
Koolance QD4 Quick Discounnec No Spill Coupling
Bitspower G1/4 Silver Triple Rotary 90deg Compression Fittings
Monsoon Free Center Compression Fittings
Phobya Angled Clip 90° Tubing Guide
Phobya Terminal Strip Tubing Clip/Holder
Cooling tubes themselves (red) PrimoChill Advanced LRT Tubing Bloodshed Red
Refrigerant phosphorescent, blue EK UV Blue Non-Conductive Fluid
Cables:
Bitfenix Alchemy Premium Sleeved Extensions
Corsair Individually Sleeved Modular Cables
Creation.
First, I took photos of all the components in their real size and put it all together in Photoshop. So I was able to move them around working surface and decide what it will look like. Well, this is necessary for wiring the cooling pipes. Here are a couple of layouts:
I refused this, because of the empty space in the lower right corner. And the motherboard turned out to be on the left, although it should be in the very center and draw attention to the entire panel. 
There is also a lot of space on the right, although the power supply and motherboard are already closer to the center. In the final version, the cooling pipes stretch along the entire right edge, plus two thermometers appeared there.

I transfer the motherboard drawing to an acrylic sheet.

Since the video adapters will be far away from the motherboard, I ordered PCIe slot extensions for each of the cards on eBay. This is me testing how they work. True, then I had huge problems with the crossover of cards due to cheap unshielded wires. They were on top of each other and created serious interference. The system hung on loading BIOS. It was possible to launch it with only one card. In the end, I had to fork out for a very expensive cables with good protection. But more on that later.

The product has arrived!

Most of the water cooling comes from Performance-PC. They even gave me a T-shirt and two whole mouse pads!

Acrylic substrate for the motherboard.

All acrylic panels are cut at 45° to achieve a glowing edge effect.

The holes are drilled, the fasteners are installed.
TA-dah!!! It turns out that the mother of Rampage III Extreme is eATX format. And this is for the ATX form factor.
I made the correct eATX substrate later.

Time to gut my dusty old hull.


In the old computer, the disks are inserted into Vantec HDCS boxes, which make 3 HDD boxes out of 2 5.25" boxes.


Video cards.
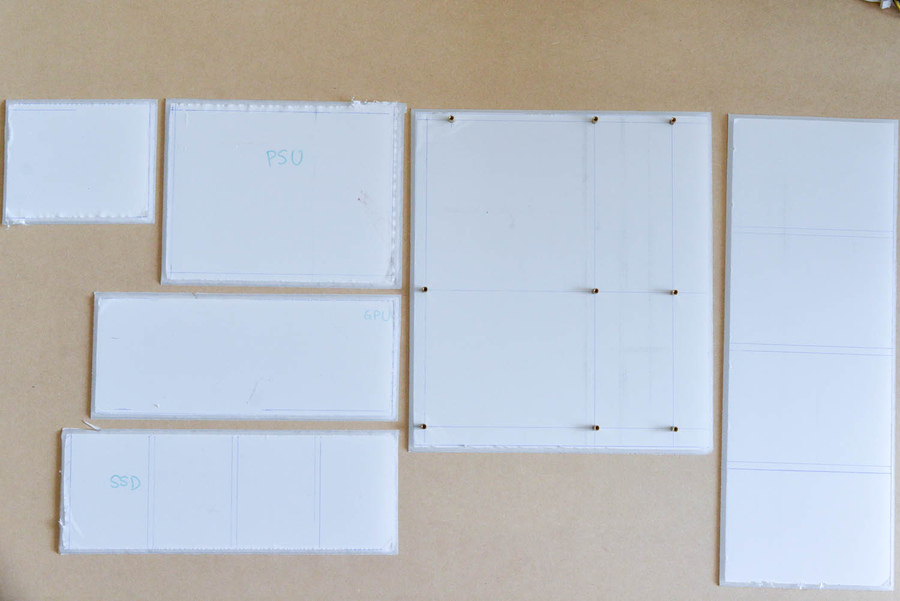
Substrates for all components.

Custom acrylic pump mounts.

Close-up of a rough finish made with a table saw. Later they will need to be sanded.

There is a triangular cut in the center of each plate. It will reflect light that is projected perpendicularly inside the plate at the edges. Without a cut, the edges barely glow.


Test with the light on on the sound panel.

All panels are sanded with 120 grit sandpaper.

Close-up of grinding.
All back panels are pre-drilled.

Under the table - acrylic snow.

Preparing to paint red.
Surprisingly, Corsair did put thermal pads on the petals, even though they don't get hot at all.

Marking all the components on the main board to mark the various slots and holes. Board - 1/4 "48 x 30 fiberboard.

All slots and holes are marked in their places.

I'm getting ready to cut the slots with a jigsaw.


I glue the frame.


I paint the inner edges black - the color of the carbon film.


Soldering LED strips.

Workplace.


LED strips. Temporary fastening.

I glue the giant vinyl film. This was the most brutal part. I almost got a heart attack. How to stick a film on a phone screen, only x1000 more.

No bubbles!


I use aluminum tape to hide the LED on the front of the panel for hard drives, between them.

My assistant is Tommy.

All substrates are installed in their places on the common board with screws No. 10. They were screwed into pre-prepared holes.


Light check.

The coolant and cables have arrived. I used Bitfenix for the components and Corsair for the power supply.


On the left is Bitfenix, on the right is Сorsair. Bitfenix doesn't have black heat shrink on the ends, so the Corsair looks cooler.

Red ties to tighten hanging wires.

Backside. All cables are connected.

We test for leaks while the entire system is on the floor - it's easier to fix problems.
First start.
Not loaded. I connected via iROG USB to my laptop to see the download log. It turned out that the system was stuck on the VGA BIOS. Disconnected one of the video cards - everything worked. Tried to connect another - also works. Both cards are not. Spent a little research and found that unshielded PCIe extenders with ribbon cables are very susceptible to EMI. I tried to shield them by wrapping them in several layers of aluminum foil. 

After 4 layers of foil, I was able to run both cards. But the car immediately hung as soon as it launched any game or some 3D editor. Not only that, my Soundblaster is also cascaded to a 3 x1 PCIe slot, and this also greatly interfered with the operation of the video cards and hung up the system.
As a result, with pain in my heart, I had to order expensive protected extenders for PCIe slots from 3M (about $100 each)

Shielded 3M extensions in place. They turned out to be longer than the previous ones and now both video cards have reached PCIe x16.


Changed the previous sound to SoundBlaster Zx. This one looks amazing!

And finally
On the this moment everything works smoothly. The unit has only 2 fans. On the PSU, it barely moves, and I put another one on the chipset - very quiet. The pump runs at the lowest power, so the computer came out pretty quiet. The only thing that irritates is that it turned out that the work of some components is heard outside the case. In my case, this is the buzzing of the video and 1TV hard drive.EK UV refrigerant is very sensitive to ultraviolet light. I know you shouldn't mix coolants to preserve their properties, but gosh, if I used it undiluted, I wouldn't be able to see the coils in the reservoir. For both circuits, I took about 1/8 of the can, the rest is distilled water.
From the translator
I do not pretend to at least some authorship of this incredible project. It's just that I'm a journalist, with an education in electronics, and doing such things is my dream. And to be honest, I would make a table, not a wall. So I decided, all of a sudden, not all Khabrovites are sitting onwe told you how to assemble a laptop yourself, using a ready-made laptop motherboard as a basis. In addition to the previous method, there is another one - non-standard. The method is to use components for a desktop PC "system unit". This option is more interesting than the previous one, as it allows you to get all the personalization options, all the power that is available to a regular PC.
The difficulty in implementing a homemade laptop, finding components at some stages is much lower than in the previous article.
Components can also be divided into primary and secondary "optional", according to their importance.
Main
Motherboard
The motherboard should have the smallest dimensions, as maximum compactness is required.
The most common form factor among PC motherboards is ATX (Advanced Technology eXtended), which measures 30.5 x 24.4 cm.
Since the main task is to obtain a small-sized device, this size will not work.
The most compact motherboards are Micro ATX (mATX) 24.4 x 24.4 cm and Mini ITX (Standard developed by VIA Technologies) 17 x 17 cm. , FM3, FM3+ will not be difficult, but with Mini ITX, those who decide to give preference to AMD with FM3, FM3+ will most likely have difficulties.
The choice of board size will depend on the size of the display diagonal, as it determines the size of the required case. We will consider the case a little later, but for now we continue.
The choice of model and manufacturer of the motherboard depends on the processor socket, the required functions, personal preferences, available funds.
For example, let's take one of the most affordable modern motherboards MSI H110M PRO-VH with Socket 1151 and support for DDR4 memory and HDMI video output, Micro ATX form factor.

Not the smallest size was chosen due to the difference in cost. Approximately the same MSI H110I PRO, with similar basic characteristics, costs more.
CPU

The choice of processor is based on the list of supported models on the official website of the manufacturer and the tasks. The manufacturer claims support for the following PC lines: Intel Core i3/i5/i7/Pentium/Celeron. Let's assume that the choice fell on core i5. Since the processor socket on the board is 1151, the processor must also have the same one. Therefore, we are looking at the Skylake line from Intel.
For example, Intel Core i5-6500, LGA 1151 was chosen.
CPU cooling

The cooler for the processor is also selected based on the socket. The main criterion for choosing will be the height, as many coolers will give the design too much thickness.
For this, the heat dissipation is 65 W, it is better if the cooler's characteristics declare a slightly higher value, so that there is a small margin.
The optimal height is 4cm or less, maybe even a complete one from intel or for example: GlacialTech Igloo i630 PWM, Titan DC-155A915Z/RPW, Cooler Master DP6-8E5SB-PL-GP, Thermaltake Slim X3 II, Thermaltake MeOrb II.
RAM

You will need the DDR4 DIMM standard, since this is what the selected motherboard supports. Memory sticks can be of any height, but it's better to use the Low profile "low profile", as the cooler can rest against the full-sized ones. The maximum supported volume in this case is up to 32GB.
For example, let's take one low-profile bar 8GB Crucial CT8G4VFS4213.
Perhaps it makes sense to use a closed, single-section CBO, but such a step will significantly add to the cost of the entire configuration, it will require more free space and not much inferior to standard air cooling.
Video

In this configuration, there are two options for the implementation of the video card.
The first
Since the selected processor has an integrated HD Graphics 530 1150MHz video core, it is possible to do without a connected video card. To do this, two main and one secondary conditions must be met: 1 the processor must have an integrated video core, 2 the motherboard must have an integrated video output and support the selected processor, 3 "optional" volume random access memory must be at least 2GB.
Video memory size will vary by kernel, bios settings, and amount of RAM. With the first option, it is possible to comfortably perform most everyday tasks and play undemanding games. The lack of power will manifest itself when working in professional application packages. For example, designed for video and photo processing or when using demanding video games.
Second
To implement the second option, you will need an extension cable, a riser for a video card.
It happens in two varieties: L-shaped and in the form of a train. The L-shaped one will not work, since the slot on the board is not on the edge, in addition, it will create additional thickness and overheating is possible, so it is better to use the second one.

In this way, it is possible to move the location of the video card, keep the thickness, avoiding overheating, and most importantly, bring the connectors to the side of the case.
It should also be small in size from about 15 to 20 cm in length.
Video cards based on the chips of the two most popular manufacturers Nvidia and AMD have the required dimensions.
Major vendors cooperating with manufacturers offer small-sized solutions, for example in the form of the following models.
ATI Radeon HD 6670
ATI Radeon R7 360
ATI Radeon RX460
NVIDIA GeForce GTX 750ti
NVIDIA GeForce GTX 950, 960
NVIDIA GeForce GTX 1060
As an example, let's choose a solution from Gigabyte Radeon R 7 360.
As you can see in the picture, in addition to its small size, it has all the necessary video outputs.
We connect through the riser and securely fix it in the case, after which it remains only to connect it to the display, which we will talk about later.
Power Supply

The power supply must be a custom TFX size. The size has one drawback - it's power. It is difficult to find a unit over 400W. 300W is enough for this build. Take, for example, the Sea Sonic Electronics SS-300TFX 300W.
Due to the power supply, the thickness of the entire structure will be at least 10cm. It is quite possible to make it external, but for this it will be necessary to lengthen all the wires on the board, push them, for example, into a heat shrink tube or corrugation. With this option, it will be external, but not detachable.
Hard drives

Hard drives should be chosen with a 2.5 ”form factor, since 3.5” form factor PC drives may not fit, and it makes sense to use them in compact device no.
Display and case

The most difficult thing is the display, since you cannot find a separate LCD panel, you will have to purchase an inexpensive monitor from 15 to 17 inches. The connection will be made using the HDMI connector on the motherboard in the first case, the video configuration or on the video card in the second.
First option
Use the suitcase as a laptop case. If you need to partially disassemble the monitor. Paste in top cover suitcases.
Second option (harder)
Disassemble the display, get rid of the case. Then insert it into the laptop case.
Keyboard and mouse

The keyboard and mouse are connected via USB. For greater similarity with a laptop, you can buy a keyboard with a touchpad, as in the picture, and install it in the case.
Conclusion and warning
In this article, for informational purposes, the theoretical assembly of a laptop from PC components was considered. This material is not detailed, or an assembly example.
Any attempt to implement the foregoing is done at your own peril and risk, excluding any responsibility of the author.
The purpose of the material is to talk about the fact that it is theoretically possible to independently assemble a laptop from PC components.
“Need is cunning,” says the old adage, and computer enthusiasts have never complained about the lack of creativity. Unusual computer cases are one of the manifestations of developed imagination and resourcefulness. These people are not stopped by the fact that after buying a suitable hardware, there was no free funds for a case for it. "Kulibins" prove that the lack of funds is not a hindrance when assembling a computer. It is the creations of such creative people that this material about cool PC cases is dedicated to.
I bought a case, but there was not enough for iron
There are also situations when there is a high-quality case at hand, but there is nothing to put in it. What to do in such a situation? You can find a set of iron "dinosaur times" at a flea market, but not everyone will like this approach. Such components are noisy, collect dust, consume electricity, and even break down at the wrong time.
American enthusiasts have developed a Raspberry Pi mini-computer, priced at about $30, which is slightly larger than a credit card. The board of this little one contains a filling comparable to that of an average smartphone, and when installing Linux, such a PC can be used to watch movies, surf the Internet and other simple tasks. In the example above, just such a computer is installed in a desktop PC case.
The supermarket will help us
Do you have access to old fruit containers at the supermarket or vegetable market? Then you can make a cool PC case for just a hundred rubles. Potato box, a few cable ties - and the case is ready. 
Such a PC can be called an example of minimalism and ingenuity rolled into one, but there are also weirder cases for a computer.
All my life I dreamed of a laptop
I want to powerful laptop, but there is not enough money, and taking a loan is not an option? Then a tool box and a matrix from an LCD monitor come to the rescue. A little ingenuity, and with a flick of the wrist, it all turns into a laptop. 
Of course, in terms of mass, such a machine will be 2 times heavier than a laptop, and you have to carry a keyboard and mouse with you. But, of course, this example deserves a place in the selection of the most unusual computer cases.
DIY iMac
Apple computers are not cheap pleasure, but Lenovo all-in-ones although they cost less, but also more expensive than the desktop. But what if you want an all-in-one PC? You can tighten your belt and save up for an iMac, or you can just take the filling from a laptop with a broken screen and desktop monitor. A little double-sided tape, a couple of self-tapping screws - and we meet the new iMac model. 
For a complete entourage, only a bitten apple is missing, as well as a silvery color. But this is not a problem either: a trip to building materials (for a can of silver) and a vegetable store (for a kilogram of apples) can solve the problem. At the same time, vitamins in the body, after a long winter. 
Another example of how to make a monoblock with your own hands. 
The second life of a cardboard box
In the era of the development of online stores, everyone in the house gradually accumulates a huge amount of packaging containers in which purchases are delivered. Sometimes it’s a pity to throw away good boxes, and the place in the pantry quickly runs out. You can breathe new life into the box by using it as a PC case. This is especially rational if the brand new pieces of iron in it also came from the store. 
This approach is very popular among the people, the Internet is full of pictures showing such unusual cases for a computer. 
If there is no time to do needlework or all the skills gained in labor lessons in the lower grades were forgotten immediately after graduation, you don’t even have to bother with scissors and tape. 
And so it goes. And even like this: 
Subtle and tasteful
Sometimes unusual cases for a computer can pleasantly surprise you. Sometimes this is the fruit of careful work, and at a price they are compared with factory models.
The production of such a case, made in the spirit of minimalism, probably cost several hundred rubles per plexiglass. And given that all the details are carefully fitted, the owner also worked on it for more than one hour. 
And this is generally a masterpiece, and the manufacture of such a cool case for a PC definitely cost the craftsman a pretty penny. 
Poor fish
Efficient heat dissipation and a stylish look all in one also deserves a place in the selection of unusual computer cases. One can only hope that the owner purchased an aquarium specifically for the PC, and the fish did not have to go free swimming. 
By the way, if someone wants to repeat such a step, you need to take into account that water cannot be poured as a liquid. For these purposes, synthetic or mineral oil, for example, transformer oil, is optimal. In any case, the fluid must be electrically inert.
Computer in a canister
Another example of the use of obsolete containers, this time plastic. Such a machine would organically fit into some fuel depot or car service. There, such a strange computer case would not stand out against the background of the general situation. 
Cooling is not superfluous
It was this slogan, for sure, that guided the owner of this strange computer case, entirely made of fans. It just consumes so many turntables a lot, you probably need another power supply for them. Yes, and one can only imagine what kind of noise rises in the room when such a monster is turned on. 
Once and forever
That's what you can call such an unusual computer case. Mounting foam is very difficult to remove from surfaces, and if any part fails, you will have to sweat to get to it. 
By the way, this is another example of recycling vegetable crates.
For those who are tired of the constant overheating of the laptop
It seems that the owner of this laptop is tired of constantly dusting his computer, regularly changing thermal paste and fighting overheating. Otherwise, why even install powerful system water cooling for laptop. 
True, it is difficult to call such a design a laptop, because we are not talking about any mobility. That is why this masterpiece of "engineering" was included in the selection of the strangest computer cases.
The computing resources of a laptop two or three years old are enough to solve a wide range of tasks, especially if it has a quad-core processor and a discrete graphics card. But it often happens that even powerful gaming laptops after a few years, they begin to slow down when performing certain actions, for example, copying files from external media, transferring data over wireless network or download applications and operating system.
Speed up your laptop with our mobile computer upgrade guide, which shows you how to install solid state drive, optional memory module, USB 3.0 controller and new module WLAN. Disassembling a laptop to replace obsolete or obsolete components is not as easy as a desktop computer, so inexperienced users often prefer to buy a new laptop instead of upgrading the old one. And in vain: after all, changing the storage device, adding RAM, or replacing the outdated WLAN module and it’s a good idea to save money for everyone.
Installing a multi-port USB 3.0 controller in ExpressCard format is as easy as inserting an SD memory card into the reader slot. And to replace the slow HDD high speed solid state drive just loosen a few screws. Having done similar manipulations, you can increase the amount of laptop RAM. Get to the mini connector PCI Express to insert a new WLAN adapter or an mSATA SSD into it is more difficult, but our tips will help you cope with this task. Specific expansion boards such as Broadcom's HD decoder are installed in the same slot.
Installing an additional WLAN antenna will require patience. To disassemble the frame around the display, under which wireless antennas are usually located, you need to act very carefully so as not to damage the very fragile parts of the laptop.
1. Install USB 3.0 controller
Outdated USB interface 2.0 limits the data rate when using new external drives information. If your laptop has an ExpressCard slot, then you can easily and quickly solve this problem. USB 3.0 controllers in ExpressCard format with a width of 34 mm, compatible with 34 and 54 mm connectors, are offered by many manufacturers at a price of 500 rubles. Power is supplied to the ports from a free USB-connector of the laptop through the included adapter. In addition, you will need to download and install the driver from the manufacturer's website.
2. Increase the amount of RAM
 If your laptop has less than 4 GB of RAM, install an additional RAM module and the speed of your computer will noticeably increase. Before heading to the store for a new SO-DIMM memory chip, you need to run the CPU-Z utility (available on the CHIP DVD) and look at the parameters already on the “Memory” tab. installed module, and on the "SPD" tab, check for a free slot. If it is present, put in it a chip with the same characteristics (frequency, volume and timings) as the standard module. To do this, unscrew the screws of the RAM bay cover and remove it. It is located on the bottom surface of the laptop case and is usually labeled as a RAM module. Release both clips and pull the connector towards you. Insert the memory module into it and reverse the steps above to assemble the laptop.
If your laptop is equipped hard drive with a SATA interface, you can significantly speed up its work by replacing the hard drive with a solid state media. Usually the drive is located under a cover on the bottom or side of the case, as is the case with our Lenovo X201. Unscrew a few screws, remove the cover and remove the hard drive along with the metal frame. Then separate the drive from the frame to which it is attached with screws. Note how it was positioned in order to place the SSD in the same way. When choosing specific model SSD should be given preference to a capacious and fast solution. Later you can use it on another computer. Place the SSD in the frame, slide it into the bay, and connect to the SATA and power connectors. For optimal performance, reinstall operating system.
Some mobile computers are equipped with two mini PCI Express expansion slots. One of them usually occupies the WLAN communication module, and the second slot is initially free. It can install a 3G/UMTS wireless modem and other similar expansion boards. As a rule, in modern laptops, this slot is compatible with mSATA solid state drives. To get to it, you will have to work hard with a screwdriver and at least remove the keyboard and top case cover. A detailed disassembly guide for your laptop model can be found in any search engine on request "disassembly laptop model". Disassemble the laptop according to the manual, place the drive in a free slot and fasten it with a screw to securely fix it.
 If, when playing HD video, the picture on the screen of your laptop is replaced by jerks, or the processor load reaches 50% or more, as a result of which the computer starts to get very hot and noisy, we advise you to equip your laptop with an HD video accelerator. A good choice is Broadcom's Crystal HD DCM-70015. You can buy it on Amazon or eBay for about 1000 rubles. The accelerator board has a mini PCI Express interface and is installed in the same way as an mSATA solid state drive. After installing the device, you need to install the driver, which can be downloaded from the manufacturer's website, reinstall the flash player and activate the Broadcom decoder in the media player settings.
Does your wireless data transfer speed leave much to be desired? Perhaps the problem lies in an outdated module wireless communication WLAN. We recommend replacing it with a new one, such as Intel AC7260 (800 rubles). Before removing the old mini PCI Express from the expansion slot network adapter, note which connector each of its antennas is connected to. After installing the new communication module, connect the antennas in the same way.
 By default your mobile computer may have only one WLAN antenna, or the antennas it has may not be suitable for receiving and transmitting a signal at a frequency of 5 GHz (the latest AC routers work on it). In this case, it is recommended to replace the wireless antennas. Order new ones on eBay by selecting the appropriate ones from the list by search query WLAN Antenna Notebook. Make sure they are suitable for 2.4GHz and 5GHz. The antennas are best placed between the two halves of the display frame. In the case of our Lenovo X201, in order to disassemble the plastic frame around the screen, you need to unscrew the three screws at the corners of the case and snap off the latches around the perimeter of the frame. Place one of the antennas vertically and the other horizontally. Pave antenna cables along the wires leading to the display, connect them to wireless module and assemble the laptop.


