Ordering ntv plus channels on sony tvs. A TV with a built-in satellite receiver has some advantages
It is difficult to find a house where there is not a single TV. But free channels are one thing, and quite another when it comes to satellite pay TV. The number of paid NTV Plus channels depends on the package that the user paid for. But to get them, you need a little setup, which you can do yourself or by contacting the service for help.
Then you will have the opportunity to watch your favorite films, sports programs, programs of domestic and foreign production, and much more. In addition, it is not difficult to find out which settings are correct for NTV Plus, since the official website has all the instructions, not only general, but also dependent on specific models receivers.
Setting up satellite equipment
A lot depends on how the equipment is configured, including the quality of the signal. Therefore, you need to understand some of the features of installing equipment, if the user decides to save money, and not to order the services of a master who will install and configure everything himself. So here are the instructions to follow:
- Since NTV satellites are located above the equator, in order to catch a signal, you need to point the dish to the south side. In order not to guess where it is, take a compass or use the online compass by downloading this application on your smartphone. But as for the tilt angle of the satellite dish, depending on the location and manufacturer, it should be somewhere in the range of 17-38 degrees;
- Carefully inspect the area to determine if there is interference. It is very simple to do this - if the view in the right direction is good, then everything is fine, and if not, then you need to find another place with a better view;
- Try to fix the plate as firmly as possible so as not to knock down the settings. Every time you get tired of tuning channels, so it’s better to use a reliable bracket and enjoy satellite TV from NTV with pleasure;
- And of course, for any TV channel to work normally, it is important to choose the right cable that will be resistant to weather conditions. Snow, rain and other precipitation will fall on it, so the equipment must be reliable;
- The cable must be connected to the receiver, and the receiver to the TV;
- Even if you don’t know the exact settings, you can catch them yourself by turning the plate in a horizontal and vertical plane until an image appears on the TV screen. When there is a picture, you need to look at the signal reception level - it should be above 50%;
- Log in to the site and get access rights to various packages. The operator helps beginners to fully enjoy broadcasting. There is a small amount on the account of a newly registered user that pays for the broadcasting of a standard package - all that remains is to set up the channels.
When the “Registration of the contract” operation is completed, the access card will activate its work, and within a day a person will be able to see what the provider has prepared for new users.
Setting up NTV Plus channels
On the this moment There are several ways to set up channels from the NTV Plus provider. There are two most popular options.
- An automatic setting that looks like this:
- Enter the menu using the remote control;
- Find the subsection “Search for channels” there;
- Click it and monitor the status of the search. When it ends, all channels will start showing.
- Setting up the TV manually has the following specifics:
- First you need to reset the tinctures. This is done in this way: “Settings” → “Default setting” → “Channels” → “Antenna” → “Satellite settings”;
- The device will require you to enter a password. Feel free to enter four zeros, but only if this option has not been changed;
- After that, when manually searching for TV channels on NTV Plus, you need to uncheck the boxes next to satellites, which are allowed by selecting only the one that NTV Plus works with. In this case, it is EutelsatW4 36E. Sometimes it happens that the service in question is blocked by the tuner or TV itself, and in order to open access, you just need to remove the access card and insert it back;
- Next, you need to configure the transponder. Here are the settings: 12130 R and Lnb levels (low = 0; high = 10750).
When the whole procedure is completed, you can proceed to the final step: Select the transponder and set the command "Search on the network". After that, you have to wait, because the setup takes a long time. But if all the changes were correct, then in half an hour all paid TV channels will work for you.
 Setting up NTV Plus Vostok channels
The NTV Plus television company is one of the most popular in Russia, but there were interruptions in broadcasting in the eastern part of the country, which were resolved with the help of a new package and the Express-AT1 satellite. The change took place in 2014, so in 2017, users can enjoy the excellent broadcasting of popular channels and more in 2017 for several years.
If, for some reason, your equipment does not want to receive a signal that comes from this satellite, you can manually search for TV channels after entering the settings. This is not so difficult, since the reconfiguration can also be done manually. TV will start soon standard mode, delighting the audience with a full package of TV channels.
So, in order to access the package, you need to check the satellite settings, and if they are not there, then first enter this satellite, and then fill in the broadcast parameters. Instructions on how to set up channels are simple:
- Open the receiver settings through the remote remote control and the "MENU" button;
- Turn on the search for NTV channels;
- Go through "Settings" - "Installation" - "Password" - "Search Mode" - "Enable";
- Enter transponder parameters: frequency - 12475; polarization - to the left; transfer rate - 27500; broadcasting - DVB-S2; modulation - 8PSK; FEC: 5/6;
- Check the "Level" and "Quality" of the signal. Click on "Search" again;
- Wait for the results and save them.
Ilya 40465
Some Sony TVs are equipped with satellite receiver. Connector for connecting satellite signal, stands alone and is marked with a plate icon. It can be used simultaneously with digital or analog TV. In this article, we will look at how to connect a Sony Bravia TV to an antenna, and how to set the settings correctly (using the example of a popular operator).
Note! If you have a different operator, the settings may vary slightly. You need data from a company that installed an antenna and offers satellite TV services.
Connecting a Sony TV to a satellite dish: general information
Before connecting the cable coming from the dish, you need to turn off the TV. You need to know the frequency range of the satellite dish receiver. These data are listed in technical specifications to your plate. You also need to ask the operator:
- frequency of the radio responder;
- signal polarization type;
- symbol rate.
Polarization can be linear (horizontal or vertical) or circular (right or left). In the first case, for the correct selection of the antenna tilt angle, it is important to know the longitude of the satellite. You do not need to understand all the intricacies of technology, it is enough to get all the data from the satellite TV operator in order to set the correct settings.

How to set up satellite TV
After all the necessary information has been received, you can proceed with the installation. Turn off the TV and connect the satellite cable to the appropriate socket on the TV. If you plan to use paid channels, you need to install an operator card in the cam-module. After that, you can turn on the TV.
- Enter the main menu by pressing the home button on the remote control.
- Go to the "settings" section and select the "discrete configuration" item in it.
- Next, "automatic satellite tuning." The program will ask you "Are you sure you want to configure?". You have to agree.
- In the "dish configuration" section, select the "DiSEq C" item. Typically, this value is specified by default.
- The data displayed in the next window does not need to be changed. That is, the items “for all channel types”, “search for all stations”, “network scanning” should be selected.
- Next, you will see a list of all satellites. If only one antenna is active, then the satellite will also be one. You can use several satellites at the same time (but not more than 4) if your connection uses a special switch and several satellite dishes.
- Select the satellite you want to set up from the list.
- Next, a window will open in which you need to enter data.
- Open the "LNB configuration" item and enter the frequencies of the dish receiver. Next, press the "Return" button to exit the subsection.
- Open the "Transponder" section and enter the frequency of the transponder.
- Enter the remaining data (polarization type, symbol rate) in the appropriate sections. Use the "Return" button to return to the previous menu.
- Then press "Return" again to return to the satellite selection menu.
- Click "start". The TV, according to the entered values, will start searching for channels. The process may take some time.
- Wait for the end message auto tuning and confirm the action by pressing the button on the remote control.
After all the settings made, you can sort the found channels. Select desired channels from the list, press the “OK” button located in the center on the remote control, determine the required position using the up and down arrows. In this way, you can set the desired channels on the remote control buttons for quick access, remove some channels from the list by pressing the blue button.

At the end of today's review, we will discuss a few more important nuances. First of all, do not forget that the satellite TV provider can change the frequency of the radio transponder. If this happens, then for the device to work correctly, it must be changed in the settings. For use pay TV you must first activate the smart card and go through the registration process. Your ISP will help you with these matters. Satellite TV has all the advantages of digital, including support for subtitles, broadcast recording and much more.
tell friends
Preparing to set up your Sony Bravia TV:
Mount the dish and point it at the EUTELSAT W4 (36B) satellite. Details about the coverage area of Tricolor satellites and the direction of the satellite dish in your locality are indicated on the Tricolor website. Write down the local oscillator frequency settings indicated on the satellite dish converter.
In our case, the upper frequency is 10.75 GHz
Make sure the TV is off. Connect the cable from the satellite dish to the TV's satellite dish input marked with the icon:
Install the smart card with your subscription in the CAM module (DRE-Crypt CI+ module) provided by the satellite TV operator:

Install the CAM module (CI module) into the appropriate slot on your Sony Bravia TV marked with the icon:

Note: it may be necessary to first remove the protective “plug” from the CAM connector of the DRE-Crypt CI + TV module
Setting up a Sony Bravia TV
1. Turn on the TV and go to the section
Settings -> Digital Configuration -> Satellite Auto Tune

2. Confirm the start of Auto Satellite Tuning.
3. Select a satellite dish configuration. with the usual individual satellite dishes option should be selected "Fixed Antenna or DiSEqC" (default). Click "Next"

On the scan page selection page, leave the default settings and confirm - "Next"

4. Select the first satellite (Satellite 1) and press the center button on the remote control to enter the settings menu:

5. Select "LNB Configuration" and enter it:

6. In the items "Lower LNB range" and "Upper range LNB" enter the corresponding values of the local oscillator of the converter (see step 2 of the "Preparation" section). In our case, the “LNB Low Range” defaults to the corresponding LO setting. But "Upper Range LNB" is not. Enter the appropriate values for this parameter in megahertz (10.75 GHz = 10750 MHz) and confirm:

7. Return to the previous sony menu and pay attention to the "Transponder" item. This item directly configures the parameters for receiving program packages. The default transponder settings in the TV menu are the same as the settings of the Tricolor TV transponder in the western region.
For this reason, there is no need to change the settings in this item. It may be required if the signal parameters are changed by the satellite TV operator or TV settings in other regions.
If the antenna is connected and the initial parameters are entered correctly, an indication of the quality and signal level will be displayed on the screen.

Return to the list of satellites and click "Start".

8. The scanning of radio and TV channels begins, during which the progress and the number of found TV channels (programs) are displayed

9. Sony Bravia TV setup is complete. Depending on the current set of satellite TV programs transmitted by the operator, the number of channels found may differ. Now you can either exit the setup menu or immediately sort the channels by pressing the corresponding button on the prompt.
Attention! Some of the detected TV channels may not be available for display if they are paid and are not included in your subscription plan with a satellite TV operator.
So, as I wrote earlier, the classic way to connect satellite TV is as follows:
Satellite dish - satellite receiver - TV.
Benefits of using a satellite receiver:
For this method, you can use any TV, it doesn’t matter if you bought it a year ago or 10 years have passed, the main thing is to choose a cable to connect the satellite receiver and TV;
A satellite receiver can act not only as a satellite signal receiver, but also have other functions, for example: Internet access, Smart TV, DLNA, etc.
Cons of using a satellite receiver:
Inconvenience when using two remote controls (from the TV and from the satellite receiver). Although modern TVs use various technologies to connect all devices and use only the TV remote control (for example, Samsung-e's anynet + technology), these technologies do not fit all equipment and do not always work perfectly.
Connecting satellite TV using the CAM module.
Another way to connect satellite television- use the CAM module. CAM module(Conditional Access Module, Conditional Access Module) - electronic device, used as an adapter of a specific coding system to common conditional access interfaces (Common Interface) in TVs and digital television receivers to provide subscribers with access to encrypted media content in digital television(Wikipedia).
Most modern TVs already have a built-in satellite receiver (DVB-S2), which only needs to add a device for decoding channels - a CAM module. Since each operator has its own coding system, each operator (Tricolor, NTV +, etc.) has its own CAM module. Thus, using the CAM module of a certain operator, you activate the receiver built into the TV and view the satellite channels of the selected operator without using an external satellite receiver.

pros CAM usage module:
Control from one remote control. It would seem a trifle, but it is VERY CONVENIENT.
TV must support DVB-S2 and the Cl+ module. You can find out this information from the technical documentation for the TV or by saying the model of your TV when buying a CAM module.
How to connect and configure the CAM module?! In fact, connecting and configuring the CAM module is extremely simple and can be handled without the help of specialists. Below is a detailed description of how to install and configure the CAM module, it will be relevant for all popular operators - Tricolor, NTV+, Telecard, Rainbow etc.
Installation and configuration of the CAM module.
The first step is to correctly insert the access card into the CAM module. To do this, turn the access card with metal contacts up and insert it until it stops, while the CAM module should be facing you.

Then turn off the TV and insert the CAM module into a special slot (PCMCIA slot), usually located on the back side of the TV. The module must be inserted facing the wall.

Connect your satellite dish to your TV.

After that, turn on the TV.
Before setting satellite channels, I recommend making sure that the TV "sees" your CAM module, for this go to the TV settings and look at the information about the CAM module. For example, on LG TVs, for this you need to go to "Settings" - "Quickly" - "Search for channels" - "CI data (CAM)"


After that "Module".

Select your module, in my case it is Tricolor CI plus CAM

And see information about it.

If the TV "does not see" the CAM module, then you have not inserted it correctly, turn off the TV and insert the CAM module correctly.
Setting up satellite channels through the CAM module.
Below I will describe how to set up the CAM module on an LG TV, for other TV models (Philips, Samsung, Sony, etc.) everything will be the same.
Go to the TV menu, to do this, press:
1) on a conventional TV remote control, the "Settings" button
2) on the magic remote control the "Input" button
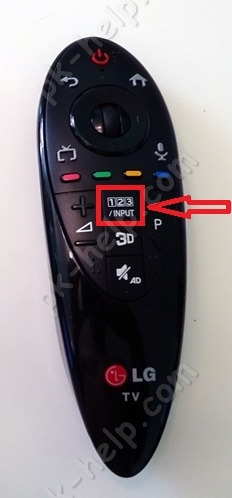
and select the "Settings" button on the TV.

From the "Quick" menu, select "Search for channels".

Select "Auto Search"

Specify "Satellite" in the settings mode and click "Next".

From the list, select the operator whose CAM module you are using, in this case Tricolor.

If you use the popular operator Tricolor, NTV+, etc., then in the next step just click "Next", otherwise click "Settings" and make the settings corresponding to your satellite operator.

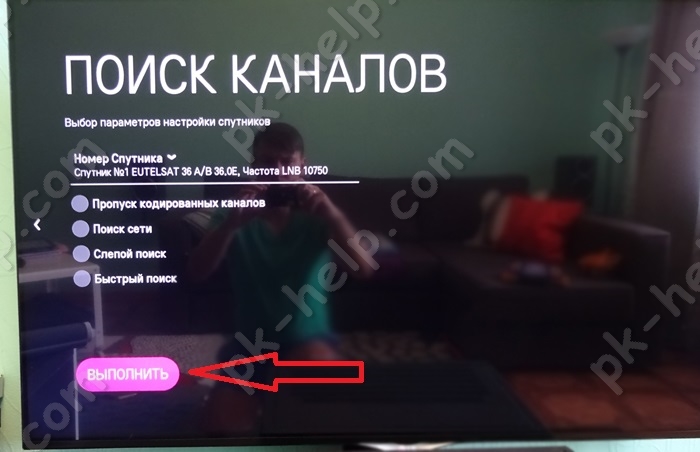
The next step, click "Run" to start searching for channels. You can also specify a more accurate search by selecting, for example - Skip coded channels, etc.
Will begin automatic search satellite channels, you must wait a few minutes before it ends.

As a result, you will see the number of channels and radio found, now you can click "Finish".

As a result, you have set up satellite TV using the CAM module.
Video settings of the CAM module Tricolor, NTV +, Telecard, Raduga.
class="eliadunit">
If your TV supports CAM modules, then you can watch paid satellite TV on it, such as NTV Plus
The surest way is to look back, where all the connectors are located, and find the antenna input "LNB IN".
All these TVs have CI» slot for « CAM» modules.

How to properly set up an LG TV with installed module CI+ CAM NTV PLUS to NTV+ channels is described below.
The principle of setting up all TVs from this manufacturer is approximately the same. Depending on the software version and model, the names of the menu items may differ, but the essence is the same everywhere.
Install smart card access " NTV+» to the conditional access module CI+ CAM NTV PLUS. Chip to the thick side of the module.
We install the conditional access module in the switched off TV.
Turn on the TV and put it into satellite reception mode. We call the list of channels on the screen with the button LIST


Select the mode " Satellite", go and click on OK,

To configure, press the button SETTING (MENU) and go to section CHANNELS

We look at information about the module and access card ( serial number smart cards NTV Plus) in the module menu CI data (CAM)> Information > Smart card > General information. If there is no information or an error, go to the menumodule settingsCI data (CAM)> Settingsand select "Reset to factory settings".

Turn off the TV completely and turn it on again.

We check that all settings are the same as in the photo above.
On the left you see two scales - you can use them to check the quality of the signal, and if you do not have an antenna tuned, adjust the antenna to the NTV-PLUS signal from the satellite
Option number 1
From the menu" Satellite setup"return to the previous menu ( BACK button) and go to the menu AUTO SEARCH. Select the mode " Satellite” and move on.

Choose an operator NTV-PLUS. If you do not have NTV-Plus in the list or your TV does not offer to select an operator at all, then it is better to use to set up channels.

Below in the window Satellite setup» just click OK

Check the search mode " Quick search» and press « OK»

On the " Run» press OK

We are waiting for the search results, click " close”, exit the menu with the button EXIT

To display a list of found channels, press the button LIST

With this search option, your TV automatically divides all channels into topics. The name of the current topic is listed at the top of the list and can be changed by clicking blue remote control buttons:

Option number 2
Go to menu " Manual setting» ( Manual search) section of the main menu " CHANNELS"
We check that all the settings are as in the photo below, and in the paragraph " Network search» was ticked. Then we go to " Add» and press OK

Waiting for search results
Click OK on the " close”, exit the menu.

To display the list of channels on the screen, press the button LIST. All channels will be configured in one list.

Also in the main menu CHANNELS" in the menu barCI data (CAM)> Information > Smart card > Providers >You can view information about packages (subscription classes) and their expiration dates.
NTV + subscription classes and their decoding:
class = E3 - Light West
class = E6 - VIP Cinema West
class = E7 - Supersport West
class = E8 - Entertaining West
class = E9 - Children's West
class = EA - Cognitive West
class = EB - Musical West
class = FF - Start West
class = 13 - Viasat West
class = 3C - Night West


