Batch photo processing. Batch photo processing: step by step instructions Bulk photo cropping program
In the era digital cameras, there is nothing easier than taking a lot of photos. In the blink of an eye, you can find yourself with a mountain of pictures that now need to be parsed, edited, etc. It doesn't matter what you decide to do with , but before you do, you'll probably have to do some extra work with them. Some of the most common image edits are resizing, renaming, format conversion, color fixes, and so on. You might be intimidated by manually editing so many photos. Don't waste your time, just download one of the free tools below and start batch editing!
XnConvert (Windows, Mac, Linux)
The powerful tool XnConvert is not only a cross-platform product, but also a cross-functional one. What do I mean by this? While most of these tools only allow you to resize an image, or only batch rename files, XnConvert manages to do it all at the same time. However, for all its power, XnConvert remains a very easy to use application.
Drag and drop your image into the Input tab and add actions from the Actions tab. This can be anything from image resizing, rotation, watermarking, to adding watermarks, filters, borders, and playing with the color palette. XnConvert does it all. In the "Output" tab, you can create new filenames (XnConver does batch renaming as well), select a folder to save the processed images, set the file format, and much more. Download from office. Website: www.xnconvert.com
PhotoMagician (Windows)

Although PhotoMagician is not as powerful as XnConvert, it offers its users several unique features. PhotoMagician's main feature is batch resizing, but you can also use it to add some basic effects and for files in some popular formats. All you have to do is select a start and end folder and then apply one of the available resizing profiles or create your own.
PhotoMagician includes resizing profiles for many popular devices such as the iPhone, iPod Nano, Sony PSP and a few others. In the Conversion Settings tab, you can add simple effects like sepia or grayscale, change the angle of the image, and more. A nice feature of the program is the ability to select images by image size, file size and file modification date.
Irfan View (Windows)

IrfanView is an excellent image viewer and editor that I have been using for many years, including a very stylish batch editing tool for some time now. IrfanView's batch editor can help you resize, rename images, convert and adjust multiple files at once. There is, however, one drawback. All these features are not easy to find. Luckily, you have this article to turn to for help.
Once IrfanView is installed and running, go to File –> Batch Conversion/Rename…. This will open an editor where you can start working right away. Look at your images at the top of the window and drag them to the bottom area. You can also choose between batch converting and batch renaming, or both. Click on the "Advanced" button to access additional options. In general, IrfanView's batch tools are quite powerful, so you can use them to fine tuning image colors. Of. Website: www.irfanview.com
FastStone Photo Resizer (Windows)

I use FastStone Capture as my main one, now that FastStone Photo Resizer is out I'm thinking about installing it on my work computer. Unlike Capture, Photo Resizer is completely free and, despite its name, can do a lot more than just resize a photo. Photo Resizer includes two main tabs: Batch Convert (batch conversion) and Batch Rename (batch rename). Unfortunately, you can't get FastStone to do these two things at the same time (at least I couldn't get it to do it), which makes communicating with the program a little awkward.
In the "Batch Convert" tab you can easily customize the format of your final files, and by clicking on the "Advanced Options" button you will be taken to a menu with additional features. Here you can resize, rotate the image, adjust the color, add text and watermarks, and pretty much anything else you can think of.
After selecting all the options, you can save the settings to a file so that you can use them again without manual setting. If you want to rename the file, then you will have to reload your edited photos into the "Batch Rename" tab and go through the process of changing names already in it. Of. Website: www.faststone.org
Picasa (Windows, Mac)

If you're using Picasa as your photo viewer and downloader, then there's nothing easier than doing some file editing, especially if you're already in it. There are several batch editing options here, but not all of them come from one place.
For batch change size, quality, and batch adding a watermark, you need to highlight the photos and select "Export" at the bottom. After that, a dialog box will open in which you can perform all the necessary operations. For some batch filters, like rotate or rename, you need to click on “Photo –> Batch Edit”. Whatever you check here will be applied to all selected photos. Offsite: picasa.google.com
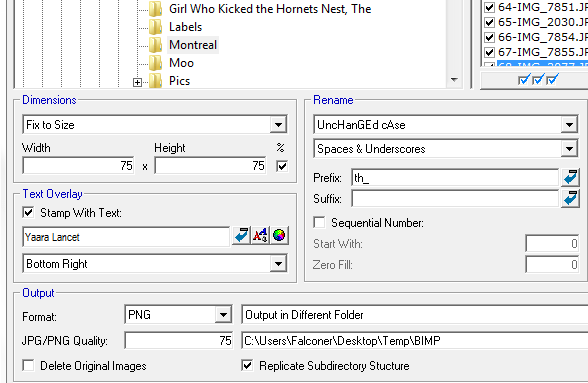
BIMP (Windows)
Sunlit Green Batch Blitz (Windows)

This is another program in a series of hidden installers, but unfortunately (or fortunately?) it hides a rather powerful batch processing tool inside, which you should definitely check out if you are a Windows user. When installing BatchBlitz, be very, very vigilant, as the installer will try to "shove" additional program Babylon will confuse you with Registry Cleaner. Just dismiss all those extra goodies and get a clean image editor.
BatchBlitz is very comfortable to use: start by opening a new Blitz session, via “File –> New”, at the top find desired image and add it to the main window. Then switch to the "Actions" tab to make changes such as resizing, renaming, converting to another format, auto-contrast, rotation and many others. After adding actions, you can double click on each of them for further customization.
Action automation tools in Photoshop can significantly reduce the time spent on performing the same type of operations. One of these tools is batch processing of images (photos).
The meaning of batch processing is to record actions in a special folder (action), and then apply this action to unlimited number photos. That is, we manually process once, and the rest of the images are processed automatically by the program.
It makes sense to apply batch processing in those cases when it is necessary, for example, to resize photos, raise or lower illumination, and make the same color correction.
So let's get started with batch processing.
First you need to put the original pictures in one folder. I have three photos prepared for the lesson. I named the folder "Batch Processing" and put it on your desktop.

If you notice, then in this folder there is also a subfolder "Ready Photos". It will store the processing results.
It is worth noting right away that in this lesson we will only learn the process, so many operations with the photo will not be performed. The main thing is to understand the principle, and then you yourself will decide what processing to perform. The procedure will always be the same.
And one moment. Disable mismatch warnings in the program settings color profile, otherwise, each time you open a photo, you will have to press the button OK.
Let's go to the menu "Editing - Color Settings" and remove the checkboxes indicated in the screenshot.


Now you can start...
After analyzing the pictures, it becomes clear that they are all slightly darkened. Therefore, we will lighten them and toned a little.
Let's open the first picture.
Then we call the palette "Operations" on the menu "Window".

In the palette, you need to click on the folder icon, give the new set some name and click OK.

Then we create a new operation, also somehow call it and press the button "Record".

First, let's resize the image. Let's say we need pictures no wider than 550 pixels.
Let's go to the menu "Image - Image Size". Change the width to the desired one and click OK.


As you can see, there have been changes in the palette of operations. Our action has been successfully recorded.

For lightening and toning, use "Curves". They are invoked by keyboard shortcuts. CTRL+M.
In the window that opens, set the current on the curve and drag in the direction of lightening until the desired result is achieved.

Then we go to the red channel and adjust the colors a little. For example, like this:

At the end of the process, press OK.
When recording an action, there is one important rule: if you use tools, adjustment layers and other functions of the program, where the values of various settings change on the fly, that is, without the need to press the OK button, then these values must be entered manually and the ENTER key must be pressed. If this rule is not followed, then Photoshop will record all intermediate values while you drag, for example, the slider.
We continue. Let's assume that we have already completed all the steps. Now we need to save the photo in the format we need.
Press the key combination CTRL+SHIFT+S, select the format and location to save. I have selected a folder "Ready Photos". Click "Save".

The last step is to close the image. Do not forget to do this, otherwise all 100500 photos will remain open in the editor. Nightmare…

We refuse to save the source.
Let's take a look at the Actions palette. Check if all actions are recorded correctly. If everything is in order, then click on the button "Stop".

Action is ready.
Now we need to apply it to all the photos in the folder, and automatically.
Let's go to the menu "File - Automation - Batch Processing".

In the function window, select our set and operation (the last created ones are automatically registered), write the path to the source folder and the path to the folder where you want to save the finished images.

After pressing the button "OK" processing will begin. The time spent on the process directly depends on the number of photos and the complexity of the operations.

Use the automation provided to you by Photoshop and save a lot of time processing your pictures.
Hello, dear friends and guests of the blog! What is batch processing of photos and how is it done? This article is devoted to an overview of the program for viewing, editing and processing graphic images FastStone Image Viewer. The program is quite old and many users know about it and most likely use it often.
Batch processing of photos in FastStone Image Viewer will be a convenient and enjoyable job for you!
Therefore, today we will get acquainted with its interface and one of the most, in my opinion, cool functionality - batch processing of photos. This option is useful for managing the huge volumes of photos stored on hard drives users.
In addition, the main features of FastStone Image Viewer include:
Red-eye removal;
Color enhancement;
Slideshow function;
Image rotations;
Cropping and resizing images;
And many many others.
In a word, if you need some kind of processing or editing photos and pictures, but you don't know Photoshop, try FastStone Image Viewer first.
Moreover, the program's arsenal includes all kinds of filters, stencils, the option of overlaying watermarks, support for all popular graphic formats and even RAW formats from semi-professional and professional cameras.
Of course, for professionals the program is rather weak, but for the average user it is quite suitable.
Batch Photo Processing and Image Viewer Interface

The Image Viewer interface is quite simple and has a Russian version. The program window is divided into two parts:
Left - Explorer or Directory Tree, designed for quick navigation;
Right - File manager, designed to manage archives of pictures or photos.
In addition, as you can see in my screenshot, under the Explorer, we can expand the third part - Preview Mode.
To assign FastStone Image Viewer as the default (default) viewer for all graphic files, it is worth doing a little tweaking.
You can, of course, right-click on each individual file format, select "Open with ..." and select FS Image Viewer in the window that opens, while not forgetting to check the box "Use this program for all files of this type". However, there are many file formats and this process will take quite a long time.
Therefore, we will make all the settings inside the program itself. In the top menu, select the "Settings" tab, and then "Program Settings" or simply click hotkey F12.
In the window that opens, we are primarily interested in the “View” tab, where on the right side, opposite the “Open Associated File” item, you need to select “in windowed mode”. This is the most convenient mode when opening a file for the first time, but you can always change it.
After this setting, go to the "Associations" tab, select all file formats and check the "Add Browse to FastStone" item in the menu Windows Explorer". Then click OK.
Now you can close the program itself and open any image by double-clicking it, it will automatically open in FS Image Viewer.
As you can see, the picture opened in FS Image Viewer in windowed mode, but, as I said above, we can always change it.
With image navigation, I think you will figure it out yourself. I will only draw your attention to the tabs "Edit", "Color", "Effects" and "Create". It is here that you can edit pictures or photos as you like.
This is where we finish our acquaintance with the interface and move on to Batch processing of graphic files.
Batch processing photos in FastStone Image Viewer

Batch processing means that we can set certain parameters (size, format, volume, quality, etc.) for a large group of pictures or photos and apply them to absolutely all pictures in the selected folder.
We launch the program itself by clicking on its shortcut, on the left side we indicate the folder with the photos that we want to process. After that, you will see all the photos from this folder on the right side. Click on the "Tools" menu at the top, and already in it select the item "Batch conversion / renaming".
And as I promised, this is where the whole universe opens up for all kinds of experiments to convert files.


At the top of the window itself, you can see two tabs: Batch Convert and Batch Rename. Let's look at the first tab.
On the "Batch Conversion" tab, we can change formats, sizes, change filenames, and much, much more.
On the left side of the window, we can see a list of all our pictures or photos. To batch process them, you need to click the "Add All" button. After that, all files will be moved to the right side. We will make all other settings in the lower right part of the window.
In the "Output Format" field, you can specify the format of the files that we want to receive. Just to the right of this field there is a "Settings" button where you can set additional settings.
In the "Output folder" field, specify the folder where all files will be saved after processing.
We tick the box "Change settings (dimensions ...)" and the "Advanced" button becomes active, by clicking on which the corresponding window will open.


This window has a lot of tabs with a wide variety of settings:
Resize;
crop;
color depth;
Image settings;
Watermark;


I think it makes no sense to paint them all, because it will draw on a separate article. I hope you can figure them out on your own. I will only note that in order to make your changes, you need to tick one single item on each tab, at the very top. Then the empty fields of the tabs will display all the settings.
After all the settings made, click the "Start" button, on the "Batch conversion" tab, and the process itself will start. Again, all converted pictures will be saved in the folder that we specified in the "Output folder" field.


It may be required when we just need to rename a large group of files. And here the principle is exactly the same: first of all, we need to add all the files from the left side to the right side. All other settings are also made in the lower right part of the tab.
Many photographers or ordinary users computer systems that deal with graphics and photos often have to process enough a large number of pictures. It is clear that performing such actions for each photo is extremely tedious, since these transformations can take a very long time. To simplify the necessary manipulations, the so-called batch processing of photos is used. What it is, and how to use such features in different applications, will now be considered.

What does "batch photo processing" mean?
Let's start with a little theory. What is batch photo editing? In the simplest sense, this is a set of predefined standard actions of the same type that need to be applied not to one picture, but to tens or even hundreds.

Actually, this is where the name of the term itself comes from, since the selected set of actions is used for the photo package.
What settings can be changed?
In principle, any, even the most primitive program for batch processing of photos that supports the function of multiple file modifications, allows you to configure one or more parameters, the values of which will be applied to all images to be edited at once. Naturally, the capabilities of applications, depending on the complexity of the programs themselves, can vary quite significantly.
However, among the most basic parameters, we can conditionally distinguish several of the most commonly used:
- change the size, color palette, brightness and saturation;
- bulk renaming;
- editing with adding effects according to the template;
- format conversion;
- file size reduction, etc.
The list of parameters can be continued for quite a long time. But let's focus on some applications with which batch processing of photos is the easiest.
Most popular programs
If we approach the choice of the appropriate software, conditionally such programs can be divided into several types. The most commonly used viewers (IrfanView, XnView), converters and converters (Image Tuner, AVS Image Converter, FastStone Image Resizer, XnConvert) and graphic editor(GIMP, Photoshop, Lightroom).
The simplest steps in Image Tuner
Now a little more about the actions performed. The simplest utility is Image Tuner. There are not so many changeable parameters and supported formats in it, nevertheless, it is worth adopting it.

The application works on the principle of one window. First, on the left side of the screen are added required files, and the required settings are indicated on the right, after which the button to start the conversion process is simply pressed.
Using viewers and converters
Among these types of programs, IrfanView, XnView and XnConvert can be especially distinguished. For the first application after adding objects, Batch Conversion mode is used. But here you can set only the basic settings.

If you need to use additional parameters, you should use the menu for setting additional options (Advanced button, by clicking on which you can call the Use advanced options function). The output format is set in the corresponding Output Format menu. The program is not very convenient, but it has support for more than 20 formats.

Much better is the case with the XnView application. Batch processing of photos in it is carried out almost at a professional level. First, the files to be processed are selected after first activating the batch processing function in the tool menu. There are two tabs here. One contains the main parameters for changing images, the second contains the actions for transformations, which, after selecting in the left window, must be added to the right side. In addition, you can immediately use the execution of XBS scripts, which, however, are incompatible with XnConvert (this application uses BAT). After setting all the parameters, the conversion process is activated, that's all.

In the XnConvert program, batch processing of photos uses the action tab, where you can select transformations, conditionally divided into four groups: image transformation, working with color and level adjustments, setting filters, and additional actions, which mostly include applying effects.
The input data tab specifies the required files, and the output tab specifies the save options. There is also an option to download scripts and the function of exporting to a Flickr account or Picasa, as well as packaging to FTP and sending via e-mail.
GIMP: Batch Photo Processing
First of all, it is worth remembering that the editor alone will not be enough. For it, you should immediately install a special add-on in the form of a BIMP plugin. Batch processing of photos in this application will be available only after installing the add-on.

The procedure is as follows. First, in the file menu, you need to select the plug-in launch line (Batch Image Manipulation), then use the Add Images button to add a folder with images or single files. Next, the Add button, marked with a plus sign, is used to select the addition of actions. AT context menu you can choose what you want and make settings for each operation. When all the settings are completed, the destination folder is selected to save the modified photos, and then the Apply button is pressed, which activates the processing process. Depending on the number of shots and the selected operations, it may take quite a long time. When done, the Close button is used to close the plugin.
Batch photo processing in Photoshop
Now a few words about such a powerful package as Adobe Photoshop. Batch processing of photos in this program can be done in several ways:
- creation or application of actions (actions);
- Batch operations;
- using the Image Processor script processor.
In the first case, first, to create an action (action), you need to use the so-called test sample, based on the analysis of which the action will be stored in the Set. True, at this stage the choice is limited solely by the capabilities of the application itself.

After that, for multiple application of the created set of actions, the file menu is used, where the Automate section is selected, followed by the transition to Batch operations. Further in the section Play settings the necessary action is selected from the set, the source and destination folder are set.

However, it is better to use a script processor. There are more opportunities here, and the image conversion operations themselves look much simpler. In the file menu, the Scripts/Image Processor transition is selected, and then the necessary settings are set. The advantage of this method is that you do not need to create actions, as in the previous version. But the main disadvantage is that only three formats (TIFF, PSD and JPEG) will be available for saving the results.
Practical application of the Adobe Lightroom package
Finally, let's take a look at how Lightroom batch processes photos. The bottom line is that this function can be applied during export using the Library module and the command itself (File/Export menu).

In the settings, you can set the following options:
- save to hard disk, write to optical media or send by e-mail (Export To ...);
- selection of the final folder for saving (Export Location);
- multiple renaming of objects according to the set mask (File Naming);
- choice of final format (File Settings);
- change resolution and size (Image Sizing);
- setting sharpness and contrast (Image Sharpening);
- saving metadata (Metadata);
- using a watermark overlay (Watermarking).
Batch processing of photos in Lightroom is not limited to this alone. In the Presets section, located in the sidebar on the left, you can select ready-made presets or add your own settings, after which they will be applied to all selected files.
Instead of total
As for the choice of program for processing photos in the right amount, the best results, for example, in terms of resizing speed, are demonstrated by XnView and Photoshop, Lightroom is slightly behind. In terms of support for readable and writable formats, XnView and XnConvert are the undisputed leaders. On the other hand, with Photoshop you can make finer or more advanced adjustments, and Lightroom has built-in templates. However, if you need to use the simplest actions, Image Tuner is also great. GIMP handles it simply, but it does require a plugin. So the choice is up to the user.
It remains to be added that far from all programs that support batch processing of photos were considered here. The list of them is so huge that just listing all the available applications can take a long time. Nevertheless, everyone can conclude that in programs of the same type, all actions are very similar to each other. Therefore, having mastered one application, it will be possible to easily apply your knowledge in another.
We often have to work with large quantity photos. Processing 300-500 photos at a time is very difficult and time consuming. Thanks to a little Photoshop tutorial on batch processing photos, you will learn how to do several actions on images at a time, which will significantly reduce the time for work.
Consider the lesson on the example of such a concept as preview. It is extremely important for any photographer. You may now say that only by enlarging the image you can realize its quality and shooting skill, but as practice shows, even the most nice photos are rarely placed in their original size. Most likely, as part of the preview, they will remain. Then it is extremely important that, despite the small size, the user feels the quality of the photo.
The main thing in processing small photos is sharpness, especially if you have greatly reduced the original size of the image. In addition to resizing, when creating a preview, sharpening is required.
If you are to process hundreds of photos (batch processing), then the most appropriate option would be to resort to help. In this case, you only need to record the course of actions once, and that's it, then the program will do everything for you.
Our action can be applied to photos of any size and subject. The main actions that we need from the action are to resize the photo, increase the sharpness and then save it in the desired format. To do this, we first need to study the command , it's in the tab File - Automation.
As opposed to just a team "Resize", which changes the size of the image, regardless of whether the photo was originally horizontal or vertical, recognizes the type of photo and accordingly brings it to the desired view.
In order to visualize what the work of the team is, I will give an example. Let's imagine that through "Resize" we set the parameters to 400px, as a result, all horizontal photos will be processed correctly, but the vertical ones will become much larger, since they should not have a width of 400px, but a length.
Through we simply put the two necessary numbers and the program itself will recognize which number refers to the length and which to the width.

Now let's move on to the instructions for batch processing a photo.
Step 1
To begin with follows. We will carry out a series of operations on it, which we will write into an action.
Step 2
Let's start recording the action. To do this, open palette Operations, create or select a folder where it will be stored, click the small button at the bottom of the palette Create a new operation, give it a name. You can find out more detailed information About, . The recording has begun!

Attention! All of the following actions are already recorded in the action.
Step 3
It is necessary to convert the photo to sRGB format (only this standard is correctly displayed by all browsers, on any devices). To record an action, press Edit - Edit Profile. If all sources are already saved in the required format, then this step can be omitted.
Step 4
AT the Change Dimension option set the value to 700px. Of course, you can put any number, but as practice shows, this is the ideal size for a preview.
Step 5
Now the main thing is sharpness. To optimally increase the sharpness, it is best to use a filter. So let's go to the section. Filters - Sharpness - Smart Sharpen. Set the optimal parameters.
Step 6
The last step is to save the image. The next step is to specify the quality of the photo. For Internet sites, the optimal parameter would be 9-10.
Step 7
Finally, close the photo if you don't want to end up with 300 open tabs.
Step 8
We press Stop. All! Our universal action is ready.
There is one thing that makes editing photos for the web even easier and more convenient. It . Thanks to this, you can create a file that will run the entire action.
How to create
It is created from an already recorded action.
Step 1
We go to File - Automation - Create Droplet

Step 2
You need to set the parameters:
- Select the folder where the photos are stored;
- Select an already recorded action;
- Select the folder where you want to save the received photos.

After clicking on the OK button, a droplet will appear in the folder you specified. in the form of a blue arrow. You just need to transfer your photos to this arrow, and all the preset settings will be applied to them immediately.
Save your time and use batch photo processing!
Noticed an error in the text - select it and press Ctrl + Enter . Thank you!


