How to install a script (hype, investment game, bux) on hosting? Setting up Apache to work with PHP.
The initial loading of scripts on the server consists of 4 steps.
1. You need to set a password for the php ftp server.
2. Connect to php server.
3. Load the script itself.
So let's get started.
1 step. Set password for php ftp server.
First you need to go to the control panel. Once you are logged in, click on the "PHP Details" link
Then click on the link: "Password not set"

And We will get to the password setting page, where you should enter the password for the ftp server, which should be from 6 to 15 characters long and contain only Latin letters and numbers.

2 step. Connecting to php ftp server.
After setting the password, you need to download ftp client. Personally, I use the filezilla program and, accordingly, the screenshots below show what and how to do exactly in this program. You can download the program on its official website. In the upper part of the program, enter the connection parameters: Server: s2000.ucoz.net Login: Enter your login, which is specified in the "PHP details" menu (second screenshot). Password: The password you entered earlier on the site. After that, click on the button " Quick connection".

Once connected, you will see a directory called "scripts" on the right side of the program window. Go to this directory by double clicking on it.

And we load the scripts we need into it. For example, we need to upload a script to the site automatic posting links from the site to Twitter, for this, on the left side of the program, go to the directory where the folder with the script is stored, and simply drag the folder we need to the right dialog (where the directories and files stored on the server are displayed).

You can find out the status of file transfer in the status window, which is located at the bottom of the program, it displays files that are waiting for transfer, those that could not be transferred, and those that were successfully transferred.

Remarks!
1. Files transferred to the server must not contain spaces and must consist of Latin letters.
2. If, when setting a password for php ftp server, the password exceeds 15 characters, then you will not see any error, but the password will not work.
Today's note is designed for very beginner webmasters.
What do you need to run a PHP script?
This requires a web server and a PHP interpreter. All this can be obtained on your computer absolutely free. The server is not necessarily separate computer. A web server is simply a program that can be installed on any computer, including home computers. However, it will not interfere with the operation of other programs and will not change the behavior of the computer. How to set up a web server under or is described in the relevant articles. And another article on how to make local server accessible to everyone.
If there is no desire to install and configure Apache, then you can simply order hosting. If you are not just going to try something, but want your own website, then you definitely need hosting. This note will be divided into two sections: Launching PHP programs on the local computer and running PHP on hosting.
Installing and running PHP programs on a local server
After finishing the installation and setting up the server, go to the root folder of websites. This folder, for example, could be C:Serverdatahtdocs(such a directory for those who installed by). You can copy a file or files with the extension to this directory. .php. The peculiarity of launching these files is that they are opened not by double-clicking, as we are used to, but through the browser. If the copied file is called programm.php and placed in the root directory of the web server sites, it will be available at
If in the root directory we create another directory like school(i.e. C:Serverdatahtdocsschool), and put a file in it, for example classes.php, then this file will be available at the address in the browser
If we need to install separate file, but, for example, a forum or message board or blog. For example, you can take any script, I will take a fairly popular WordPress engine. Go to his website and download.
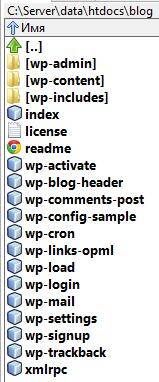
I have downloaded the file wordpress-4.1.1-en_RU.zip. Let's unpack it. Inside directory wordpress, and in this directory files:
If we want our blog to be available at http://localhost , then we need to copy the contents of the wordpress directory to the root directory of the sites, i.e. everything inside wordpress move to C:Serverdatahtdocs.
If there are many sites on our server (message board, forum, dating site, blog, etc.), then you need to copy them to a separate directory. For example, I create a directory
C:Serverdatahtdocsblog and in this directory I copy everything that is in the wordpress folder. It turns out like this:
Everything is ready, now in the browser we go to http://localhost/blog and see:
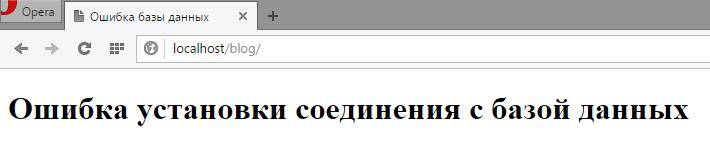
It seems that something is working, but definitely not in the way we would like.
Modern popular scripts have their own installer, or you need to manually write the data into a file (usually these files are called config.php etc.). Let's not guess, but just open the file readme.html. And we immediately find the answer:
"Open wp-admin/install.php in your browser."
Those. in our case, the path to the future blog http://localhost/blog, add to it wp-admin/install.php, as a result we get the address

Just press "Forward".
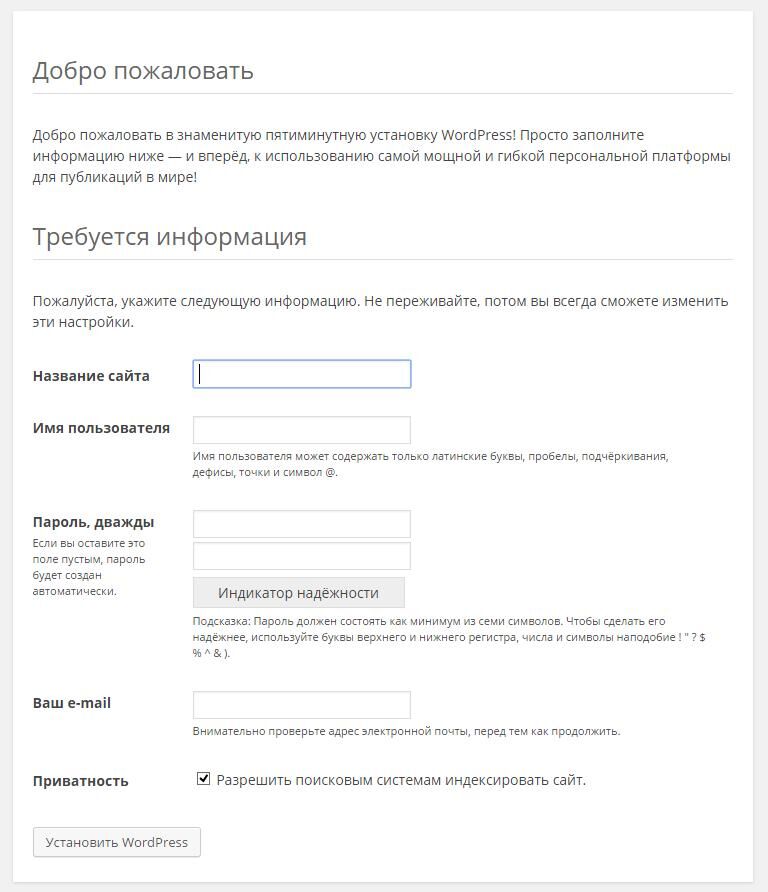
In the next window, you need to enter a username and password. Note that this is the database username, not the blog owner. Usually, on the localhost, the name root user, and the password, if you did not change it, is empty.
You also need to create a database. To do this, go to phpMyAdmin (http://localhost/phpMyAdmin/). There we go to the section " Database". Enter the name of the base and click " Create».

We return to our installing WordPress and click next.

On this window, simply click "Run the installation".

We enter the name of the site, the username (blogger) and his password - everything is clear. Press " Install WordPress” and everything will be ready - you can use the blog.
Installing and running PHP programs on hosting
First, we need hosting. Most best hosting, on which it works, including . Please note that a promo code has been entered: c79d4aad
Then you will get all the bonuses: a free month, a free domain, a discount when paying for a year, etc.
So, we already have hosting. Now we need to upload files to it. This can be done, for example, via FTP. I've been using FTP for a long time and, frankly, I'm not thrilled with this long outdated technology. An FTP connection can be configured, for example, in a file manager like (or Total Commander). There are specialized programs for communication using this protocol. I will not dwell on this in detail. Enough information. Just a hint where to find the site's root directory. For example, in my case it is here:
/site/blogs/htdocs/www/
Those. The site's root directory is located at:
your_domain/htdocs/www/
If you copy PHP file progaramm.php to this directory, it will be available at
http://your_domain/progaramm.php
Is that another useful link - domain registration . Domains in some (not all) domain zones You can get it for free if you pay for hosting for a year - keep this in mind.
Otherwise, the installation of PHP scripts on the server is exactly the same as on the hosting. If you still have questions - ask, we will figure it out together.
Let's now move on to the installation PHP language version 4. Unfortunately, at the time of this writing, PHP did not have a proper setup program that could install PHP with all the modules we need in one go, as we did with Apache. So, perhaps, its installation will seem to you a little more difficult.
First of all, you need to be patient and download two files from the official PHP website http://www.php.net in the Downloads section: one with a zip extension, and the other with an exe extension. Links to these two files are located almost at the very top of the page, after the Win32 Binaries heading. The first file is full version PHP 4 but doesn't have convenient program installation, and the second, on the contrary, is automatic program installation, but does not contain the most commonly used modules.
Important!
That was the case at the time of this writing. Perhaps in the future, PHP developers will ship the distribution as one large exe file, but this is not the case for now.
I also advise you to download the full PHP documentation, the link to which is on the page just below. I'm sure she'll help you out more than once in the future.
It is worth saying a few more words about the PHP version. The language is constantly being improved, and at the time of this writing latest version was 4.0.3. Most likely, when you read these lines, more a new version- for example, 4.0.10. Think, best solution will download the newer one, because it may have fixed some errors from previous versions of the language. The main thing is that the first digit is 4, because the third PHP is much inferior to the fourth in terms of the number of supported functions.
Installing PHP
Run the exe file you just downloaded. In the dialog box that appears, click Next.
Agree to the license terms by clicking the I Agree button. In the dialog box that appears, select the Standard installation type.
Now specify the directory where PHP will be installed. By default, C:PHP is suggested, but I think it would be more logical to choose C:Program FilesPHP4, "closer" to Apache. To specify this directory, press the Browse button and enter its name, then press the OK button as usual and then Next to proceed to the next dialog. (If you are a real programmer and like order, then do these steps for sure).
Set the address of your SMTP server (Send Mail Transfer Protocol - mail forwarding protocol), as well as your address Email. It is this server and return address that will be used for outgoing mail requests when PHP's Mail() function is called. In general, this is the same server through which your regular mail is sent. mail client- for example, Outlook Express. However, you can leave the default values in the text fields - in this case, the Mail () function simply will not work on the local machine.
Select the server on which PHP will be configured. In our case, this is Apache.
The process of copying files will begin. After its completion, perhaps there will be some more dialog boxes with various notices. Pay no attention to them.
Apache setup to work with PHP
Open file in notepad apache configuration httpd.conf, in the C:Program FilesApache GroupApacheconf directory. However, you can not search for this file manually, but use the Edit configuration shortcut in the Start menu - Programs - Apache Web Server - Management.
Find the following commented line in it:
#AddType application/x-httpd-php php
Uncomment it:
AddType application/x-httpd-php php
Thus, we have given all files with the php extension the application/x-httpd-php type.
Immediately after this line, add the following settings:
ScriptAlias /_php/ "C:/Program Files/PHP4/"
Action application/x-httpd-php "/_php/php.exe"
With this, we firstly create a _php alias for the PHP processor directory so that Apache can access it, and secondly, we associate all files with type application/x-httpd-php with the php.exe handler.
Important!
The string "_php" is taken in such a way that it won't conflict in the future with directory names that you can make on your host.
Save the changes in the configuration file, stop Apache if it was running before (shortcut Start - Programs - Apache Web Server - Management - Stop Apache), and start it again. If Apache does not start (its window opens and immediately closes), then you have allowed somewhere syntax error. In this case, you can use the troubleshooting tips above.
PHP Testing
Let's now make sure the PHP scripts work. To do this, create a test.php file in the z:/home/localhost/www directory with the following content:
echo "It works!
";
phpinfo();
?>
Now type in your browser: http://localhost/test.php. This should display a page with a variety of PHP information generated by the phpinfo() function.
Important!
We remind you that php scripts are not the same as cgi scripts. In particular, if cgi scripts are usually located in /cgi-bin/ or /cgi/, then the php script should be in the documents directory.
If the page is not displayed, then you made a mistake in the httpd.conf file. Open it again and fix the error, then don't forget to restart Apache.
Stop Apache as described above. AT otherwise only the Apache window will close, and the server itself will remain running.
Installing additional modules
After we have verified that PHP is working, we need to install additional modules for it, which are located in the downloaded zip file. Among them - tools for working with pictures, calendar, FTP (File Transfer Protocol - File Transfer Protocol), etc. It should be noted that the archive contains the full version of PHP, and not just modules for it. The only reason we didn't use it right away was the lack of a user-friendly installer. So, you need to do the following.
Unzip the zip directly into the same directory where PHP is already installed (in our example it is C:Program FilesPHP4). Some files will be overwritten, some will be added. In particular, the extensions directory will appear, containing almost all the necessary modules.
Now we need to let PHP know what modules it can use, as well as some more settings. To do this, open the php.ini file in Notepad in the directory with Windows files(usually C:WINDOWS). This file was placed there by the program PHP installations. The file is a set of lines, each of which is set to the value of one parameter. Parts of lines after the ";" character are treated as comments and are ignored.
Find the magic_quotes_gpc setting and set it like this:
magic_quotes_gpc=Off
This prevents PHP from forcing backslashes before certain characters coming from the form.
Now find and configure the following setting:
extension_dir=C:Program FilesPHP4extensions
By this we tell PHP that it should look for modules in the C:\Program Files\PHP4extensions directory, that is, exactly where it is needed. Note that the default value for this parameter is "./", i.e. in the same directory as PHP. This, of course, is wrong.
Look for commented lines that start with ;extension=. You have to uncomment those of them that correspond to the modules we need. Support for MySQL and calendar functions is already built into PHP.
It should be noted that in previous version The article described the procedure for installing PHP3, not PHP4. However, progress is making itself felt, and in the near future, PHP3, apparently, will be completely replaced by its fourth version brother (this is evidenced by at least the fact that the latter executes scripts several tens (!) Times faster, while having almost 2 times more built-in functions). In addition, PHP4 is top-down compatible with PHP3, which means that most scripts written for PHP3 will work on the fourth version of the interpreter.
The initial steps for installing almost any script on any normal hosting are the same: you need to create a database, upload the script files to the server, link the domain. This post will provide detailed instructions to install an online store script (or any other CMS) on BeGet hosting. This hosting will come in handy: 30 days of free trial access will allow you to practice to your heart's content.
This manual is suitable for almost any hosting. Since the control panels of all hosting are similar. There may be differences in the names of menu items and dialogs. But I think you will figure it out: all hosting services perform the same function and changing the names does not change the general meaning.
So, you have registered on the hosting, you have downloaded the distribution kit with the script. Let's think about what we're going to do next. A script is a collection of folders and files. These files contain instructions for managing the site. And what is a site - it is a set of data: text, pictures, goods, manufacturers. The script will use a database to store this data. Most often MySQL. This means that before installing the script, we need to create a database on the hosting, and tell the script the access parameters to this database. This is done once during installation. The site must also have a unique name: Domain name. This name is attached to the folder with the script.
It turns out that the site is physically a folder with a script that has access to the database to store all the information. Any domain name can be linked to this folder. From here, the chronology of our actions will be as follows:
- register on hosting by choosing any tariff (during the test period, the tariff is not important, and then you can change)
- download the script from the official site or from ours.
- create a hosted database
- create a website (directory for the script) and link the domain name
- upload script files to hosting
- start installation
I think it will not be difficult to register for a hosting: we select the Start tariff (in principle, it doesn’t matter which one, if it becomes crowded, you can change the tariff at any time), enter your name and E-mail in the form and wait for the letter in which passwords for access will be indicated for hosting. After registration, you have 30 days to try, if you do not want to use hosting, then after 30 days your account and sites will simply be deleted.
After registering and entering the hosting, we see the Control Panel (CP) hosting:

Create a hosted database
In order to create a database on the hosting, you need to click on the MySQL icon in the PU. As a result, the database control panel will open:

Here we specify the database name and password. Click the Create button. The database has been created. We just need to remember the entered data. We will pass them to the script during installation. We note that there is a prefix before the database name and the database name will be the name that is obtained as a result of gluing this prefix and the name that you entered. Later, when installing the script, you will need to enter: database name, username, password. The username on this hosting is not entered - it matches the database name.
Create a site (directory for the site) and link the domain name
In order to upload the script files to the hosting, we need to create a separate folder for the site: after all, several sites can be located on the hosting - the files of each should be located in a separate directory. When you create an account on hosting, one folder is automatically created: public_html. We will upload the script to it. If in the future you need to create a second site, then use the Sites item in the PU:

In order to create a site (directory) specify a name and click the create button.
Nothing complicated. In the future, we will see the created directory in the file manager when uploading script files to the hosting. Also in this control panel item, you can link (attach) one of the available domain names to the site directory. In our case, a free third-level domain name of the form AccountName.bget.ru should be linked to the public_html directory. We receive it when creating an account. In the future, a normal second-level domain name can be linked to an already created site.
Uploading script files to hosting
There are two ways to upload a script to a hosting: through file manager hosting control panel or via FTP.
How to install the script?
Even a small user experience of interaction with the uCoz system, if available understanding HTML basics and CSS will allow you to personally install the script purchased on our website. In the event that you are unable to install the script, you can order a script installation service from our specialists.
In the archive for each script you can find a file with instructions. It can be a text file in the format txt, or format page html. They will give you general information on installing the script on the site in the uCoz system.
Each script has its own zip or rar archive you need to download. The download link will be sent to your e-mail only after you make the payment for the order.
DETAILED ALGORITHM OF ACTIONS DURING INSTALLATION:
- Open the script archive and check if all the necessary files for installation are present: instructions, files for the script to work. Often the script code or styles are present in the setup document (e.g. ReadME.txt), so if you didn't find separate JS or CSS files carefully check the contents of the manual.
- Next, you need to enter the site control panel at: http://your-site/admin. Most of the subsequent actions will take place there.
- Check if the modules in which the script will run are activated. To do this, go to Control Panel - Left menu and view the Active tab. If the required module is missing, click the "Inactive" tab, find and activate the desired module.
- Now open the instructions for installing the script and start following it. As a rule, your actions should begin with loading desired files to the site's file manager or to the PHP server.
In the first case, most of the time it's just graphic files images, fonts, and so on, which must be loaded into the appropriate folders img\images, fonts, js, and others. If there are a lot of files, then it is most convenient to upload using an FTP client.
In the second is a script file. Check in the instructions if you need to change the script file in any way (format.php) before uploading it to the server. Then connect to the PHP server via FTP and upload the files folder/script file to the "scripts" root directory. - The next paragraph of the instruction boils down to placing the script code or CSS styles. Look carefully at the instructions from the archive with the script, where exactly you need to place the codes and in which template. Perhaps the code will need to be placed immediately after the closing tag , or before the closing tag
Attention: all files (for example, those with the extension txt, js, php or css), can be opened in any text editor(for example, "Notepad"), however, to edit files in the format css, js or php we recommend downloading a special editor designed for using files of this type(for example, Sublime Text 2 ).


