Testing payments. Connecting the online payment acceptance service Ya.Kassa Payment parameters
If you are connected according to the diagram Payment module or HTTP protocol, you can test your integration in the test store. When paying, everything goes as with real payments, but the money is not transferred anywhere. You can test payment in two ways: by bank card and from a Yandex.Money wallet.
The test store is available in your personal account and can be selected using the button All stores and payments.
Important. If you did not find a test store in your personal account, you may have previously worked with the Yandex.Checkout demo environment. The demo environment is being decommissioned. Write to your manager so they can connect you to a test store.
Preparation
To test payment, you will need the shopId and scid of your test store. They can be viewed in the test store settings in your personal account.
Payment verification using the CMS payment module
To test payment in the settings of the Yandex.Checkout payment module:
transfer the module to Work mode(if you enable test mode, payment will not go through);
specify the shopId and scid of the test store.
You can find instructions for installing and configuring the payment module on the Cashier website, in the section Setting up a CMS, framework or CRM, or request it from the developers of your system.
Checking payment using a payment form
Create empty file with *.html extension.
Copy the example code of the payment form you need into it.
Change the values of the shopId and scid parameters to the shopId and scid values of the test store.
Save the file.
An example of a form with a choice of payment method on a store website
> >
An example of a form with a choice of payment method on the Yandex.Checkout side
Carrying out a test payment
Step 1. Proceed to payment:
If you are using the payment module, place an order in the same way as your customers will do and proceed to payment.
If you are using a payment form, open the html file in your browser, select a payment method and click Pay. The payment method is selected on the store website or on the Yandex.Checkout side (this depends on the payment scenario).
Step 3. If your store receives notifications via HTTP (connected using the HTTP protocol or Payment module), check that the order is marked as paid in your system.
Important. Do not give away an item you paid for through a test store. To avoid problems, use a special URL for test notifications from Yandex.Checkout (it must be entered in the test store settings in your personal account).
Payment by bank card
Test bank cardsReal cards cannot be used in the test store. Instead, check your payment using the test cards below. As the validity period, specify any date (but greater than the current one), CVC and code for passing 3-D Secure - any numbers.
Testing successful scenarios
You can check payment by bank cards different types.
| Number | Card type |
|---|---|
| 5555555555554477 | MasterCard (with 3-D Secure) |
| 5555555555554444 | MasterCard |
| 6759649826438453 | Maestro |
| 4111111111111111 | Visa |
| 4175001000000017 | Visa Electron |
| 370000000000002 | American Express |
| 3528000700000000 | JCB |
| 36700102000000 | Diners Club |
Checking for Unsuccessful Scripts
Select a test card depending on the scenario you need.
| Card number | Reason for cancellation of payment |
|---|---|
| 5555555555554592 | |
| 5555555555554535 | |
| 5555555555554543 | |
| 5555555555554568 5555555555554634 | |
| 5555555555554527 | |
| 5555555555554600 | |
| 5555555555554618 | |
| 5555555555554626 | |
| 5555555555554501 | |
| 5555555555554576 | |
| 5555555555554550 | |
| 5555555555554584 | configure restrictions |
| Card number | Reason for cancellation of payment |
|---|---|
| 5555555555554592 | 3-D Secure authentication failed. The buyer should repeat the payment, contact the bank for clarification, or use another means of payment |
| 5555555555554535 | Payment with this payment method was rejected for unknown reasons. The buyer should contact the organization that issued the means of payment |
| 5555555555554543 | Your bank card has expired. The buyer should use another means of payment |
| 5555555555554568 5555555555554634 | Payment blocked due to suspicion of fraud. The buyer should use another means of payment |
| 5555555555554527 | The reason is not detailed. The buyer should contact the initiator of the payment cancellation for further details. |
| 5555555555554600 | There is not enough money to pay. The buyer should top up the balance or use another means of payment |
| 5555555555554618 | The card number is entered incorrectly. The buyer must repeat the payment and enter the correct data |
| 5555555555554626 | The CVV2 code (CVC2, CID) is entered incorrectly. The buyer must repeat the payment and enter the correct data |
| 5555555555554501 | The organization that issued the payment instrument is unavailable. The buyer should repeat the payment later or use a different means of payment |
| 5555555555554576 | The payment limit for this payment method or your store has been reached. The buyer should repeat the payment the next day or use another means of payment |
| 5555555555554550 | Operations with this means of payment are prohibited (for example, the card is blocked due to loss, the wallet is blocked due to hacking by fraudsters). The buyer should contact the organization that issued the means of payment |
| 5555555555554584 | You cannot pay with a bank card issued in this country. The buyer should use another means of payment. You can set restrictions on payments with foreign bank cards |
Payment from a wallet in Yandex.Money
To test payment from a wallet in Yandex.Money no test wallet required: in the test store, payments are made without the participation of a real wallet.
Important. Before payment, you need to log out of your Yandex.Money wallet account.
Making real payments
For stores based on a CMS or other ready-made system, you need to change the shopId and scid to real ones in the payment module settings and check that the module is in working mode.
If you do not use a payment module or other ready-made solution, replace the shopId and scid parameters in the payment form with the real ones.
Why do you need Yandex.Checkout?
Connecting your site to this payment service allows you to use the most popular methods to pay for orders from your customers. According to some estimates, there are about 70 million users in the Russian segment of the Internet, more than 20% of them use Yandex.Money to pay for services, and the remaining 80% pay by bank card, through terminals or in cash. Connecting to the Yandex.Checkout payment service will allow you to accept for payment:
Payment methods will also be available( Some payment methods are available only after agreement with the payment service manager!):
- Selecting the payment type on the Yandex.Checkout side, the client will choose the most convenient method from those available to you.
- From the user's account in Yandex.Money or from a bank card added to the e-wallet
- From any bank card that is not added to the user’s wallet in Yandex.Money
- Via payment terminal
- From a mobile phone account
- Payment from a wallet in the WebMoney system
- Payment via Sberbank: payment by SMS or Sberbank Online
- Payment via mobile terminal (mPOS)
- Payment via Alfa-Click
- Pay in installments
- QIWI Wallet
!!!On this moment integration is implemented through a Yandex widget, which only requires payment by card or through Sberbank/Internet banking
Connecting to Yandex.Checkout
Important! This payment method is available for use only if an agreement is concluded between your company and the Yandex.Checkout payment service!
Setting up a connection to accept payments via electronic payment service Yandex.Checkout consists of two main stages.
- Registration of a legal entity in Yandex.Checkout.
- Setting up a connection in Yandex.Checkout.
- Setting up a store connection in the Site Control Panel.
Let's go through it in order and indicate all the necessary settings for these stages!
1. Registration of a legal entity in Yandex.Checkout
Fill out the connection application according to instructions.
As a result, you will be taken to a page where you need to fill out a form:

2. Setting up a connection in Yandex.Checkout.
At this stage you need to fill out technical settings connections.

Select "Payment module", click "Continue".

Select ABCP from the "Your system" list.
Specify the Email to send the registers and click “Save and Continue”
Next, release the secret key according to the instructions. In addition to the secret key (secretKey), you will also need the store ID in the Yandex.Checkout service (shopId). It can be viewed in the Yandex.Checkout account in the settings section.
Important! Be sure to save the shopId and secretKey values you receive in a safe place. We will need these parameters to configure the store connection on the side of the ABCP platform.
At this point, the settings for connecting to the Yandex.Checkout payment service on the side of the Yandex.Checkout payment service are completed, let's move on to the settings on the side of the store created in the ABCP service.
3. Setting up a site in the Control Panel
This stage of setting up the payment system takes place in the user interface of your website. IN PU --> Settings --> Finance --> Setting up payment systems you need to create a new set of settings. When creating, select a system Yandex.Checkout.
Options " Description" And " Status"fill in as recommended on the payment systems description page.
In field "Counterparty ID (shopId)" Counterparty ID(shopId)
In field "Secret Key"– indicate the parameter received in the Yandex.Checkout account Counterparty's secret key(secretKey). If necessary, the key can be generated again according to the instructions.
Leave the "testShopId" and "testSecretKey" fields empty.
In field "Payment type"– indicate the payment method that Yandex will offer the client to pay for the order. To use several types, create several separate Yandex.Checkout settings.
In field "Demo mode"– is responsible for the operation of the demo mode. In demo mode, you can pay for your order in demo rubles through a test account. Test data account must be requested separately. To switch the Yandex.Checkout PS to combat mode (or to test payment on behalf of your client) and receive working credentials, select “No”.
If you use Yandex.Checkout integration with an online cash register to fiscalize checks, then you need to activate the checkbox "Send data for checks:" and choose "Company taxation type" And "Setting up VAT", which you indicated when activating the online cash register. Select "Attribute of the subject of calculation" And "Indicator of the calculation method", corresponding to your specifics.
3. Payment using Yandex.Checkout
After selection this method payment, the client will be asked to go to the website of the Yandex.Money payment service to make the payment.
After completing the payment, the client will be redirected back to your website. The Yandex.Checkout service notifies your website about the payment status using a special protocol at certain intervals. You can view the payment status on the page " Payment systems" in PU.
Please note that you have the opportunity to independently indicate any additional text on the page to go to the Yandex.Checkout website to pay for the order. You can do this in the Control Panel, page Appearance and content, Infoblocks tab, symbolic code of the required paymentViaYandexMoney infoblock.
IMPORTANT!
- You can connect this system to accept payments only if you are individual entrepreneur or legal entity.
- You can connect the payment system, Yandex Cashier, only if you have a website that is already available on the Internet using a real domain name.
- You NOT you can connect the payment system as long as your site is available on technical address for filling.
Application for connection
In the “Registration in your personal account” field you will be asked to create new mailbox(Yandex account) to which Yandex.Checkout will be linked. You cannot use the existing one.
Fill out all fields and carefully save your access data in a safe place.

After filling in all fields, click " Send a request" After which you will be taken to the page personal account Ya. Cash desk.

Questionnaire
As soon as you have access to your personal account, you need to fill out a form in it to draw up an agreement with Yandex.Checkout. You must fill out all fields in detail and upload the necessary documents. All data you fill out will be checked by Yandex employees. If there are errors in the questionnaire or there is not enough data, the manager will contact you and tell you what needs to be corrected.
After approval by Yandex, you will be sent a temporary one within 1-3 days for making test payments "SCID display number", which is necessary for exchanging data with the Yandex.Checkout payment system and your website, it must be saved subsequently.


! If you need a paper version of the contract, you can request it through the Yandex.Checkout support service.
Settings
Once you receive the “Storefront SCID Number”, start setting up the connection method. Go to your Yandex.Checkout personal account in the “Settings” section:

Go to the admin panel of your site "Settings"/"Settings" third party services"/ "Yandex.Checkout". And copy the links into the Yandex.Checkout settings, pasting them into the appropriate fields:


Set the slider to " I will make test payments» to position ON and paste the same links from the admin panel of your site into the test payment fields (demo):
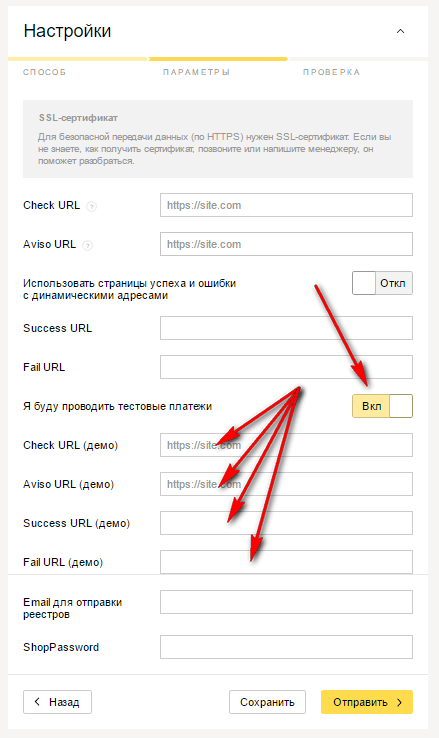
Enter a new e-mail in the field " Email for sending registers", to which Yandex.Checkout is linked.
Select a password in the " ShopPassword", at least 12 characters are recommended. To do this, you can use the password generator http://onlinepasswordgenerator.ru/
Return to the site’s admin panel and fill out the remaining fields:
1. Shop ID, we take it in the header of our personal Yandex account.
2. The “SCID storefront number” field that you received from Yandex.Checkout.
3. In the “Payment Password” field, enter the same password as in the ShopPassword field.
4. Check the box, “ Use "test mode" for configuration and debugging"

Testing online payment
1) You need to create a test product in the catalog of your site. Assign a price of 1 ruble to the test product. (Instructions for filling out the catalog and product card).
2) Create a payment method that will be used by the Yandex.Checkout payment aggregator. (Instructions for setting up payment methods for your online store)
3) Next, go to the website and add a test product to your cart, complete the purchase process and make payment using the method to which Yandex.Checkout is connected. If everything is configured correctly, you will be “redirected” to the Yandex.Checkout page, where you need to enter demo bank card data:
To test payment from a bank card
Card number: 4444 4444 4444 4448
Valid until: any year and month in the future
CVV code: 000
Setting up real payment methods
If the payment is accepted, you will receive a notification of successful payment by email. After testing online payment, you need to contact Yandex.Checkout technical support by mail or call them at 8 800 250-66-99 and inform them of your readiness to accept real payments (you will need to tell them your Shop ID).
Ya.Kassa employees will switch you to “combat” mode and send you a new working SCID code by email.
IMPORTANT! Replace it in the admin panel of your site with a new one and do not forget to uncheck the box for making test payments. "Save changes":
.PNG)
Then go to your Yandex.Checkout personal account and move the “I will make test payments” slider to the position OFF.

Don't forget to remove the test product from your catalog.
That's it, congratulations, you have connected Yandex.Checkout.
Was this article helpful?
Not reallyThank you, your rating is extremely important to us
It is very important for us to know your opinion, please write to us what information you did not find in this article, we will definitely supplement it and send you a response by letter.
Yandex.Checkout is a popular service for accepting online payments; it allows you to accept bank cards, electronic money, cash and more.
To enable the module, go to the control panel of your site and in the top menu select Modules →
Module management → Sales- - Turn on .
After installation, the module will appear in the menu Modules → Yandex.Checkout.
How to connect to Yandex.Checkout?
- Apply for connection using the link and get access to your personal account.
- Fill in the form.
- Select the API connection method.
- Sign the contract.

Technical data required for registration and connection to Yandex.Kassa
In your Yandex.Kassa personal account, open Settings/Store, "URL for notifications" specify https://site_name/phpshop/modules/yandexkassa/payment/check.php
The Secret Key field must be copied from your Yandex.Checkout personal account (Settings/API Keys, Secret Key).
The ShopID field must be copied from your Yandex.Checkout personal account (Settings/Store, shopId).
In the "Payment with status" setting, select the order status at which the user will be able to pay for the order using this method. If the "New order" status is selected, the user will be able to pay for the order immediately after placing it. The message specified in the "Payment description" field is displayed after placing an order if the order status does not match the status specified in the "Payment upon status" setting.
Delivery setup
The VAT rate parameter for delivery can be configured in the delivery edit card.
Design templates
Template for displaying information about payment system after registration: /phpshop/modules/yandexkassa/templates/payment_forma.tpl
Successful payment message template: /phpshop/modules/yandexkassa/templates/success_forma.tpl
Successful payment message template: /phpshop/modules/yandexkassa/templates/fail_forma.tpl
Starting from version 6.0.1, the Yandex.Checkout module uses the API new version, you need to change the Secret key in the module settings. It must be copied from your Yandex.Checkout personal account (Settings/API Keys, Secret Key). You need to contact the Yandex.Checkout manager and ask to change the protocol to the Yandex.Checkout API. In the same message to the manager, you can inform that for the new protocol you need to set the URL for notifications: https://site_name/phpshop/modules/yandexkassa/payment/check.php
This is a universal payment tool for online stores, online services and charitable foundations. Through the Cashier you can receive one-time or regular payments (with automatic debiting) from bank cards Visa, MasterCard and Maestro, as well as cash (through terminals and communication shops), electronic money (Yandex.Money and WebMoney), from a mobile account and through Internet banking (Sberbank Online, Alfa-Click, MasterPass). Legal entities or individual entrepreneurs can work with the Cashier.
! Important!
First you need to make an online store. And this online store should be complete.
- Must not be blank pages;
- You must provide contact information and company information;
- You need to connect your domain like site.ru:
- In other words, look at your online store. Is it finished? If yes, then connect Yandex.Checkout.
Let's start registration
1. Go to the website https://kassa.yandex.ru/ and click the register button on the slider
2. After this, you will be redirected to the connection application page where you will need to indicate in the first part:

- Type of organization (individual entrepreneur or Entity)
- Your website address
- Select the country in which you are registered from the available ones
- Indicate your TIN (Taxpayer Identification Number)
- The contact person
- Email for contact
- Contact phone number (be sure to indicate your current number)
- Smartphone terminal (not required for operation, at your discretion)
In the second part, you need to fill in the information for registration in your Yandex.Checkout account. It is recommended to use this account in the future only to work with this service.

- come up with a login for your account, it will look like [email protected]
- please indicate strong password and repeat it in the field below. Passwords like qwerty, asdfg, zxcvb or consisting of your phone number or date of birth are not reliable.
- indicate the code word, you will need it to restore access to your account, save it securely and don’t tell anyone.
Enter the code from the picture and click on the “Submit Application” button.
3. If you entered everything correctly, after clicking the button you will see the following message:

Click on “Continue” and move on to the next step.

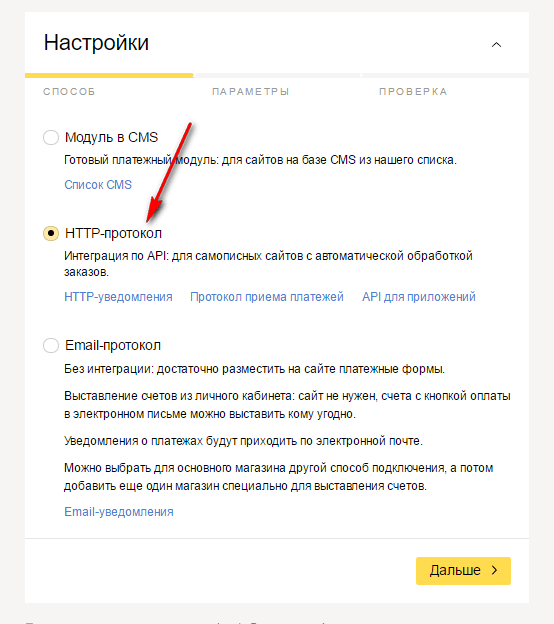
5. After you have filled out the form, you can start connecting Yandex itself. Cash register by clicking on the “Select method” button, we need the HTTP protocol.

Where to indicate:
- checkURL - https://domain.ru/yandex_kassa_check
- avisoURL - https://domain.ru/yandex_kassa_aviso
- successURL -http://domain.ru/yandex_kassa/ success
- email for sending registers
- ShopPassword - create a strong password for your store (needed for later settings)
Important:
- domain.ru should be replaced with your domain name.
- checkURL and avisoURL - must be specified with the https protocol.
- The option “Use success and error pages with dynamic addresses” does not need to be checked.
It should look like this:

7. At this stage, the setup is complete, all you have to do is wait until your application is accepted. And you will complete the necessary requirements that the Yandex cash register manager may ask you to do. If you have indicated everything correctly, your documents have been approved and your application has been accepted. You will be given a “Counterparty ID” and “Counterparty Showcase Number”, first you will be given test data, if you come for verification you will be given real data. If you received them, we can move on.
8. Now you need to configure Bazuim itself to work with Yandex.Checkout. To do this, go to the “” settings page, you need to check the item indicated in the screenshot below:

- Counterparty ID (Fig. 1)
- Counterparty showcase number (Fig. 1)
- Store password (Fig. 1)
Important! Before you are given real IDs and a storefront number. The Yandex.Checkout manager will give you data for making a test payment. You need to indicate them, and also mark the “test mode” checkbox (Fig. 2). After you pass the verification, you will be given real data.

That's all, your website is ready to accept payments through this system.


