Windows 10 computer boots slowly when turned on. Inaccurate handling of hard drive partitions
Let's figure out what steps should be taken if Windows 10 does not start in various situations: black screen, error, PC does not start correctly, Boot Failure and other boot problems operating system.
The main thing when a problem occurs is to remember what happened to the system before the last shutdown or reboot. The error may be caused by installing a program, updating the BIOS or Windows 10, adding a new device, malware activity, or the appearance of bad sectors on the hard drive.
Before you do anything, keep in mind that following some instructions may not only make the situation better, but also make it significantly worse, so be prepared for any eventuality in your attempt to get Windows back to working order.
Black screen
There may be a couple of factors that cause the cursor to appear on a black background:
- malware has interfered with the conductor's operation;
- something is wrong with the video card drivers.
For the first case, a separate article has been written about solving the black screen problem. In short, you need to launch Explorer, and then check your computer for viruses and unwanted software, which most likely replaced the explorer.exe file responsible for the operation GUI Windows.
1. Press Ctrl+Alt+Del or open context menu launch.
3. Using the “File” menu item, launch a new “explorer” task.

4. In the same way or through the “Run” line (Win + R) execute the “regedit” command.

5. Expand the HKLM branch.
6. Go to the Software section.
8. In the Winlogon folder, look for a parameter called Shell and double-click on it.
This key is responsible for launching the graphical shell, which was probably replaced by a virus.

9. Change its value to explorer or explorer.exe and save the adjustments.

If you are using a multi-display system or a TV is also connected to the computer, you need to do the following to correct the situation.
- On the lock screen, press Backspace to delete it.
- Log in to the system by clicking “Enter”.
- When using a protected account or account Microsoft switch the keyboard layout to the desired one and enter the password blindly.
- We wait about a minute until the system boots completely (it all depends on the speed of the PC, the OS configuration and the speed of its startup).
- Call the projection dialog (screen image output parameters) for several displays using Win+P.
- Click on the “cursor right” button (sometimes “cursor down”).
- Click "Enter".

This function will duplicate the image on both monitors, which guarantees that the image will appear on the second display if this is the problem.
The OS takes an incredibly long time to load
After prolonged use, the operating system naturally begins to work slower. If downloading “ten” has become unbearably long, you need to restore order in the startup list.
1. Call “Task Manager” via Win→X.
3. Remove all programs that are not needed at startup via the context menu.

This can significantly reduce operating system boot time.
Additionally, you can defragment the system volume.
1. Open “Properties” of the C:\ drive.
2. Go to the “Service” tab and click “Optimize”.

3. Select the system partition and click “Optimize” again.
Additionally, you should clean system disk from junk files, and the registry from erroneous keys. CCleaner is best suited for this.
Failures after the next update
There were no more problems after installing updates than in Windows 10 with any operating system. In this case, the conflict is resolved by simply rolling back the system to its previous state if the option to create rollback points when making changes to the system is activated. Windows registry and in case of modification system files.
1. Reboot the computer using Reset.
2. After self-testing, press F8 several times to make the system recovery menu appear.
3. Click on the “Diagnostics” icon.

4. Visit the additional options, where we select the “System Restore” item.


6. Select the last rollback point or the state before the problem appeared.

In a few minutes a new version Windows 10 will be replaced by an older one in pre-boot mode.
Error “The computer is not started correctly”
The window appears " Automatic recovery" indicates that some system files are damaged by erasing them, modifying them, or damaging the sectors in which the files are stored.

One way to solve the problem is to call additional parameters. In the window with their list, click “Boot Options”, then “Reboot”.

After the system restarts, press “6” or “F6” to boot into safe mode with support command line.

We sequentially enter and execute the commands:
- sfc /scannow
- dism /Online /Cleanup-Image /RestoreHealth
- shutdown -r.
As a result, all system files will be scanned and, if damaged, restored.
After the Windows 10 logo appears, the PC turns off spontaneously
The problem is in many ways similar to the previous one, but it cannot be solved by calling the recovery environment; for this you will need a distribution kit with “tens” installation files.
After creation bootable flash drive or recovery disk, boot from it and do everything as in the previous case: call “Advanced options” and reboot in safe mode with the command line.
Errors with messages An operating system wasn’t found and Boot Failure
Black background with white text that downloading is not possible and a suggestion to check the priority of download devices or paste bootable media indicates an incorrect boot device sequence in the BIOS/UEFI.

Correct prioritization in the list of boot devices will help get rid of the error in both cases. To do this, reboot and go into the BIOS, visit the menu Boot Device Priority, Boot Options or something else with the word Boot. Select the hard drive with the operating system as the main boot device and save the new settings.
If after all, Windows 10 does not start, check the functionality of the hard drive: is it detected in the BIOS, is the cable damaged.
INACCESSIBLE_BOOT_DEVICE
The error indicates that the operating system loader did not gain access to the Windows 10 disk due to its modification file system, the appearance of bad sectors in which system files are written, or physical/logical defects with the volume or hard drive. This can be caused, for example, by manipulation of partitions via ATI.

One option to solve the problem is to boot the PC in the “Advanced Settings” mode or start the PC from a recovery disk or installation flash drive to open the command line (both cases are described above). How to determine the system volume is also described. Knowing its letter label, in the command line window we run the command “chkdsk C: /r” to scan system files in order to restore damaged ones.
Try to keep the image ready Windows systems 10 with all pre-installed software for quickly reinstalling the OS in critical situations when the above tips do not help solve the problem.
Many of the things we associated Windows with slowly disappear over the years as technology advances and we form new habits to accommodate. For example, I remember the days when to download to safe mode I just had to press F8 repeatedly.
It was such a little secret - something like a life hack that you could teach a friend at the right time over the phone. Those days are long gone, however, even if entering Safe Mode has become more confusing, it is also a hallmark of progress in the Windows boot sequence.
Windows 10 Safe Mode
In a safe Windows mode automatically excludes some programs and drivers that are not necessary for loading and normal operation of Windows. And he takes only what is necessary in minimal quantities. This way, the download process will be fast and safe.
In Windows 10, booting your computer into Safe Mode is slightly different from previous versions Windows. Starting with versions 8 and 8.1, Microsoft changed the way everyone used to get into safe mode.
If previously we simply used the F8 keys or the Shift + F8 combination to enter Safe Mode, then in Windows 10 these old methods rarely work. But this does not mean that you do not have another way to enter Safe Mode in Windows 10. In this post, I will show you 4 ways to boot your Windows 10 computer into Safe Mode. Let's take a look.
#1 F8 or F8 + Shift
In this case, the oldest method is not the best. Pressing F8 or F8 + Shift repeatedly during boot can bring back memories of your first Windows 95 or XP. But the truth is that these key combinations will rarely work in Windows 10.
Since Windows 8, Microsoft has been able to significantly reduce boot times and therefore a large percentage modern computers too fast to register these keystrokes. Even if the method is still technically supported by the operating system, the system simply cannot react fast enough.
Of course, you should try this easiest method first. If everything went well, you will be directed to the Advanced Boot Options Menu, where you can select and launch Safe Mode.
Note: You must press the key quickly enough until the boot logo appears. The boot logo will look like a picture, which may be different for each user, depending on the equipment manufacturer.
#2 Special download options
The Custom Boot Options menu was introduced in Windows 8.1 and it provides a wide range of options for users who have problems with their computer. It also gave access to additional boot options, which is what we needed. Below are several ways to access the menu with special boot options:

- One of the easiest ways to boot into a menu with special boot options is a combination of Shift and the reboot button. To do this, press the button Shift and press reset button. This can be done in Start Menu, V login menu And other places, where there is a reboot button.
- Another way is to connect recovery disk. Immediately after connecting the drive, start the system. You will be asked to select a keyboard layout, after which you will be taken to a menu with specific boot options. Creating a recovery disk is very easy. Simply type "recovery drive" into the search field, plug in the flash drive, and follow the onscreen instructions.
- Finally, you can boot into a menu with special boot options, via Settings > Update & Security > Recovery. There, click the "Restart now" button under the Special boot options chapter and your computer will restart.
All three of these methods will take you to the same menu. There select Diagnostics > Advanced Options > Boot Options. Then click the reboot button, after which various download options will appear on the screen. Press F4, F5 or F6 to load one of available options safe mode.

#3 System configuration
The System Configuration menu provides the most quick method, at least when you're already on Windows. Open the search field, enter msconfig.exe and press Enter. Then, in the tab, check the “Safe Mode” box. If you want to enter Safe Mode with advanced options, select the option Another shell, not minimal. Click OK and you will be prompted to reboot the system immediately.

If you need to do something before rebooting, then simply select the “Exit without rebooting” option and you can restart your PC after.
#4 Startup abort
The last method is a little harsh, but necessary in some cases. For example, if you cannot boot into the desktop, then of all the options that I described above, only one is guaranteed to work on Windows 10 - the recovery disk. Pressing F8 or F8 + Shift simply won't work on most modern computers, and unless you have a recovery disk, there seems to be no way to get into Safe Mode.
If this is your situation, then I want to reassure you that you can still get into safe mode. Do you remember that your computer crashed repeatedly and then displayed a message notifying you that Windows work was completed incorrectly, or the launch was interrupted (like the screenshot below)?

You can do the same with your computer. Just start your computer and abort the startup before or during the appearance Windows logo. Do this three times and then allow your PC to start normally. Instead of booting to the desktop, your PC will ask you how to start the system, and Safe Mode will be among the available options.
As a rule, after the initial Windows installations 10 the computer simply “flies”: pages open in the browser very quickly and any, even the most resource-intensive programs are launched. But over time, users load hard drive necessary and unnecessary programs, which create additional load on the central processor. This dramatically affects the speed and performance of a laptop or computer. A considerable amount of resources is taken up by all sorts of gadgets and visual effects that some inexperienced users love to decorate their desktop with. Computers that were purchased five or ten years ago and are already obsolete “suffer” more from such ill-considered actions. They cannot maintain at a certain level the system requirements that are necessary for the normal operation of modern programs, and begin to slow down. To understand this problem and get rid of freezes and slowdowns of devices based on information technology, you need to carry out a step-by-step diagnostic complex.
Why does a computer or laptop with Windows 10 start to freeze and slow down: reasons and solutions
To figure out what is causing the computer to slow down, you need to conduct a comprehensive check of the device. All possible ways are already known and tested, all that remains is to get to the bottom of a specific problem. By correctly identifying the cause of device slowdown, it is possible to increase performance by twenty to thirty percent, which is especially important for outdated models of laptops and computers. The check will have to be carried out in stages, gradually eliminating the tested options.
Not enough processor power for new software
Excessive load on the central processor is one of the most common reasons that causes a computer to freeze and lead to a decrease in its performance.
Sometimes users themselves create additional load on the processor. For example, install 64-bit Windows version 10 per computer with four gigabytes random access memory, which can hardly cope with the amount of resources consumed for this edition of the distribution, despite the 64-bit processor. In addition, there is no guarantee that when all processor cores are used, one of them will not have a defect in the silicon crystals, which will negatively affect the speed properties of the product. In this case, switching to a 32-bit version of the operating system, which consumes much less resources, will help reduce the load. The standard amount of RAM of 4 gigabytes is quite enough for her with clock frequency processor 2.5 gigahertz.
The cause of your computer freezing or slowing down may be a low-power processor that does not satisfy system requirements, which modern programs present. When several quite resource-intensive products are turned on simultaneously, it does not have time to cope with the flow of commands and begins to crash and freeze, which leads to constant slowdown in work.
Check the load on the processor and get rid of unnecessary work this moment applications in a simple way:
- Launch Task Manager by pressing the combination Ctrl keys+ Alt + Del (you can also press the combination Ctrl + Shift + Del).
Click on the “Task Manager” menu item
- Go to the "Performance" tab and view the percentage of CPU load.
View CPU percentage
- Click the “Open Resource Monitor” icon at the bottom of the panel.
In the Resource Monitor panel, view CPU percentage and graphics usage
- View CPU load in percentage and graphical form.
- Select the applications that you don't currently need running and right-click on them. Click on the “End process” item.
Select unnecessary processes and terminate them
Often, additional processor load occurs due to the continued activity of a closed application. For example, the user was communicating with someone via Skype. At the end of the conversation, I closed the program, but the application still remained active and continued to load the processor with unnecessary commands, taking away some of the resources. This is where the “Resource Monitor” will help, in which you can complete the process manually.
It is advisable to have a processor load of between sixty and seventy percent. If it exceeds this figure, then the computer slows down, as the processor begins to skip and reset commands.
If the load is too high and the processor is clearly unable to cope with the volume of instructions from running programs There are only two ways to solve the problem:
- purchase a new central processor with a higher clock speed;
- don't run a large number of resource-intensive programs at the same time or reduce them to a minimum.
Before you rush to buy a new processor, you should definitely try to find out the reason why the performance has decreased. This will allow you to make the right decision and not waste cash. The reasons for braking may be:

After carrying out the initial steps to identify the causes of slowdown in work, you can move on to a more thorough check of the computer components and system software.
Video: how to disable unnecessary processes through the Task Manager in Windows 10
Hard drive problems
Braking and freezing of a computer or laptop can occur due to problems with the hard drive, which can be either mechanical or programmatic nature. Main reasons slow work computer:

Video: what to do if the hard drive is 100% loaded
Lack of RAM
One of the reasons why your computer slows down is a lack of RAM.
Modern software requires more and more resources, so the amount that was enough to run older programs is no longer enough. The update is proceeding at a rapid pace: the computer, which until recently successfully coped with its tasks, today begins to slow down.
To check the amount of memory used, you can do the following:

If your computer slows down and freezes due to lack of memory, you can try to fix the problem in several ways:

Video: How to optimize RAM using Wise Memory Optimizer
Too many programs in startup
If a laptop or computer is slow to boot, this indicates that too many applications have been added to startup. They become active already at the moment of system startup and additionally take up resources, which leads to slowdown.
During subsequent work, startup programs continue to be active and slow down all work. You need to check “Startup” after each application installation. It is possible that new programs will be added to autorun.
“Startup” can be checked using the “Task Manager” or a third-party program:
- Using Task Manager:

- Using Glary Utilites:

Video: how to remove a program from Startup in Windows 10
Computer virus infection
If a laptop or computer that previously worked at good speed begins to slow down, then possible reason This may result in the penetration of a malicious virus program into the system. Viruses are constantly modified, and not all of them manage to get into the antivirus program database in a timely manner before the user catches them from the Internet.
Many viruses are embedded in browsers. This becomes noticeable when working on the Internet. There are viruses created to destroy documents. So their range of action is quite wide and requires constant vigilance. To protect your computer from virus attacks, you must always keep your antivirus program turned on and periodically conduct a full scan.
The most typical types of virus infection are:
- many options on the page when downloading files. As a rule, in this case it is possible to pick up a Trojan, i.e. a program that transfers all information about the computer to the owner of the malicious program;
- many enthusiastic comments on the program download page;
- phishing pages, i.e. fake pages that are very difficult to distinguish from genuine ones. Especially those that ask for your phone number;
- search pages with a specific focus.
The best thing you can do to avoid catching a virus is to avoid unverified sites. Otherwise, you can get such a problem with your computer braking that nothing will help except complete reinstallation systems.
Overheating of components
Another one common reason Slow computer operation - processor overheating. It is most painful for laptops, since its components are almost impossible to replace. The processor is very often simply soldered into motherboard, and replacing it requires specialized equipment.
Overheating on a laptop is easy to determine: in the area where the processor and hard drive are located, the case will constantly heat up. The temperature regime must be monitored so that any component does not suddenly fail due to overheating.
To check the temperature of the processor and hard drive, you can use various third-party programs:
- AIDA64:
- download and run the AIDA64 program;
- click on the “Computer” icon;
In the AIDA64 program panel, click on the “Computer” icon
- click on the “Sensors” icon;
In the "Computer" panel, click on the "Sensors" icon
- In the “Sensors” panel, view the temperature of the processor and hard drive.
View CPU temperature and hard drive in the “Temperature” section
- HWMonitor:

If the temperature limit is exceeded, you can try the following:
- disassemble and clean the laptop or system unit computer from dust;
- install additional fans for cooling;
- remove as many visual effects and firewall communications with the network as possible;
- buy a laptop cooling pad.
Video: how to find out the processor temperature in Windows 10
Insufficient paging file size
The problem with an insufficient paging file stems from a lack of RAM.
The less RAM, the larger the page file is created. This virtual memory is activated when the standard memory is insufficient.
The page file begins to slow down the computer if several resource-intensive programs or some other powerful game. This usually happens on computers with no more than 1 gigabyte of RAM installed. In this case, the page file can be increased.
To change the page file in Windows 10, do the following:
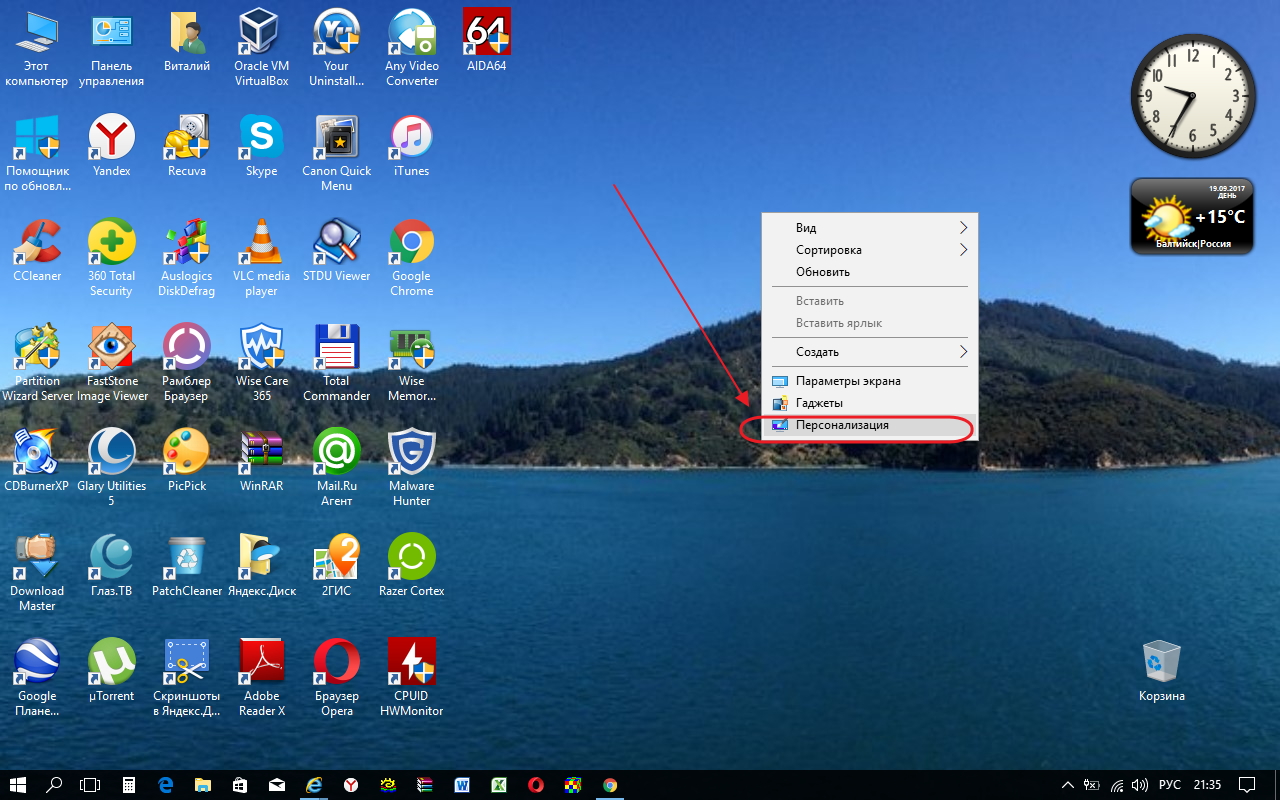
- Right-click on the “This PC” icon on your desktop.
- Select the "Properties" line.
Select “Properties” from the drop-down menu
- Click on the “Advanced system settings” icon in the “System” panel that opens.
In the panel, click on the “Advanced system settings” icon
- Go to the “Advanced” tab and in the “Performance” section, click on the “Options” button.
In the “Performance” section, click on the “Options” button
- Go to the "Advanced" tab and in the " Virtual memory» Click on the “Change” button.
In the panel, click on the “Edit” button
- Specify the new paging file size and click OK.
Specify the size of the new swap file
Video: how to resize, delete or move the page file in Windows 10
Impact of visuals
If the computer or laptop is outdated, then the braking can be greatly influenced by a large number of visual effects. In such cases, it is better to minimize their number to increase the amount of free memory.
There are two options for this:
- Remove desktop background:
- Minimize visual effects:

Video: How to disable unnecessary visual effects
Much dust
Over time, the processor or power supply fan personal computer covered with a layer of dust. The elements of the motherboard are also susceptible to this. This causes the device to heat up and slow down the computer, as dust disrupts air circulation.
Periodically you need to clean the computer components and fans from dust. This can be done using an old toothbrush and a vacuum cleaner.
Firewall restrictions
Even if there is no Internet connection, the computer accesses network connections. These requests are lengthy and consume a lot of resources. It is necessary to limit their number as much as possible to speed up performance. To do this, do the following:
- Open Control Panel by double-clicking the corresponding icon on your desktop.
- Click on the "Windows Firewall" icon.
Click on the Windows Firewall icon
- Click on the “Allow interaction...” button.
Click on the “Allow interaction...” button
- Click on the “Change settings” button and uncheck unnecessary applications.
Disable unnecessary applications by unchecking
- Save your changes.
You need to disable the maximum number of programs that have access to the network to speed up your computer.
Too many junk files
The computer may slow down due to accumulated junk files, which also use RAM and cache resources. The more garbage on the hard drive, the slower the laptop or computer runs. The largest volume of files of this type consists of temporary Internet files, information in the browser cache, and incorrect registry entries.
You can fix this problem using third party programs eg Glary Utilities:
- Download and run Glary Utilities.
- Go to the “1-Click” tab and click on the green “Find problems” button.
Click on the “Find problems” button
- Check the "Auto-remove" box.
Check the box next to “Auto-remove”
- Wait until the computer scan process completes.
Wait until all problems are resolved
- Go to the "Modules" tab.
- Click on the “Security” icon on the left side of the panel.
- Click on the “Erase traces” button.
Click on the “Erase traces” icon
- Click on the “Erase traces” button and confirm the erasure.
Reasons why certain programs slow down and how to fix them
Sometimes the reason for the computer slowing down may be the installation of a game or application.
Games slow down
Games often slow down on laptops. These devices have lower speed and performance than computers. Additionally, laptops are not designed for gaming and are more prone to overheating.
A common reason why games slow down is a video card for which the wrong driver is installed.
To resolve the issue, you can do the following:

Sometimes gaming applications can slow down your computer due to the activity of the uTorrent client, which distributes files and heavily loads the hard drive. To fix the problem, you just need to close the program.
The computer slows down due to the browser
The browser may become sluggish if there is a lack of RAM.
You can fix this problem by doing the following:
- install latest version browser;
- close all unnecessary pages;
- check for viruses.
Driver problems
The reason for the computer slowing down may be a conflict between the device and the driver.
To check, do the following:
- Go to computer properties and in the “System” panel, click on the “Device Manager” icon.
Click on the "Device Manager" icon
- Check for yellow triangles with exclamation marks inside. Their presence indicates that the device is conflicting with the driver and requires an update or reinstallation.
Check for driver conflicts
Vitaly Ovchinnikov
A problem with long switching on computer disease is quite common and has different symptoms. This can be either a freeze at the stage of displaying the logo of the motherboard manufacturer, or various delays already at the start of the system itself - a black screen, a long process on the loading screen, and other similar troubles. In this article, we will understand the reasons for this PC behavior and consider ways to eliminate them.
All reasons for long delays when starting a computer can be divided into those caused by software errors or conflicts and those that arise due to incorrect operation physical devices. In most cases, it is the software that is to blame - drivers, startup applications, updates, and BIOS firmware. Less commonly, problems arise due to faulty or incompatible devices– disks, including external ones, flash drives and peripherals.
Reason 1: BIOS
“Brakes” at this stage indicate that the motherboard BIOS takes a long time to poll and initialize devices connected to the computer, mainly hard disks. This happens due to lack of device support in the code or incorrect settings.
Example 1:
You have installed new disk into the system, after which the PC began to boot much longer, moreover, at the POST stage or after the motherboard logo appeared. This may indicate that the BIOS is unable to detect device settings. The download will still occur, but after the time required for polling has elapsed.
In this case, there is only one way out - update the BIOS firmware.
Example 2:
You bought a used motherboard. In this case, a problem may arise related to the BIOS settings. If the previous user changed the settings for his system, for example, configured combining disks into a RAID array, then there will be long delays at startup for the same reason - a long poll and attempts to search for missing devices.
The solution is to bring BIOS settings to the "factory" state.
Reason 2: Drivers
The next “big” boot stage is launching device drivers. If they are out of date, significant delays may occur. This is especially true for software for important components, such as the chipset. The solution to the problem is to update all drivers on your computer. It is most convenient to use special program, such as , but you can get by with system tools.

One of the factors influencing the speed of system startup is programs configured to autoload when the OS starts. Their number and features affect the time required to move from the lock screen to the desktop. Such programs include drivers for virtual devices - disks, adapters, and others installed by emulator programs, for example.
To speed up system startup, at this stage you need to check which applications and services are included in startup, and remove or disable unnecessary ones. There are other aspects that are worth paying attention to.
Concerning virtual disks and drives, then you need to leave only those that you often use or even turn them on only when necessary.
When we talk about lazy loading, we mean a setting in which programs that are mandatory, from the user's point of view, automatic start, start a little later than the system itself. By Windows default launches all applications at once whose shortcuts are located in the Startup folder or whose keys are registered in a special registry section. This creates increased resource consumption and long wait times.
There is one trick that will allow you to first fully deploy the system, and only then launch the necessary software. Will help us realize our plans "Task Scheduler", built into Windows.
- Before setting up lazy loading for any program, you must first remove it from startup (see articles on loading acceleration at the links above).
- We launch the scheduler by entering the command in the line "Run" (Win+R).

It can also be found in the section "Administration" "Control Panels".

- In order to always have quick access to the tasks that we will now create, it is better to place them in a separate folder. To do this, click on the section "Task Scheduler Library" and select the item on the right "Create a folder".

We give a name, for example, "AutoStart" and press OK.

- Click to go to a new folder and create a simple task.

- We give the task a name and, if desired, come up with a description. Click "Further".

- In the next window, switch to the parameter "When you log on to Windows".

- Leave the default value here.

- Click "Review" and we find executable file the desired program. After opening, click "Further".

- In the last window, check the parameters and click "Ready".

- Double-click on the task in the list.

- In the properties window that opens, go to the tab "Triggers" and, in turn, double-click to open the editor.

- Place a checkbox next to the item "Save for" and select the interval in the drop-down list. The choice is small, but there is a way to change the value to your own by directly editing the task file, which we will talk about later.

- 14. Buttons OK close all windows.
In order to be able to edit a task file, you must first export it from the scheduler.
- Select a task in the list and press the button "Export".

- The file name does not need to be changed, you just need to select a location on the disk and click "Save".

- We open the resulting document in the editor (not with an ordinary notepad, this is important) and find the line in the code
PT15M Where 15M– this is the delay interval we have chosen in minutes. Now you can set any integer value.

- Another important aspect is that, by default, programs launched in this way are assigned low priority for accessing processor resources. In the context of this document parameter can take values from 0
before 10
, Where 0
– real-time priority, that is, the highest, and 10
- the lowest. "Scheduler" writes the value 7
. Line of code:
7 
If the program being launched is not very demanding on system resources, for example, various information utilities, panels and consoles for managing the parameters of other applications, translators and other software running in the background, then you can leave the default value. If this is a browser or other powerful program that actively works with disk space, requiring significant space in RAM and a lot of processor time, then it is necessary to increase its priority from 6 before 4 . It is not worth higher, as malfunctions in the operation of the operating system may occur.
- Save the document using a keyboard shortcut CTRL+S and close the editor.
- Removing a task from "Planner".

- Now click on the item "Import task", find our file and click "Open".

- A properties window will automatically open where you can check whether the interval we specified is preserved. You can do this on the same tab. "Triggers"(see above).

Reason 4: Updates
Very often, due to natural laziness or lack of time, we ignore offers from programs and the OS to reboot after updating versions or implementing any actions. When the system is restarted, files, registry keys and settings are rewritten. If there are many such operations in the queue, that is, we have refused to reboot many times, then the next time you turn on the computer, Windows may “think” for a long time. In some cases even for a few minutes. If you lose patience and force a restart of the system, this process will begin again.
There is only one solution: patiently wait for the desktop to load. To check, you need to reboot again and, if the situation repeats, you should move on to searching for and eliminating other causes.
Reason 5: "Iron"
Lack of computer hardware resources can also negatively affect its startup time. First of all, this is the amount of RAM into which the necessary data is loaded during loading. If there is not enough space, then there is active interaction with hard drive. The latter, as the slowest PC node, slows down the system start even more.
The solution is to install additional memory modules.
Hi all! Yesterday one client asked me to look at his laptop, the fact is that it took him quite a long time to load, three whole minutes. Finding out the reason took the same amount of time. If you're wondering how This I did it, read this a short article.
Windows 10 takes a long time to load. Or how to quickly determine which application is slowing down the loading of the operating system the most
Many articles and even books have been written about how to reduce the startup time of the operating system, they all advise the same thing - then they show where this startup is located and how to disable it. I think this approach is wrong, because OS startup can be slow antivirus program, and you can’t disable it from startup, besidesA modern user has several dozen programs installed on his computer, and he needs many of them at startup. Therefore, to make a start Windows is faster, need to first of all install - Which application is causing the OS to take a long time to load? In the future, you need to deal with this application; reinstallation often helps, and if this does not help, then you need to look for an alternative in the form of another program or some other solution.
Diagnosing a slow start in Windows 10 can be done using the event log, but this method is long and will not show you the culprit program. I can say the same about the diagnostic package “CheckBootSpeed" . You can also use the tricky one« » , but novice users will run away from the site as soon as I start talking about it.Also determine which application is slowing down the most Windows startup 10 can program"", e You need to run it and see the total boot time of Win 10, then disable programs from startup one at a time and so on ( hours in 12) you will understand why your Windows 10 takes a long time to load.
Friends, I won’t bore you and will show you the simplest (in my opinion) solution using the example of my client’s laptop.
Launch the Manager Windows tasks 10.
Read more.

The Task Manager opens, go to the “Startup” tab.
We see the columns "Publisher", "State", "Impact on launch."
In our case it can help “Influence on launch”, but agree, the definition"High", it's all the same general concept. I would like to know the impact on startup in seconds or milliseconds and it is feasible.

Right-click on the column “Publisher” or any other and select the item in the drop-down menu"CPU at startup."

A new column appears “CPU at startup”, displaying the CPU usage time of each startup application Windows 10. Time is shown in milliseconds (1000 milliseconds equals 1 second). That is, in simple words we can say that the program " Download Master" delayed loading the operating system by 3 seconds.Acronis True Image 2017 has three services in autostart and slows down the OS startup by 0.5 seconds.But the strange application "Chilschilchik" (which turned out to be malware) delays the system startup by as much as 10 seconds!Also, an attentive reader may notice the malicious “Amigo” browser, whose impact on the OS loading speed is as much as 8 seconds.


