Asus zenfone 2 laser with good camera. Zen UI: useful services
Introduced in early 2013 a budget option elite family of Ziksel routers Keenetic Start immediately gained popularity in the brand's new price segment of the market "about 1000 r". For a relatively low price, the manufacturer provided everything the same invariably high quality and device reliability. The router was designed to function both with a wired connection and to distribute a Wi-Fi network. Thanks to a high-quality antenna, the maximum transmission speed this device via radio reached 150 Mbps, and setting up the Zyxel Keenetic Start router became even faster and more intuitive.
But, no matter how well-developed the process is, many may still have the question of how to connect the router to the Internet and iptv (dedicated video channel for the TV) on their own. This article is devoted to this algorithm.
In order for the router to work for the first time, you need to take a few simple steps:
- Connect the device to the network using the power supply and pressing the power button;
- Connect the router to an external network (provider cable) via the WAN port (highlighted in color on the rear panel);
- Connect the PC via the included cable (plugged into one of the five connectors);
- Check the correctness of the execution by the indicators on the front panel: the power light, network connection and the port indicator with the inserted cable for the PC should be on;
After we can open the computer, check the network connection (if there is an “Access restricted” error) and set an important setting:
- From the tray (a place on the Start panel next to the time and date) open the "Network Control Center ..." by right-clicking on the network icon;
- In the window that opens, find the adapter settings tab and open it;
- On a working connection, right-click and select properties;
- In a new window, we are looking for the fourth version of the Internet protocol, using the button below the list, open the properties;
- For both selectors, we set automatic receipt (IP and DNS);
With this, the Wi-Fi network connection for the Rostelecom provider and any other service provider begins.
Setting up the router
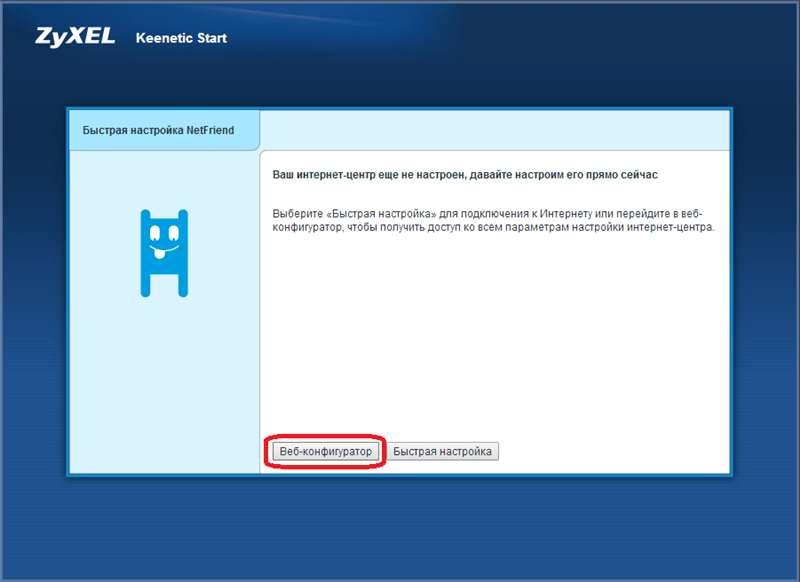
To start Zyxel setup Keenetic Start, you need to get into the main interface. And for this we need to open the browser and enter the number series 192.168.1.1 in the address bar - standard address of the Kinetics family. Immediately after loading the page, we will see an authorization form, in which we will enter the standard data: login - admin and password - 1234. Behind it, the Setup Wizard, unified for the entire line of routers, awaits us.
To enter the settings, open the browser, and enter the address: HTTP://192.168.1.1
In the newly opened page, we will find only two buttons to choose from: "Quick setup" and go to the "web configurator". In this case, we are interested in the first option. After clicking on it, we will see three selectors that allow us to specify the relation of our provider to MAC addresses. Most of today's service providers do not register these addresses, and for them the first option (selector) should be selected. But if your company is not Rostelecom, but, say, Dom.ru, you need to look into the contract or call the technical support service to get your MAC address. Then we indicate the resulting alphanumeric combination in the field next to the "Other" selector, click on the "Next" button.
On the page that opens, set the automatic IP configuration option or specify your own address, as well as NDS, if the provider has given you this information. Let's move on. Specify the username and password, if they are available in the contract for the supply of Internet services, or put a tick in the value "I do not have a password ...". It is important not to confuse this data with the key and name for the Wi-Fi network, which are indicated on the bottom of the router. These are completely different data, because. Rostelecom is the service provider and Zyxel is the hardware provider.
When we go further, we get to the status page, which shows the connection data and information about whether we managed to connect to the Internet (only wired connection, not Wi-Fi) or not. In most cases, the setup will be successful and you will have access to the network.
Other ways to customize
Let's consider a few more special cases for connecting to the networks of individual Russian providers. Let's start with Rostelecom, Dom.ru and TTK. The algorithm of work in this case is as follows:
- Instead of quick setup select the transition to the web configurator;
- Install New Password to enter the web interface;
- Below we see a menu with icons, open the "Internet" tab;
- The new page we're on should be the List tab from the top menu;
- Click on the only name of the network interface in the list;
- Using the “Use connector” checkbox, select the port where the WAN cable (Internet) is inserted;
- We check the presence of checkboxes below in the fields of inclusion and use for accessing the Internet;
- We leave the IP parameters by default: the value "Without an IP address";
- We also do not change the MAC address;
- Apply the changes and go to the tab of the top menu "Authorization";
- Adding a connection
- Enable it by checking the corresponding selector;
- Select the type of PPoE, assign an arbitrary (own) name-description;
- Assign a connection to access the Internet;
- Enter the authorization data from the service delivery agreement (login/password);
- We select all security protocols or the first two: pap and chap;
- The name of the PPoE server is written "Internet".
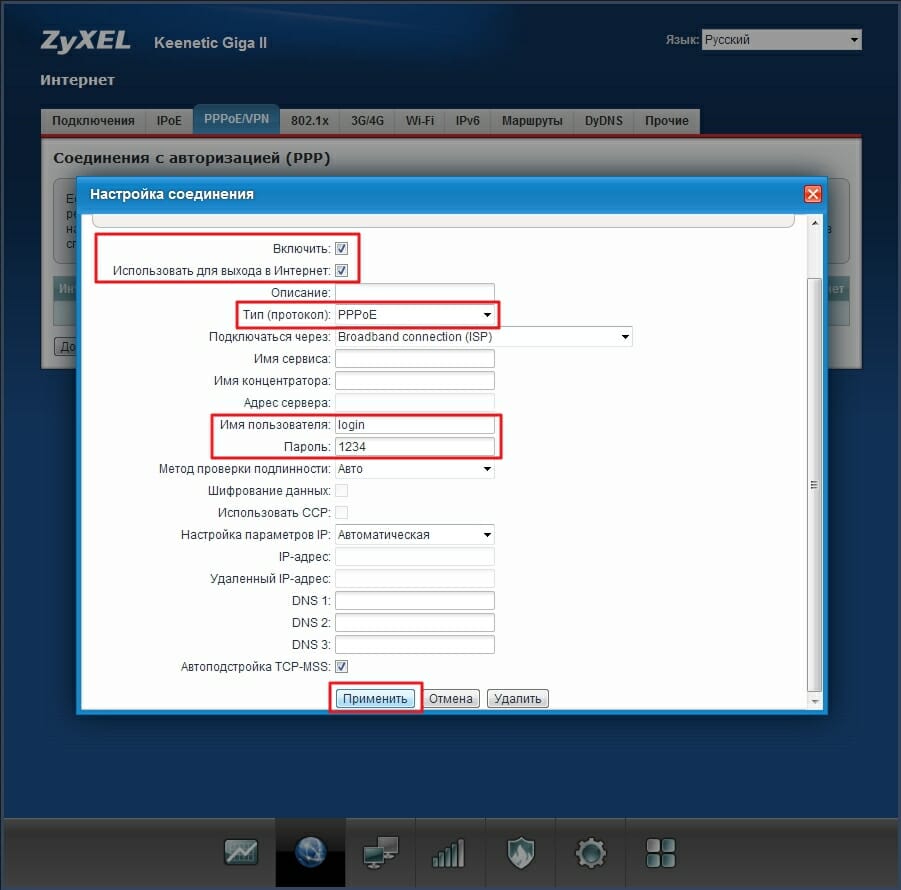
Apply the changes made. On this connection wired connection completed for Rostelecom. WiFi setup and IpTV we will consider further. In the meantime, let's consider how the router setting for Beeline differs from the description above:
- At the first stage (configuring the network interface), you only need to set automatic tuning IP addresses. Otherwise, everything is the same as for the Rostelecom router.
- When adding a connection in the “Authorization” tab, only the type of protocol changes (to L2TP), and the link “tp.internet.beeline.ru” is written in the “Server address” field;
After setting the necessary parameters, we apply the settings and check the connection of the Kinetic Start router to the Internet. If everything is functioning as it should, we proceed to setting the Wi-Fi transmission parameters.
WiFi setup
To set up WiFi transmission on Zlex Keenetic Start, you need to open the corresponding item in the lower menu. Then, on the web page that opens, set the device to the “Access Point” mode of operation, select the connection to the new radio network, and apply. After that, you need to go to the top menu item of the same name (Access Point), where the Wi-Fi network settings table will appear in front of us:
- Set the desired connection name that users will see when searching for available networks (SSID);
- We set the protection to the maximum level. The key is the password for connecting to your Wi-Fi;
- Without touching anything else, click on Apply.
After the router processes the received data, the light on the indicator panel should light up wireless network. Devices capable of connecting to WiFi links should detect a new available connection. Try to log in using the password you specified earlier and test the connection.
P.S. If several routers/wi-fi receivers operate on the same frequency in a room or in an adjacent area, the signal may mix and slow down. To avoid this, you need to change the used channel in the settings above (from Auto to any other unused number). In this case, it is necessary to restart the device so that it begins to broadcast the Wi-Fi signal at the new frequency.
This completes your WiFi setup! Use the Internet with pleasure!
IP TV settings
To set up a video stream, which today is called IPTV (IPTV), you must, firstly, allocate a port for it: go back to setting up an existing network interface (from the algorithm above) and put an additional checkmark next to the WAN port on another connector. You insert the cord from IpTV into it and you can watch TV channels even on a laptop via Wi-Fi (in installed program view).
Next, it is worth checking the correctness of the settings in the WAN menu, the port selection field for creating a bridge: the same as above should be specified. Also, in the LAN connection settings, the corresponding ip must be set: 192.168.2.2 and 192.168.2.1 for the upper and lower fields. The subnet mask should display the value 225.225.225.0 and leave the rest of the parameters undefined (by default). After saving the changes, we check IpTV and make sure that everything works.
In case something went wrong (the Wi-Fi signal disappeared or the Internet disappeared altogether), you can reset the settings to the factory settings by pressing the Reset button on the rear panel. It costs 10 seconds or more to hold it in a clamped position, after which the data for entering the router and all parameters will be reset to the original ones.
Found a typo? Select the text and press Ctrl + Enter
Network equipment from ZyXEL has established itself in the market due to its reliability, relatively low price tag and ease of setup through a unique router. Today we will just discuss the topic of router configuration in the proprietary web interface, and we will do this using the Keenetic Start model as an example.
Immediately I want to talk about the importance of choosing the right location for the router in the house. This will be especially useful for those who are going to use the dot WiFi access. If only the right length is needed for a wired connection network cable, then wireless connection afraid of thick walls and working electrical appliances. Such factors reduce penetration, resulting in signal degradation.
After unpacking and choosing a place for the router, it's time to connect all the cables. This includes a wire from the provider, power and a LAN cable, the second side connecting to motherboard computer. You will find all the necessary connectors and buttons on the back of the device.

The final step before entering the firmware is to check the network values in the operating room Windows system. There is an IPv4 protocol for which it is important to set the parameters for automatically obtaining IP addresses and DNS. Read more about this in our other material at the link below.

Above, we figured out the installation, connection, OS features, now you can go directly to the software part. The whole procedure begins by logging into the web interface:
- In any convenient browser, in the appropriate line, type the address 192.168.1.1, then press the key Ente r.
- Most often, the default password is not set, so the web interface will immediately open, but sometimes you still need to enter your login and security key - write admin in both fields.


A welcome window will be displayed, from where all adjustments to the operation of the router begin. Configuration in progress ZyXEL Keenetic Start manual method or using the built-in Wizard. Both methods are quite effective, but the second is limited only by the main points, which sometimes do not allow you to create the most suitable configuration. However, we will consider both options, and you will already choose the best one.
Quick Setup
Quick setup is ideal for inexperienced or undemanding users. Here you will need to specify only the most basic values, without trying to find the desired string in the entire web interface. The whole setup process looks like this:

The disadvantage of the Wizard is the absence of even a superficial adjustment of the wireless point. Therefore, users who want to use Wi-Fi will need to manually configure this mode. For information on how to do this, see the relevant section below.
Manual wired internet setup
Above, we talked about the quick configuration of a wired connection, however, the parameters present in the Wizard are not enough for all users, and therefore there is a need for manual adjustment. It is done like this:

From additional features in category "Internet" I would like to note the function of dynamic DNS. This service is provided by the service provider for a fee, and Domain name and Account obtained after the conclusion of the contract. The purchase of such a service is only necessary if you use a home server. You can connect it through a separate tab in the web interface, specifying the relevant data in the fields.
Setting up a wireless access point
If you paid attention to the quick configuration mode, you should have noticed the absence of any wireless point parameters there. In this case, everything has to be done manually using the same web interface, and you can do the debugging as follows:

As you can see, it takes just a few minutes to adjust the Wi-Fi access point and even an inexperienced user can handle it. When finished, it's best to reboot your router for the changes to take effect.
home network
In the paragraph above, we mentioned home network. It unites all devices connected to one router, allows them to share files and perform other processes. The firmware of the Zyxel Keenetic Start router also contains parameters for it. They look like this:

Safety
It is important not only to create an Internet connection, but also to ensure reliable protection for all members of the group. There are several security rules in the firmware of the router in question, which I would like to dwell on in more detail:

We talked about the Yandex.DNS function at the stage of quick configuration, so we will not repeat ourselves, you will find all the necessary information about this tool above.
System settings
The final step in setting up the work ZyXEL router Keenetic Start is to edit system settings. You can do this in the following way:

A rare manufacturer is limited to the release of a new generation of smartphones in one or two modifications. Usually these are several devices at once, in which the emphasis is on different parameters. The Asus Zenfone 2 Laser is a phone for people who love taking photos. The main feature of the device lies precisely in photographic capabilities, and more details about them are described in the review in Asus Zenfone 2 Laser (ze500kl).
Asus specs Zenfone 2 Laser is quite typical, and no one was going to surprise the user with them. The emphasis is on the photo, it was this parameter that the phone was supposed to win the love of the public.
| Characteristics | Zenfone 2 Laser |
| Frame | Glass, plastic |
| CPU | Snapdragon 410, 4 cores, 1.2 GHz |
| 5 inch IPS HD Gorilla glass 4 | |
| Memory | 2/16 GB |
| Interfaces | Wi-Fi, LTE, Bluetooth 4.0, GPS |
| 13 and 5 MP | |
| battery | 2400 mAh |
| Dimensions and weight | 71.5*143.7*10.5mm, 140 grams |
The model for its time has good amount of memory. At the time of the announcement, a device with 16Gb of memory was presented, a modification with 32Gb was released a little later. You can also put a memory card on 128Gb, there is a separate slot for it.
Appearance
Smartphone Asus Zenfone 2 Laser ze500kl is a typical monoblock with a plastic case and glass on the front panel. The cover is removable, you can change the battery, there are slots for two SIM cards and a memory card. On the front panel there are 3 touch buttons under the screen. Above it is a speaker, Asus inscription, camera, proximity and light sensor.

On the back of the camera. On the sides of her flash and laser focus eye. The volume button is located here, which, according to reviews, is not very convenient. At the bottom of the rear panel is the second speaker. Also not the most logical solution, since when listening to music, the sound goes into the table, and the phone will have to be placed on the display.

The top end is the power button, microphone, headset jack. Bottom - microUSB, speaker. Build quality, back cover convex metal effect relief. It carries not only aesthetic value, but also makes the device not slippery.
The Asus Zenfon 2 laser ze500kl display is created using IPS technology, there is an air gap. From this, the color rendition is a little lame, although the colors themselves are quite natural, but not bright enough. The viewing angles are very high, there is no distortion. Display protected durable glass Gorilla Glass 4th generation with a good oleophobic and anti-reflective layer. The sensor recognizes up to 10 clicks. The brightness is at an average level, sometimes it may not be enough. HD resolution, for a 5-inch screen, this is more than normal, and no pixels are noticeable. The matrix is worthy of a phone from the middle price segment, there are no complaints about its work.

Capabilities
The Asus Zenfone 2 Laser ze500kl phone runs on a cheaper processor than the usual deuce. It uses a chip from Intel, in this device the manufacturer was Qualcomm. You can compare this device in terms of work with the younger version of Zenfone 2 on a less productive Intel processor. That is, the device is able to play games and run heavy tasks, but sometimes it slows down a bit. You can avoid this by setting medium settings.


2 gigabytes of RAM was enough for a device released in 2015, as well as native memory of 16 gigabytes. Telephone medium speed, but at the same time in the tests it takes the last places with 20 thousand points. In general, this is not critical, since the phone is evaluated by real work, rather than indicators in artificial tests.
Important! The model has two radio modules, that is, both SIM cards can work simultaneously. Navigation systems not the fastest, it will take about 16 seconds to connect with satellites. There is support for LTE, as well as a dual Wi-Fi antenna.
The battery of the smartphone has a capacity of 2400 mAh, according to reviews, with average loads, the device lives up to two days. The indicator is very worthy. 5 hours of play took only 40% of the battery, the video can be watched for 12 hours. It is difficult to say what affected such battery survivability, but most likely the matter is energy efficient processor. In terms of autonomy, the phone gets a confident five.
The Asus Zenfone 2 laser is a device with advanced photography capabilities. The main camera has a resolution of 13 megapixels, the selfie module is 5 megapixels. At first glance, the performance is not the best, but the whole point here is laser autofocus. It instantly finds the right subject, selects the exposure, and the shutter release time after pressing the capture key is calculated in seconds. It is important not to close the eye of the laser, which is located near the camera. The device works great at night.

On a note! An interesting feature of the device is the smart delete function. When the camera focuses on a subject, it automatically removes any extraneous and moving objects that block the main subject.


Implemented in the phone many shooting options, from fully automated to manual professional settings. The device shoots video in FHD format. Shooting on the front camera also gives good pictures, and there are no questions about it. The manufacturer promised good camera and made her.
Conclusion
The Zenfone 2 Laser is a very interesting low price device. The price at the time of release was only 11 thousand rubles, while the camera here is better than in many expensive devices. The same can be said about autonomy. Perhaps the phone is not up to speed, but such tasks were not assigned to it. If you add a good design and matrix to these pluses, you get an excellent phone for little money.
To be honest, I have never chased the top variations of smartphones. Unlike “heavy computer hardware”, for me, a smartphone has always remained simply a working tool and did not have “fads” for quarterly updates.
At a certain point in time, I happened to meet representatives at the base Windows phone, namely with Nokia Lumia 925 and then I fell in love a little bit with the combination of this smooth interface, great design and excellent screen with infinite black. Yes, after the smartphone on Android based, for iron it was one middle peasant of the second generation Sony Xperia, the WP-based system brought a clear boost in the smoothness of the interface, and office suite with the OneDrive cloud, they completely forced me to get hooked on this platform.
Now in daily use is the Nokia Lumia 735, which clearly beats the 925 in terms of battery life and has the size of a pre-shovel era, and also provides me with an office on the road. However, lately, I have had a desire to use a current Android smartphone. Probably several factors contributed to this. Upgrading to 10's did not bring delight, the presence of obvious bagulins forced me to return to 8.1 after about a week of use (yes, I survived the week). In this regard, the desire to find out how “andryusha” is doing now has intensified even more. And finally, excuse me, the 735’s camera does not allow you to take decent photos of pieces of iron for instagram.
This is how a smartphone, the exact model ZE500KL, came to me for testing. This is one of the variations of the ZenFone division. If you look at the ASUS catalog, you can see that the company is trying to offer smartphones for various price ranges and use cases. Laser, the hero of today's review, boasts a camera with laser autofocus, which I hope will solve one of my current needs, but let's start with everything.
Contents of delivery
Zenfone 2 Laser comes in a very compact package, by the standards of computer hardware, of course. It has an explicit model name and a list of additional data from the SN category. The sides of the packaging are made with small circles, in which the manufacturer has placed markers of the technologies used.
.jpg)
Inside, we can find the smartphone itself, a small quick start guide, a charging box and cable, and a headset.
.jpg)
The charging unit is made in a medium-sized case, its output characteristics are 5v 1A, the cable is detachable and can be used for data transfer. No function declared for this model fast charging, which is in ZenFone 2.
.jpg)
The headset is made according to the type of "plugs", has three types of earbuds of various sizes. Microphone and one key let you take calls on the go. The quality of performance and sound are at a good level, but something didn’t pull me to refuse;).
.jpg)
Visual inspection
Overall dimensions of Zenfone 2 Laser ZE500KL are 71.5x143.7x10.5mm and are based on installed screen- This is a 5.0-inch variation on an IPS-matrix with an HD resolution of 1280x720 pixels. The entire screen is covered with glass generation Gorilla Glass 4 and has an oleophobic coating. In working condition, with the installed battery and SIM card, the weight of the "laser" was 145 grams.
.jpg)
The upper part of the front side bears a small manufacturer's logo and a speaker area. Here, but already under glass are: front-camera, light and proximity sensors.
.jpg)
On the lower part there was a place for three physical keys, there was no backlight in them. A decorative insert is located under them, it shimmers very interestingly when light hits, but does not carry any functionality.
.jpg)
The reverse side is made of matte plastic, which in our black version can be compared with a full-fledged soft-touch. In the lower part there is the logo of the series, and an elongated perforation behind which the speaker is hidden. However, all the fun is in the upper area.
.jpg)
Here we see another manufacturer's logo, a camera lens, on the various edges of it there was a symmetrical place for a two-block LED flash and the same laser autofocus. Here is not the most standard element for most smartphones: a volume rocker made under metal with a recognizable pattern of the series.
.jpg)
The upper edge sheltered an audio output for a headset like a 3.5 mm Jack and a power / lock key.
.jpg)
On the bottom edge there is one micro-USB and the main microphone output.
.jpg)
Thanks to the set of connectors and keys mentioned above, the side faces of the ZenFone 2 Laser are completely free from controls. Only on the right side there is a small platform with which you can pick up the housing cover to remove it.
Due to the absence of elements, the manufacturer was able to “underestimate” the width of the case along the edge as much as 3.5 millimeters. In general, this solution can be called calling card series. When using, the fad is clearly noticeable: the gentle shape of the body allows you to slightly improve grip with the hand, and also tactilely reduces the size.
.jpg)
Opening the chest
It was not in vain that I mentioned the possibility of removing the cover, it is dismantled and can be replaced with an analogue of a different color. By the way, I didn't talk about the color before, ASUS offers seven different colors of the removable cover. Once removed, the user has access to the removable battery and internal slots.
.jpg)
Here the user can install a microSDHC expansion card with a capacity of up to 128 GB, as well as simultaneously use two micro SIM cards. There is no need to choose between an expansion card or a second SIM, the slots are separate.
.jpg)
We launch
In terms of the iron component, in the ZenFone 2 Laser, the manufacturer installed a Qualcomm MSM8916 processor, which is based on four cores with a maximum frequency of 1.2 GHz. The role of the video processor is performed by the no less familiar Adreno 306. Available volume random access memory is 2 GB, and the internal storage is 16 GB, here we do not forget about the possibility of installing expansion cards. By default, about 10.4 GB are available to the user. There are interfaces: Wi-Fi 802.11 b/g/n, Bluetooth 4.0 and, of course, GPS.
.jpg)
Initially, Android 5.0.2 (Lollipop) is installed on the smartphone, it is not “bare” at all and is covered with ASUS' proprietary ZenUI interface. ZenUI customizes the system, both in visual aspects and provides some additional features.
.jpg)
Separate applications, both standard and additional, are located in folders, which initially puts a little order in the "tiles" and allows the new user to quickly navigate the terrain. Separately, we note that ZenUI supports visual expansion themes.
.jpg)
ASUS has thoughtfully approached the issue of pre-installed applications. In the lists you can find everything you need, from an organizer and a “mirror”, to a laser rangefinder and a data backup system. At the same time, applications are not intrusive and can be disabled in the autorun manager;). I also liked the functionality of unlocking / locking the device with a double tap on the screen - this is convenient, especially considering that the lock key is not "at hand".
.jpg)
Next, I will provide screenshots of the most common test packages. But, as we know, these numbers are not always able to convey the general impressions of working with the device, which in my case they are purely positive.
The main interface of ZenUI works very smoothly, transitions between screens, pulling out the curtain and reorienting the screen happen with a bang, I didn’t manage to observe any “brakes”. Probably one of the first devices on Android system, which did not make me say "but everything works smoothly on Windows Phone." It was this factor that made me very happy, in almost all applications the ZenFone 2 Laser behaves perfectly, of course, some games from the top segment make the video core “touch the tatami with the shoulder blades”, but these were not found among ordinary applications.
.jpg)
.jpg)
.jpg)
.jpg)
Offline work
The removable battery has a capacity of 2400 mAh, which for 5 inch smartphone can be called the middle bar.
.jpg)
However, such a margin allowed the ZenFone 2 Laser to be used in active working mode with social media (without games) for one and a half daylight hours, plus two nights in standby mode. With a more linear load in the form of a Full HD movie with the maximum brightness of the screen and the inclusion of all wireless interfaces, in two hours we managed to discharge the battery by about 20%, which, with adequate settings and the use of standard modes, we save the charge, we can talk about 10-13 hours of active playback video, in my opinion a worthy result.
.jpg)
Screen
Let's mention the existing screen again. HD resolution of 1280x720 gives a pixel density of 294 ppi, which visually almost does not allow you to find graininess, even if you try very hard. The brightness margin is decent, during the day, even in the presence of the sun, you can safely send a message and find the desired contact or address on the map, and I'm not talking about street use on a typical "Moscow-cloudy" day, as in the photo below.
.JPG)
.JPG)
The IPS-matrix will remind you of your presence if you suddenly want to look at the phone from the end - the viewing angles are decent, there are no obvious color changes. The color temperature "by eye" is not littered with blue and is at a moderate level. Well, here I also remind you that the screen understands ten simultaneous clicks at once.
.JPG)
Launching the camera
The camera app is intuitive. Starting a video recording, taking a single photo and switching to another mode, and there are quite a few of them, is at hand. Manual mode allows you to set basic shooting options.
.jpg)
.jpg)
.jpg)
Below I will give a small set of photos from the main camera, all shots were taken in various lighting conditions. The specimens presented in the article have been resized to 2040px by larger side, sources and additional photos you can download (15Mb, our file server).
According to personal impressions, laser autofocus definitely does its job! When choosing a focus area, the adjustment is very fast, and the process of saving a photo also goes without difficulty. I am glad that the finished result does not differ from what we see at the time of shooting, WP sin with this fad. During our testing, the ZenFone 2 Laser's camera took shots with the correct exposure and adequately adjusted to the white balance. In general, personally, I am pleased with the result. However, I probably won’t attribute ZenFone 2 Laser to top camera phones.


SUMMARY
So, after a fairly long acquaintance, it's time to take stock. And we will start with the announcement of the price, which at the time of publication of the material, according to Y. Market in the capital region, was about 12,500 rubles. And this time, it seems that I will be able to look at it only from one side, positive :).
.jpg)
In short, what did I like about ZenFone 2 Laser in the end? And here it is: good build quality and comfortable body shape, excellent screen with Gorilla Glass 4, decent performance in everyday use, the absence of "glitches" and the overall stability of the work. Of course, we do not forget about adequate indicators of survivability from the battery and support for two SIM cards.
Camera? She is good, but, to be honest, I expected the bar from her to be a few more, even small, steps higher. Perhaps the spoiled user of a bunch of DSLRs and flashes speaks in me. But it looks like the guys from ASUS are well aware of the current situation, quite recently there was a presentation of ZenFone Zoom (ZX551ML), maybe it will be his fate to surprise? Hopefully we'll see :).
By competitors (I just want to stop this paragraph at this point). The analysis of Yandex.Market made me think a little... The very first clarification of the current price for Lumia 735 gave a price tag of 13,500 rubles, which can be attributed to the clear victory of the hero of today's review. Early devices on WP were given good performance for a small price, albeit with limited functionality. Now, using the ZenFone 2 Laser as an example, I can say that Android devices have come to a state good quality and balance. If we recall the analogues on the same platform, then on the side ASUS Zenfone 2 Laser ZE500KL has the already mentioned balance of characteristics, which competitors in their solutions may not respect, for example, many have only one GB of RAM or a more ordinary camera;).
Based on the results of the foregoing, the hero of today's review,
Asus Zenfone 2 Laser ZE500KL wins website award


