Battery charger for li ion batteries. Charger for lithium-ion battery
The invention and use of tools with autonomous power sources has become one of the business cards our time. More and more active components are being developed and introduced to improve the performance of battery assemblies. Unfortunately, batteries cannot work without recharging. And if on devices that have permanent access Since the issue is solved by built-in sources, for powerful power sources, for example, a screwdriver, you need separate chargers for lithium batteries, taking into account the peculiarities various types batteries.
In recent years, products based on a lithium-ion active component have been increasingly used. And this is quite understandable, since these power sources have proven themselves from a very good side:
- they have no memory effect;
- almost completely eliminated self-discharge;
- can work at sub-zero temperatures;
- hold the discharge well.
- the number was brought up to 700 cycles.
But, each type of battery has its own characteristics. So, the lithium-ion component requires the design of elementary batteries with a voltage of 3.6V, which requires some individual features for such products.
Recovery Features
With all the advantages of lithium-ion batteries, they have their drawbacks - this is the possibility of an internal circuit of the elements during charging overvoltage due to active crystallization of lithium in the active component. There is also a limitation on the minimum voltage value, which leads to the impossibility of receiving electrons by the active component. To eliminate the consequences, the battery is equipped with an internal controller that breaks the circuit of elements with a load when critical values are reached. Such elements are stored best when charged at 50% at +5 - 15 ° C. Another of the features of lithium-ion batteries is that the battery life depends on the time of its manufacture, regardless of whether it was in operation or not, or in other words, it is subject to the “aging effect”, which limits the service life to five years.
Charging lithium-ion batteries

The simplest single cell charger
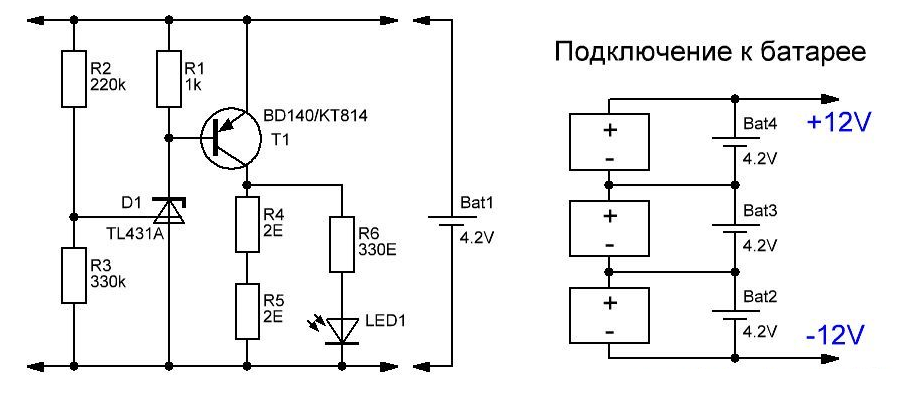
In order to understand more complex lithium-ion battery charging schemes, consider a simple lithium battery charger, more precisely for a single battery.
The basis of the circuit leaves control: a TL 431 microcircuit (acts as an adjustable zener diode) and one reverse conduction transistor.
As can be seen from the diagram, the control electrode TL431 is included in the base of the transistor. Setting up the device boils down to the following: you need to set a voltage of 4.2V at the output of the device - this is set by adjusting the zener diode by connecting to the first leg of the resistance R4 - R3 with a nominal value of 2.2 kOhm and 3 kOhm. This circuit is responsible for adjusting the output voltage, the voltage adjustment is set only once and is stable.
Next, the charge current is regulated, the adjustment is made by the resistance R1 (in the circuit with a nominal value of 3Ω) if the emitter of the transistor is turned on without resistance, then the input voltage will also be at the charging terminals, that is, it is 5V, which may not meet the requirements.
Also, in this case, the LED will not glow, and it signals the current saturation process. The resistor can be from 3 to 8 ohms.
For quick adjustment of the voltage on the load, the resistance R3 can be set adjustable (potentiometer). The voltage is adjusted without load, that is, without the resistance of the element, with a nominal value of 4, 2 - 4.5V. After reaching the required value, it is enough to measure the value of the resistance of the variable resistor and put the main part of the desired rating in its place. If there is no required rating, it can be assembled from several pieces in parallel or serial connection.
Resistance R4 is designed to open the base of the transistor, its value should be 220 ohms. When the battery charge increases, the voltage will increase, the control electrode of the transistor base will increase the emitter-collector transition resistance, reducing the charging current.
The transistor can be used KT819, KT817 or KT815, but then you have to install a radiator for cooling. Also, a radiator will be needed if the currents exceed 1000mA. In general, this classical scheme simple charging.
Improvement of the charger for lithium li - ion batteries
When it becomes necessary to charge lithium-ion batteries connected from several soldered elementary cells, it is best to charge the cells separately using a control circuit that will monitor the charging of each individual battery individually. Without this circuit, a significant deviation in the characteristics of one element in a series-soldered battery will lead to failure of all batteries, and the block itself will even be dangerous due to its possible overheating or even ignition.
Charger for lithium batteries 12 volts. Balancer device
The term balancing in electrical engineering means a charging mode that controls each individual element involved in the process, preventing an increase or decrease in voltage less than required level. The need for such solutions stems from the features of assemblies with li - ion. If, due to the internal design, one of the cells is charged faster than the others, which is very dangerous for the condition of the remaining cells, and as a result of the entire battery. The circuit design of the balancer is designed in such a way that the elements of the circuit take on excess energy, thereby regulating the process of charging an individual cell.
If we compare the principles of charging nickel-cadmium batteries, then they differ from lithium-ion batteries, first of all, for Ca-Ni, the end of the process is indicated by an increase in the voltage of the polar electrodes and a decrease in current to 0.01 mA. Also, before charging, this source must be discharged by at least 30% of its original capacity, if this condition is not maintained in the battery, a "memory effect" occurs, which reduces the battery capacity.
With Li-Ion active component, the opposite is true. Completely discharging these cells can lead to irreversible damage and drastically reduce the ability to charge. Often low-quality controllers may not provide control over the level of battery discharge, which can lead to failure of the entire assembly due to one cell.
The way out of the situation can be the use of the above circuit on an adjustable zener diode TL431. A load of 1000 mA or more can be provided by installing a more powerful transistor. Such cells are connected directly to each cell to prevent improper charging.
Choose a transistor should be on power. Power is calculated by the formula P = U*I, where U is voltage, I is charging current.
For example, with a current charging of 0.45 A, the transistor must have a power dissipation of at least 3.65 V * 0.45A \u003d 1.8 W. and this is for internal transitions a large current load, so it is better to install the output transistors in radiators.
Below is an approximate calculation of the value of resistors R1 and R2 for different charge voltages:
22.1k + 33k => 4.16 V
15.1k + 22k => 4.20 V
47.1k + 68k => 4.22V
27.1k + 39k => 4.23 V
39.1k + 56k => 4.24V
33k + 47k => 4.25 V
Resistance R3 is a transistor-based load. Its resistance can be 471 Ohm - 1.1 kOhm.
But, when implementing these circuit solutions, a problem arose, how to charge a separate cell in the battery pack? And such a solution was found. If you look at the contacts on the charging leg, then on recent cases with lithium-ion batteries there are as many contacts as there are individual cells in the battery, of course, on the charger, each such element is connected to a separate controller circuit.
The cost of such a charger is slightly more expensive than a linear device with two contacts, but it's worth it, especially when you consider that assemblies with high-quality lithium-ion components reach up to half the cost of the product itself.
Pulse charger for lithium li - ion batteries
Recently, many leading manufacturers of self-powered hand tools have been widely advertising fast chargers. For these purposes, pulse converters based on pulse-width modulated signals (PWM) were developed to restore power supplies for screwdrivers based on a PWM generator on a UC3842 chip, a flyback AS - DS converter was assembled with a load pulse transformer.
Next, the operation of the circuit of the most common source will be considered (see the attached diagram): the mains voltage of 220V is supplied to the diode assembly D1-D4, for these purposes any diodes with a power of up to 2A are used. Ripple smoothing occurs on capacitor C1, where a voltage of about 300V is concentrated. This voltage is the power supply for the pulse generator with the output transformer T1.
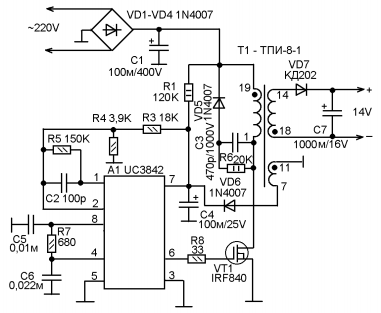
Initial Power to Start integrated circuit A1 enters through the resistor R1, after which the pulse generator of the microcircuit is turned on, which outputs them to pin 6. Next, the pulses are fed to the gate of a powerful field-effect transistor VT1, opening it. The drain circuit of the transistor supplies power to the primary winding of the pulse transformer T1. After that, the transformer will turn on and the transmission of pulses to the secondary winding begins. The pulses of the secondary winding 7 - 11 after rectification by the VT6 diode are used to stabilize the operation of the A1 microcircuit, which in the full generation mode consumes much more current than it receives from the resistor R1 through the circuit.
In the event of a malfunction of the D6 diodes, the source switches to the pulsation mode, alternately starting the transformer and stopping it, while a characteristic pulsating “squeak” is heard, let's see the operation of the circuit in this mode.
Power through R1 and capacitor C4 start the chip's oscillator. After starting, a higher current is required for normal operation. If D6 fails, additional power is not supplied to the microcircuit, and generation stops, then the process repeats. If the diode D6 is working, it immediately turns on the pulse transformer under full load. During a normal start of the generator, a pulsed current of 12 - 14V appears on the winding 14-18 (at idle 15V). After rectification by the diode V7 and smoothing of the pulses by the capacitor C7, the pulsed current is supplied to the battery terminals.
A current of 100 mA does not harm the active component, but increases the recovery time by 3-4 times, reducing its time from 30 minutes to 1 hour. ( source — magazine Internet edition Radioconstructor 03-2013)
Quick Charger G4-1H RYOBI ONE+ BCL14181H
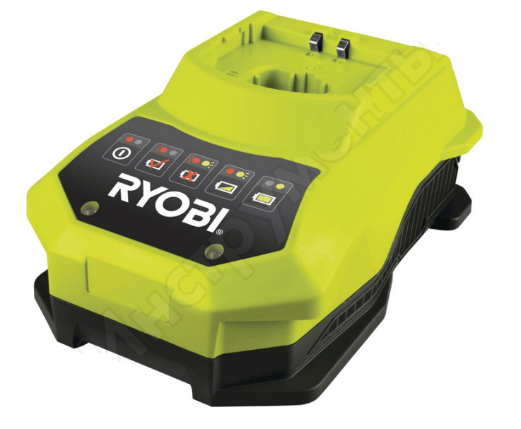 Pulse device for lithium batteries 18 volts manufactured by the German company Ryobi, manufacturer in the People's Republic of China. The pulse device is suitable for lithium-ion, nickel-cadmium 18V. It is designed for normal operation at temperatures from 0 to 50 C. The circuit solution provides two power supply modes for voltage and current stabilization. The pulsed current supply ensures optimal feeding of each individual battery.
The device is made in the original housing made of impact-resistant plastic. Forced cooling from the built-in fan is applied, with automatic switching on upon reaching 40 ° C.
Characteristics:
- Minimum charge time 18V at 1.5 Ah - 60 minutes, weight 0.9 kg, dimensions: 210 x 86 x 174 mm. The charging process is indicated by a blue LED, and red when finished. There is a fault diagnosis that lights up when the assembly fails with a separate backlight on the case.
- Power supply single-phase 50Hz. 220V. The length of the network cable is 1.5 meters.
Charging station repair
If it happens that the product has ceased to perform its functions, it is best to contact specialized workshops, but elementary malfunctions can be fixed by hand. What to do if the power indicator is not on, let's analyze some simple malfunctions using the station as an example.
This product is designed to work with Li-ion batteries 12V, 1.8A. The product is made with a step-down transformer, the conversion of the reduced alternating current is performed by a four-diode bridge circuit. An electrolytic capacitor is installed to smooth out the ripple. From the indication there are LEDs for mains power, the beginning and end of saturation.
So, if the network indicator is off. First of all, you need to make sure the continuity of the circuit through the mains plug. primary winding transformer. To do this, through the pins of the mains plug, you need to ring the integrity of the primary winding of the transformer with an ohmmeter by touching the probes of the device to the pins of the mains plug, if the circuit shows an open, then you need to inspect the parts inside the case.
A fuse break is possible, usually a thin wire stretched in a porcelain or glass case, which burns out during overloads. But some firms, for example, Interskol, in order to protect the transformer windings from overheating, install a thermal fuse between the turns of the primary winding, the purpose of which, when the temperature reaches 120 - 130 ° C, is to break the power supply circuit and, unfortunately, it is already after the break does not restore.
Typically, the fuse is located under the paper insulation of the primary winding, after opening which, you can easily find this part. To bring the circuit back into working condition, you can simply solder the ends of the winding into one piece, but you need to remember that the transformer remains without short circuit protection and it is best to install a conventional mains fuse instead of a thermal fuse.
If the primary circuit is intact, it rings secondary winding and bridge diodes. For continuity of diodes, it is better to unsolder one end of the circuit and check the diode with an ohmmeter. When connecting the ends to the terminals of the probes in turn in one direction, the diode should show an open, in the other, a short circuit.
Thus, it is necessary to check all four diodes. And, if, indeed, we climbed into the circuit, then it is best to immediately change the capacitor, because the diodes are usually overloaded due to the excess electrolyte in the capacitor.
Buy power supplies for a screwdriver
Any hand tools and batteries can be purchased on our website. To do this, you need to go through a simple registration procedure and then follow the simple navigation. Simple site navigation will easily lead you to the tool you need. On the site you can see prices and compare them with competing stores. Any question that arises can be resolved with the help of the manager by calling the specified phone number or leaving the question to the specialist on duty. Come to us, and you will not be left without the choice of the tool you need.
So, my Top 5 chargers for 18650 batteries. Which charger to choose than to charge a 18650 battery for a flashlight or vape? On aliexpress and other stores in bulk different models. But when people come to me to buy a Li-Ion battery and / or charger for it, it turns out that a regrettably small number understand what exactly they want.
important! You can’t ignore the upcoming big sale, Black Friday 2019 with new promotional codes and coupons will provide an opportunity to save a lot on some big purchases. And, in general, even now there is a working coupon for 8/50. So I recommend spending some time to learn how to save money on Black Friday 2019. Read on
It is expected that some next “most popular and cheapest charger for 18650 on aliexpress” is the first choice for many, if only because of the price. In order to keep you from buying such rubbish, briefly (fortunately, there is no point in talking about it here), I will tell you that you can buy a good charger for lithium on aliexpress for any, even the most modest budget, and at the same time not fall to frank slag.
In all other cases, the chance of running into a fake is exceptionally high, unless we are talking about, again, all sorts of batteries from lamp manufacturers. The last ones are hellishly expensive and are the same repackaging of other accs. so taking them makes no sense. And I take normal accounts from nkon.nl.ru. So, the battery I'm talking about is a repackaging of the original Panasonic NCR18650B. The cells have left the rejection, but it seems that its logic boils down to putting everything below 3350mah overboard and selling these off-grade cans for further sale on the same ali. Actually, almost all the banks I ordered were somewhere around 3250-3350mah, which more than suited me for its price. I ordered a LOT of these accs, zero complaints. For domestic purposes, these low-current cans are enough for your eyes. Here is the link. Again, for most flashlights, this will be the best lithium-ion battery from aliexpress. the current output is small, but 3-4A is quite enough for most flashlights, and the protection board will save you from overdischarge.
The graphs in my flashlight reviews showed that the most popular flashlight on Ali is convoy, in its most popular models (s2 +, c8, c8 +) it works on this battery, in fact, just like with some more expensive original medium or high current. Therefore, I don’t see the point in taking some other battery in an inexpensive Chinese flashlight. And if you need an 18650 battery for a cheap headband with Ali, then this is the only option - the risk of deep discharge and death of the battery is too high. There is no protection in such headbands, you have to rely on the corresponding one already in the 18650 battery itself.
I'll start with why you shouldn't take such products from the world famous company noname. Given the penny difference between this craft and normal charging, I don’t see the point of taking something like this at all.
- work only with lithium. no nickel.
- the devil knows what charging algorithm.
- it’s good if it doesn’t charge a little, but it can drive up to 4.3v, which is very bad for chemistry
- The build quality corresponds to the price - it's not a fact that it won't break or bang.

well, an important point - charging for a 18650 battery = charging for a 26650 battery, all models below have a movable bar for charging almost all models of li- ion batteries
Xtar (after a recent rebrand, they are sold under the allmaybe brand)
For me personally, the clear favorite in the segment of inexpensive single-slot chargers is the Xtar MC1. This is an extremely compact (with dimensions somewhere in the index finger) charge. Unlike a lithocal, it cannot boast the same 1A charging current, but there is a proprietary technology for raising deeply discharged batteries. However, the Xtar MC1plus 1A already has a charging current.
Periodically, in the process of writing a review of flashlights, I came across a situation where the battery discharged below 2v. And other charges, the same lithocals of different stripes simply do not define such accs. Of course, it will not be possible to reanimate a battery that has gone to zero with degraded chemistry at all. Comes with a carrying case so you can take it with you wherever you go.
0.5A current pours out somewhere in 6 hours of charging, +\- depending on the capacity and depth of discharge of the battery. If you put it on at night (and for the most part it happens), then this is enough for the eyes. For charging in the car, along the way, this will not be enough and you need to look at the same lithocal.
Of course, charging also supports nickels, i.e. You can charge ordinary AA \ AAA.
The price tag for both versions below on Ali is quite lifting, about 4-7 bucks in the regular and plus versions. I don’t bring them here in detail because they walk back and forth.
Of the other versions, I will only note VC2, which, with the same correct charging algorithm, has the advantage of a good and visual indicator. The rest of the models, although interesting, are inferior to Litocale in terms of price / functionality, therefore they are less preferable and I will not talk about them here.
the price tag is spinning around 14 bucks. and here, as in other models, it is necessary to build on the presence of points and coupons.

Liitokala
For a long time, charging for 1 slot was extremely popular among knowledgeable people, the miller, whose poor design was compensated by good giblets and a competent charging process. This continued until the release of the 101st lithocal. Although the simplest, but the indication of the charging process and battery voltage, the versatility of chemistry and standard sizes, the ability to work in power bank mode and 0.5 \ 1A current to choose from - this model instantly became a bestseller as the cheapest and at the same time a good charger for lithium batteries.
after that, models gradually began to appear on large quantity acc, 202 - for two, 402, for 4, and recently a model for 3 acc was released. from 101 they differ only in the number of connectors.
Of course, you need to understand that if your power supply outputs 2A, then you can charge 4 batteries no higher than 0.5A for each.
If the release of the 101st removed the miller from the market, then the 202\402 completely dropped sales of Nightcore chargers. I remember how in 15/16 I traded them well. It all ended with the fact that I simply handed over the rest to a vape shop for purchase, for my money this nightcore did not stick to anyone. In addition to the price, there is also a functional minus - for example, boiling nickel with 1A current.

Separately, I will tell you about the popular 4-slot charging. Liitokala Lii-500 it is actually an all-in-one harvester.
Charging, capacity test (when forced over and over again, you can actually run the same refresh as in Opus), full indication (including resistance). Charging current from 0.3 to 1A per channel, a lot of different chemistries and sizes.
For its low price, this charger is an excellent choice for those who want something more than just charging batteries or if you have a lot of them and need to assess their condition, quickly charge.

Opus
The final touch (I will not talk about Imax model chargers, since if in this case you already know about them) will go Opus BT - C3100 V2.2
This extremely a popular charger among those who constantly have to deal with batteries. I myself used this for about a year, but still switched to 500ku. With an almost twofold difference in price, I did not see a clear advantage in functionality for myself. 2A, the charging current is not important to me, and the refresh function can work in the 500th lithocal, taking about 3-4 manual runs of the norm test, i.e. charging-discharging-charging.
Well, yes, another obvious functional plus is the presence of a fan, which is extremely reasonable when 4 batteries are charged or discharged at once with high current

Basically, you can stop there. There are several other specific models, but I am sure that for the vast majority of readers, one of the above will suffice. I used them all, sold dozens of them, and for all the time only once in one piece of 202 litocals did the charging stop not work, he drove the acc to the stop. But this is one of several dozen.
Chargers for 21700 batteries.
Separately, it is worth mentioning the once popular Nitecore chargers.
The only thing that attracts me now is that even the simplest models fit 21700 batteries perfectly. And since it’s not at all difficult to buy a 21700 flashlight on aliexpress now, the fact that Litokalov’s charges can hold them with a creak is really sad. And some fashionable branded 21700 batteries will not fit at all.
So in such a situation, it is justified to buy Nightcore chargers, only for 21700 batteries. I recommend the one that I use myself - nitecore UI2 (see my Nitecore chargers). Even cheaper -. 
If finances allow, then you can take something radically better, since Nitecore has fixed almost all the jambs of past models here (such as roasting AAA nickel batteries with a current of 1A)
So, Nitecore UM4(). By the way, now, adding this charger to the selection, I noticed that the price tag has fallen to the level of Liitokala Lii-500, very good!
Last time I considered replacing nickel-cadmium NiCd screwdriver batteries with lithium-ion ones. Now there was a question of charging these accumulators. Lithium ion batteries 18650 batteries can typically be charged up to 4.20V per cell with a tolerance of no more than 50mV because increasing the voltage can damage the battery structure. The battery charge current can range from 0.1C to 1C (C-capacity of the battery). It is better to choose this value according to the datasheet for the specific battery. I used Samsung INR18650-30Q 3000mAh 15A batteries in the alteration of the screwdriver. We look at the datasheet-charging current -1.5A. 
The most correct way would be to charge lithium batteries in two stages using the CC / CV method (constant current, constant voltage- D.C., constant pressure). The first step is to provide a constant charge current. The current value is 0.2-0.5C. For a battery with a capacity of 3000 mAh, the rated charge current in the first stage is 600-1500 mA. The second stage is charging the battery constant voltage, the current is constantly decreasing. The battery voltage is maintained within 4.15-4.25 V. The charging process will be completed when the current drops to 0.05-0.01C.
At this stage, the charger maintains a voltage of 4.15-4.25 volts on the battery and controls the current value. As the capacity increases, the charging current will decrease. As soon as its value decreases to 0.05-0.01С, the charging process is considered completed.
Taking into account the above, I used ready-made electronic modules from Aliexpress. Current limited CC/CV step down board on XL4015E1 chip or on LM2596. The board based on XL4015E1 is preferable, as it is more convenient in settings. 

Characteristics of the board on XL4015E1.
Maximum output current up to 5 Amps.
Output voltage: 0.8V-30V.
Input voltage: 5V-32V.
The board on the LM2596 has similar parameters, only the current is slightly less - up to 3 Amperes.
The charge management board for the lithium-ion battery was selected earlier. As a power source, you can use any with the following parameters - output voltage not lower than 18 Volts (for the 4S circuit), current not lower than 2-3 Amperes. As a first example of building charger for lithium-ion screwdriver batteries, I used a 220 \ 12 Volt, 3 Amp adapter. 

First, I checked what current it can give out to the feast of the rated load. I connected an autolamp to the output and waited half an hour. It gives out freely without preload 1.9 Amperes. I also measured the temperature on the radiator of the transistor -40 degrees Celsius. Pretty good, normal mode. 
But in this case, there is not enough tension. This is easily fixable with just one penny radio component-variable resistor (potentiometer) of 10-20 kOhm. Consider a typical adapter circuit. 
The circuit has a controlled zener diode TL431, it is in the circuit feedback. Its task is to maintain a stable output voltage in accordance with the load. Through a divider of two resistors, it is connected to the positive output of the adapter. We need to solder to the resistor (or solder it completely and solder it in its place, then the voltage will be regulated downward) which is connected to pin 1 of the TL431 zener diode and to the negative bus variable resistor. We rotate the axis of the potentiometer and set the desired voltage. In my case, I set 18 Volts (a small margin from 16.8 V to drop on the CCCV board). If your voltage indicated on the cases of electrolytic capacitors at the output of the circuit is greater than the new voltage, they may explode. Then you need to replace them with a margin of 30% voltage.
Next, connect the charge control board to the adapter. We set the voltage of 16.8 volts with a trimming resistor on the board. With another trimming resistor, we set a current of 1.5 Amperes, first we connect the tester in ammeter mode to the output of the board. Now you can connect the lithium-ion screwdriver assembly. Charging went well, the current dropped to a minimum by the end of the charge, the battery was charged. The temperature on the adapter was in the range of 40-43 degrees Celsius, which is quite normal. In the future, it is possible to drill holes in the adapter case to improve ventilation (especially in summer).
The end of the battery charge can be seen by turning on the LED on the board on the XL4015E1. IN this example I used another board on the LM2596, as I accidentally burned the XL4015E1 during the experiments. I advise you to do charging better on the XL4015E1 board.
I also have a regular charger from another screwdriver. It is designed to charge nickel-cadmium batteries. I wanted to use this regular charger to charge both nickel-cadmium batteries and lithium-ion ones. 
This was solved simply by soldering wires to the output wires (red plus, black minus) to the CCCV board.
The idle voltage at the output of the standard charger was 27 volts, which is quite suitable for our charging board. After I connected it in the same way as the version with the adapter. 
We see the end of charging here by changing the color of the LED (switched from red to green).
I placed the CCCV board itself in a suitable plastic box, bringing the wires out. 

If you have a regular charger on the transformer, then you can connect the CCCV board after the diode bridge of the rectifier.
The way to remake the adapter is within the power of beginners and can be useful for other purposes, as a result we get a budget unit for powering various devices.
I wish you all health and success in shopping and life.
You can see the process of working with a charger for a converted screwdriver in more detail in the video
The product was provided for writing a review by the store. The review is published in accordance with clause 18 of the Site Rules.
I plan to buy +27 Add to favorites Liked the review +28 +51Lithium batteries (Li-Io, Li-Po) are the most popular on this moment rechargeable electrical energy sources. The lithium battery has a nominal voltage of 3.7 volts, which is indicated on the case. However, a 100% charged battery has a voltage of 4.2 V, and a discharged “to zero” voltage is 2.5 V, it makes no sense to discharge the battery below 3 V, firstly, it deteriorates from this, and secondly, in the range from 3 to 2.5 The battery gives only a couple of percent of the energy. Thus, we accept the operating voltage range of 3 - 4.2 Volts. You can watch my selection of tips on the operation and storage of lithium batteries in this video.
There are two options for connecting batteries, series and parallel.
When connected in series, the voltage on all batteries is summed up, when a load is connected, a current equal to the total current in the circuit flows from each battery, in general, the load resistance sets the discharge current. You should remember this from school. Now the fun part, capacity. The capacity of the assembly with such a connection is good equal to the capacity of the battery with the smallest capacity. Imagine that all batteries are 100% charged. Look, the discharge current is the same everywhere, and the battery with the smallest capacity will be discharged first, this is at least logical. And as soon as it is discharged, it will no longer be possible to load this assembly further. Yes, the rest of the batteries are still charged. But if we continue to remove the current, then our weak battery will begin to over-discharge, and fail. That is, it is correct to assume that the capacity of a series-connected assembly is equal to the capacity of the smallest or most discharged battery. From this we conclude: it is necessary to assemble a serial battery, first of all, from batteries of the same capacity, and secondly, before assembly, they must all be charged equally, in other words, 100%. There is such a thing, called BMS (Battery Monitoring System), it can monitor each battery in the battery, and as soon as one of them is discharged, it disconnects the entire battery from the load, this will be discussed below. Now as for charging such a battery. It must be charged with a voltage equal to the sum maximum stresses on all batteries. For lithium this is 4.2 volts. That is, we charge a battery of three with a voltage of 12.6 V. See what happens if the batteries are not the same. The battery with the smallest capacity will charge the fastest. But the others haven't loaded yet. And our poor battery will fry and recharge until the rest are charged. Overdischarge, I remind you, lithium also does not like very much and deteriorates. To avoid this, we recall the previous conclusion.
Let's move on to parallel connection. The capacity of such a battery is equal to the sum of the capacities of all the batteries included in it. The discharge current for each cell is equal to the total load current divided by the number of cells. That is, the more batteries in such an assembly, the more current it can give. But with tension, an interesting thing happens. If we collect batteries that have different voltages, that is, roughly speaking, charged to different percentages, then after connection they will begin to exchange energy until the voltage on all cells becomes the same. We conclude: before assembly, the batteries must again be charged in the same way, otherwise large currents will flow when connected, and the discharged battery will be damaged, and most likely it may even catch fire. In the process of discharging, the batteries also exchange energy, that is, if one of the cans has a lower capacity, the rest will not allow it to discharge faster than themselves, that is, batteries with different capacities can be used in a parallel assembly. The only exception is high current operation. On different batteries under load, the voltage sags differently, and current will start to run between the “strong” and “weak” batteries, and we don’t need this at all. And the same goes for charging. You can absolutely safely charge batteries of different capacities in parallel, that is, balancing is not needed, the assembly will balance itself.
In both cases considered, the charging current and the discharging current must be observed. The charging current for Li-Io should not exceed half the battery capacity in amperes (1000 mah battery - charge 0.5 A, battery 2 Ah, charge 1 A). The maximum discharge current is usually indicated in the datasheet (TTX) of the battery. For example: laptop 18650 batteries and batteries from smartphones cannot be loaded with a current exceeding 2 battery capacities in Amperes (example: 2500 mah battery, which means you need to take a maximum of 2.5 * 2 = 5 Amperes from it). But there are high-current batteries, where the discharge current is clearly indicated in the specifications.
Features of charging batteries with Chinese modules
Standard purchased charging and protection module for 20 rubles For lithium battery (Aliexpress link)
(positioned by the seller as a module for one can of 18650) can and will charge any lithium battery regardless of shape, size and capacity to the correct voltage of 4.2 volts (the voltage of a fully charged battery, to the eyeballs). Even if it is a huge 8000mah lithium package (of course, we are talking about one cell at 3.6-3.7v). The module gives a charging current of 1 amp, this means that they can safely charge any battery with a capacity of 2000mah and above (2Ah, which means the charging current is half the capacity, 1A) and, accordingly, the charging time in hours will be equal to the battery capacity in amperes (actually a little more, one and a half to two hours for every 1000mah). By the way, the battery can be connected to the load already during the charge.
Important! If you want to charge a battery with a smaller capacity (for example, one old jar at 900mah or a tiny lithium pouch at 230mah), then 1A charging current is a lot, it should be reduced. This is done by replacing the resistor R3 on the module according to the attached table. The resistor is not necessarily smd, the most common one will do. I remind you that the charging current should be half the capacity of the battery (or less, it's not scary).
But if the seller says that this module is for one 18650 can, can it charge two cans? Or three? What if you need to assemble a capacious power bank from several batteries?
CAN! All lithium batteries can be connected in parallel (all pluses to pluses, all minuses to minuses) REGARDLESS OF THE CAPACITY. Batteries soldered in parallel maintain an operating voltage of 4.2v and their capacity adds up. Even if you take one can at 3400mah and the second at 900, you get 4300. Batteries will work as a whole and will be discharged in proportion to their capacity.
The voltage in the PARALLEL ASSEMBLY IS ALWAYS THE SAME ON ALL BATTERIES! And not a single battery can be physically discharged in an assembly before others; the principle of communicating vessels works here. Those who claim the opposite and say that batteries with a lower capacity will discharge faster and die - they are confused with SERIAL assembly, spit in their face.
Important! Before connecting to each other, all batteries must have approximately the same voltage so that equalizing currents do not flow between them at the time of soldering, they can be very large. Therefore, it is best to simply charge each battery individually before assembly. Of course, the charging time of the entire assembly will increase, since you use the same 1A module. But you can parallelize two modules, getting a charging current of up to 2A (if your charger can give that much). To do this, you need to connect all similar terminals of the modules with jumpers (except for Out- and B +, they are duplicated on the boards by other nickels, they will already be connected anyway). Or you can buy a module ( Aliexpress link), on which the microcircuits are already in parallel. This module is capable of charging with a current of 3 Amperes.
Sorry to be so obvious, but people still get confused, so we'll have to discuss the difference between parallel and series.
PARALLEL the connection (all pluses to pluses, all minuses to minuses) keeps the battery voltage at 4.2 volts, but increases the capacity by adding all the capacitances together. All power banks use a parallel connection of several batteries. Such an assembly can still be charged from USB and the boost converter raises the voltage to the output 5v.
SEQUENTIAL connection (each plus to the minus of the subsequent battery) gives a multiple increase in the voltage of one charged can of 4.2v (2s - 8.4v, 3s - 12.6v, and so on), but the capacity remains the same. If three 2000mah batteries are used, then the assembly capacity is 2000mah.
Important! It is believed that for sequential assembly it is sacred that it is necessary to use only batteries of the same capacity. Actually it is not. You can use different ones, but then the battery capacity will be determined by the LOWEST capacity in the assembly. Add up 3000 + 3000 + 800 - you get an 800mah build. Then the specialists begin to crow, which then is less capacious battery will run out faster and die. And it doesn't matter! The main and truly sacred rule is that for sequential assembly, it is always necessary to use a BMS protection board for the required number of cans. It will determine the voltage on each cell and turn off the entire assembly if one is discharged first. In the case of a bank of 800, it will be discharged, the BMS will disconnect the load from the battery, the discharge will stop and the residual charge of 2200mah on the remaining banks will no longer matter - you need to charge.
The BMS board, unlike the single charger module, IS NOT A SERIAL CHARGER. Required for charging tuned source of the desired voltage and current. Guyver made a video about this, so don't waste your time, watch it, it's about it as thoroughly as possible.
Is it possible to charge a series assembly by connecting several single charging modules?
In fact, under certain assumptions, it is possible. For some homemade products, a circuit using single modules, also connected in series, has proven itself, but EACH module needs its own SEPARATE POWER SUPPLY. If you charge 3s - take three phone chargers and connect each to one module. When using a single source - power short circuit, nothing works. Such a system also works as a protection for the assembly (but the modules are capable of delivering no more than 3 amperes). Or, simply charge the assembly by the cell, connecting the module to each battery until it is fully charged.
Battery indicator
It is also an urgent problem - at least to know approximately how much percent of the charge remains on the battery so that it does not run out at the most crucial moment.
For 4.2 volt parallel assemblies, the most obvious solution would be to immediately purchase ready board power bank, which already has a display showing the percentage of charge. These percentages are not super-accurate, but still help. The issue price is about 150-200 rubles, all are presented on the Guyver website. Even if you are not building a power bank, but something else, this board is quite cheap and small to place it in a homemade product. Plus, it already has the function of charging and protecting batteries.
There are ready-made miniature indicators for one or more cans, 90-100r
Well, the cheapest and most popular method is to use the MT3608 boost converter (30 rubles), set to 5-5.1v. Actually, if you make a power bank on any 5-volt converter, then you don’t even need to buy anything. The refinement consists in installing a red or green LED (other colors will work at a different output voltage, from 6V and above) through a current-limiting resistor of 200-500 ohms between the output positive terminal (this will be a plus) and the input positive terminal (for an LED, this will be a minus). You are not mistaken, between two pluses! The fact is that during the operation of the converter, a voltage difference is created between the pluses, +4.2 and + 5V give a voltage of 0.8V between themselves. When the battery is discharged, its voltage will drop, and the output from the converter is always stable, which means the difference will increase. And when the voltage on the bank is 3.2-3.4V, the difference will reach the required value to light the LED - it starts to show that it's time to charge.
How to measure battery capacity?
We are already accustomed to the opinion that Imax b6 is needed for measurement, but it costs money and is redundant for most radio amateurs. But there is a way to measure the capacity of a 1-2-3-cell battery with sufficient accuracy and cheaply - a simple USB tester.
In a previous article, I considered the issue of replacing nickel-cadmium (nickel-manganese) NiCd (NiMn) screwdriver batteries with lithium ones. It is necessary to consider several rules for charging batteries.
Li-ion batteries of 18650 size can generally be charged up to 4.20V per cell with a tolerance of no more than 50mV because an increase in voltage may damage the battery structure. The battery charge current can be 0.1xC to 1xC (here C-capacity). It is better to choose these values according to the datasheet. I used brand batteries in the alteration of a screwdriver. We look at the datasheet-charging current -1.5A.

The most correct way would be to charge lithium batteries in two steps using the CCCV method (constant current, constant voltage).
The first stage is to provide a constant charge current. The current value is 0.2-0.5C. I used a battery with a capacity of 3000 mAh, so the nominal charge current will be 600-1500mA. After charging the banks goes at a constant voltage, the current is constantly decreasing.
The voltage on the battery is maintained within 4.15-4.25V. The battery is charged if the current decreases to 0.05-0.01C. Taking into account the above, we use electronic boards with Aliexpress. Current limited CC/CV step down board on XL4015E1 chip or on LM2596. The board is preferable because it is more convenient in the settings.


Characteristics of XL4015E1.
Maximum output current up to 5 A.
Output voltage: 0.8V-30V.
Input voltage 5V-32V.
has similar parameters, only current up to 3 A.
List of tools and materials.
Adapter 220 \ 12 V, 3 A - 1 pc;
- standard screwdriver charger (or power source);
- CC/CV charge board on or on -1pc;
-connecting wires -soldering iron;
-tester;
- plastic box for charge board - 1 piece;
- minivoltmeter -1 piece;
- variable resistor (potentiometer) for 10-20 kOhm - 1 piece;
- power connector for the battery compartment of the screwdriver - 1 pc.
Step one. Assembling the battery charger of the screwdriver on the adapter.
We have already chosen the cccv board above. As a power source, you can use any with the following parameters - an output voltage of at least 18 V (for a 4S circuit), a current of 3 A. In the first example of making a charger for lithium-ion batteries of a screwdriver, I used a 12 V, 3 A adapter.

First, I checked what current it can give out to the feast of the rated load. I connected an autolamp to the output and waited half an hour. It gives out freely without overload 1.9 A. I also measured the temperature on the radiator of the transistor -40 ° C. Completely normal mode.

But in this case, there is not enough tension. This is easily fixable with just one penny radio component-variable resistor (potentiometer) of 10-20 kOhm. Consider a typical adapter circuit.


The circuit has a controlled zener diode TL431, it is in the feedback circuit. Its task is to maintain a stable output voltage in accordance with the load. Through a divider of two resistors, it is connected to the positive output of the adapter. We need to solder to the resistor (or solder it completely and solder it in its place, then the voltage will be regulated downward) which is connected to pin 1 of the TL431 zener diode and to the negative bus variable resistor. We rotate the axis of the potentiometer and set the desired voltage. In my case, I set it to 18V (a small margin from 16.8V to drop on the CC/CV board). If your voltage indicated on the cases of electrolytic capacitors at the output of the circuit is greater than the new voltage, they may explode. Then you need to replace them with a margin of 30% voltage.
Next, connect the charge control board to the adapter. We set the voltage of 16.8 V with a trimmer resistor on the board. With another trimmer resistor, we set the current to 1.5 A, first we connect the tester in ammeter mode to the output of the board. Now you can connect the lithium-ion screwdriver assembly. Charging went well, the current dropped to a minimum by the end of the charge, the battery was charged. The temperature on the adapter was in the range of 40-43°C, which is quite normal. In the future, it is possible to drill holes in the adapter case to improve ventilation (especially in summer).
The end of the battery charge can be seen by turning on the LED on the board on the XL4015E1. In this example, I used another board on the LM2596, as I accidentally burned the XL4015E1 during the experiments. I advise you to do charging better on the XL4015E1 board.
step two. Assembling the screwdriver battery charger circuit on a standard charger.
I had a regular charger from another screwdriver. It is designed to charge nickel-manganese batteries. The task was to charge both nickel-manganese and lithium-ion batteries.


This was solved simply by soldering wires to the output wires (red plus, black minus) to the CC / CV board.
The idle voltage at the output of the regular charger was 27 V, which is quite suitable for our charging board. Further, everything is the same as in the version with the adapter.


