Linux mint 18.3 sylvia system requirements. Create a system snapshot
In this article, we will walk through the installation process Linux Mint. It is a community-developed Linux distribution based on Ubuntu. But there is also a Debian-based edition (LMDE).
The main goal is to provide the user with a "modern, elegant and user-friendly operating system that is both powerful and easy to use." Linux Mint provides full support for a variety of media formats, includes some proprietary programs, and comes bundled with a wide range of open source applications.
The founder of the project is Clement Lefebvre, the development team and the user community are also actively involved in the development.
Preparing for installation
Step 1. Download the image
You can download the distribution kit on the official website. Choose the edition that suits you and download it. In this tutorial, I will use Linux Mint Cinnamon
Step 2 Burning the Image
Now we need to create a boot device. As such a device, I recommend that you use USB flash drive. You can make such a flash drive in Linux using the program, or use the command dd:
$sudo dd if=~/linuxmint-18.3-cinnamon-64bit.iso of=/dev/sdX1
Where " sdX" is your flash drive, and " 1 ” is the first section on it.
For creating bootable flash drive under Windows OS, I recommend using the Rufus program.
Step 3Setting up the BIOS
I won’t stop at this stage in detail, since there are a lot of instructions on the Internet (for example,). Just restart your PC. Enter the BIOS menu and put your flash drive first in the list.
Linux Mint 18.3 installation process
Step 4 Download
Below are screenshots when booting with BIOS and UEFI. In both cases, choose the first item.
Step 5Run the Installer
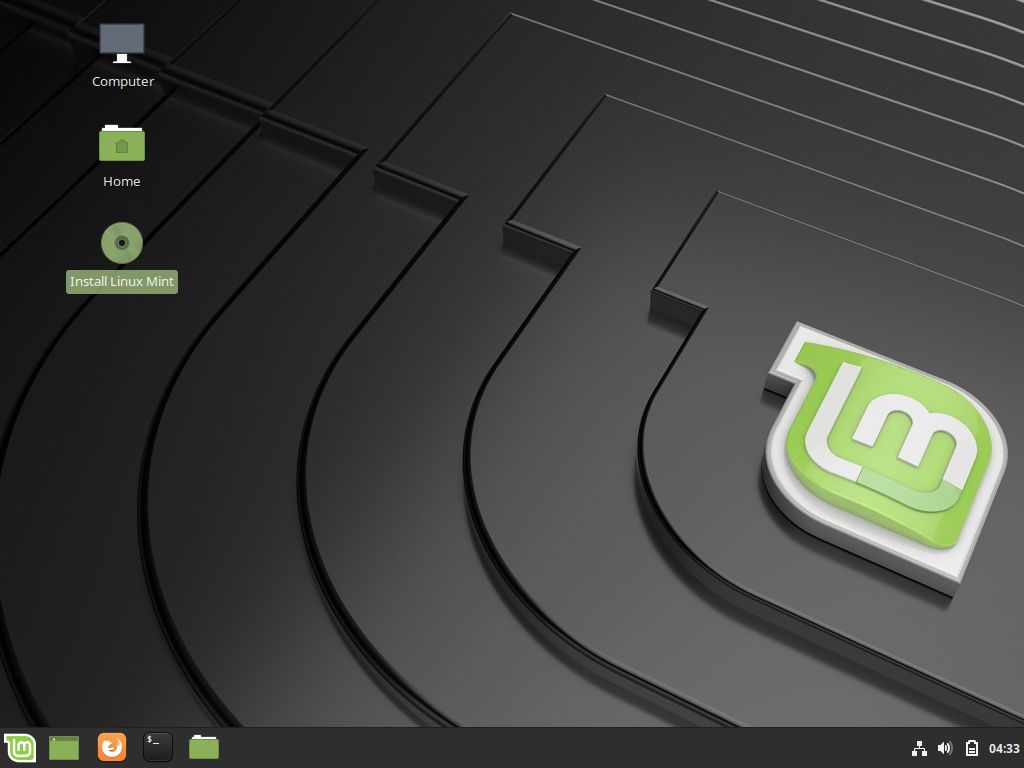
After loading the desktop, find the icon on it " Install Linux Mint” and click on it 2 times.
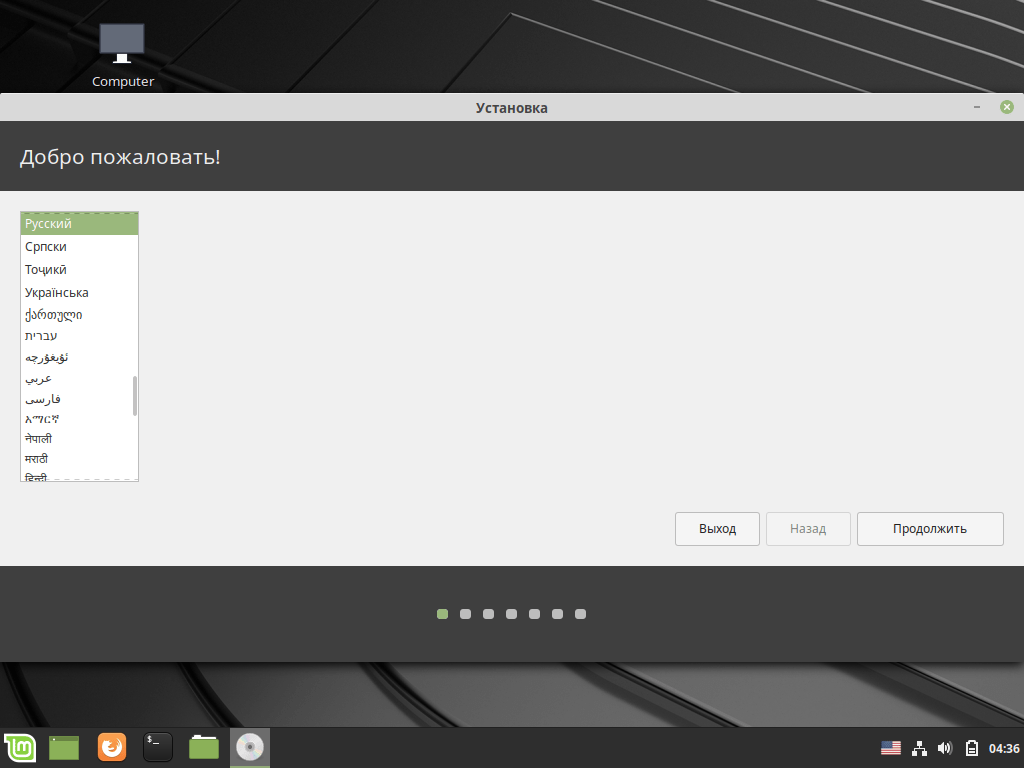
Step 6. Greeting and system language
After starting the installer in the right menu, you will need to select the language that will be used during installation and later in the system itself. To go to the next step, click " Proceed»
Step 7. Installing additional software
Here you are prompted to install various additional software such as drivers, Flash, and other programs. Some software is proprietary. Set it at your discretion. Personally, I usually refuse and then put with my hands only what I need.
Step 8. Partitioning the hard drive
Here you have to choose the installation method. But I will be splitting the disk with my hands, so I chose " Another variant».
You will see a window for setting partitions. To begin with, we have to create a new partition table if we install Linux completely (If you put it next to Windows, then skip this step). To create a blank table, click " New partition table...».
You will be notified that all partitions on the hard disk will be destroyed. If you agree, then click " Proceed».
To create a new section, click on " + ' in the lower left corner.
If you are installing Linux on UEFI computers, then you need to create an ESP partition. How to set it up is shown in the screenshot below.
You can also create a swap partition. It is done in the same way as the rest, but in the paragraph " Use as» indicate « swap partition". It is needed for hibernation, it is also used when there is not enough RAM. You can specify the size you want. Previously, 2 GB was enough for me. Now I'm using a swap file, if it's interesting, I'll write an article about it. So whether you use a swap partition or not is up to you. I went straight to creating the root partition. The system itself will be installed on it.
You can also create a home partition, then if you reinstall the OS, all data on it will be saved. If you still decide to make it, then I recommend allocating the most memory for it, since it is there that all your personal information will be stored.
This is how my disk partitioning scheme looks like (I remind you that the ESP (efi) partition is created only when the OS is installed in UEFI mode).
If you still did not create a swap partition, then you will be notified about this and offered to go back and repartition the disk. If you are sure that you do not need it, then just click " Proceed».
Now you will be shown all the changes you made. If everything suits you, then click " Proceed».
If you are installing the system in UEFI mode, and the computer has other operating systems installed in BIOS compatibility mode, the installer will warn you about this. If you continue, you will lose the ability to run OSes installed in BIOS compatibility mode. If you have other operating systems, then you should stop the installation and deal with the problem. If there are no other operating systems, then feel free to click " Proceed».
Step 9Determine the location
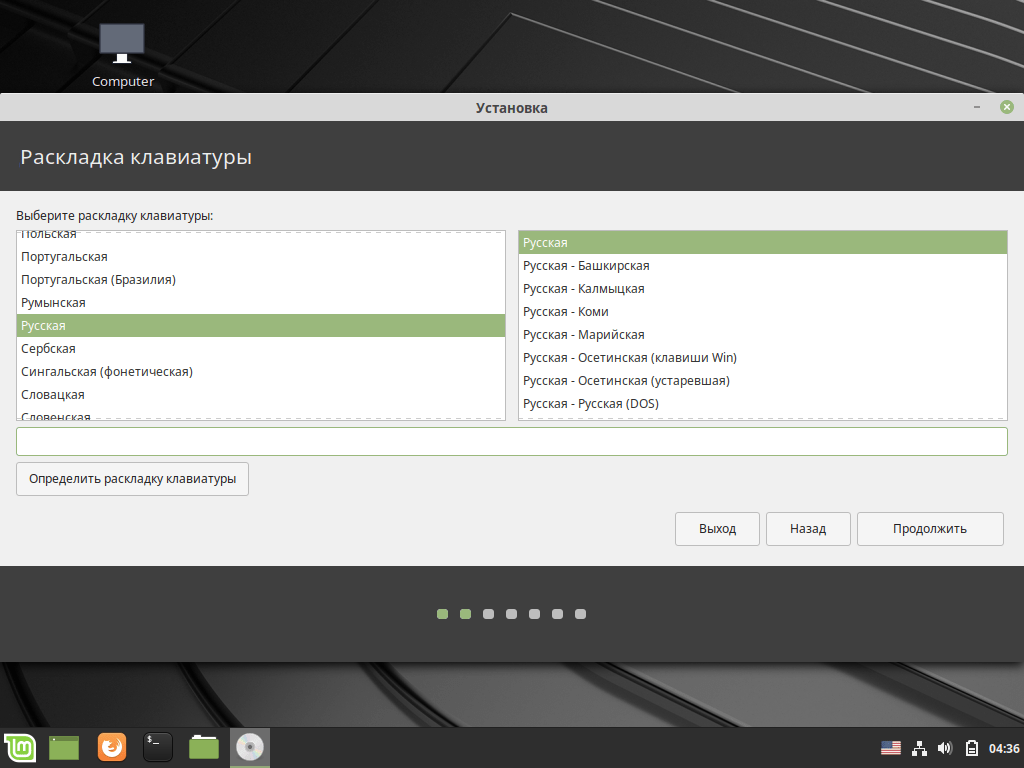
Step 10 Keyboard Layout
Now you need to select the keyboard layout you need from the list. You can leave what is specified by the standard. Or you can try to define it by clicking on the button " Define keyboard layout».
Step 11. Create a user
In this window, you need to specify your full name and the name that will be used for the user (you can specify the same), computer name (you can specify whichever you want). You also need to set a password for your user. Be sure to remember it! If you do not want to enter a password after each system boot, then click "". If you use a password, you can set the encryption to home folder. Do it at your own discretion.
Step 14 Login
After the reboot, if you did not select the item " Log in automatically”, then you will need to enter a password.
Video with the installation process:
conclusions
In this article, we have analyzed the installation process in detail. Linux distribution Mint 18.3. After the installation is complete, if necessary, you can customize the system for yourself. If you have any questions, ask in the comments!
To upgrade from Linux Mint 18.3 BETA to Linux Mint 18.3 stable, simply launch the Update Manager and apply all available updates.
It is also possible to update Cinnamon and MATE editions of Linux Mint 18, 18.1 and 18.2 to version 18.3.
Updates for the Xfce and KDE editions will be available later this year once the stable versions of those editions are released.
1. Create a snapshot of the system
Timeshift has been ported to Linux Mint 18, 18.1 and 18.2. You can use timeshift before upgrading to take system snapshots.
If something goes wrong, you can easily restore your operating system to a previous state.
To install timeshift, open a terminal and type:
sudo apt update sudo apt install timeshift
Run Timeshift from Application Menu, follow the on-screen instructions to set it up and create a system snapshot.
2. Preparing for the update
- Turn off your screensaver.
- If you have installed Cinnamon spices (applets, desktops, extensions, themes), update them from System Preferences
3. Operating system update
Upgrading to Linux Mint 18.3 is relatively easy.
In the update manager, click on the Check for updates button, pay attention to the new version of mintupdate and mint-upgrade-info. If they are, then install them.
Run the system update by clicking on "Edit" -> Update to "Linux Mint 18.3 Sylvia".

Follow the prompts on the screen.

If there is a request to save or replace configuration files, choose to replace them.
After the update is complete, restart your computer.
Frequently asked Questions
- Although there is a new kernel in Linux Mint 18.3, this update does not change the kernel for your benefit. This is a decision that you yourself must make.
- The same applies to selecting a display manager or selecting software. Applications in your interest will not be removed or enabled. You can decide whether to make these changes, but you are definitely not awarded this.
- After the upgrade, you can install new introduced applications such as redshift-gtk and mintreport from the repositories.
- If you are on Cinnamon or MATE and there is no update available for you, check if you have latest versions mintupdate and mint-upgrade-info. If the latest versions are not yet available in your mirrors, switch to the default repositories.
- This rarely happens, but if you get locked out and can't get back in, switch to the console with CTRL+ALT+F1, log in, and type
- killall cinnamon-screensaver
- Or if you are in MATE:
- killall mate-screensaver
- Use CTRL+ALT+F7 or CTRL+ALT+F8 to return to your session.
What's new in Linux Mint 18.3
Linux Mint 18.3 is a Long Term Support release that will be supported until 2021. It comes with updated software and offers enhancements and many new features to make your desktop more user-friendly.

Improved Program Manager
He now has a more modern look, he has become more comfortable.

Popular programs such as Spotify, WhatsApp, Skype, Google Earth, Steam and Minecraft are now Editors' Choice and very easy to install.
The user interface has become not only more modern, but at the same time more simple and understandable.

The program manager is now lighter and faster. It no longer uses Webkit, navigating through categories and applications is now almost instantaneous, and it opens 3 times faster than before.
The main process has been ported to AptDaemon and the Program Manager is now running in user mode. As a result, you do not need to enter any passwords to view applications, and if you enter a password to install or uninstall an application, the authentication is remembered for a while, so you can install or remove other applications without having to enter this password again.
Under the hood, the code has been simplified and modernized.
Flatpak Support
Thanks to this, you can install the latest versions of applications even if their dependencies are not compatible with Linux Mint.
Linux Mint 18.3 comes with Flatpak installed and the new Software Manager fully supports it.
There is a special section dedicated to Flatpak, in which the Software Manager contains a list of everything available in Flatpak (so-called remotes):

Although Flathub is configured by default, you can change the list of remotes. If you have added new ones, they will appear in the Program Manager.
Packages and flatpaks are completely different things, but they are presented in the Software Manager the same way: they are just applications that you can install.
Flatpaks look like other apps in the Program Manager:

You can visit any remote, see their flatpaks, their reviews, take a look at their screenshots, hit the install button and run them just like other apps.
Once installed, Flatpaks run in their own environment, isolated. They do not affect any other part of the operating system. Below GNOME Games 3.26 runs in its own GTK 3.26 environment. Otherwise these applications cannot run on Linux Mint as they are not compatible with GTK 3.18.

Backup (Backup Tools)
This is another aspect of Linux Mint that has been greatly improved in 18.3.
Personal files
Tool Reserve copy has been almost completely rewritten. Everything was rewritten: its functions, appearance and how it works.

Now backing up your home directory is a standalone feature - nothing more, nothing less. It saves all your files in an archive. When a backup is restored, the files are restored to the exact location they were previously, with their original access rights and timestamps.
It runs in user mode so you don't have to enter a password anymore. The steps required to perform a backup or restore of data are much easier than before. The settings that you chose the first time are remembered and when you create backups again, you no longer need to do the same steps to select the same options.
Saving software choices is also much easier than before. Instead of showing you thousands of packages to choose from, the Backup Tool now simply lists the packages you have installed from the Software Manager.

Under the hood, the code is also much smaller and much more modern. Improved performance and stability, especially regarding data compression and multithreading. Just like it was done for the Program Manager. APT based has been switched to AptDaemon.
System Snapshots
Linux Mint 18.3 has got Timeshift- a tool designed to create system snapshots.
Timeshift is the perfect companion for the Linux Mint Backup Tool. It doesn't save your personal data, it saves everything else.
Thanks to Timeshift, you can create backups of the operating system itself.
You deleted system files by mistake? You can restore them. You have upgraded to more new version, and something doesn't work so well? You can return to the past.

In preparation for Linux Mint 18.3, their development team worked in collaboration with Timeshift developer Tony George to improve localization, HiDPI support, appearance, the feel of the program, and support for the progress bar and encrypted directories. If you have already appreciated Timeshift in the past, now you will like this program even more.
Timeshift Tips
RSYNC Pictures
- Snapshots are created by making copies of system files using rsync and making hard links to the unchanged files from the previous snapshot.
- All files are copied when the first snapshot is taken. Subsequent snapshots are incremental. Unmodified files will be linked to the previous snapshot, if available.
- Snapshots can be saved on any disk formatted with the Linux file system. Saving snapshots to a non-system or external drive allows you to restore the system, even if system disk damaged or reformatted.
- Files and directories can be excluded to use less disk space.
BTRFS Pictures
- Snapshots are created using the built-in facilities of the BTRFS file system.
- Snapshots are created and restored instantly. Taking snapshots is an atomic transaction at the file system level.
- Snapshots are restored by replacing system partitions. Because files are never copied, deleted, or overwritten, there is no risk of data loss. Existing system saved as a new snapshot after restoration.
- Snapshots are the ideal means of copying a byte-for-byte system. Nothing will be missed.
- Snapshots are saved on the same drive they were taken from (the system drive). Storage on other drives is not supported. If the system disk fails, the snapshots stored on it will be lost along with the system.
- The size of BTRFS snapshots is initially zero. Because system files gradually change over time, data is written to new blocks of data that take up disk space (copy-on-write). The files in the snapshot continue to point to the original data blocks.
- The OS must be installed on a partition with BTRFS partitioned into subsections like Ubuntu (@ and @home subsections). Other breakdown types are not supported.
System reports
For Linux Mint 18.3, a new tool called "System Reports" has been developed. Its purpose is to generate software crash reports and display information related to your computer and your environment.
Crash reporting
When a crash occurs, information is collected and a crash report is generated.
The System Reports tool displays crashes and allows you to create stack traces for them:

When developers cannot reproduce a bug, this information is very helpful. For inexperienced users, it is always very difficult to create core dumps or stack traces. This tool helps with that.
Information reports
In addition to crash reports, this tool can also display informational reports.
Unlike release notes, which show the same general information for everyone, informational reports are focused on specific users, specific hardware, individual cases. Each report can determine its own relevance based on your environment, the desktop you're using, your processor, your graphics cards...etc.

The development team will use this tool to report and resolve specific issues by displaying information, workarounds, and troubleshooting methods that may help affected users.
Reports can even include actions and decisions. Sometimes the development team knows how to solve a particular problem, but the solution cannot or should not be made without the consent of the user. In such cases, the report may simply ask for the user's permission, and a button click will suffice to resolve the issue.
Cinnamon 3.6
Network accounts
Cinnamon 3.6 supports GNOME network accounts. Among other things, this support makes it possible to use Google drive and OwnCloud in Nemo.
Connect your account Google, and Nemo will automatically add access to your Google Drive in the sidebar:

Libinput support:
Where previous releases used the Synaptics touchpad driver, this one ships with the Libinput driver by default.
When the Libinput driver (xserver-xorg-input-libinput) is installed, it is used. When it is removed (and after a reboot), Synaptics is used instead.
Cinnamon 3.6 supports both drivers out of the box, thanks to improvements to the configuration daemons and the introduction of "automatic" configuration options that adapt well to most touch panels, regardless of which driver is used.

The configuration module for Cinnamon Spices (applets, desktops, extensions, themes) has been completely updated:
It allows you to place applets directly on different panels, gives you 1-click access to settings, shows Spices that have received an update since they were installed, and updates faster. There is also a link " Additional Information to the Spices website for screenshots and user reviews.
Screen keyboard:
The size and position of the on-screen keyboard can now be adjusted. You can place it at the top or bottom, and it can take up half, a third, or a quarter of your screen.
Support for AT-SPI has been improved (which allows you to automatically open on-screen keyboard when you focus on a text entry) and it is now fully functional.
Onboard and Cinnamon have been modified so they can be installed without interfering with each other. You can now use the Cinnamon on-screen keyboard without interfering with AT-SPI events, and you can launch and use Onboard without Cinnamon interfering as well.
Nemo extensions:
Nemo extensions can now pass the name of their config tool to Nemo to get the "Config" button in the Nemo plugins dialog:

This makes it easy to integrate extensions properly and doesn't clutter up the application menu.
Other improvements:
Some of the other improvements in Cinnamon 3.6:
- HybridSleep support
- Ability to show other workspaces in the window list
- Middle clicks to trigger "secondaryActivate" signal in indicators
- Rescan button for wireless networks in the network applet
- Improved localization in Nemo extensions, cinnamon-session and cinnamon-settings-daemon
- Performance (5x faster in some cases for nemo-media-columns) and stability improvements in nemo API extensions
- Support for animated GIFs in nemo-preview
- Applets that are normally invisible (such as the notification applet) are now visible in edit mode so they can navigate panels more easily
- Improved Systray icon scaling in hidpi
- Cinnamon input fields (like app menu search) now support middle-click paste
- Bug fixes and performance improvements
- Translations have been added for many applets
HiDPI
HiDPI support is getting better with every new release.
The software manager and software sources have been ported to GTK3 and now support HiDPI.
HiDPI support in Cinnamon 3.6 is now "Auto" by default (it was disabled in previous versions), so the environment will scale out of the box on HiDPI displays.
windows progress
LibXapp now allows applications to report their progress to the window manager.
This feature is called "window progress" and is supported by Cinnamon 3.6.
When an application uses it, its progress is displayed in the panel window list:

In Linux Mint 18.3 windows progress is supported by the following applications:
- Nemo (file operations)
- Backup
- Timeshift
- Program Manager
- Driver Manager
- Formatting USB flash drives
- Writing an image to a USB drive
- Any application that uses dialog boxes Synaptic (language settings, update manager, software sources, etc.)
XApps Improvements
xed, text editor, now got a minimap.

Improved PDF reader toolbar, Xreader. History buttons have been replaced with navigation buttons (history can be viewed via the menu). The two zoom buttons have been toggled and a reset zoom button has been added to keep Xreader in line with other Xapps.

The document viewer now also detects the DPI and size of your monitor so that the size of the document you see on the screen matches the paper size in real life when using 100% zoom level.
In Xplayer, the media player, the fullscreen window has been improved to look cleaner and more compatible with the player's windowed mode.
Login window
The login window contains more settings than before. Options have been added for automatic login logged in, so if you're the only one, you can set up your computer to log in without a password.
LDAP users will appreciate the ability to hide the user list and enter usernames manually.
Various UI elements such as bar indicators now show tooltips and can be enabled/disabled in settings.

Support for numlockx has also been added (which aims to enable the numlock key at startup).
Other improvements
Linux Mint now offers the best support to check spelling and synonyms in English, German, Spanish, French, Italian, Portuguese and Russian.
Redshift has been added to the software selection and is now installed by default. This tool adapts your screen's color temperature based on the time of day, making it warmer at night to reduce the impact on your eyes.
The Driver Manager now detects your processor and presents firmware packages in a more meaningful way:


File Upload Manager (mintupload) and Domain Blocker (mintnanny) have been removed from the default software selection. They will still be available in the repositories, but they are no longer installed by default.
PIA Manager, a toolkit for PIA VPN connections (available in the repositories), now runs in user mode and no longer requires a root password at startup.

This release ships with linux firmware 1.157.13 and Linux kernel 4.10.0-38.
New desktop backgrounds
Linux Mint 18.3 has an excellent collection of backgrounds from various artists.

Main Components
Linux Mint 18.3 has Cinnamon 3.6, Linux 4.10 kernel and Ubuntu 16.04 package base.
LTS strategy
Linux Mint 18.3 will receive security updates until 2021.
Until 2018, future versions of Linux Mint will use the same package base as Linux Mint 18, making it trivial to upgrade.
Until 2018, the development team will not start working on the new base and will be fully focused on this one.
Linux Mint is one of the most popular . Linux Mint is optimal for beginners, convenient, beautiful and contains everything you need. This guide covers the Linux Mint installation process in detail. It covers how to install Linux Mint on a blank disk, how to create partitions, and how to install Linux Mint alongside Windows.
This guide can also be used to install other Linux distributions as most Linux distributions install in the same way.
Linux Mint comes in three editions that differ in desktop environment:
- Linux Mint Cinnamon
- Linux Mint MATE
- Linux Mint Xfce
All editions are installed in the same way. In this guide, we show you how to install Linux Mint Cinnamon. If you have never used Linux before, you can start with Linux Mint Cinnamon.
Yes it is. On the this moment this distribution is #1 on Distrowatch's rankings. Of course, recently Manjaro has been rapidly catching up with him, but in past years, Mint has been confidently in the lead. Moreover, even Debian, the descendant of which he is, could not catch up with him.
It is worth saying that Mint is a kind of grandson of the famous Debian. It is based on Ubuntu, which in turn is based on Debian. Many Linux distributions can boast of a similar pedigree, but only Mint and Ubuntu have been able to gain popularity greater than that of their ancestor.
Once upon a time, Ubuntu overtook Debian in popularity. Now Mint has overtaken Ubuntu in popularity.
However, how do all these distributions differ from each other? I will not draw parallels with Debian, but let me compare Linux Mint and Ubuntu.
Differences between Linux Mint and Ubuntu
These distributions are very similar, but they also have their differences. Among them are:
- Linux Mint has the necessary software and media codecs right out of the box
- Linux Mint has a more Windows-like (and therefore more beginner-friendly) interface
- Ubuntu is developed by a huge company, while Mint is developed by a small team
- Many tools and packages available in Mint out of the box are missing from Ubuntu (need to be reinstalled)
- Mint is ready to work almost immediately after installation - Ubuntu needs to be finished
- Mint uses its own graphical environment - Cinnamon. On Ubuntu, it's Unity. (And since version 17.10 - Gnome)
That's not all, there are other differences as well. However, they are petty, and it does not make sense to talk about them here.
Installing Linux Mint is quite simple.
The installation here is little different from. However, there may be some nuances here. Before proceeding directly to the installation, you need to familiarize yourself with the requirements of the system.
System requirements:
- CPU: x86 or x64-architecture processor with a frequency of at least 1.3GHz
- RAM: 512MB for Cinnamon, xfce4 and mate. 2GB for KDE
- HDD: 9GB free space
- Video card: the one for which there is a driver
- Rest: CD/DVD-ROM drive or USB port
This is how they look system requirements for Linux Mint. These are the minimum ones, there are also recommended ones, but I see no reason to consider them, because the difference in work will still be felt weakly (Mint is fast).
Preparing for installation
Before proceeding to the installation itself, we need to decide on the choice of edition. There are already 4 pieces to choose from, and this is very good:
- Cinnamon: default, moderately beautiful, light design, developed by the authors of Mint
- MATE: a fork of Gnome 2 that also has high performance
- xfce: probably one of the smartest graphical shells
- KDE: more beautiful, but at the same time more demanding shell
Installing Linux Mint is fairly easy to run. You download the distribution image (a file with the .iso extension), burn it to a flash drive or disk, and boot from the flash drive (disk) into the Live system. Inside the Live system, run the installer and follow the instructions of the installer. Installation is relatively fast.
The most important step at the installation stage is partitioning the disk or choosing the disk (disk partition) on which the system will be installed. If you are installing the system next to Windows, then you need to be careful not to accidentally format the existing disk partition (if any) that contains important data. Below we break down the disk partitioning process step by step, so don't worry.
Also, we must not forget about the processor architecture. There is a 32x version available for older machines (While many other distributions have only one version left - 64x), whether to use it or not is up to you. I recommend doing this only if you have a very old and antediluvian processor.
Now we need to get an image given Linux distribution. For this, we go to the official Linux Mint website. The download page is available in the main menu, however, in order to save you time, I put a link to it, and not to home page(substantial reduction in time, I know).
Scrolling down, we can see a block with all the necessary links. Click on the one you want, and then go to the next page.

As you might have guessed, this page will contain links to mirrors. If you are from Russia, then it is best for you to use domestic mirrors, because the download speed, otherwise, will be dramatically lower. Accordingly, if you, for example, are from Ukraine, then it is better for you to use the mirrors of your own, or the country closest to you.
Clicking on the appropriate version will open new page, where you can choose the server closest to you for downloading or use a torrent file for downloading.
Burn image to CB/USB drive
- If you have Windows, use the Rufus program
- If you have Linux/Mac - Etcher
Installing Linux Mint alongside Windows
If you already have Windows installed on your computer and you want to install Linux Mint next to it, then it is advisable to first allocate space on the disk that will be used for Linux Mint. This can be done as standard Windows tools. If you are not installing Linux Mint alongside Windows, then proceed to the next step.
Before proceeding with the steps below, as well as further installation of Linux, it is highly recommended that you back up important data. It is desirable to make a copy on removable media.
Let's look at how to allocate disk space in Windows for a future installation of Linux Mint. Through the menu Start find the utility Computer management.

The computer setup utility will open. Select an item on the left side of the list Disk Management . A table will appear with a list of disk partitions. In the screenshot below (example for Windows 10), you can see that the main partition is a disk C. From it we will cut off the place that we need to install Linux. Click on drive C and right click on it. From the pop-up menu, select Shrink Volume

In the window that opens, in the field Compressible space size enter the size you want to cut from the disk. For Linux, it is desirable to allocate at least 40-50Gb (although less is possible, depending on how you plan to use the system). I cut off only 20Gb, since this is a test system. Enter the desired size in the field and press the button Compress.

The result is the following markup. We see that an unallocated (empty) area of \u200b\u200b~20Gb has appeared on the disk. We will use this area to install Linux Mint.

Now you need to boot from the flash drive (disk) that you created. To do this, you need to set boot from external media in the BIOS / UEFI settings of your computer. To do this, you need to restart your computer and open the BIOS. On the different computers BIOS can be accessed in different ways.
On the modern computers, where the mode is used UEFI, to enter the BIOS / UEFI, you need to hold down when you turn on the computer special key. At different manufacturers key may be different. Usually this: F2 , Del , F10 , Esc , F11 or F3 .
On older computers that use the classic BIOS (legacy BIOS), to enter the BIOS, when you boot the computer, at the very beginning, when the motherboard logo appears, press a special key. For different motherboards key may be different. Usually this is one of the keys: Del , F1 , F2 , F8 , F10 or some other, or even a keyboard shortcut.
Example BIOS settings to boot from a USB flash drive:

Save the BIOS settings and restart the computer. Do not forget to first connect the USB flash drive to the computer.

The boot menu will appear. You need to select the first item - Start Linux Mint , to start loading the Live system.

In some cases, the boot menu may look like this:

Starting the installation Linux Mint
When the Live system boots up, the desktop will appear in front of you. Double click on the icon to start the installation. Install Linux Mint, located in the left upper corner desktop.
The installer will start. The installer will take several steps.
Language selection Linux Mint
Select the language of the future system from the list and click the button Proceed.
Choosing a keyboard layout Linux Mint
Select a keyboard layout.
Installing additional components Linux Mint
At this step, you are prompted to check the box so that video card drivers, WiFi, Flash support, MP3 support, and some other components are automatically installed during installation. I recommend installing them, so check the box and click Proceed .

Disk selection and disk partitioning
Disk selection and disk partitioning important step installation, which is usually difficult for beginners. At this step, you need to choose which disk or disk partition to install Linux Mint on. And also, if necessary, mark the disk yourself, that is, create the necessary disk partitions on which the system will be installed.
A few words about disk partitions for Linux Mind
Before we move on to disk partitioning, just a few words about why Linux needs any partitions at all.
Any disk can be divided into several partitions. Sections can be different size, have a different file system and a different purpose. For example, when Windows and Linux are used on the same computer, separate partitions are created on the disk for them.
If you already have Windows installed, then you have already created several partitions on the disk, or in the simple case there may be only one section. But usually these are at least three partitions: an EFI partition, a recovery partition about 500Mb in size, and a partition that is allocated for disk C.
Any Linux system (not just Linux Mint) has a certain directory structure. Linux can be installed not on one disk partition, but on several. In this case, each section is used for specific purposes (for a specific system directory).
For example, a user can create the following partitions:
| EFI | EFI partition. This section must be created for computers running in UEFI mode. If you already have Windows installed on your computer (running in UEFI mode), then the EFI partition should already exist and you do not need to create it. |
| / | Root section. This is the main partition, which contains all directories of the system, except for those located on other partitions. |
| /home | Home section. This is the section where user data is placed. Exactly at /home section, the user creates his personal files. If we draw a distant analogy with Windows, then /home section is something like a directory Users (Users) on Windows. Everyone has it Linux user the /home directory has its own personal directory, for example, /home/vasya in it he creates his files. |
| swap | swap partition. Used by the system if not enough random access memory. Previously, it was usually always created, but now a swap file is more often used instead of a swap partition, so we will not create it. |
| /boot | Boot section. This partition contains the GRUB bootloader that boots the system and other components that are required to start the system. This section is usually used for more, shall we say, advanced installations. When you plan to set up RAID, full-disk encryption, and so on. |
For the simplest Linux installation, it is enough to create one root partition "/" (not counting the EFI partition).
But sometimes it is useful to create more /home chapter. If you are creating /home section, then in this case, user data will be placed on a separate section. And if, for example, you need to reinstall the system, then during the reinstallation you can use the existing /home partition with your data (but do not format it), and your data will remain intact (if you are not sure what you are doing, then create a backup anyway).
Below, when manually partitioning the disk, we will create partitions: root "/", /home and for computers running in UEFI mode, also an EFI partition, if not already created.
- Installing the system on a "clean" disk ( automatic creation sections). This option is worth choosing if you are dedicating a separate disk for Linux Mint and do not plan to create partitions yourself. In this case, the installer usually creates only one root partition and one EFI partition (for UEFI mode).
- The Linux Mint installer will automatically detect that you already have Windows installed and offer to create disk partitions automatically.
- Self-partitioning the disk (creating partitions), as well as partitioning the disk when installing Linux Mint next to Windows. In this case, the user himself creates the desired partitions.
Installation on a blank disk (full disk format)
This is the simplest case - for Linux Mint you allocate a separate disk that will be automatically formatted and on which the installer will automatically create the required partitions. For this installation option, select Erase disk and install Linux Mint and press the button Install now.

The following warning will appear. From this warning, you can see that 2 partitions will be created on the disk: an ESP (EFI) partition and one root partition.

For systems with classic BIOS, no ESP (EFI) partition is created, meaning only the root partition will be created.
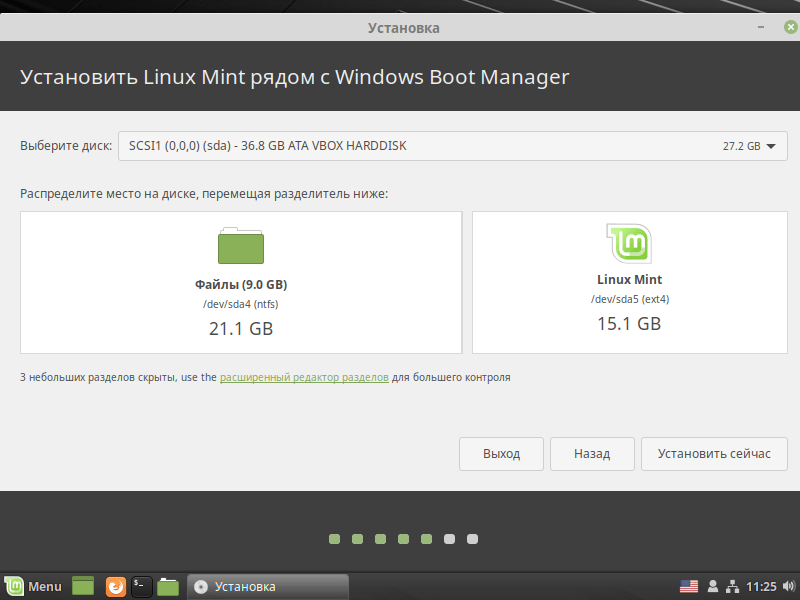
If you already have Windows installed, then the installer will detect this and prompt you to install Linux Mint alongside Windows. In this case, the installer will automatically shrink the partition on which Windows is installed and create a root partition for Linux. Let's see how to do it. Choose an item Install Linux Mint alongside Windows Boot manager.

The following window will appear. In it, you must specify how much space you plan to cut off from the partition on which Windows is installed in order to use this space for Linux. To do this, move the separator left or right with the mouse. In my case, on a test system for Linux Mint, I allocate 15.1Gb. When everything is ready, press the button Install now.
The following warning will appear. Think again if you did everything right and if you backed up your data. If yes, then click Continue.

Another warning will appear. It shows that the installer will create one root partition and format it to the ext4 file system. Click Continue.

Self-partitioning a disk (creating partitions)
Now let's look at how to create disk partitions ourselves. To do this, select the item Another option and click the Continue button.

The utility for creating disk partitions will open. It contains a table with disks and disk partitions.
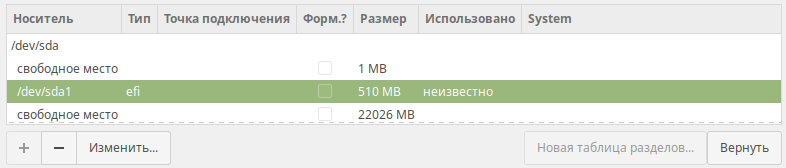
If you have a blank disk that does not have any partitions, then you will see the following window. Your drive is labeled as /dev/sda, it is presented in the list of sections. If you have several disks connected to your computer, they will also be displayed in the list and will be named /dev/sdb, /dev/sdc, and so on.

If you are installing Linux alongside Windows, then the list of partitions will look something like this. At the bottom of the list we see free place. This is the location we have set aside for installing Linux. You can also notice that an EFI partition has already been created (it is signed as Windows Boot Manager).

If you have a completely empty disk, then you must first create a partition table on it. Click the Create Partition Table button. The partition table may already exist on the disk, in which case you do not need to create it. A warning will appear. Click Continue.
We will create three sections:
- EFI section. It only needs to be created for computers running in UEFI mode. This partition is formatted in the FAT32 file system. The volume of the EFI partition is recommended to be 512Mb.
- Root "/". It is recommended to allocate at least 30-50Gb for the root partition. File system EXT4.
- /home chapter. For /home partition, you can use the rest of the remaining disk space. EXT4 file system.
Create an EFI partition (if it doesn't exist).
This item needs to be performed only if you are using UEFI mode and if you have not already created an EFI partition. We click in the table on the line with the inscription free space and press the button with the plus symbol "+". A window with the settings for the new section will open. Specify the following settings:
- The size. Specify the partition size in megabytes - 512Mb.
- New partition type: Primary.
- Use like: EFI system partition.

If suddenly, in the process of creating partitions, a 1Mb free space line appears above or below any partition in the table, do not pay much attention to it. This is due to the alignment of the partitions on the disk.
Now the partition table will look something like this (this is only if you had an empty disk before):
Let's create a root partition "/"
Again, click in the table on the line of free space and click the "+" button. Specify the settings:
- The size. Specify the partition size in megabytes. A minimum of 30-50Gb is recommended. I indicated only 10Gb, since I am installing a test system.
- New Partition Location: Start of this space.
- Mount point: /

Let's create /home chapter.
Click on the line free space and click "+". Specify the settings:
- The size. Since under /home section we plan to use all the remaining free space, then we leave the size that is already indicated.
- New partition type: Primary. If you have a disk with an MBR partition table, then it is better to select Logical.
- New Partition Location: Start of this space.
- Use as: Ext4 journaling file system.
- Mount point: /home

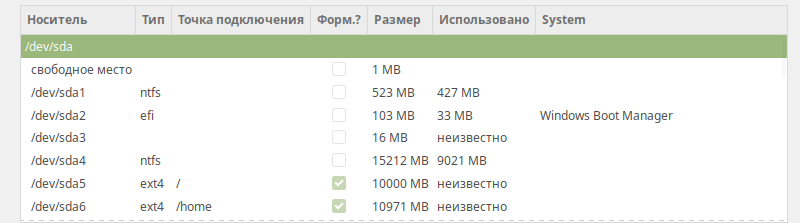
As a result, my list of sections looks like this:
Section List
Or like this if you install next to Windows.
Also note that there is a drop-down list at the bottom of the window. This is the choice of the disk on which the GRUB bootloader will be installed. To install the bootloader, you do not specify a disk partition, but the entire disk. In my case, the bootloader is installed on the /dev/sda drive on which I install the system, and which is set in the BIOS as bootable.
Review the list of sections carefully again. If you need to change something, then you can delete sections and create again. In fact, at this step, no partitions are physically created on the disk yet, you are only specifying the settings for now. If everything is ready and you are sure that you did everything correctly, then press the button Install now.
A warning will appear that lists the partitions that will be created. Click the Continue button

Linux Mint timezone selection
A window will open with a choice of time zone. Select your time zone.

At this step, you need to specify the data of the user who will be created in the system and on whose behalf you will work, as well as specify the computer name.

You need to fill in the following fields:
- Your name - enter the name in any format.
- Your computer name- The computer name (hostname) is used to identify the computer on the network. You can specify something like mylaptop or vasyapc. I pointed pingvinus host.
- Username- Username on behalf of which you will work in the system. I recommend that you specify a not very long name. You can just enter your name, for example, vaysa, petya. I pointed pingvinus.
- Password and repeat password- You must specify a password that will be used to log in to the system and perform administrative tasks. Be sure to memorize or write it down.
Select an item below Log in automatically, if only you plan to use the computer and you do not want to enter a password to enter the system. But I recommend choosing Require password to login. You can also set the option Encrypt my home folder. For beginners and for most users, this is not necessary. When all settings are specified, press the button Proceed .
Installation process
Now the installation process will finally begin. It may take several minutes. You don't need to do anything, just wait for the completion.

Installation completed
When the installation is complete, a warning will appear. We press the button reload, to restart your computer.

Another warning will appear. Disconnect (remove) the flash drive or disk from the computer and press the Enter key.

After installing Linux Mint
If everything goes well, you will be prompted to enter the user password. Enter the password you provided during installation and press Enter . 
A worker will appear linux table Mint and a welcome window will open Welcome to Linux Mint.
To prevent this window from appearing on every boot, uncheck the box in the lower right corner of this window. 

Switching the keyboard layout by default is done by pressing Shift+Alt .
If you're trying to install Linux Mint alongside Windows, you'll have Linux booted by default. To boot Windows, you need to select the item in the Grub bootloader menu when booting the computer: Windows Boot Manager 4.2 / 5 ( 5 votes)
Today we will consider the distribution of the operating system Linux Mint 18.3 Cinnamon, we will download this version, install it on your computer, talk about innovations, and I will also show the process of updating to this version.
Linux Mint 18.3 distribution overview
First, let's remember what Linux Mint is.
Linux Mint is the operating system distribution Linux systems, it is free and designed for use on home computer. Linux Mint is available in both 32-bit and 64-bit versions, it supports the Russian language, it is functional, stable and undemanding to resources. Therefore, if you want to use Linux as an operating system on your home computer, then I personally recommend installing the Linux Mint distribution.
Linux Mint can be installed with desktops such as Cinnamon, Mate, KDE and Xfce. As you can see from the title of the material, today we will consider the version with the Cinnamon desktop environment.
The official site of the distribution is www.linuxmint.com
What's new in Linux Mint 18.3 Cinnamon?
Linux Mint version codename 18.3 " Sylvia”, supported this version will be until 2021, like the entire line of 18.X versions, it is based on the Ubuntu 16.04 package base.
Main components and changes :
- Linux 4.10 kernel;
- Cinnamon version 3.6;
- Browser Mozilla FireFox 57.0;
- Mozilla Thunderbird 52.4 mail client;
- Office suite LibreOffice 5.1.6.2;
- Updated program manager ( Software Manager) - probably the main innovation of the current version is the redesigned program manager. It has been completely redesigned, including GUI user. Now, by the way, you do not need to enter a password, in order to simply launch the manager to view available applications, a password is required only to install these applications. I hope this version will be as convenient as the previous one, which I personally liked very much. Now the program manager looks like this;
- Popular applications are available - now programs such as Skype, WhatsApp Steam or Minecraft can be easily installed from the program manager using standard tools;
- Flatpak Support - The distribution now supports Flatpak technology. flatpak is a technology by which applications run in an isolated container, so it doesn't matter which Linux distribution you use. In other words, you may install an application that is incompatible with the Linux Mint distribution. The Software Manager even has a separate category for applications developed with Flatpak;
- Support for GNOME Online Accounts - Cinnamon now supports GNOME accounts, which allows you to view Google Drive and OwnCloud in the Nemo file manager;
- Backup tools: Personal Files and System Snapshots. Tool " Backup" has been completely rewritten, and now it works in user mode ( those. you don't need to enter a password), this tool is designed to create backup your home directory. It is also now possible to take system snapshots thanks to the Timeshift functionality, which is designed to take snapshots of the operating system in a similar way to System Restore in Windows;
- System Reports - a new tool " System reports", which is designed to generate reports on software failures, such reports are called " crash reports", as well as to display system information, reports " Information Reports»;
- Window Progress ( window progress) - LibXapp now allows applications to send their progress to the window manager, in other words, the progress is displayed in the window list of the panel. This feature is supported by the following applications: file manager Nemo ( file operations), a backup tool, Timeshift, a software manager, a driver manager, and some other applications that use Synaptic dialog boxes;
- Improvements in XApps applications - for example, the Xed text editor now has a minimap, Xreader detects DPI, the full screen window has been improved in Xplayer;
- Improved login window - added additional settings, for example, it became possible to hide the list of users and enter usernames manually, also various elements on the panel can be disabled and now, by the way, they show tooltips;
- Linux Mint now has better support for spell checking and synonyms in English, German, Spanish, French, Italian, Portuguese and Russian;
- The default is now Redshift. This software adapts the color temperature of the screen depending on the time of day, in other words, the screen will be warmer at night, thereby reducing the impact on your eyes.


Backup

Timeshift


![]()

Linux Mint 18.3 Cinnamon system requirements
- 1 gigabyte of RAM ( recommend more);
- 15 gigabytes of free disk space ( recommend 20 gigabytes);
- Support for 1024×768 screen resolution.
The version with Cinnamon is one of the most undemanding to resources and it works really fast.
Where to download Linux Mint 18.3 Cinnamon?
You can download the current version of the Linux Mint 18.3 operating system from the download page of the official website - here it is.
After going to the page, you need to select the desktop environment and system architecture ( 32-bit or 64-bit). Click on the required link.

After you need to choose a download method, for example, via a torrent or from any available mirror, for Russia you can choose Yandex Team, here is a direct link to download Linux Mint 18.3 Cinnamon 64-bit from this mirror.

As a result, I downloaded the 64 bit version, namely the file ( iso image ) linuxmint-18.3-cinnamon-64bit.iso approximately 1.76 gigabytes in size.
Installing Linux Mint 18.3 Cinnamon on a Computer
The process of installing Linux Mint is simple, and we have already covered it many times, but for those who will be installing Linux Mint for the first time on a computer, I will describe this process step by step and with pictures.
On a note! . Basics of Linux - as an operating system on a home computer
Step 1
We write the image that we downloaded to disk and boot from it. After loading, the disk menu will open, select " Start Linux Mint».

Step 2
The Live version will load, on the desktop click on the shortcut " Install Linux Mint”, as a result, the installation program will start on HDD computer.

Step 3
First, select the language, click " Proceed».

Step 4

Step 5
Now we select the type of disk layout, I have this test installation, so I select the first item " Erase disk and install Linux Mint". To manually partition a disk, select " Another variant". We discussed manual partitioning in detail in the material " Partitioning a hard disk in Linux Ubuntu during installation". In my case, click " Install now».

Confirm the changes, click " Proceed».

Step 6
Specify your location, click " Proceed».

Step 7
Select your keyboard layout and click the " Proceed».

Step 8
It remains only to create an account, for this we enter our name, computer name, username and password with confirmation, click " Proceed».

The installation has started.

The installation will be completed, when the following message appears, click " Reload»
Upgrading Linux Mint to Linux Mint 18.3
It is not necessary to install Linux Mint from scratch, if you already have the previous release of Linux Mint 18.2 installed, you just need to update already installed system, for example, using " Update Manager". To do this, open Menu ->Administration -> Update Manager».

If there is no update mint-upgrade-info”, then first press the button “ Check for updates", and then " Install updates I".

Enter the administrator password, since installing updates requires certain privileges, click " Authenticate».

After you have installed this update, in your menu " Edit» update manager, the item « Upgrade to Linux Mint 18.3 Sylvia”, to update the entire distribution, we need to click on this item.

As a result, the update program will start. In the first window, click " Next».

Then we are prompted to read the release note ( for this, if you want, you can click on the appropriate link), press " Next».

Before updating, we are offered to find out the new features of this version ( if you want to see them, click on the appropriate link), press " Next».

Further, we are warned that there is a risk of harming the system, since after any update some problems may arise, but in standard cases everything goes well, we put a tick, thereby confirming our intentions to update the system, and click " Apply».

To update the system, you need to enter your password, click " OK».


The system update will be completed, as the following window appears, click " close' and restart the computer.

Screenshots of Linux Mint 18.3 Cinnamon
Desktop

File manager

System Settings

That's all, good luck!
The other day, a new version of the Linux Mint 18 Sarah distribution was released. This is another huge step in the evolution of this great operating system based on Ubuntu. Linux Mint 18 is based on the LTS release of Ubuntu 16.04, in fact it will always be, the next major version of Mint will be based only on LTS releases, and minor updates will take place locally without changing the main distribution. This version has a lot of fixes and improvements. All of them we considered in the article "What's new in Linux Mint 18".
From the main one, we can note the new theme of the Mint-Y desktop environment and icons, the release of the Cinnamon 3.0 desktop environment, which has become much better lately, as well as the improvement of scrolling using the touchpad: now it works the same as on the Mac, with two fingers . This article will cover the installation of Linux Mint 18 Sarah on a computer. We will walk you through the entire installation process step by step so that even a beginner can handle it.
System requirements
The minimum system requirements remain the same:
- RAM: 512 MB
- Disk space: 9 GB
- Screen resolution: 1024x768, on smaller screens you can use Alt to move the window if it doesn't fit on the screen.
1024 MB of RAM and at least 20 GB of disk space are recommended for software installation. Linux Mint 18 comes in 64 and 32 bit versions. The 64-bit version can work on both BIOS and UEFI, only BIOS is suitable for 32. The developers recommend using the 64-bit version on all modern computers.
Step 1: Download the image
You can download the image of the architecture you need on the official website. We will be installing the version with the Cinnamon desktop environment:
Step 2. Burn the image to disk
You can use unetbootin to write the image to a flash drive:

Windows has a great solution for this - Rufus:

Or the most reliable way for Linux, here sdb1 is your flash drive:
dd if=~/disk_image.iso of=/dev/sdb1
To write to an optical disc, you can use UltraISO or, on Linux, K3b.
Step 3: Boot from media
Before you can install Linux Mint 18, you need to enable booting from external media. To do this, restart your computer and, while the operating system has not yet started loading, press F2, F8, Shift + F2 or Del several times. The BIOS menu will open in front of you, go to the tab Boot, then in section 1st boot device select your flash drive or CD-ROM.

Do not forget that the flash drive must be already connected to the computer. Then go to the tab Exit and choose Exit & Save Changes.
Step 4. Start downloading
Wait 10 seconds for the automatic download to begin:

Or press any key and select the first item in the menu:

Step 5. Working environment
After the download is complete, a working environment will open in front of us:

Step 6 Mint-Y Theme
I don’t know about you, but I want to already try a new theme without waiting for the installation to complete, so right-click on the desktop and select Desktop Settings:

In the window that opens, the button HAzad, and then open the item Themes. Here you need to set all components to Mint-Y:

Done: now we have new topic. Let's move on to the installation.
Step 7. Starting the installation
Double click on the icon Install Linux Mint on desktop:
Step 8. Language
Choose language. Scroll down the list to find Russian:

Step 9: Additional Components
Check the box to install Linux Mint 18 along with proprietary drivers for graphics cards and Wi-Fi adapters:

Step 10Starting Disk Partitioning
If you have a blank disk, select Erase disk and install Linux Mint, if you need two operating systems or more fine-tuning, choose Another variant and click next.

Step 11New Partition Table
If the disk is clean, at this stage you need to create a partition table. There is a button for this.


Step 12 Boot Partition
First, let's create a partition for the bootloader. Click icon + , in the window that opens, select a partition size of 300 MB - no longer needed, ext2 file system, /boot mount point. With the last parameter, we tell the system that this partition should be used as a bootloader:

Step 13. System Partition
I set aside at least 10 GB for the system partition, because this is a test installation, but I recommend that you allocate at least 50 GB. The filesystem is ext4, but if you're not already a beginner, you can use btrfs. The mount point is the root /.

Step 14Home Partition
We give the rest of the space for the user's files. Optional file system, ext4 is better, mount point is /home.

Step 15 Finishing the Markup
Click Start installation and check if everything is correct:


Step 16 Timezone
Select your timezone:

Step 17 Keyboard Layout
Select keyboard layout:

Step 18. Username
Create a new user who will use the system. Enter your name, you can in Russian, the computer name, only in English, and the username, in English and with a small letter. Come up with a fairly complex password:

Step 19 Installation
Wait for the installation to complete. Installing Linux Mint 18 Sarah can take up to half an hour depending on the speed of your internet connection:

Step 20: Reboot
Restart your computer:

Step 21 Media
Remove the installation media:


