What to do after installing a new motherboard. How to properly replace the motherboard and untie Windows from the old hardware
Practical steps for launching an already installed Windows XP SP3 on new hardware. This often needs to be done in connection with an upgrade for various reasons (the old system is not fast enough, or it has stopped working). The links helped me a lot in my work; the information from there can also be used in various cases. All software mentioned in the article can be downloaded from the links.
When I started moving to new hardware without reinstalling, I wasn’t particularly confident of success. Judge for yourself - the new hardware is completely different from the old (only the SSD remains old HDD, which was running Windows XP SP3). The table lists the main components that affect system performance.
The old hardware was bought about 7 years ago (except for the video card, it was replaced later) and by those standards it was “wow”. It was worth much more then than it is now. The move was surprisingly successful and not very difficult. So, the process is step by step.
[1. Backup]
First do backup copy everyone important files that are on your system disk, where Windows XP is installed (on a different drive). This is necessary to avoid any accidents, so that mistakes that you accidentally made when manipulating the disk and system do not affect the safety of your data. All your data is most likely located in the Documents and Settings folder, installed programs in Program Files, WINDOWS, at a minimum you need to make a copy of these folders. The ideal option is to make a disk image special programs. For example, on Windows there is for this Norton Ghost, Acronis True Image, a Linux utility dd. If the amount of data on the disk is too large to make an image, you can clean it by deleting what is unnecessary, or rewrite only what is necessary.
The copying process can be done on old hardware if it still works. If the old system is inoperative, then you can remove the disk from the computer, transfer it to a work computer and make a copy. You can do this on new hardware without starting Windows, if you use boot disk Hiren’s BootCD (its iso image can be downloaded from the link). This disk has a lot of useful things - utilities for cleaning the registry, repairing the disk, restoring files, resetting passwords, deleting data, see for more details.
[2. Required programs]
 |
 |
Download the necessary links from the links software. Hiren's Boot CD burn it to CD-ROM (this will become a boot disk), and TerraByte OSD Tool Script 3.85(tbosdts_pro) unpack from the archive and write to a flash drive. The tbosdts_pro program must be launched using Hiren’s BootCD, written to a flash drive or CD (Hiren’s BootCD itself does not have this program).
[3. Preparing Windows to transfer to new hardware]
This step removes all old Windows drivers(entries in the register). Boot from Hiren's BootCD, select Mini Windows XP from the disk menu. Insert the flash drive on which the tbosdts_pro program is recorded, and launch it using the tbosdtw shortcut - Shortcut.lnk (link to the command line tbosdtw.exe startup.tbs), or enter tbosdtw.exe startup.tbs in the command line. cmd will appear in a black window text menu of 9 points.

Select item 3 (OSDTOOL.TBS). In the next menu, select Physical Drive.


Remove all drivers on Windows XP; to do this, select Remove Installed Drivers -> Remove all installed drivers in the main menu.

[4. Install the standard IDE driver]
From the main menu, select Install Drivers, and then select to install the standard IDE driver.
[5. Changing the kernel HAL (processor type, CPU type)]
From the main menu, select Change HAL(Hardware Application Layer, which determines the type of CPU). In the next menu, select halaacpi.dll (ACPI Uniprocessor PC), the first line in the list.

This completes the basic steps for transferring Windows XP. You can reboot the system from your system hard drive.
[6. Activation of Windows XP]
After the system starts on the new hardware, it will notice this and ask for a new activation. Complete it using the Windows Activation Wizard.


To activate use free phone(working hours from 8.00 to 22.00, Moscow time) Microsoft Product Activation Center, 8-800-200-80-02 .
[Troubleshooting Possible Problems]
1 . The system does not boot, or there are a lot of errors when loading. Try to reinstall the system “on top”, while the old installation will remain, but many errors in the configuration and files will be corrected (to do this, upon request, click the ‘ R‘, which specifies recovery Windows systems). For such a reinstallation, you will need the Windows XP boot disk from which you installed the system the first time. After such a recovery, you may need to install service pack 3, since there may be old versions on the Windows boot disk system files. After reinstalling the service pack, you will need to reactivate Windows. In addition, after installing the service pack, System Restore (monitoring the contents of disks) is re-enabled. To speed things up, I advise you to leave disk tracking enabled only on the system drive (which is pointed to by environment variable%SystemDrive%).
2 . If for some reason system files have been deleted or corrupted, then running from the command line will help restore the original state of the Windows XP system SFC /SCANNOW, you will need to install the Windows XP installation disk into the CD-ROM drive.

The system file check will take about 5 to 15 minutes, depending on the speed of the disk. If you previously installed the WPA_kill patch, then after completing SFC /SCANNOW you will need to run it again.
3 . Motherboard chipset drivers are not installed with the “insufficient rights” error. Make sure that you are installing drivers under the control of a user with administrator rights. Try allowing Windows to find the driver on the Internet (this is the first thing the Driver Installation Wizard asks).
4 . Windows XP has blocked login and requires activation. This can happen even with your licensed system if, during recovery, the clock on the motherboard was set incorrectly, but was then changed to a new time (this happens automatically when connected to the Internet). If you cannot get qualified help from technical support, then the easiest way to fix the problem is to boot into safe mode and run the WPA_kill utility.
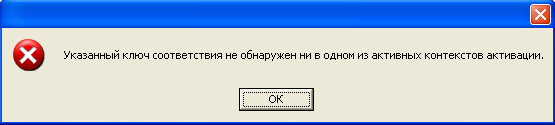
5 . After running WPA_kill, automatic update does not work (“The specified match key was not found in any active activation contexts.”).
Set up to receive the update local server provider, the setup procedure is described in.
6 . BSOD Stop 0x0000007B can occur during the boot phase if Windows XP cannot find a suitable driver for the hard drive. The reason may be that you did not complete steps 3 and/or 4. Follow steps 3 and 4 of this article.
UPD140520: Sergey advised switching the BIOS setting from AHCI on IDE.
7 . Problems with WMI (Windows Management Instrumentation service) are expressed in the fact that some system management functions are unavailable. For example, some drivers are not installed (they show the error “you do not have enough rights”), some programs are not installed or do not start (with the error “the WMI service cannot be started”), firewall management is not available in the network connection properties, services are not shown in the “Advanced” tab » service management console, etc.
The procedure for re-registering and restoring WMI is well described in (in English).
8 . To clean and fix the registry, you can use free program Registry Life.
9 . A general method to eliminate all Windows problems saving all existing settings and installed programs is to reinstall Windows XP in update mode.
1
. Preparation operating system for transfer to another hardware site:forum.ru-board.com.
2
. Transferring a system to another motherboard or cloning Windows XP (Make universal image Windows XP) site:gromr1.blogspot.ru
3
. Hiren's BootCD boot disk image (HBCD15.1_Russian_by_lexapass.iso).
4
. 151029!CloneXP.zip - tbosdts_pro, grub4dos, usb_format, documentation.
5
. Review of Hiren's BootCD (Widows recovery disk).
6
. Windows XP Service Pack 3 (SP3) Russian version (WindowsXP-KB936929-SP3-x86-RUS.exe).
7
. Configuring an update server for the Automatic Updates service.
8
. Repairing and re-registering WMI site:windowsxp.mvps.org.
9
. How to update (reinstall) Microsoft Windows XP site:support.microsoft.com.
10
. Transferring Windows 7 to a new HDD using built-in utilities.
Replacing the motherboard without relay Windows installations
In most cases after replacing the motherboard Windows stops loading. When loading windows appears blue screen(BSOD) with error STOP 0x0000007B. This is due to changing the ATA/SATA bus controller.

The fact is that Windows cannot independently change the controller driver when loading. As a result, when booting, the operating system simply loses the hard drive and cannot continue booting.
The question arises: how to produce motherboard replacement without Windows reinstallation ? After all, reinstalling Windows is not difficult, but all programs and settings will be lost. And this is often unacceptable!
Method replace motherboard without reinstallation OS three. If you have Windows 7, go straight to option 3
Option 1 - the old motherboard is working (Windows XP)
If with the old one motherboard If it is possible to boot into Windows XP, then you need to replace the IDE and SATA controller drivers with standard ones.
For this purpose in device manager open the properties of the controller (the name depends on the motherboard model). On the tab Driver press the button Update.

We answer the question about connecting to the Internet to search for a driver No, not this time and press Further. In the next window select Installation from a specified location and click Further. In the driver search options window that appears, select Don't search. I'll choose myself required driver and press Further.
In the window that appears, select from the list Standard Dual Channel PCI IDE Controller and press Further.

After the driver installation is complete, click Ready and restart the computer.
After loading, check in Device Manager what is installed standard IDE controller driver and turn off the computer.
If there is no driver in the selection list Standard IDE Controller Driver(for example in the case of SATA controller), you can simply remove the installed controller driver from the old motherboard. To do this, in Device Manager, right-click on the device and select context menu Delete. After uninstalling, turn off your computer.
Now produce motherboard replacement to a new one. Windows XP should boot without any problems. After that, all that remains is to install all the drivers on the new motherboard from the disk and that’s it!
Option 2 - Booting with old motherboard is not possible (Windows XP)
Second option replacing the motherboard without reinstalling Windows XP longer than the first and should be used if a computer with an old motherboard does not turn on or booting is impossible. We will need a Windows XP installation disk. If there is no disk, you can download a disk image (WinXP Professional SP3 with an integrated package of hard disk controller drivers) and burn it to a CD-R, for example, using the DeepBurner 1.9 program (the distribution kit can be downloaded for free).
For restoring Windows XP after replacing the motherboard you need to do the following:
Install the new motherboard and connect all devices.
Start downloading from installation disk Windows XP. On the first installation screen (image below), press ENTER to begin installing Windows XP.

On the next screen, press F8 to accept the license agreement.
The installer will then search for installed operating systems and display a list of them.

Select the operating system to restore and click the button R. The further process is not much different from normal installation Windows XP. The differences are that the installer will not ask which partition of the hard drive to install the OS on and will not prompt you to enter your computer name and username. Be ready to enter license code Windows XP and activate it after installation via the Internet.
After the installation is complete, you need to install all the drivers on the new motherboard. All programs, user files and operating system settings will remain the same.
Option 3 - Fix the IDE Controller Driver in the Registry (Windows 7)
If you replace the motherboard without reinstalling Windows 7, things are a little more complicated. The previous 2 options do not work. It will also not be possible to restore Windows 7 by updating it from the installation disk, since this function can only be launched from an already loaded OS.
But don't be upset! ERD Commander will help us (download a CD image, or make a bootable USB flash drive ERD Commander). With its help, we will make adjustments to the Windows 7 registry necessary to boot on the new controller.
Let's get started! We boot from a burned disk or flash drive. In the boot menu select version ERD Commander 6.5 for Windows 7.

Selecting the ERD Commander version to download
To the question “Initialize a network connection in the background?” we answer No.
To the question “Reassign drive letters...” we answer Yes.
Select the keyboard layout and press the button Further. Then select our operating system from the list and click Further.

Selecting the operating system to which ERD Commander will be connected
failed, the search for boot problems will begin.
Finding problems in booting Windows 7
Click Cancel, so as not to waste time, since this startup recovery tool will not help if the motherboard is changed. To the question “Stop troubleshooting?” we answer Yes. The next message that the problem could not be resolved, do not be alarmed and press the button Ready.
In the window that appears, select the item Microsoft Diagnostics and Recovery Toolset.

Now launch the registry editor.
First of all, you need to delete the registry branch HKLM\SYSTEM\MountedDevices

Now you need to enable the launch of services that load standard drivers for IDE and SATA controllers.

Opening a thread HKLM\SYSTEM\CurrentControlSet\services on the left side of the Registry Editor. Now check the following sections in this thread: amdide, amdsata, amdxata, atapi, intelide, msahci, pciide. Parameter Start everyone should have equal 0x00000000 (0). ValueStart=0—start the service when Windows boots. If it is equal to 0x00000003 (3) double-click on the parameter name (Start) and change the value to 0 (picture below) and click OK.

After start will be set to 0 for all of the above registry keys, close the registry editor and restart the computer in normal mode. In most cases, this is enough to successfully boot Windows 7. Now you need to install drivers on the new motherboard.
If it doesn't help
If the above steps did not help and Windows 7 still does not load and displays the error STOP 0x0000007b, then the required controller driver is not loading. Let's try to enable the loading of all drivers known to the operating system.
To do this, set the parameter value Start equal to 0 in the following services: adp94xx, adpahci, adpu320, aic78xx, amdsbs, arc, arcsas, elxstor, HpSAMD, iaStorV, iirsp, LSI_FC, LSI_SAS, LSI_SAS2, LSI_SCSI, megasas, MegaSR, nfrd960, nvraid, nvstor, ql2300, ql40xx, SiSRaid2, SiSRaid4, vhdmp, vsmraid, alide, cmdide, nvraid, viaide .
Reboot the computer in normal mode. The OS should boot.
Booting Windows XP can also be restored in a similar way, but everything is more complicated there and I will not describe it in this article. Those who are interested can read it.
Using an operating system on your own computer can vary greatly from user to user. Some, having bought a new PC, mainly use the built-in Windows programs and tools, as well as default OS settings. Others - work with many third party applications and utilities, while customizing the system interface to your own taste.
And if in the first case, reinstalling the system and several applications is not a difficult task, then in the second, in addition to installing the OS, you will have to reinstall all necessary programs, Windows personalization and other settings. That is why many users are not eager to do this again. Moreover, it may not be at hand required applications or their settings were performed by a specialist, who will now have to be called again.
In general, there can be a lot of reasons not to touch a normally working operating system, but the time comes when internal components your computer is starting to become hopelessly outdated and replacing it with more productive hardware becomes an urgent need. And if installing a new power supply, RAM, separate processor or video card can be done relatively painlessly, that is, without reinstalling the operating system, then when replacing a hard drive or motherboard, everything is not so simple.
As you understand, everything Windows files are stored on the computer's hard drive, so replacing it leads to an inevitable re-installation of the system. Although, this can be avoided by first making a complete backup copy of the current OS into an image and saving it on an old HDD or some other storage medium. Then all you have to do is unpack the resulting system backup to new disk, and you can continue working in the same Windows using all previously installed programs.
If you replace the motherboard on a PC with Windows result may depend on many different factors, but the main thing is the choice of the future hardware platform (for example, when changing Intel to AMD or vice versa, problems are almost inevitable) and the set system logic(chipset). In a word, the more differences the new motherboard has from the previously installed one, the less chance the old system will have to boot after it is replaced.
Despite the fact that Windows 7 has an impressive database of drivers in its arsenal, just change the motherboard and run it earlier installed system often it doesn't work out. This is especially true for those boards that were released much later than the release of the system itself. But they are now the majority, since more than three years have passed since that moment. So the question is how to replace the motherboard with personal computer with Windows without reinstalling it, is still relevant.
Why does replacing a motherboard so often result in reinstalling Windows? As a rule, the most common reason is the incompatibility of the ATA/SATA hard drive controller drivers already installed in the system with the one equipped with the new motherboard. In this case, after replacing the hardware, when loading the OS you will receive a blue screen of death (BSOD) with the STOP error: 0x0000007B.

The fact is that when loading, Windows simply does not have the ability to change the hard drive controller driver on its own. As a result, a hard drive with the installed OS connected to the new controller is simply not seen by the system, and its further launch becomes impossible.
To avoid this situation, there is a fairly simple solution. Even before replacing the motherboard, start Windows, go to device Manager, there, by clicking on the arrow, expand the item IDE ATA/ATAPI controllers and remove all installed devices from it.

To do this, right-click on all controllers one by one and select Delete in the context menu that opens. If after this a window appears Device removal confirmation, check the box Remove driver programs for this device and click OK.
In some cases, to complete the controller removal operation, the system will require a reboot. You shouldn't do this until you've gone through the entire list. Then simply turn off your computer and proceed to replace the motherboard. If you do restart your PC, you will have to do the entire procedure again, since Windows will restore all previously deleted devices at startup.
And yet, it is not uncommon for this method won't help you. For example, if the system logic set (chipset) on the new motherboard will be very technologically different from the previous one. In this case, in order to avoid problems with loading the system, you need to completely get rid of all drivers that can cause them. But how to do that?
In the Windows system there is one very useful utility, which not everyone knows about, even advanced users. It's called Sysprep and allows you to delete system data from the operating system, including information about installed equipment, as well as drivers installed by the user.
Thus, in order to ensure successful booting of Windows on new hardware, it is necessary to clean the OS from old system information using this utility even before replacing components! Also, before running Sysprep, it is better to remove all installed antivirus programs or disable self-defense in them. This is especially true for Kaspersky Lab products. IN otherwise When you start an OS with new hardware, you run the risk of receiving the message: “Windows was unable to complete system setup. To resume setup, please reboot." But no reboot will help you. You will have to return the old equipment to its place and do everything again.
So, to launch the Sysprep utility, press the key combination Win + R and in the window that opens Execute enter the full path to executable file: "%windir%\System32\sysprep\sysprep". For those who don't know, "%windir%" is a variable containing the path to the folder where the system is installed, most often "C:\Windows". And we use it because the location of the system folder and its name on different computers may be different.

In the system preparation program window that opens, in the option System cleaning action paragraph Go to the system welcome window (OOBE) we leave it unchanged. Next, put a checkmark next to the parameter Preparation for use.
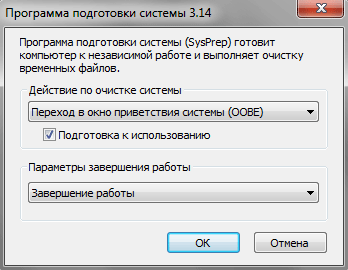
In the drop down menu Shutdown Options select a team Shutdown. This is done so that immediately after cleaning the system the computer does not reboot, because if it is not stopped in time, the primary process will start Windows settings and you'll have to do it all over again!
Having completed all these simple settings, press the OK button to start the system cleaning procedure. This process is completely automatic and after it is completed, the computer should turn off on its own. Now you can start replacing the system board.
During the first Windows startup With the new equipment, the necessary device drivers will be installed and the corresponding entries will be made in the operating system registry. You will also have to re-enter your regional settings and account settings.
Please note that when the OS asks for a username, you cannot enter the old account name because it already exists. There is no need to be particularly upset about this. Enter any name, and after logging in for the first time, new account you can remove and use the old one.
The only inconvenience that can await you after booting the system with new components is re-activating Windows. The fact is that a number of versions of this OS are tied to the installed hardware. In particular, the most common legal Windows version 7 OEM, which is installed on new desktop computers and laptops. In this case, activation will most likely have to be carried out over the phone, since this will no longer be possible to do via the Internet due to the fact that the system will mistake your operation for installing Windows on another computer, which in this version is prohibited by the terms of the license agreement.
Strictly speaking, it was initially designed to create a customized Windows image with the purpose of reuse. That is, simply put, Sysprep is a utility for cloning a prepared OS onto other computers. Most often, installing Windows from a pre-generated image is carried out in organizations where the set of basic work applications among employees, for the most part, may be the same.
True, in our time there are often situations when there is not one computer at home, but several at once. For example, one desktop PC is used as a multimedia center, another is in the child's room for studying, and a laptop is a business tool for parents. Despite the different purposes of each device, they may well have common software: operating system, office suite, web browser, archiving tool, recording program optical disks, all kinds of auxiliary utilities and much more.
In such a situation, it is convenient to have a “standby” OS image, from which, if necessary, you can always install the system with all the main applications. To create it, you just need to install Windows and all the necessary programs once on any computer, then use the Sysprep utility to delete system data using the method described above. Next, you will need to burn the image of the prepared system onto a separate medium: a Blu-Ray disc (there is simply not enough space on a DVD), external hard disk or flash drive.
The key point here is that the computer must be booted from an optical disc or USB drive to be imaged, but never from the hard drive on which it is installed. If this happens, the process of initial OS setup will start and the entire procedure will have to be repeated again.
Prepare a boot disk and save Windows image V in the right place possible using special applications, for example Acronis True Image Home, a paid program, but it has a clear graphical interface and all the necessary tools. There are also free alternatives, for example, ImageX included Windows shell P.E. However, in this case, get ready to work with the command line.
Unpacking the image to the desired (target) computer is similar to removing it using the same programs.
Is it possible to replace the motherboard without reinstalling Windows? It turns out - yes. But in order to replace the motherboard on a personal PC with a working operating system, while avoiding its reinstallation, you need to perform the following steps.
Sequence of operations to restore system operation

After a fairly lengthy operation of removing drivers, turn off the PC and proceed to replacing the computer’s motherboard. When you first boot Windows 7 with the new motherboard. The board installs pre-downloaded drivers for the motherboard.
If it is not possible to prepare the systems for an upgrade, or the old motherboard is faulty, after replacement the system may not boot, displaying a BSOD with error code 0x0000007B:

This indicates a failure of the hard disk controller driver or its incompatibility with the PC hardware.
To resolve the problem, perform the following steps:
- First of all, in the BIOS we try to change the operating mode of the hard drive controller from SATA to IDE, and try to boot;
- You need to reset the HDD controller driver, which will force the system to use the standard ATA/IDE driver. To solve the problem we need a boot disk or flash drive and ERD Commander. You can download the ERD image from the link http://blog.fc-service.ru/downloads/erdc.htm, instructions for creating bootable flash drive well described here http://blog.fc-service.ru/soft/erd-commander-usb-download.htm.
After booting from a CD or bootable flash drive, select Erd Commander for Windows 7.

When the system requests a change to reassign drive letters, click “Yes.” Skip setting up network parameters and select the keyboard layout. In the operating system selection list, select the one we need copy of Windows, if there are several of them installed on the disk.

In the window that appears, select the menu item as shown in the figure below.

Choosing an editor Windows registry 7:

In the registry editor window, find the “MountedDevises” branch and delete:

Now you need to enable usage standard drivers IDE and SATA. To do this, go to the registry branch HKLM\SYSTEM\CurrentControlSet\Services and edit the Start parameter

setting it to 0

This operation must be done for the services adp94xx, adpahci, adpu320, aic78xx, amdsbs, arc, arcsas, elxstor, HpSAMD, iaStorV, iirsp, LSI_FC, LSI_SAS, LSI_SAS2, LSI_SCSI, megasas, MegaSR, nfrd960, nvraid, nvstor, ql2300, ql40xx, SiSRaid2, SiSRaid4, vhdmp, vsmraid, aliide, cmdide, nvraid, viaide. Next, search for the Msahci parameter in the registry branch and set its value to 0.
After the completed operations, boot the system in normal mode and install the drivers. If, however, a BSOD occurs, then its cause is most likely a conflict with the built-in video card or another driver. By the way this algorithm can also be applied to running Windows 7 before upgrading.
To fix the problem, reboot in bladeless mode. You can enter the mode by pressing the F8 key when the system boots, and select from the list “ Safe mode" After downloading the seven, through the “Device Manager” we remove the equipment that is interfering with us from the system. If it is not possible to identify conflicting devices, you can delete the entire PCI bus, by the way, it’s best to do this right away and install all the motherboard drivers instead of the standard ones.
If instead of ERD Commander you have at hand Acronis disk True Image Home 2013 Plus Pack, then you can transfer the system by following these steps:
- We create an image of the Acronis system on another partition; if there is only one partition, then the image must be created in a protected area previously prepared by Acronis.
- We deploy the system to the same partition using Universal Restore, which is capable of deploying a system image without being tied to the hardware.
Using this guide, you will certainly be able to replace the motherboard without having to reinstall Windows 7, which in some cases is very convenient and will save you from having to reconfigure the system, applications, etc.
Sooner or later, each of us thinks about a complete upgrade of our computer, or a partial upgrade by replacing its individual components. The main advantage of such a “point update” is that the user does not need to reinstall Windows OS after the upgrade (provided that the user does not change the system hard drive). However, when changing the motherboard, some difficulties may arise, since it is a fundamental link in the operation of the entire PC. Therefore, before upgrading the motherboard, it is necessary to carry out a kind of “preparatory stage”.
What problems does the user face after upgrading the motherboard?
As already mentioned, the motherboard is a kind of “central link” of the entire computer, where data about all devices connected to the PC is concentrated. During the installation of Windows 10, the motherboard's "database" receives information about installed drivers ATA/SATA for hard drives(especially system), but when upgrading this data is lost, which ultimately leads to problems starting Windows OS. Such as a BSOD error or “blue screen of death”:
How to keep Windows 10 working when upgrading your motherboard
To protect your computer from BSOD errors and ensure Windows 10 starts correctly after upgrading the motherboard, you need to do a little preparatory work - make certain data adjustments in the system registry.
"Preparatory stage" of the Windows registry
To prepare your PC for component upgrades, follow several steps step by step:
- Open the task bar (WIN+R) and type regedit in it.
 The “task bar” can also be launched through the “Task Manager” of Windows
 - Then in the root directory of the registry, find: HKEY_LOCAL_MACHINE\SYSTEM\CurrentControlSet\services\msahci.
 The directory path is also displayed at the bottom of the registry window
 - In the work field (right column), highlight the “Start” line. Double-click on it with the mouse to open the parameters and set “0” in the “Value” field.
 You can also open the Start parameter settings by right-clicking on it and selecting “Change”
 - Then navigate to the directory: HKEY_LOCAL_MACHINE\SYSTEM\CurrentControlSet\services\pciide.
 It doesn't matter what order you change the registry settings in.
 - Find the “Start” line again, and similarly set the “Value” to “0”, saving the data.
 Even if in the “Value” parameter settings is “0”, still write zero again and save the data
 - Done, you can now exit system registry.
The “preparatory stage” is over. You can turn off your PC and upgrade your motherboard. The next time you start your computer, Windows 10 should boot without critical errors.
Based on my personal experience in upgrading the motherboard on a PC, I would like to note that even after completing the “preparatory stage” of changing the system registry settings, there is still a small probability of a “blue screen of death” appearing after the upgrade. This can usually happen due to differences in chipset versions on motherboards. A way out of the situation may be to “brute force” the PC startup settings in the BIOS. You just need to load the BIOS and in the Configure SATA As tab (Main category) set the available boot modes one by one. Go through them until the Windows OS boots.
 The Configure SATA As setting category may also be called SATA Mode
 How to restore Windows 10 after replacing the motherboard
Do not forget that it is not always possible to complete the “preparatory stage” before upgrading your computer. What to do if the motherboard has already been replaced and it’s too late to edit the system registry settings? Don't worry, you can still adjust the registry and "return" Windows performance 10, thanks to the “system recovery” mode. All you need to have is this Bootable CD/USB drive with Windows 10 OS.
- Before starting the PC, insert a bootable CD/USB media into the drive/slot. After turning on the computer, enter the BIOS settings (which button you need to press is written in the information help of the start window).
 Call key BIOS settings depends on the PC motherboard model
 - Next, in the window BIOS settings select the Boot tab.
 Navigation through the BIOS settings menu is carried out using the arrow keys.
 - In the Hard Disk Drives category, highlight 1st Drive, press Enter and set the value to CD/USB device. Press F10 to accept the changes.
 If the boot device is not a USB drive, but a CD or DVD, then you need to prioritize the corresponding drive
 - After restarting your computer, you will see a black screen with a notification: Press any key to boot from CD/USB. Press Enter.
- Next, the “installer” will autorun the “Windows Installation Wizard”. Go to the System Restore settings.
 Through the "System Restore" function you can access the offline Windows registry
 - In the subsequent Diagnostics window, go to Advanced Options.
 You don't need to restore Windows 10 itself
 - Click on the " Command line».
 If you accidentally went to the wrong settings section, you can always go back a step by clicking on the “arrow” icon at the top of the window
 - After activating the “command line”, enter the value regedit. Press "Enter".
 Command Prompt automatically runs as administrator
 - In the root directory of the registry, select the HKEY_LOCAL_MACHINE subdirectory, click on the "File" tab/"Load hive" option.
 You need to select the entire folder, not individual files.
 - Specify the path to the installed Windows OS on your hard drive, namely: Drive\Windows\system32\config. Open system file.
 You need to open the system file (refer to the “file type” description), and not its text document
 - Give the new hive a name.
 The name can be anything (in Latin)
 - After this, follow the root directory of the registry to the branch: HKEY_LOCAL_MACHINE\Name of the created “hive”\ControlSet001\services\msahci. In the properties of the “Start” parameter, set the value = 0.
 To open the parameter settings, right-click on it and select “Properties”
 - Then similarly change the “Start” value in the pciide folder, which is located along the path: HKEY_LOCAL_MACHINE\Name of the created “hive”\ControlSet001\services.
 The path taken through the registry root directory is displayed at the bottom of the window
 - Select the “hive” folder you downloaded, click on the “File” / “Unload hive” tab.
 You only need to select the “hive” you created, and not the entire HKEY_LOCAL_MACHINE folder
 - Done, now you can close the registry and restart your PC. After this, your Windows 10 OS should boot.
Restoring a Windows 10 license after upgrading the motherboard
An equally important problem after changing the motherboard may be the “unexpected reset” of the license of your Windows 10 OS, i.e. After booting the system, a notification about the lack of activation will appear on your desktop.
 “License reset” can happen even if you made all the necessary adjustments to the registry before changing the motherboard
 In order to prevent and quickly correct this kind of trouble, you will need to perform a number of specific actions, which can be divided into two stages.
The first stage is “preparatory”. Before upgrading your motherboard, you need to “link” a licensed copy of your “Ten” to account Microsoft. For this:
- In Windows 10's Settings, go to the Update & Security settings.
 You can access Settings through the Start menu by selecting the appropriate tab
 - Next, go to the “Activation” tab, where in the “Add Microsoft account” section, select the line of the same name.
 Make sure your Windows 10 OS is activated with a digital license
 - Then enter your account details in the form provided and click the “Login” button.
 If you do not have a Microsoft account, then create one by clicking on the line “Create one!”
 - Done, now the license (digital key) of Windows 10 is linked to your Microsoft account. You can start replacing the motherboard.
 After logging into your Microsoft account, a message will appear in the OS activation field stating that Windows 10 is activated and linked to your account
Second stage - recovery Windows licenses after a successful upgrade of your PC components.
- Go back to Settings/Update and Security/Activation, where you will find and click on Troubleshooting.
 When changing hardware component an entry will appear in the activation section warning that your OS version is not activated
 - Wait until the scanning process for problems is complete, and then select the line “Hardware changes have recently been made to this device.”
 You will also be prompted to go to windows store for purchase new version OS (no need to do this)
 - Next, you will be asked to sign in to your Microsoft account, do so.
 If you are already logged in, this step will be automatically skipped.
 - After successful authorization, select the replaced components (motherboard) from the proposed list and click on the “Activate” button.
 If you changed several hardware components at once, then you must select them all from the list presented.
 - Done, Windows 10 is now activated on your PC again.
 After troubleshooting, a success message will appear in the settings Windows activation 10
If you do not have a Microsoft account or you have not previously “linked” a Windows 10 OS license to it before changing the motherboard, then you may have problems re-activating the system. In this case, I will advise you only one way out - contact Microsoft support: either writing through the official website or by phone hotline 8–800–200–8001. You should absolutely not use other solution options, as this may lead to permanent loss of your license.
Upgrading PC components can often bring a number of inconveniences associated with the correct operation of the Windows system. The most “problematic” problem is replacing the motherboard. The result of such an upgrade may be a BSOD error (“blue screen of death”) when trying to start the computer. However, if you approach the replacement of components correctly and first carry out the “preparatory stage”, then such errors and inconveniences will not bother you.
With these tips you can avoid trouble.
Replacing a PC motherboard takes a little time and a lot of effort, especially if you've never done it before. You may encounter many small obstacles during the motherboard replacement process. But don't worry! But you can avoid all this by entrusting the motherboard replacement to experienced professionals.
Let's start with why you want or need to replace your motherboard. (If you're just looking for instructions on how to install a motherboard in a new PC, scroll down a bit.)
Sometimes components fail. Motherboards are no exception. Many motherboards "burn" due to bad BIOS firmware and low-quality batteries. Mistakes happen, and sometimes these mistakes can cause irreparable damage to your motherboard.
But replacing the motherboard will be a lot of hassle. If you do not have the desire or opportunity, the service “Assembling a computer to order” is especially for you.

What to look for in a new motherboard
There are many motherboard manufacturers, but only two CPU manufacturers. The processor is the core of the PC, you should choose a motherboard that is compatible with your processor, be it Intel or AMD.
Next, make sure you choose a board that is compatible with your current (or new) processor. Both companies have slightly different processor sockets for their chips. For example, if you have one of the recent AMD CPUs, you want to buy a Socket FM2 + motherboard. Google your CPU socket type and then look at the motherboards you are planning to purchase.

Motherboard socket compatibility with processor is key.
Now you have a list of compatible motherboards with CPU. In most cases, motherboards are in the ATX form factor, but some can fit smaller mATX boards, and even smaller ones can fit ITX boards. You should limit your motherboard search to only motherboards that can fit in your case.
The next step is to choose the motherboard brand. Today, motherboards have more similarities than differences. Key differences in performance, power consumption and overclocking between similarly priced boards from different manufacturers. However, they differ in color scheme and expansion slots.

You need to make sure that the motherboard you choose has enough USB, Ethernet and other ports for your use.
Motherboards start at around $80, but you won't get a better performance motherboard even if you buy one for $250. Motherboards with similar feature sets from different manufacturers tend to be within $10 of each other.
How to install a new motherboard on a computer
Start by unplugging the cables connected to your computer.
Large items such as graphics cards and Wi-Fi cards should be pulled out of your motherboard first. Then switch to SATA or other interface cables that connect the SSD, hard drive, optical drive or media to your motherboard.

SATA cables connected to the motherboard.
Finally, it's time to disconnect all power cables connected to the motherboard. Most motherboards will have an 8-pin CPU power connector on the top of the motherboard, a 24-pin connector ATX power supply near the middle of the left side of the motherboard. Unplug both of these connectors.

8-pin motherboard power connector.
Remove the screws securing the old motherboard. Save the screws, you will need them later.
From the old motherboard you will need to remove the cooler, processor and RAM, you need to install them in a new motherboard.

Removing the cooler from the processor.
Once this is done, it is time to install the new motherboard. You pretty much just have to replace whatever you just pulled out of your old board.

Install the processor, cooler, and RAM into the new motherboard, and then place it in the case.

We connect two power connectors (24-pin and 8-pin) that you removed earlier. Now plug the SATA cables and expansion card slot back into place. Double check that all internal cables in the computer are connected correctly and that everything is securely in place.

This is the moment of truth. Your computer will probably reboot a couple of times as the motherboard gets ready for a new life.
If you encounter problems, your computer does not boot correctly after you replaced the motherboard, contact us with the service " Computer assembly" We will be happy to help.


