How to connect to the Internet using a router. Wi-Fi router for dummies: purpose, principle of operation, device connection
In this article I will tell you how to set up wi-fi from scratch. First you need to set up a wireless network on the router, and then on the laptop. With a simple step by step instructions even a beginner will be able to set up the Internet on TP-Link routers and D-Link, which are most common in the CIS.
Setting up a wi-fi router
Step 1. We connect the router to the network using the power supply. Turn on the power with the ON button, if the router has such a button.
Step 2 We connect the router to a laptop or computer using an ethernet cable (patch cord) that comes with the router. You need to plug the cable into the port network card computer and to the LAN1 port of the router. (In no case, not to the WAN port - you won’t be able to configure it through it)
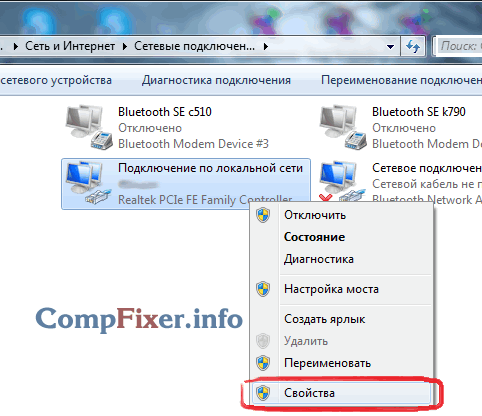
Step 3 We check that on the computer in the properties of the network card we have selected automatic receipt of the IP address. To do this, go here: "Start" -> " Control Panel» -> « Network and Sharing Center» -> «» -> « LAN connection»
Attention! In chapter " Change adapter settings» You may have multiple connections displayed. For example, "Local Area Connection" , "Local Area Connection 2" , "Wireless Network Connection" , "Network Bluetooth connection 2" etc. How to find the right one among these connections?
Firstly, By default, a wired connection in Windows 7 and 8 is called Local Area Connection. If no one managed to rename it manually, then it will be called that way. Unless there may be a number at the end - most often "2". This is the case if several network cards are installed in the computer (relevant for stationary computers, because in a laptop in 99% of cases there is only one wired network adapter from the factory)
Secondly, the connection we need should be active, since you connected the computer and the turned on router with a cable: the connection icon should glow in a bright color (usually blue if your Windows uses a standard icon pack), i.e. the icon should not be grayed out. See picture:

Here, we found the right active wired network connection.
Step 3.1. Right-click on the desired active wired connection and select " Properties»:
Step 3.2. In the window that opens, click the button " Properties":

Step 3.3. Select with the left mouse button Internet Protocol Version 4 (TCP/IPv4) " and press the next button " Properties»Bottom:

Step 3.4. We set both switches to the upper positions so that it is " … … … automatically»:

Step 3.5. Press the "OK" button to save the settings.
Step 4 Open the connection window again:
Step 4.1. Press the button " Details":

Step 4.2. In the window that opens, find out the IP address of the default gateway:

In most cases it is equal to 192.168.1.1
Step 5. Open the browser to go to the web interface of the router.
Step 5.1. In the address bar, enter the gateway address and press Enter:
Step 5.2. Enter login and password:

Attention! You can find out the login details in the instructions for your device. Included with the router may be both instructions on paper and in PDF-document format on the attached disk.
If the instruction is lost, you can try to download it on the manufacturer's website. For example, http://dlink.ru , http://asus.com , http://tplink.com .
Often in a new device, the default login = admin and password = admin . It also happens that the login = admin and the password is empty.
Step 5.3. After you have logged into the web interface of the router, open the wireless network settings (wi-fi):
(illustrated on TP-Link example TL-WR841ND and D-Link DIR-300 NRU)

Step 6 Actually setting wireless connection.
Step 6.1. Disable WI-FI protected setup this feature is a serious security hole and could allow an attacker to hack into your Wi-Fi network and gain access to your information.
Step 6.2. We check that the Wi-Fi network is enabled: the “Enable wireless” checkbox is checked if it is D-Link.
Step 6.3. Set a name for our wireless network.
If the default is dlink or home, then it is recommended to specify some original name in order to avoid confusion with neighboring networks of the same name.
Step 6.4. Set the security settings. We strongly recommend using the following options:
- security mode WPA2 ;
- encryption type AES;
- key type PSK(aka Personal Key).
After specifying all the parameters, do not forget to click the save settings button!
On a TP-Link router:
 in D-Link:

Setting up Wi-Fi on a computer (laptop)
In this section, we will show you how to set up wi-fi on a windows 7 laptop.
Step 1. Find on the taskbar near the clock network connection icon and click on it with the left mouse button once. A list of available wireless networks will open:

Step 2. Find your wireless network in the list (it will have the name that you specified in previous paragraph) and click on this network with the left mouse button.
Step 3. Leave the "Connect Automatically" checkbox checked and click the "Connect" button:

Step 4. Enter security key WiFi networks. This is the character set you specified in the Network Key field. After entering the key, click "OK":

After clicking "OK", it connects to your wireless network.

After a few seconds, the previous window will disappear, and the network connections icon next to the clock will change its appearance.
Now, when you click on the network connections icon, you will see that the computer is connected to your wi-fi network, but at the top you can see the inscription “ Without internet access» , because we have not set up the Internet on the router yet:

Setting up the Internet on the router
We set up a wi-fi network on the router and connected to it from a computer. We just need to help the router see the Internet so that the router can distribute the Internet to any devices that connect to it via wi-fi or cable.
Step 1. In order for the Internet to appear on computers, you need to set up a connection with the provider on the router. We show on the example of the same D-Link
Step 1.1. Type the IP address of the router in the address bar
Step 1.2. Enter your login, password and click " Log in»:
Step 2. We go to the Internet settings section. At different manufacturers routers, it can be called differently: WAN Setup, Internet settings, etc. In our D-Link, this section is called "Internet Setup":

Step 3 We get to the WAN port settings section.
Step 3.1. Remove the checkbox "Enable Access Point Mode".
Attention! Other manufacturers may refer to this setting as "Disable NAT". The bottom line is that the "Access Point" mode disables NAT and turns the router into an access point. This option is useful if this router is connected not to the provider, but to another one of your routers.

Step 3.2. Select the type of connection with the provider.
To find out what settings you need to choose to connect specifically to your provider, you can:
- in the contract;
- on the provider's website;
- by calling hotline provider
These days, the most commonly used type is Dynamic IP.
Step 3.3. If your ISP only allows connection from a registered MAC address, you have 2 ways to resolve the issue.
- Go to the provider's office with a passport and register a new MAC address;
- Specify the MAC address in the MAC address field network board the device from which you successfully accessed the Internet before buying a router. Usually, this is the MAC address of the computer's wired network card.
Step 3.4. Specify the DNS servers, if the instructions from the provider require it.
Step 3.5. Select the MTU value. If the provider does not require changing given value, we advise you to leave it as it is: 1500 .
Step 3.6. Save settings
Attention! If you have lost the contract document with the provider, which contains the details, then in extreme cases you can always drive up to the office of your provider with a passport and find out all the comprehensive information: connection type, MAC address, login, password, MTU, etc.
The number of smart gadgets used in our homes is growing every year. Therefore, having a good and stable WiFi network in every room becomes not a whim, but a vital necessity.
With its help, you can easily combine all devices into a common local network with Internet access.
The article will step by step and discuss in detail all the stages WiFi connections router, starting from the choice of installation location, laying wires and installing Internet outlets - where, how and how it is better to do it.
And ending directly with the very setup of the Internet connection and network on the computer. Plus, we will touch on the question of search possible problems and faults.
How to connect
 Let's start with tools and materials. If you install the router directly near the computer, then the factory patch cord that comes with the kit will be enough for you to connect.
Then you can skip this stage of installation work and go directly to the setup below.
But when the WiFi router is mounted in the hallway on the wall, for a good distribution of the Internet throughout the apartment or house, then here you will have to purchase some materials:

Utp5e or utp6 is used, the so-called twisted pair.

You can take single or double, depending on the number of gadgets.


- directly myself wifi router
Wi-Fi router installation location
First of all, choose the right location for the router. It is from this that the speed and quality of the signal in remote rooms will largely depend.
For those who, in addition to the switchboard, also mount a low-current shield, they usually place it near it. In this case, there will be less trouble with connecting and pulling wires. 
It is in the low-current shield that the cable from the Internet provider is inserted from the entrance of the house.
Who does not have such a shield, choose a place in the corridor on the wall in its upper part. The higher, the better the signal will be. 
At the same time, do not forget that there are places where it is absolutely impossible to mount wifi router:
- near devices operating at frequencies of 2.4 and 5 GHz (microwaves, cordless phones)
By the way, frequency range 2.4GHz is in turn divided into 13 channels. 
This is done so that several different gadgets do not interfere with each other during work.
At the same time, it is not at all a fact that you will be able to find an absolutely empty channel that is not occupied by neighbors. You will have to look for the most free one in order to avoid further disconnections and improve the quality of communication.
- right in front of a mirror or cabinet with glass doors
- in a deep niche with a metal door
This also applies to the low current shield. Some put the router in it, along with all the rest of the weak current. For example video surveillance. 
Be careful and pay attention to the material from which the shield is made. 
Connecting the UTP cable and installing Internet outlets
You can connect it directly to the router, or make a separate outlet for it. Thanks to such an outlet, your router will not be tied to one place, and the design of the apartment will look much prettier. Compare a neat outlet to a lone wire sticking out of a wall. 
In order not to confuse it, sign this cable as WAN. 
From this place where the WAN cable ends, you stretch four-pair UTP cables to the rooms where Internet sockets will be mounted for all your other gadgets. 
Number these wires as LAN1-LAN2-LAN3, etc. 
Of course, the router itself, hanging from the ceiling, needs to be somehow connected to the power supply. To do this, you do not need to pull a separate 220V cable directly from the switchboard. Make the connection from the nearest junction box of the socket group. 
Pull the cable VVGnG-Ls 3 * 1.5 from the junction box to the installation site of the future 220V outlet near the router. 
Having completed the installation of all the wires, we proceed to the installation of accessories - electrical sockets, Internet sockets and connectors. First of all, you need to connect the Internet power cable from the provider signed as WAN. 
Remove the outer insulation from it by 2 or 3 cm, and spread the multi-colored veins on the sides separately from each other. 
The correct connection can be seen on the body of the outlet itself. Install the cores inside and snap the cover. 
All that remains to be done is to fix the Internet outlet in the socket and close it with a decorative frame. All the rest are done in exactly the same way. computer sockets near the router itself and in all rooms.
In this seemingly simple matter, you can initially make a bunch of mistakes, due to which you will not be able to set up your network. You will climb in the settings, reflash the drivers, and the matter will turn out to be in an incorrectly mounted outlet.
How to avoid such errors is detailed in the article below. Be sure to check it out, especially if you have network problems. 
Each output on the sockets is signed, and the router itself is fixed on the wall. 
Of course, you can buy them ready-made, but they do not always come in the required length. It is better to measure the size yourself, strip the wire from both sides and carefully arrange the veins in a row according to the T568B scheme:
- white- Orange
- Orange
- white- green
- blue
- white- blue
- green
- white- brown
- brown


After that, carefully insert the cores into the RJ connector until it stops and crimp the ends of the cable with a crimper. You do the same with the rest of the patch cords for other devices. 
It remains to connect the cables to the router itself. Find the blue connector on the back panel with the inscription WAN and connect it with a patch cord to the Internet power outlet from the provider. 
Some manufacturers may have connectors of the same color, see do not confuse. In this case, be guided by the name of the WAN. By inserting the provider's Ethernet cable into the LAN connector, you will not have the Internet. 
Also note that on older models where the Internet is distributed over a telephone line, this connector has the RJ-11 format. Inside such routers there is a built-in DSL modem. They are intended for those providers who provide exactly ADSL connection.
But this technology is already considered obsolete, and such modems are not so in demand, although they are used.
Output connectors yellow color– LAN1,2,3 are designed to connect wired internet. Connect through them the Internet sockets in all rooms. 
And then to them, their smart stationary gadgets - TV, set-top boxes, etc. 
Plug the power supply into a 220V socket and apply voltage to the WiFi router. 
Don't forget to switch the appropriate lever or Wi-Fi button to the ON position. 
Otherwise, the device will work for you like a regular cable router, without creating a wireless network. If your router is not new, or it was configured when checking in the store, then you need to reset all the old default settings. This is done by long pressing (a few seconds) on the Reset button. 
You have completed the physical connection of the router itself, it remains to configure it correctly on the computer.
Setting up a router on a computer
Insert a patch cord from LAN1 into the appropriate connector on the computer. When connected, two indicator lights should light up. 
If there is a disk included, insert it and start the installation wizard. 
In it, select your country, city and provider from the drop-down list. 
All settings from this provider are already sewn into the router. This assistant will automatically detect the type of WAN connection available.
If your service provider is not in the list, then you will need to choose the type of connection yourself. To find out, study the contract, or call the technical support service.
The most common is dynamic IP, where the address is assigned automatically. 
When the disk is missing, type in the browser line the default address, which is indicated on the back of the router. 
Enter your username and password. They are also listed on the sticker.
Or just dial the universal addresses 192.168.0.1 or 192.168.1.1. After that, also enter the password and name (admin). 
After passing this, you will home page all settings. We will consider the settings using the example of a router from TP-Link.
The first tab ”status” gives general information on all parameters of the device. Including the status of the Internet signal connection. 
“Operating mode” – in this window you can change the main operating modes wireless module router to “access point” or “amplifier” mode wifi signal". A detailed description of these modes is given on the side. 
Now you can go directly to setting up an Internet connection.
When choosing "quick setting" press automatic detection connection type and click next. This process is very fast and sets up the local network. 
To configure the Internet itself directly, select the ”Network” tab and then the WAN subsection. 
In the window that opens, call up the list of available connections. The default is dynamic IP.
If your provider uses just this type, then in fact you do not need to make any settings in this subsection. The router itself will work to obtain an IP address, subnet mask, etc. 
The next type is ”Static IP”. This type of connection is the exact opposite of the first, since all network parameters will have to be entered manually. All the necessary information must be provided to you by the provider. 
L2TP point - this type of connection is one of the varieties of VPN connection. Therefore, for the connection, you must enter a lot of identification data.
Login, password, server IP address. Be careful with the latter, as both dynamic and static address, which of course increases the amount of information entered during setup. 
Next "PPTP connection". It is similar in configuration to the previous L2TP. 
The last tab is ”BigPond cable”. A very rare compound and it makes no sense to consider it within the framework of this article. 
Let's take a closer look at the third type - PPPoE. Very often it is used by the Internet provider Rostelecom. Here it is necessary to register the login and password, which are specified in the Internet services agreement. 
All other data should be left unchanged. After that, click "connect" and "save".
This completes the manual Internet connection settings. Now you can open any web page for verification.
Sometimes a bad connection can be caused old version embedded software. To check if the software is up to date, return to the ”status” tab and remember or write down the data on the software indicated above. 
Then, in the search engine, enter the version of your device with the control phrase "official site". Select the required link and check the hardware version. 
In the screenshot it is V5. Scroll down and click on the Firmware tab. It compares the last available version installed on your router. 
As you can see, in this case, the update is not required.
Setting the wireless mode of the router
Now let's take a closer look at the wireless mode. To do this, select the appropriate menu item on the left and the subsection "Basic settings". 
In this window, you can change the standard network name to your own.
The mode and channel width change if any of your wireless devices connection has problems connecting to this WiFi router. Otherwise, it's best to leave these settings at their defaults.
So your router has changed the network name. However, the password remained the same, which came from the factory. Therefore, find your network with a new name and click connect. 
Next, enter the old security key. New network connected. Return to the settings menu. 
The next subsection is WPS. 
In this window, you can enable or disable the WPS function, which allows you to quickly and passwordlessly connect devices by pressing the corresponding button on the router case. 
"Wireless Protection" - this page allows you to make the network open or change the version, type of encryption, and most importantly the password of the Wi-Fi network. 
Since you have changed the network key, you need to reconnect, but with a new password. To do this, you must first "forget" the old password in the wireless settings menu.
After that, reconnect again and prescribe new data. 
This completes the basic settings of the router.
Connection errors or why WiFi does not work
 What to do if you have gone through all the steps of the settings, but there is no Internet. Either one day, after a long successful work, your WiFi network suddenly disappeared, or the devices stopped seeing it and connecting normally.
Where to start looking for the cause, and how to solve it? There are many reasons and ways, we will list only a few that are most common. 
The first simplest, but nevertheless effective and working method that helps in many cases is an elementary reboot of the router or computer.
When WiFi disappears on only one device, but on others, then look for the problem first of all on this device.
For example, there is no Internet on the network on a laptop, but the TV and phone work fine. For many, the error is hidden in the power supply of the wifi adapter. Go to the following path: device manager - your network adapter - properties.


Select the "power management" tab and DISABLE the checkbox "Allow the computer to turn off this device to save power".


If there is no network on all devices, then the reason is in the router. To find the problem, find out if WiFi works at all as such? To do this, it must be made open.
Go to the router settings address 192.168.0.1 in the wireless network section and then remove encryption by setting the value to "open system" or "disable" depending on your model. 
Also open the network SSID.
If Wi-Fi appeared, then the reason is encryption. You can try other signal encryption methods, there are several of them.
Another reason could be the length of the WPA key. If there are too many characters in it, then the router stops working.
By enumeration with a gradual increase by one, you can choose the maximum length.
Firmware update
If the problem is not encryption or the length of the keys, then try resetting the settings to the factory settings and going through the connection procedure again.
When this does not help, it is worth updating the firmware. Check the manufacturer's website for the latest current version, download it and update the file.
Problems on the computer
If the reason for the health is not the router, but the computer itself, then in the device manager check the properties network adapter for WiFi network. When the device is working normally, then the cant is in the software.


And when an error clearly comes out, then update the driver. 
How to determine that the problem is in the software? You can do this by checkpoints recovery. Restore the system from the last automatically created point and return Windows to a few days ago when the network was healthy. 
If everything goes well, then the problem is definitely on the side operating system, or some other programs in Windows associated with a Wi-Fi network.
Authentication error
With this error, the first thing to do is to check the password. If you doubt its correctness and want to know if you are entering the right characters, you need to go to the router settings.
Again 192.168.0.1 - security settings - encryption key.
When connecting the device to WiFi, re-enter it in the login field. If nothing has changed, you may have to reinstall the drivers on the network card or network adapter.
Other causes of the malfunction, not listed above, can be found in the video:
Introduce modern computer, smartphone or tablet without the Internet is extremely difficult. Since the number of devices that require a wireless connection to the World Wide Web is increasing every year, it is advisable to take care of convenience and connect a Wi-Fi router. It will not be difficult for you to independently connect the equipment at home to provide wireless Internet access.
Choosing the best place for equipment
Before connecting to Wi-Fi apartment router, you will need to decide on a place in an apartment or house. At this stage, pay attention to the following characteristics of the room:
- Housing layout
- Location of the service provider's modem or cables
- Location of the desktop computer (if any)
Depending on the equipment manufacturer, the wireless router may have a slow data rate. Also at various models coverage area may vary. All this must be taken into account when choosing a place in an apartment or house where the device is supposed to be placed. In a specific case optimal solution will be the placement of the router in the central part of the room. If there is a need to install the device as close as possible to the computer to connect with the cable, take this task as a priority.

The signal in the rooms behind the crossbar will be significantly worse than in front of it. You should not fix the equipment without making sure of the quality of the signal in different parts of the apartment or house. If the signal quality differs markedly in different areas of your home, it is advisable to immediately choose the best place to place the router. When choosing a place to place the router, you should take into account the materials from which the walls are made: brick, expanded clay blocks, foam concrete and aerated concrete and other materials can interfere with the signal.
Video - step by step connection:
Connecting the router to a computer (laptop)
Connecting Wi-Fi in the apartment to the computer is easy. The user may experience some difficulties only at the stage of setting up the equipment. Below we will consider how to properly connect a computer via a wireless network, as well as using network cable. It is worth noting that in the case of a laptop, the procedure will be identical.
It's important to know! Before buying equipment, it is worth remembering that the modern market offers customers models of routers without WiFi sharing. Such devices play the role of a kind of adapter.
First of all, you need to connect the wires to the equipment. At this stage, there are no procedural features, since the main market players produce equipment with the same connection scheme.
Here is a sequence of actions in case the router is connected to a computer:
- First you need to unpack the device, then connect the cable to the outlet. Back panel devices often contain a power button that must be pressed. Light bulbs lit up - you did everything right
- Sockets are located behind the device. On the edge is the nest we need (it has a yellow or blue color) and is marked with the inscription WAN. Connect the wire from the equipment to this jack. If you do everything right, you should hear a characteristic click
- If you need to connect a cable to your computer, you will need to insert it into any empty slot nearby. Next, run the cable to the computer's network card, where you connect it to the appropriate connector. In the case of the correct actions, the paw should light up, which serves as a signal indicator
- If you are interested in the wireless method of connecting the router, you will need to go to the computer settings

Connecting to wired Internet is easy, just like getting wireless access to the network.
Wireless connection of the router
Connecting a laptop to wireless internet difficulties and controversial issues should not arise, and you will most likely be able to achieve the desired result yourself the first time. The laptop is equipped with a built-in module that serves to receive a signal from a Wi-Fi router. In the case of connecting a desktop computer, additional steps are required - buying an adapter for network access. There are two types of adapters for computers available in the store - external and internal. The first equipment option involves the use of a usb cable. The device is placed on the table. Internal adapters require mounting on motherboard through the PCI slot.
Both types of equipment are able to function perfectly, but external adapters can be disconnected and connected to another device. The internal adapter requires a lot of free space on the table. The device kit contains drivers and software. At the end of the procedure for connecting to a computer, the device is configured like a laptop. To connect a computer to the device, you need to find a suitable connection from the proposed list, and then enter the password. When connecting for the first time, the equipment may require you to specify the settings provided by the service provider.
Twisted pair and connection setup
Can I connect a router to a desktop computer? Of course, yes! Previously, only one method was available to users, which involved the use of a cord. Later, other features and methods became available with which you can connect a computer to the Internet and a TV to cable channels. And yet, what is needed to connect a computer to a router via a cable? Here is the algorithm of actions:
- First, the service provider's wire is connected to the router, for which the WAN socket is used
- The power cord plugs into one of the LAN connectors
- The other end of the cable goes to the Ethernet port
- A working light bulb serves as an indicator of the presence of a connection.

Router not connecting
After completing all the steps, it may happen that there is no connection to the Internet (with a valid wired connection signal). If the wireless network does not transmit data, but is visible in the list of connections, you should unplug the equipment from the outlet, then wait a few minutes and turn on the equipment again.
Video - Connection from A to Z:
If these steps did not solve the problem, you will need to check the settings. Right-click on the connection and select the "Network and Sharing Center" section. Next, click on the connection image, go to the "Details" tab. DNS or IP are empty fields? The problem lies with them. contact the center technical support provider and ask for information to make changes.
Welcome to my article! So, you bought a router and now it's time to start setting it up. But there are still so many steps to the final result - you need to install it correctly, connect it to all the equipment and configure it. But what if you don't understand it? My course for a young fighter is setting up a router for dummies.
Attention! The article proposes general model router settings for all devices. I strongly recommend that you find an article on our website for your model and make settings for it. I offer a list of the most popular models for which we have instructions on how to set up:
And even if your model is nowhere to be found, it's okay. The configuration process itself is almost the same everywhere (you will see this below) for any router model. In addition, there is no difference in your Internet provider. Let's just say, if your ISP's cord successfully enters your router, everything will be fine) Let's go.
Customization plan
So, in order to make the Internet work successfully through a router, for any model, you need to take approximately the following steps:
- Install the router, connect all the wires, connect the tuning device.
- Entering the router settings.
- Internet setup.
- Wi-Fi setup.
- Change passwords (optional).
All! And now let's go over each item in more detail in my step-by-step instructions. If something is not interesting or not needed, just scroll using the Contents of the article to the desired section. But you can first watch the setup video:
Step 1. Installation and connection
We begin to disassemble the primary steps for installing a router.
- The easiest method to place a router is near the ISP wire. No, I am not limiting you. Moreover, I advise you to first choose a place in the middle of the apartment for the router, and only then ask the provider to install a cable. Another option is to extend the cable through repeaters up to right place. But my universal advice - where the wire fell, put it there.
- We are engaged in connecting the router. Are the antennas removable? We connect. We stick the power supply, and then it into the outlet. Immediately we do a check - if there are indicators, they light up. If not, check the connection again, or the power button on the router (they are on the back panel). Now it is important that it simply has power and any indication is on.
- The best option for initial setup is to connect via wire. This paragraph will be about this. For those who will connect via WiFi, read the next paragraph, but be sure to connect the provider's cable !!!
- First, connect the provider's cable. There is Ethernet (like a wire to a computer in size) and telephone (thin such, ADSL). We stick it into the port on the back of the router. The port is usually highlighted in a separate color from the rest. Usually blue. It has the inscriptions WAN, Internet or something like that.

- We connect the router to a computer or laptop with a wire to the LAN port (yellow). That's all. If the connection was successful, go to the settings entry section.

- If you want to connect via Wi-Fi - connect. This is especially true for those who want to connect on a laptop or phone and do everything through them. Do not forget to also connect the power adapter to the network and the provider's wire. Data for accessing the network on a new modem is sometimes indicated on a sticker on the bottom of the device - you can connect both through a password and through WPS. Often just an empty password is used. Some models do not create a network when set up.
There should not be much difference between setting up a router using a computer, laptop, phone or tablet. The router has a standard web interface, which will be the same for all devices. Just like your favorite sites.
The main thing after these points is to have any connection with the router - whether it be by wire or by air.
Step 2Enter Settings
All settings of any modern router are made through its web control panel. This is an analogue of the site that works on the device itself. So you need to connect to it like a site - through a browser.
The data for accessing the control panel of a particular router is usually located on a sticker at the bottom of the router. Required - connection address, login, password.

Usual connection addresses for most modern models:
192.168.0.1
192.168.1.1
We follow these links, and most likely in one of the cases you will be taken to a panel where you will be asked for a username and password. Factory login and password you already know where to get it. If not, look on our website for your model. The usual most common settings for almost any router model are as follows:
Login - admin
admin or empty

What needs to be done to continue: You must log into the router's control panel.
Note. Your device must be set to automatically receive addresses. Otherwise, you may get an IP address on a different subnet and not be able to connect to the settings. If the connection fails, this is the most common problem. Write in the comments! Let's fix it.

Step 3. Internet setup
Now let's move on to setting up the Internet on the router. Of the most important, if you have successfully completed the previous steps, we will definitely need the provider's login and password to connect to the Internet. You can find it in the contract - so it's time to look for this paper.
Almost any modern router has a setup wizard that will guide you step by step through all these steps - setting up the Internet, setting a password for Wi-Fi, changing the password of the router itself. Many routers and place it on their start page. Usually they have names like "Quick Setup Wizard", "Quick Setup" or "Quick Setup". Look for something like this. For me it looks like this:

Don't be afraid to walk through the steps on your own. I will leave notes below on some controversial points, but anyway, on any router model, you will be asked about the same thing. So you did it once and learned for the rest of your life!
One of the important points is to choose the type of connection. It depends on what is written in your contract. Usually there just indicate these technical points. The most common is PPPoE, there is a Dynamic IP address and a Static IP, L2TP, PPTP. The main thing here is to choose your type (but usually we have PPPoE with Rostelecom), enter your login and password - that's all, this is enough for the Internet to appear on all devices automatically.
Usually the settings are in the WAN section. I show you my working ones, you need to enter your own login and password.

In the case of dynamic The IP address where the Internet provider is tied to the line - the Internet will appear immediately after connecting the router. Check if you already have it? Maybe nothing needs to be configured?
If you can't connect to any, just call your provider. They are great at giving advice over the phone and helping you solve your problem. Especially with the internet. Do not be afraid!
: Working Internet on wired devices. Possibly over Wi-Fi.
Step 4Wi-Fi Setup
Another important step, which is found in wireless routers. The main point of this setup is to either start Wi-Fi (if it suddenly did not start at the factory settings), or change the network name and password so that it is both understandable and safe. Here are the main settings:
- Network name or SSID - as it will be visible to everyone, its name, write in English letters! It is better to write clearly for yourself.
- Security Type - WPA2 - This is the most current type of connection security. The WEP standard is completely full of holes, and WPA is simply previous version. So it’s better to immediately stop at WPA2, which is the default on any modern device.
- Password - the same password that you use to connect to the Wi-Fi network. Don't forget to change! And then any neighbor will be able to freely connect to you. Length - from 8 characters. I recommend coming up with something more complicated, and ideally generating it.
These settings can be located both on one tab and on several, like mine:


Don't forget to save all changes. And it happens that you change the sea of \u200b\u200bvalues, forget to save in a hurry, and then you wonder why it all doesn’t work. After saving, it usually throws it out of the network - after all, the network name becomes different, so you have to restart again with a new password.
What needs to be done to continue: The device is successfully sharing Wi-Fi. Everyone is calmly connected and using the Internet.
Step 5. Change the password from the router
Remember, at the beginning you went into the router settings with a default password? So any neighbor can do the same, and there they can already see the password for your Wi-Fi, or even worse, redirect you to bad sites. Do you want this? And so I think not. So let's change the password!!!
This is usually done in a special dedicated section with the appropriate name. I have so:

As you can see, it will be possible to change both the username and password at the same time - these are excellent basic settings safety for everyone.
Video version
For the reading haters, watch everything in the video again. You might find something useful for yourself:
Add-ons
That seems to be all the most important steps - then it remains only to use your Internet on all devices in home network. And if you suddenly have any problems - be sure to write in the comments. If everything turned out well, write too, it is very important for me to hear your opinion.
Here I will also note interesting optional router settings. On all modern routers, they are no longer critical (I have already painted all the necessary ones above), but suddenly they will be needed. Usually each of them is located in the corresponding section:
- WPS - setting quick connection by PIN code to Wi-Fi. It is usually disabled by default. It is convenient for someone, but personally I do not use this stray. Only hardcore, only complex password.
- IPTV - many routers support interactive TV from your ISP. The main thing is that during operation everything is connected here, otherwise the router will cut off your television.
If something didn’t work out for you during the setup process, and you can’t do anything, don’t panic, but reset the settings to factory settings. To do this, press the Reset or Reset button on the back of the router. Usually the button is in a recess, you can get it with a needle or something narrow. Sometimes you take not a new, but an old router - and there may be other people's settings. So it's a panacea.

Frequent problems
There can be a lot of problems, and it is impossible to predict everything. Here I will just highlight the most common ones:
- Check the cable - most often the cable is to blame for connection problems. It can bend over, move away - and there will be no connection, no Internet. Not to mention settings. TOP1. More common cause here - people confuse the cable connector. Remember: the cable from the provider - into a separate connector (blue), the cable from the computer into any of the LAN connectors (yellow, usually several). If you mix it up, nothing will come of it. But there are exceptions - for example, some routers from providers like Rostelecom. Read the instructions just in case.
- DHCP and auto tuning. The problem is that for some reason the devices are getting incorrect network settings. There are two reasons for this: either they have already been set manually, or it does not work correctly DHCP server. In the case of manual exposure, I already wrote - you just need to change everything to automatic receipt. In the case of a DHCP server, it is more difficult to calculate, for clarification, it is the DHCP server that distributes settings on the network, and usually it is created on your router when you turn it on. What if there are multiple routers on the network? Need to check.
That's all. Set up and enjoy!
Currently, there is a huge range of different routers on the market from a variety of manufacturers. We spend a lot of time looking through all kinds of notes on the net about certain brands and models of routers in order to maximize the benefit for ourselves from the purchase.
When it comes time to prepare the purchased router for work, i.e. connecting it to the network, the device and its subsequent configuration, then our eyes begin to diverge and our thoughts get confused. The thing is that the first setup of the router is not the easiest task, which is due to multiple factors: a frightening number of different connectors on the case, correct installation, device configuration, etc.
In this article, we will present detailed instructions for installing and configuring the router, which you can use with any model from any manufacturer. In the end, they are not so much different from each other. So, let's begin.
First, let's go over some points that will be useful for anyone who is going to connect a router for the first time. Firstly, the connection principle is the same for all routers, i.e. it doesn't matter which model and from which manufacturer you purchased - it doesn't matter at all. Secondly, it also does not matter which provider you use.
The only thing you should worry about is the type of your Internet connection that you will work with when setting up the router, but more on that later in the instructions. So, let's roughly draw up your plan for the first installation of the router for your use:
- Your first barrier to using the router will be its packaging, which we hope you will not have any problems with. After getting rid of the packaging, then you need to connect the device to the computer you need, and then connect cables to both of them, i.e. power adapter, ISP cable, network cable between the router and the computer.
- Once you can run all this bunch of wires between the computer and the router, and then power it up, you will then need to go into its settings. This is done in all cases in the same way using a special IP address and a browser. Enter the IP address indicated on the box of the router into the address bar of the browser and the page with its settings will open. Everything is pretty simple here.
- After going into the settings of the router, you will need to set the necessary parameters in it. Running a little ahead, you will set the type of your Internet connection in the settings, as well as personal data from it, if required, but more on that later in the instructions.
- And the last thing left is setting your preferred Wi-Fi network name and password for your already configured Wi-Fi network. You can use the factory values, but it's still better to set your own.
As you can see, everything is not so complicated ... relatively. Most users still experience some difficulties during the above steps. Let's go through them in more detail.
Setting up a router for work
First you need to decide on the place where the router will be located. But, you don’t really have to choose, since this place will be the location of your ISP cable. In general, start from the circumstances. However, it is still recommended to install the router higher.
Next, you need to connect the router to power using an adapter. You will immediately understand that he began to work on the lights on the indicators on it. If they are not lit, then you probably have a power button on the router - press it.
Now you need to scatter the necessary cables for the router. If you will be connecting the router to a computer, then you must first connect the cable from the ISP to the WAN port (usually highlighted in one color on the device, usually blue or black). Then take the standard network cable that should have been in the router box, plug one end into your computer's LAN port and the other end into one of the router's four LAN ports.

If you do not want to connect the router to your computer or you do not have such an opportunity, then you just need to plug it in and connect the cable from the Internet provider.
If you followed the above steps, then your router should already have created a wireless hotspot. WiFi access. However, this connection will act under a standard name and password, which must be indicated on the box or body of the device itself.
To connect to the created network from any device that has on board wifi module, you need to activate this module and enter the password and login specified by the manufacturer.
Login to the web interface of the installed router
To configure the installed router, you need to log into its web interface, which will contain all kinds of settings for this device. All you need to do is to enter the IP address indicated on the box of the router or its body into the address field of your browser, for example, 192.168.1.1 , and navigate through it.
I would also like to point out that you do not need to already have a network connection in order to go to this address, i.e. configuration can be done without connecting to the network.

The only thing you really need to set up is a computer or device connected to the router via a cable that has logged into the Wi-Fi network created by the router.
So, you have found the address you need to enter the web interface of the router. You should see a screen asking you to enter your username and password. As mentioned earlier, it will not be difficult to find this data on the router box or on it itself. It is also worth pointing out that in some cases the user will not even have to enter anything, i.e. the router will not be protected and it is you who will have to immediately set your username and password.
Configuring the router via the web interface
So you are inside the settings of your router. To be honest, when you get there for the first time, you will probably be confused, due to the presence of a huge number of tabs in the web interface and a lot of settings that are located in these tabs.
However, you should not worry, since almost any router from any manufacturer has special option- quick setup. It may look different, but its meaning is the same - to make the device setup as quick and easy as possible for the user.
You can find this item on the start page of the web interface or in one of the tabs. For example, in a router from the manufacturer Netis (yes, not the most popular brand of routers, but it will do too), quick setup can be done immediately on the start page. Here is a screenshot of the Netis web interface:

As you can see, you just need to check the box next to one of the types of Internet connection and drive some data (if necessary) into the required fields. If you need more detailed settings, then click on the section Advance, and if again simplified - Quick Setup. On the page with quick setup you will have the opportunity to change the login and password for the network distributed by the router.
You must immediately indicate that the web interface of each router model will be different, but this should not be a problem, since the principle of configuring these devices is the same. First, use the quick setup, and then, when necessary, use the advanced one.
Setting up network-connection
Well, we come to one of the most difficult parts of this topic - setting up network connection for the router. If for the majority up to this point everything was normal and understandable, then at this point many users are really lost.
A quick setup can automatically set everything up in most cases, but sometimes you may need to do everything manual settings. So, first you need to find out what type of connection you are using: DHCP, Static IP, PPPoE or other. This information you can find out by contacting your provider or you can find it out from the contract, which should be with you.
In most cases, providers prefer to use DHCP or Dynamic IP. If you also use this type of connection, then your router should already work fine, since it is preconfigured to work with a DHCP connection.
If you do not have access to the network, then in your case a different type of connection is used. Describing the steps for setting up other types of connection is not an easy task due to the difference in the web interfaces of routers from different manufacturers. But let's still consider an example of setting up a PPPoE connection in a router from the same Netis:

As you can see, you just need to go to the Network tab, then select WAN under the tab. In these settings, click on the connection type drop-down menu and select PPPoE. Then enter the username and password for your Internet connection and you'll be done.
Everything is intuitive and understandable if you have knowledge about the type of connection and the data for setting it up. So, in the end, you should get the following: connected the router, chose desired type connections and set up this connection, i.e. introduced desired login and password (if required), etc. If you did everything right, then your router will start distributing Wi-Fi and you can easily join it.
Changing the name, password, and Wi-Fi region
Everything works, you have access to the network and everything is literally wonderful. But, the last step in setting up your router remains - this is changing the standard name of the Wi-Fi network, changing the password for it (saving the factory password is not best solution) and setting the desired region.

Again, web interfaces vary, but you should find all of the above settings under Wireless network. However, you need to clarify something about the name of the network - it can be set in the SSID field. The password, respectively, is set in the line of the same name. Set the region according to your location, for example, if you live in Russia, then select the EU region.
Finally
Setting up a router, although it may seem like some kind of complicated series of actions, is actually incredibly simple. So let's take a quick look at what you need to do again:
- Install the router in a convenient place for you with a cable from the Internet connection.
- Connect the provider's cable to the WAN port, then connect one end of the network cable to one of the four LAN ports on the router, and the other end to the LAN port of your computer's network card. If you do not connect the cable - only to the WAN port.
- Log in to the web interface of the router through a computer browser or using another device via Wi-Fi.
- Make settings according to your connection type.

That, in fact, is all. If you didn’t succeed on the first attempt to correctly configure your router, then it doesn’t matter, since you can always reset it and try to configure it again.
Found a typo? Select the text and press Ctrl + Enter


